User Guide
Create My Account
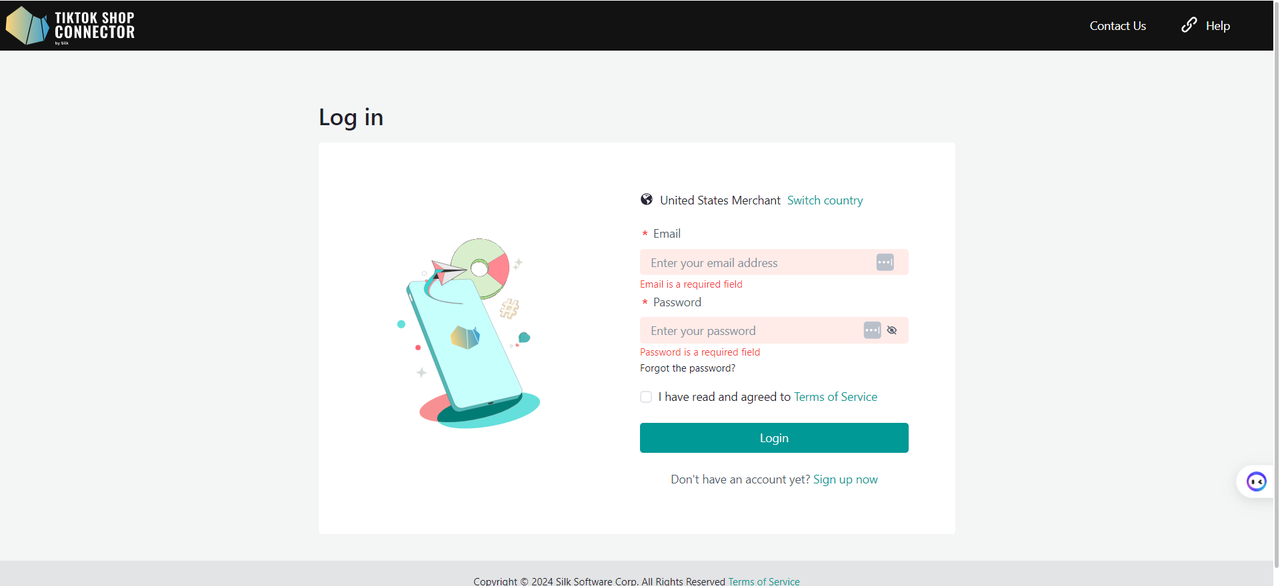
The first step to start syncing your products from Shopify to TikTok Shop would be to create your account with Silk!
Having trouble logging in? Email tiktokshop@silkcommerce.com to reset your account.
Step-by-Step Guides
How to Create a Connection
Before you get started, check the Installation Checklist to make sure your stores are ready for integration - failure to do so may result in being unable to "save the connection" between Shopify and TikTok Shop.
*Recommended: Watch a Tutorial Video on How to Create a Connection.
Have your Shopify, Connector by Silk, and TikTok Shop Seller Center accounts open on 3 different tabs.
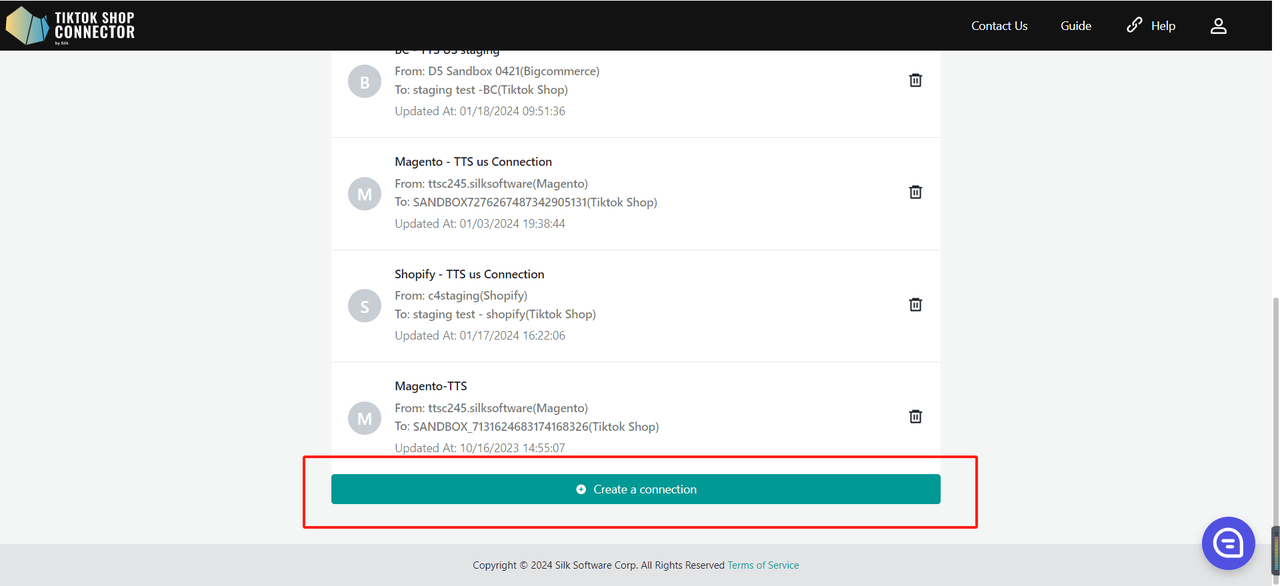
- Login to the Connector by Silk
- Click "+ Create Connection"
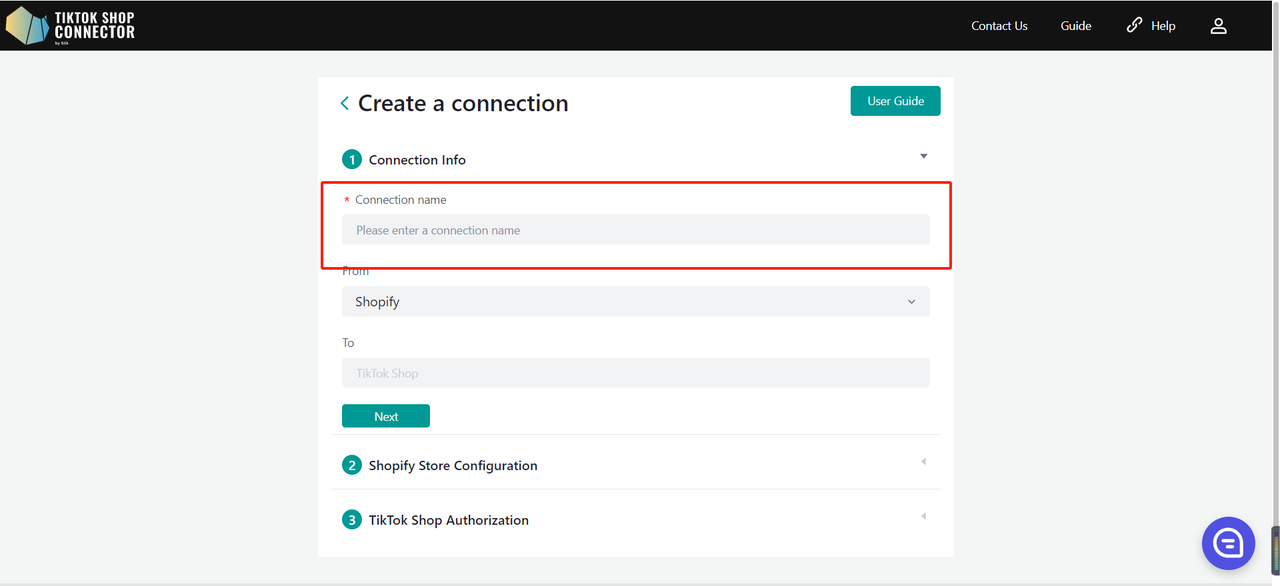
Connection Information
Fill in Connection Name (This can be any name you want)
From: Shopify
To: TikTok Shop
Click "Next"
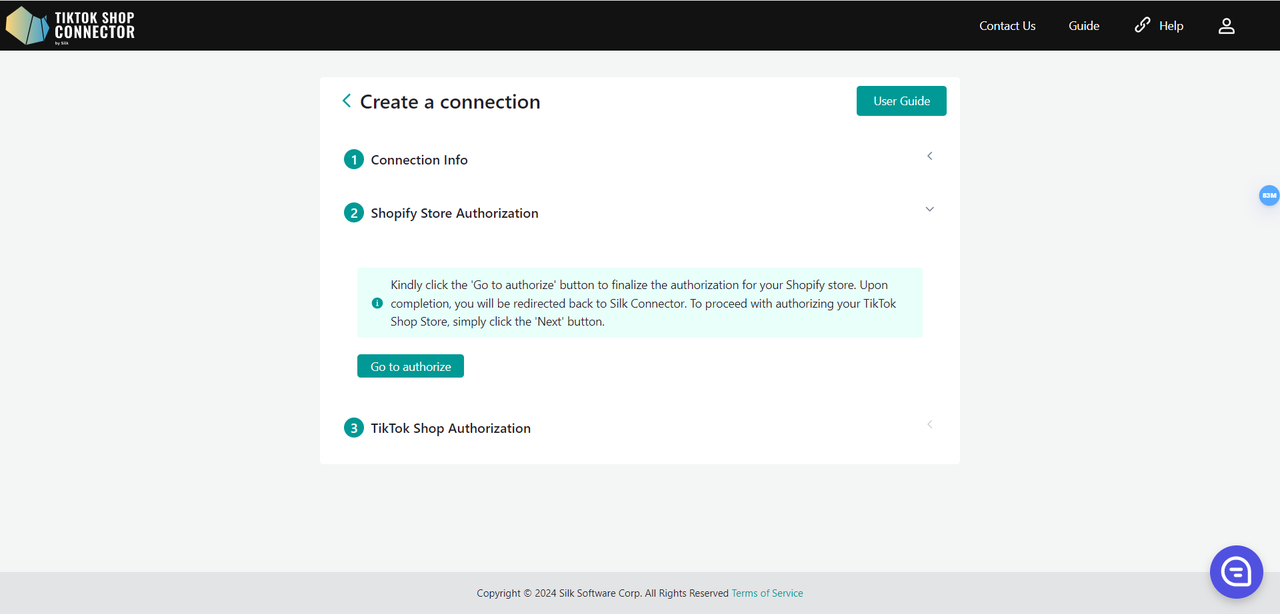
Shopify Store Configuration
Click "Go to authorize" in the Connector. We will redirect to Shopify authorization page.
Login to your shopify account.
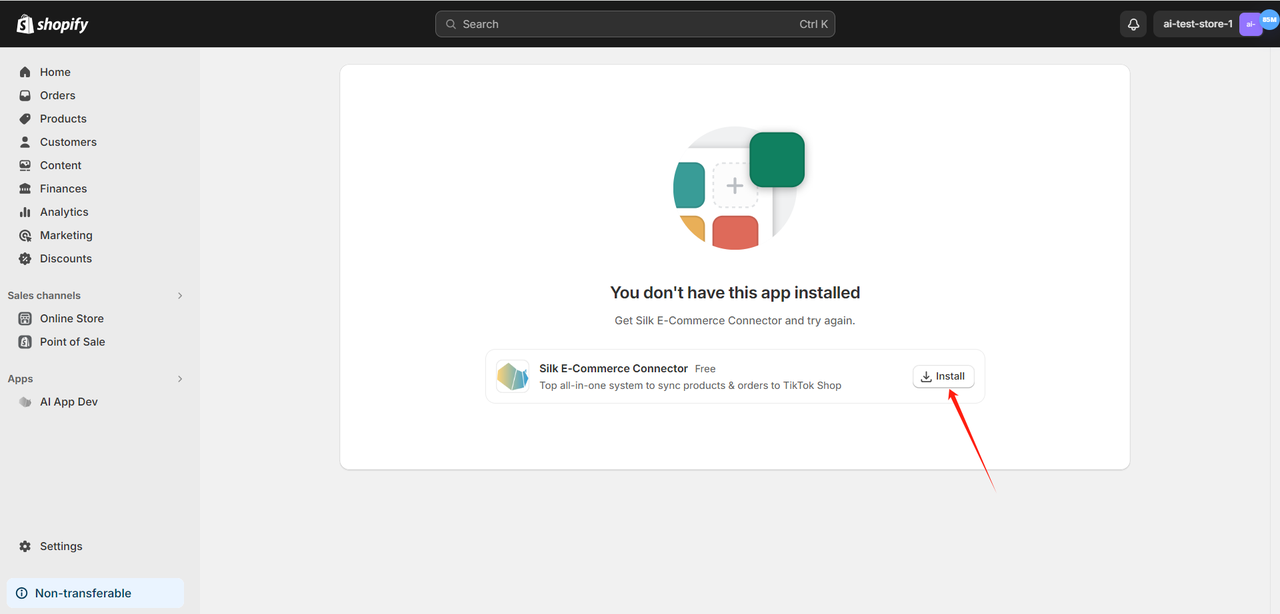
Install the "Silk E-Commerce Connector" APP
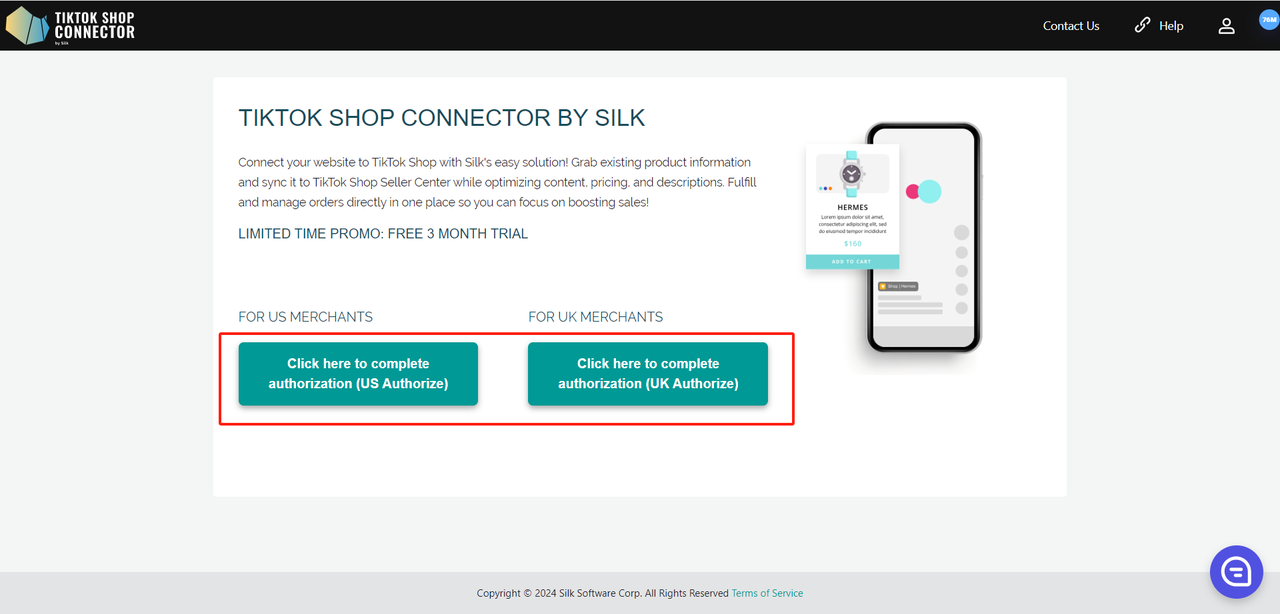
Select the US/UK/Mexico/EU(Spain, Ireland, German, France, Italy) market based on your market and click the button.
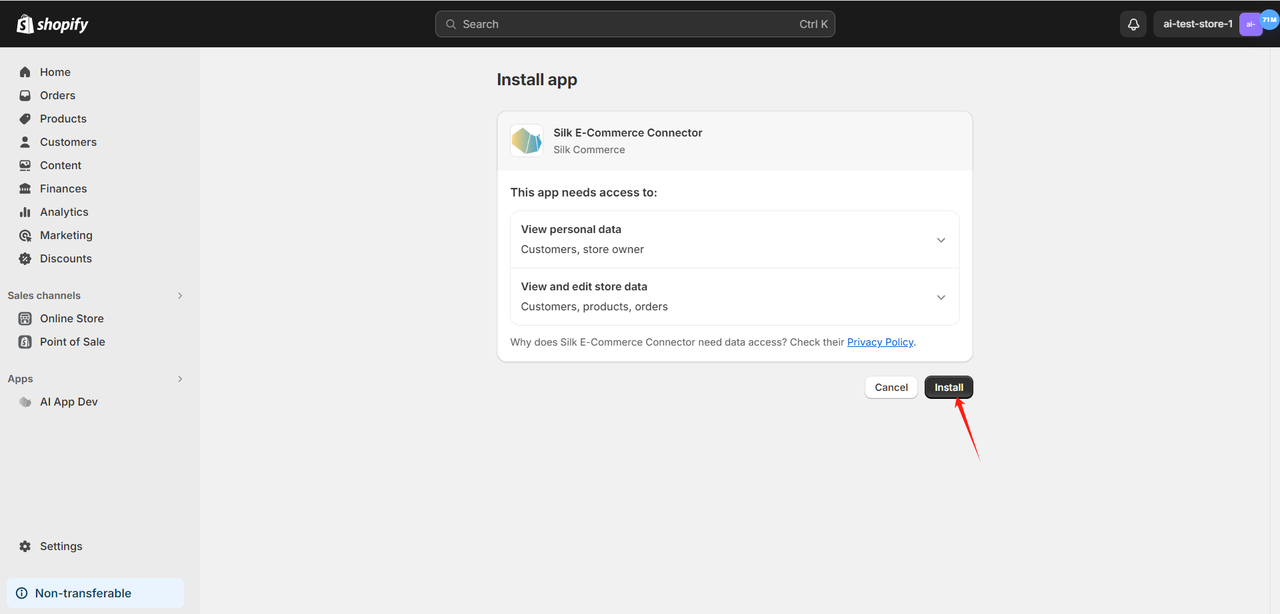
Click install to confirm authorization
Now we have completed Shopify Store Authorization.
Click "Next"
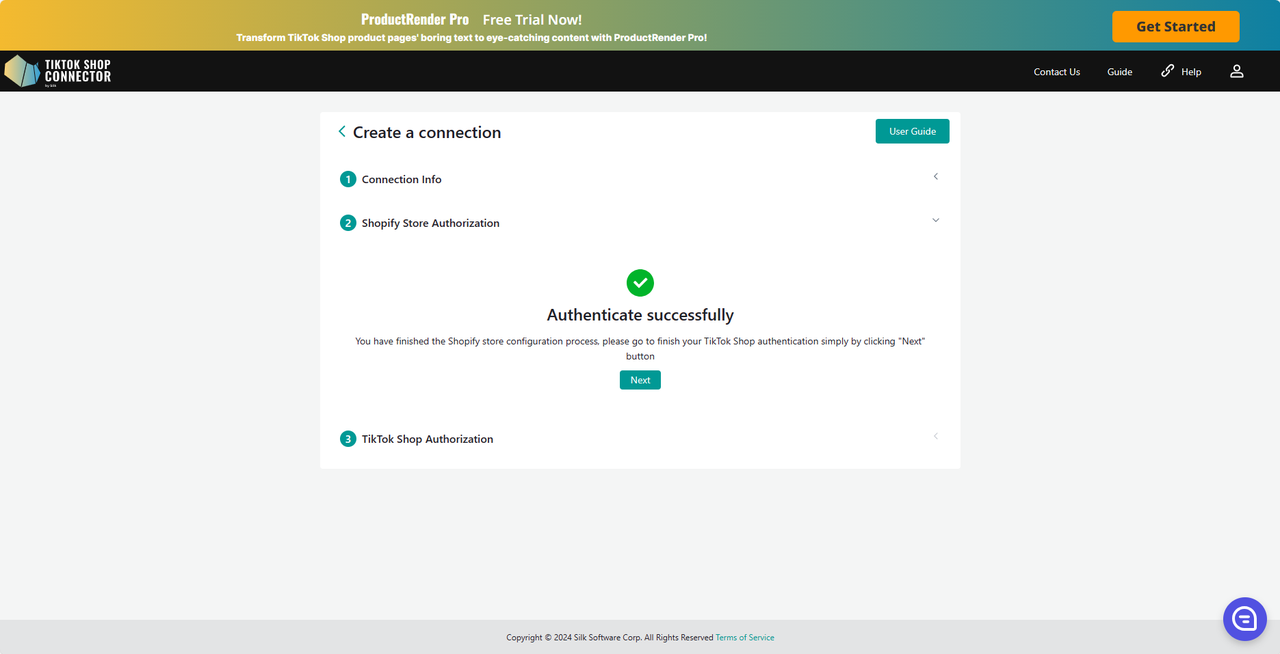
TikTok Shop Authorization
Click "Go to Authorize" in the Connector.
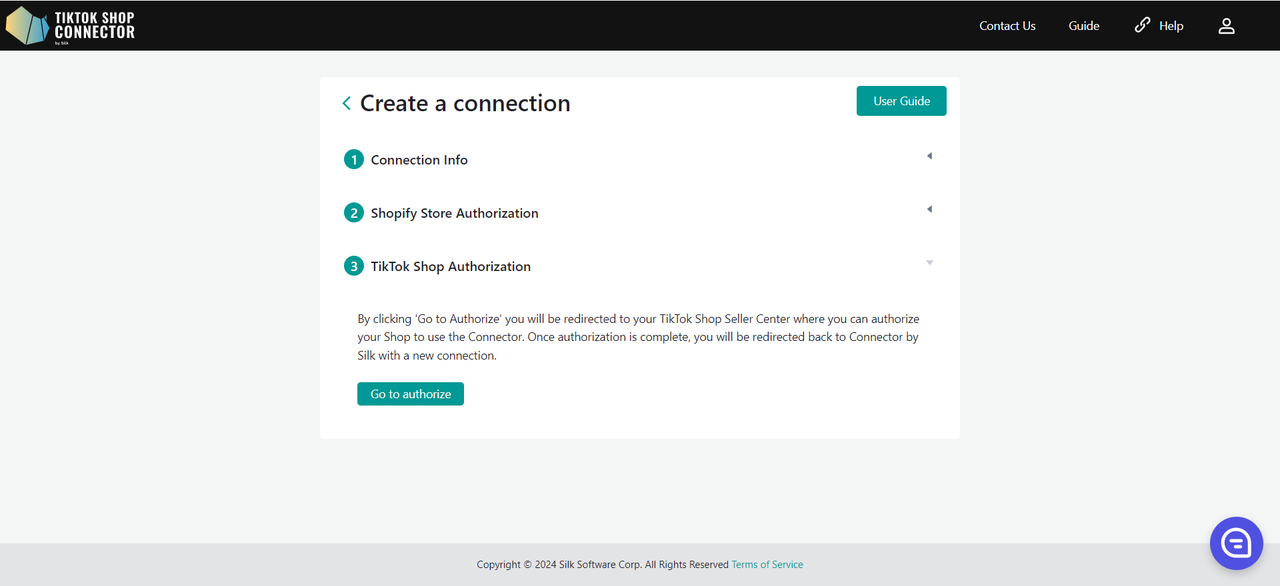
You will be redirected to TikTok Shop Seller Center.
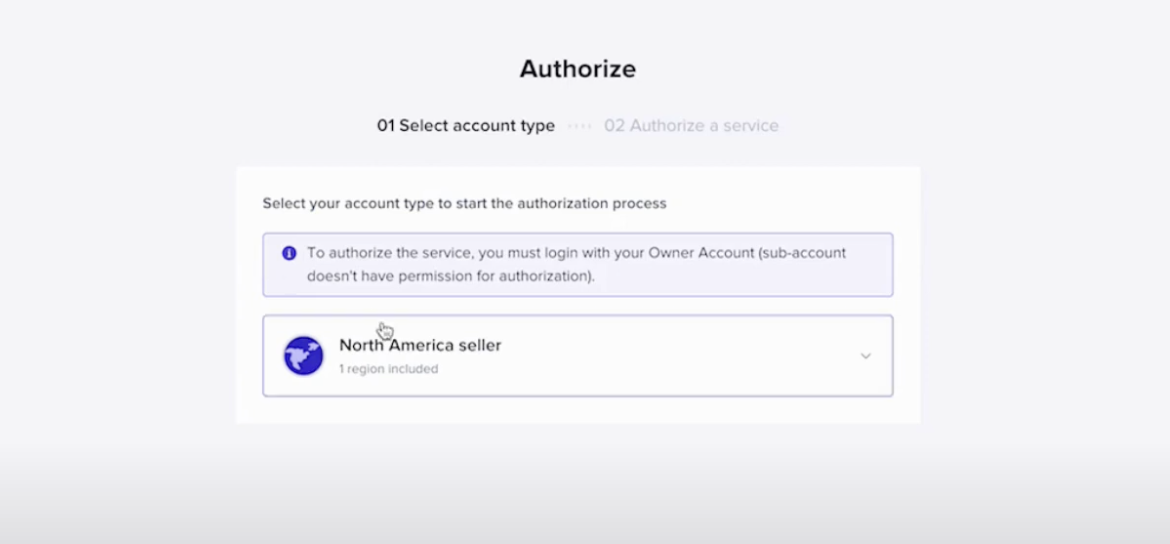
Click on "North America Seller" -> Next
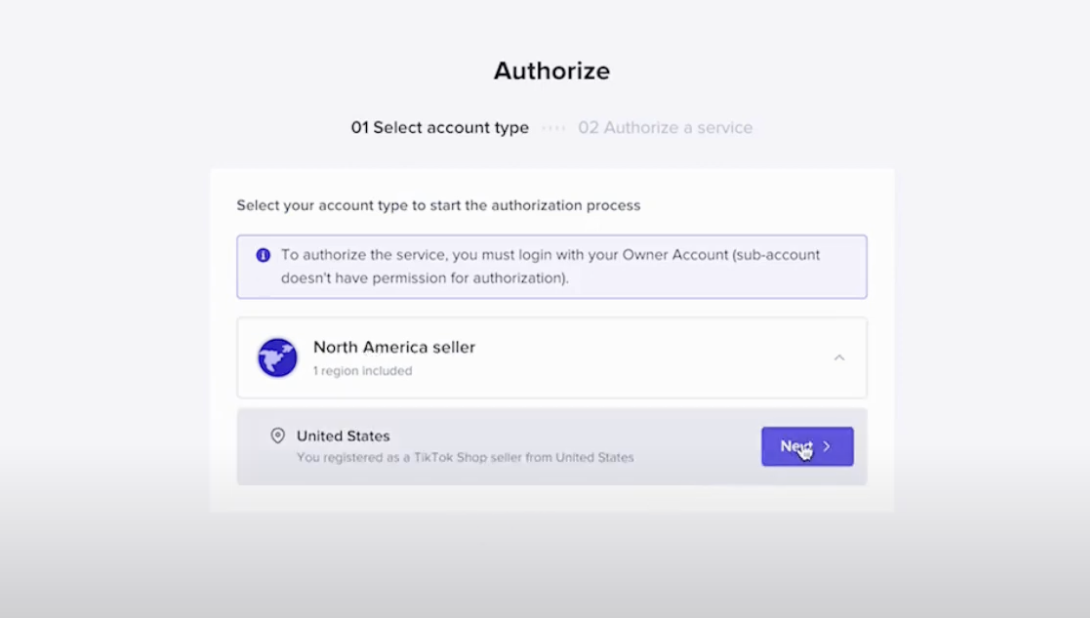
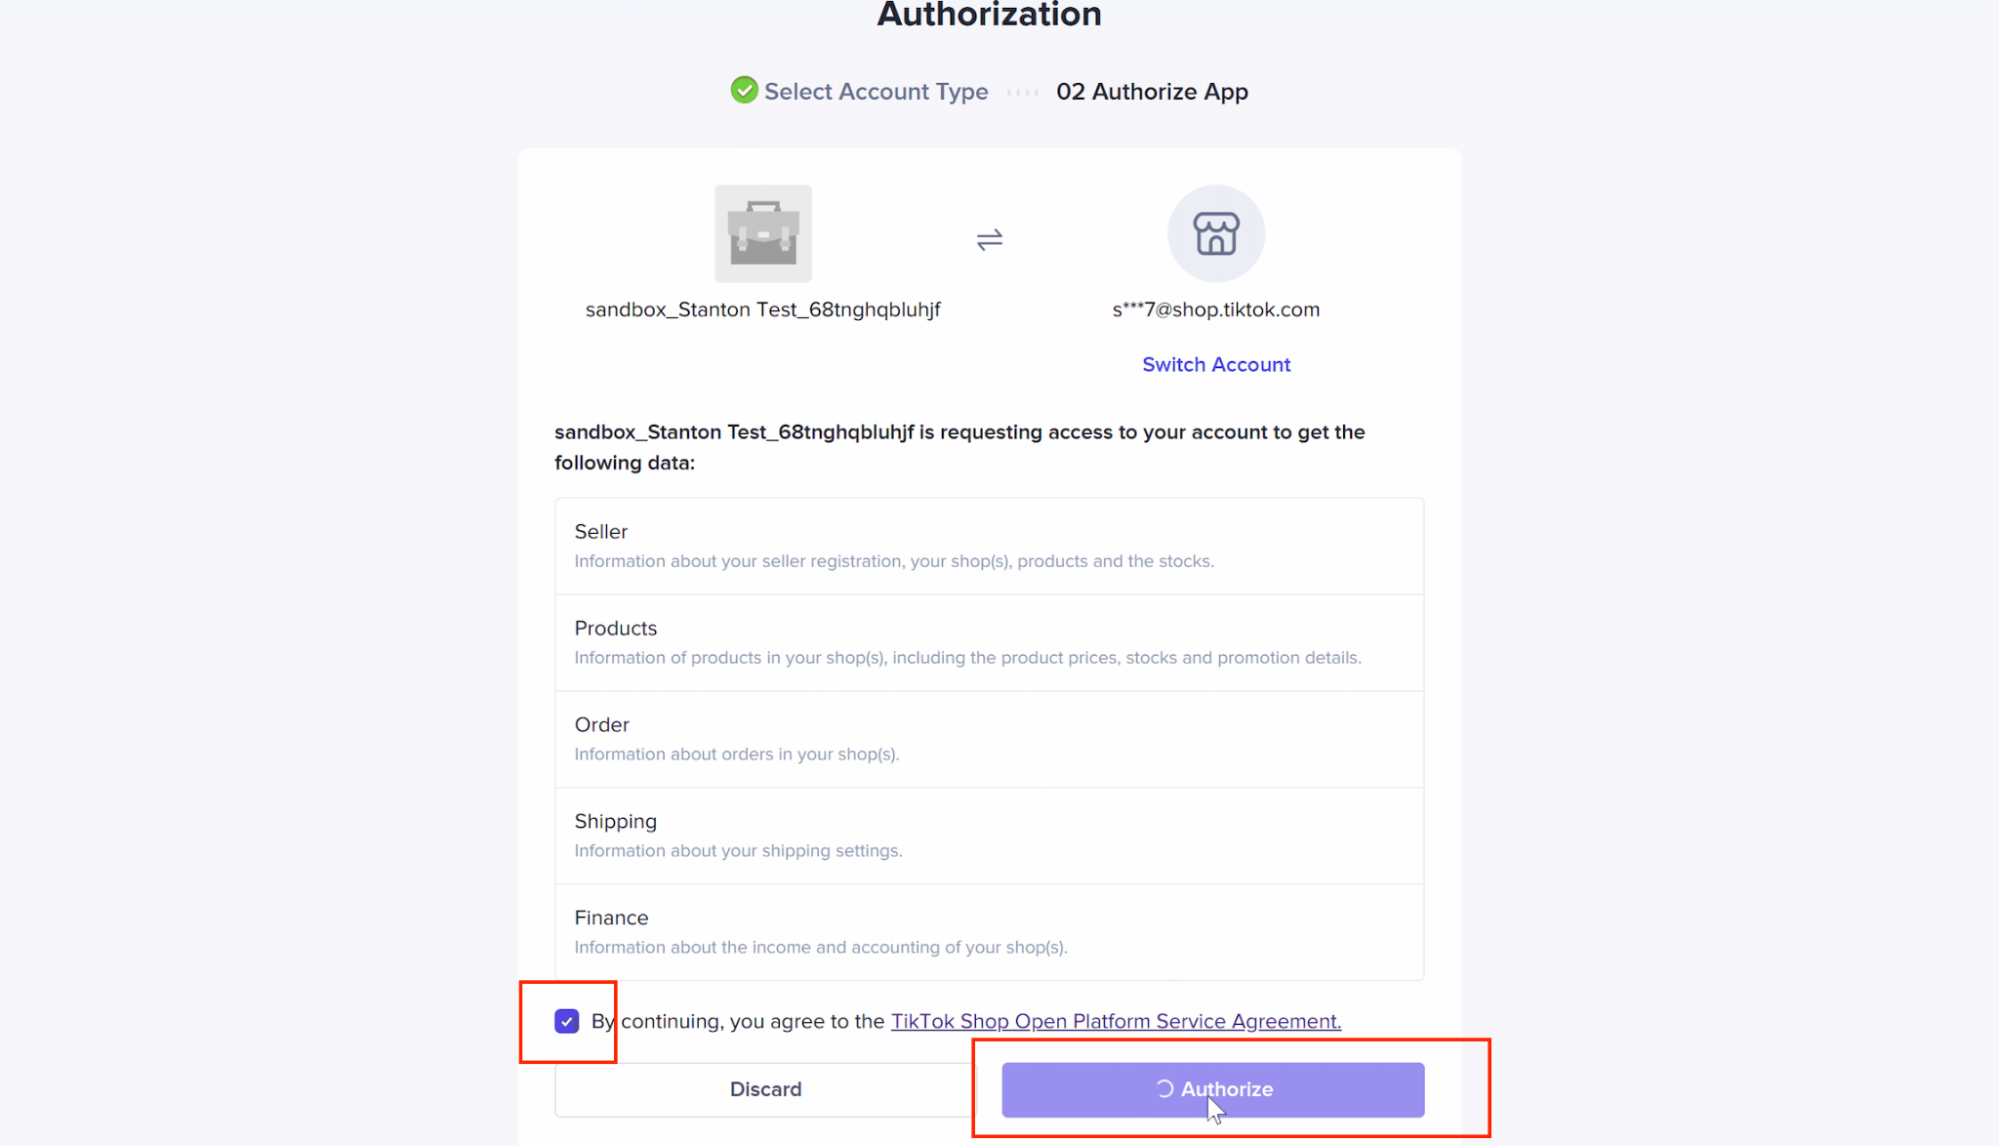
Check off the box to agree to terms and conditions
Click "Authorize"
You will automatically be redirected back to the Connector with your new connection!
Click on your Connection to start syncing products.
How to Create a One-to-Many Connection (1 Shopify → Multiple TikTok Shop Stores)
As this feature is currently in beta, if you would like to use it, please contact our support team at tiktokshop@silkcommerce.com
This section explains how to connect a single Shopify store to multiple TikTok Shop stores in Silk, and how to manage them effectively.
Silk supports a one-to-many connection model, allowing you to:
- Use one Shopify store as the central source of truth
- Connect multiple TikTok Shop stores across supported markets (US, UK, EU, JP, BR, MX)
- Manage each TikTok Shop store independently within the same Shopify connection
Each TikTok Shop store is treated as an independent connection, with its own configuration and data scope.
Market Limitation:
- Multiple TikTok Shop stores can only be connected within the same market
- For example, you can connect to multiple US TikTok Shop stores under one Shopify store
- Cross-market connections are not supported (e.g., connecting both US and UK TikTok Shop stores under the same Shopify store is not allowed)
Step 1: Create Connections
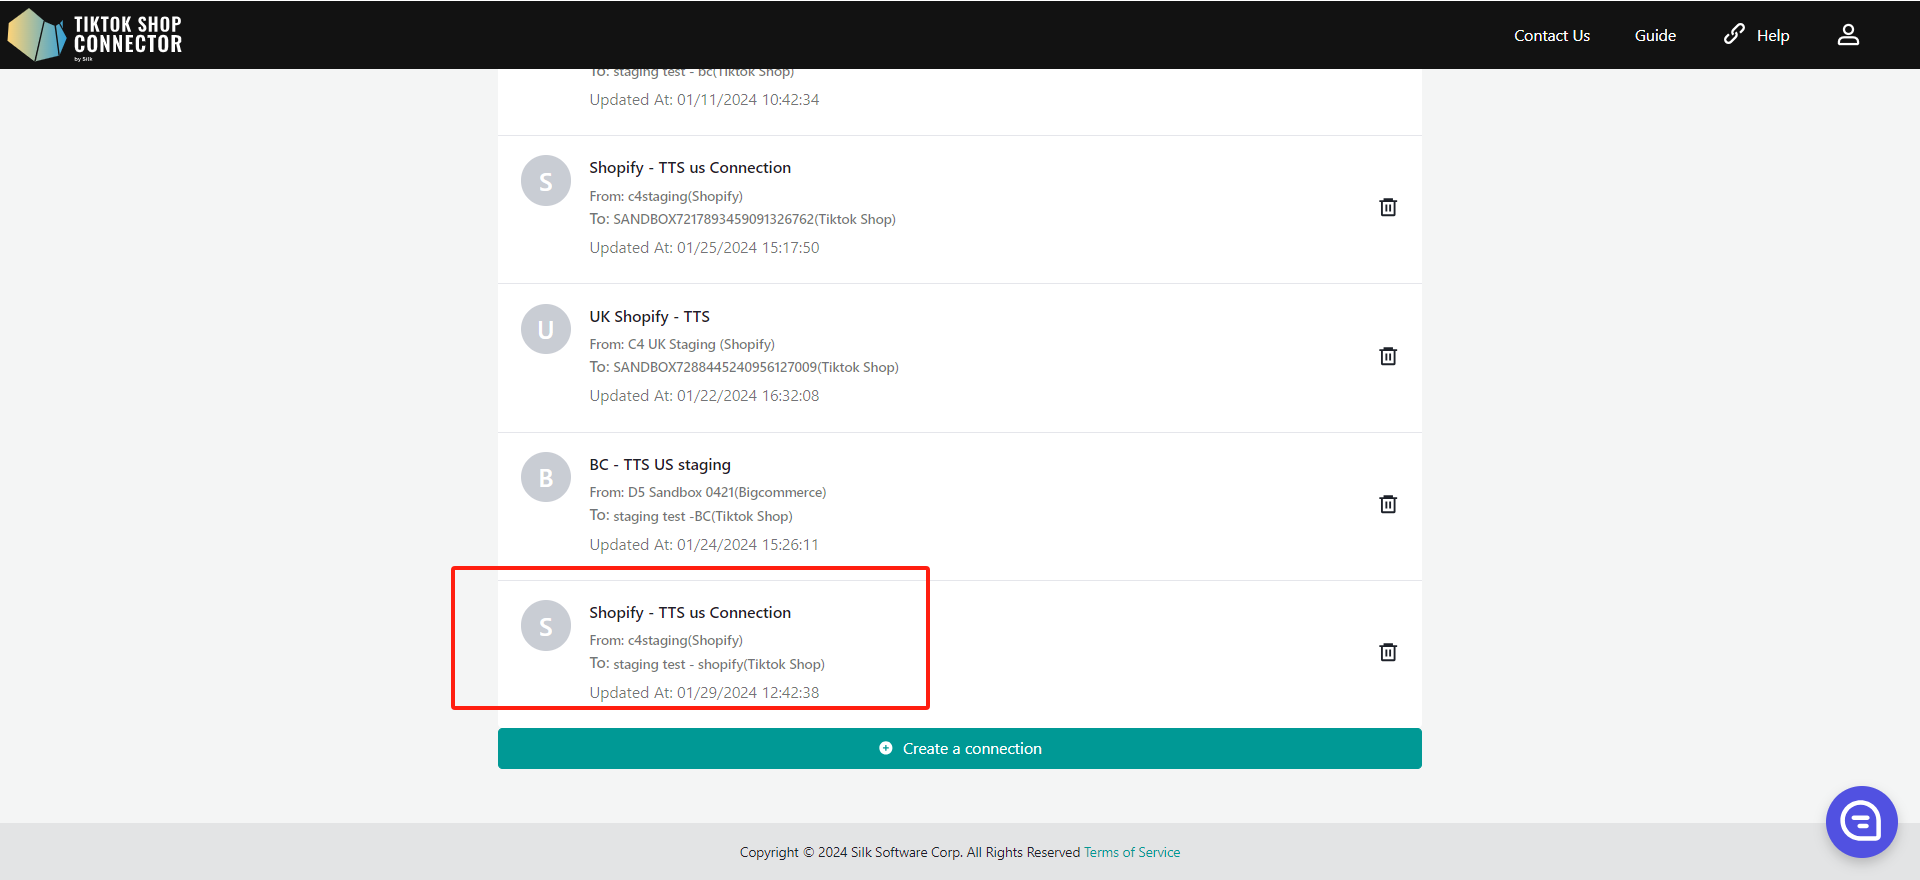
- Go to the Connection listing page in Silk
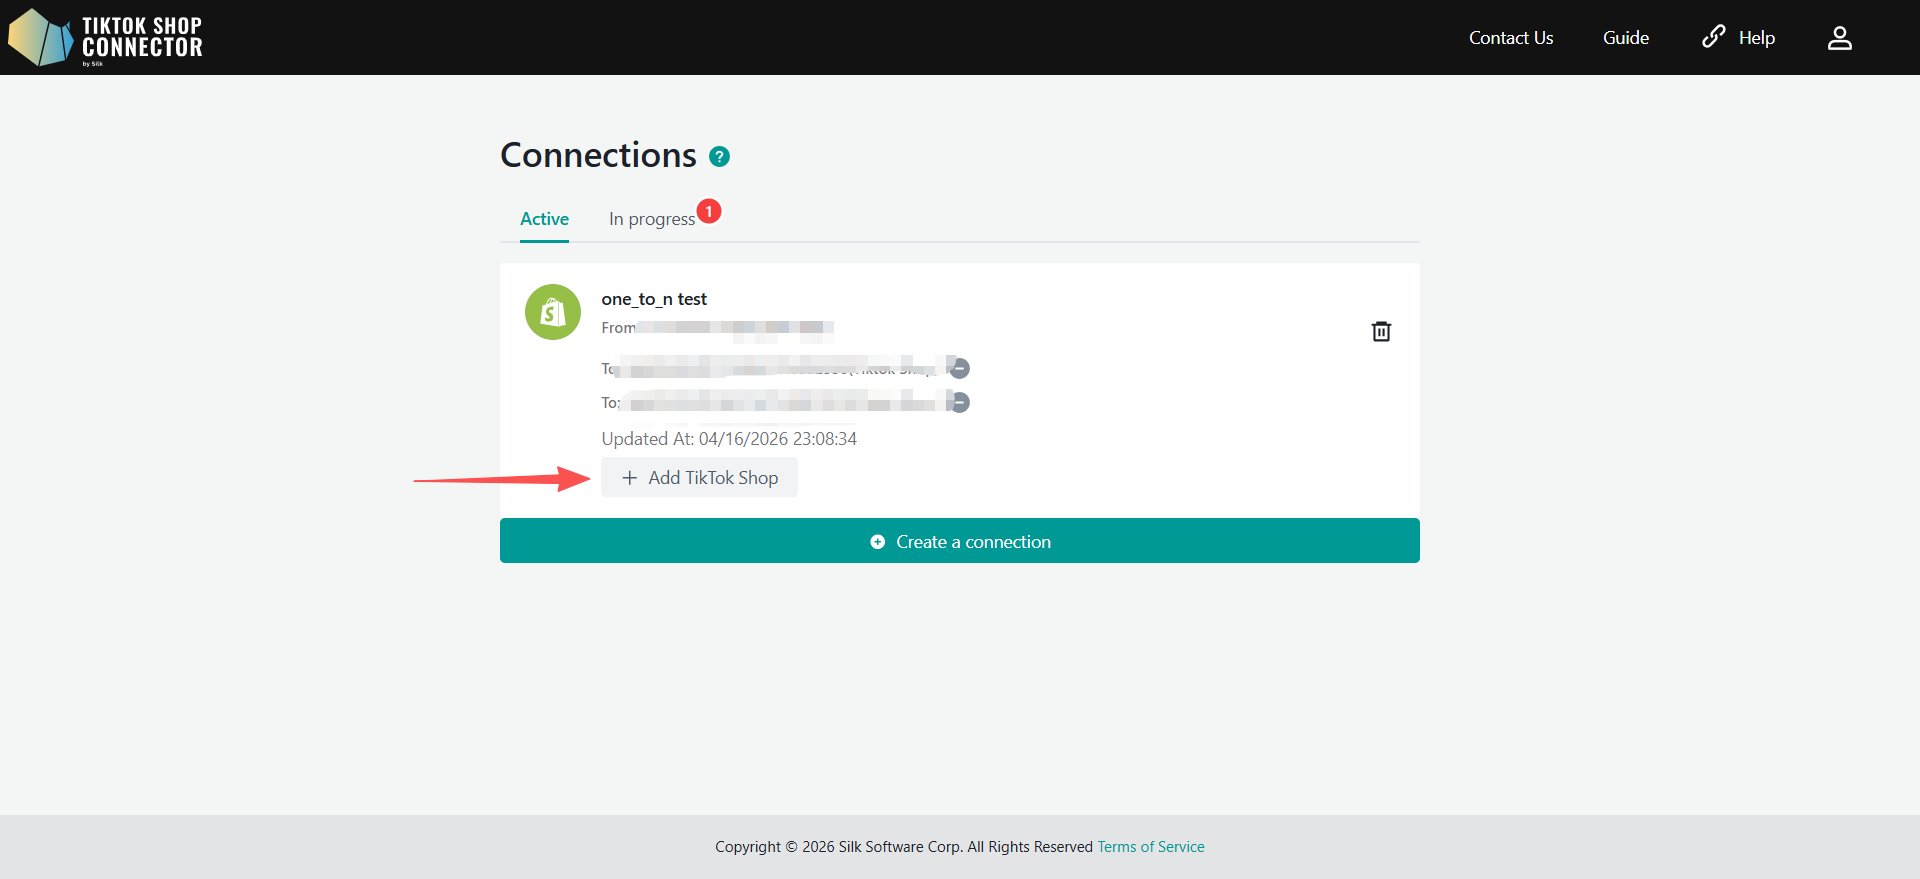
- Select the connection where you want to add a TikTok Shop store
- If you don’t have a connection yet, please create one first (refer to the Create Connection section)
- Click to add a TikTok Shop connection
- You will be redirected to the TikTok Shop Seller Center for store authorization
- Make sure you are already logged into the correct TikTok Shop store account before proceeding
- Complete the authorization
- After successful authorization, you will be redirected back to the Connection listing page
- Repeat the above steps to add multiple TikTok Shop stores under the same Shopify store
Important: Before each authorization, ensure you are logged into the correct TikTok Shop store.
Step 2: Switch Between TikTok Shop Stores
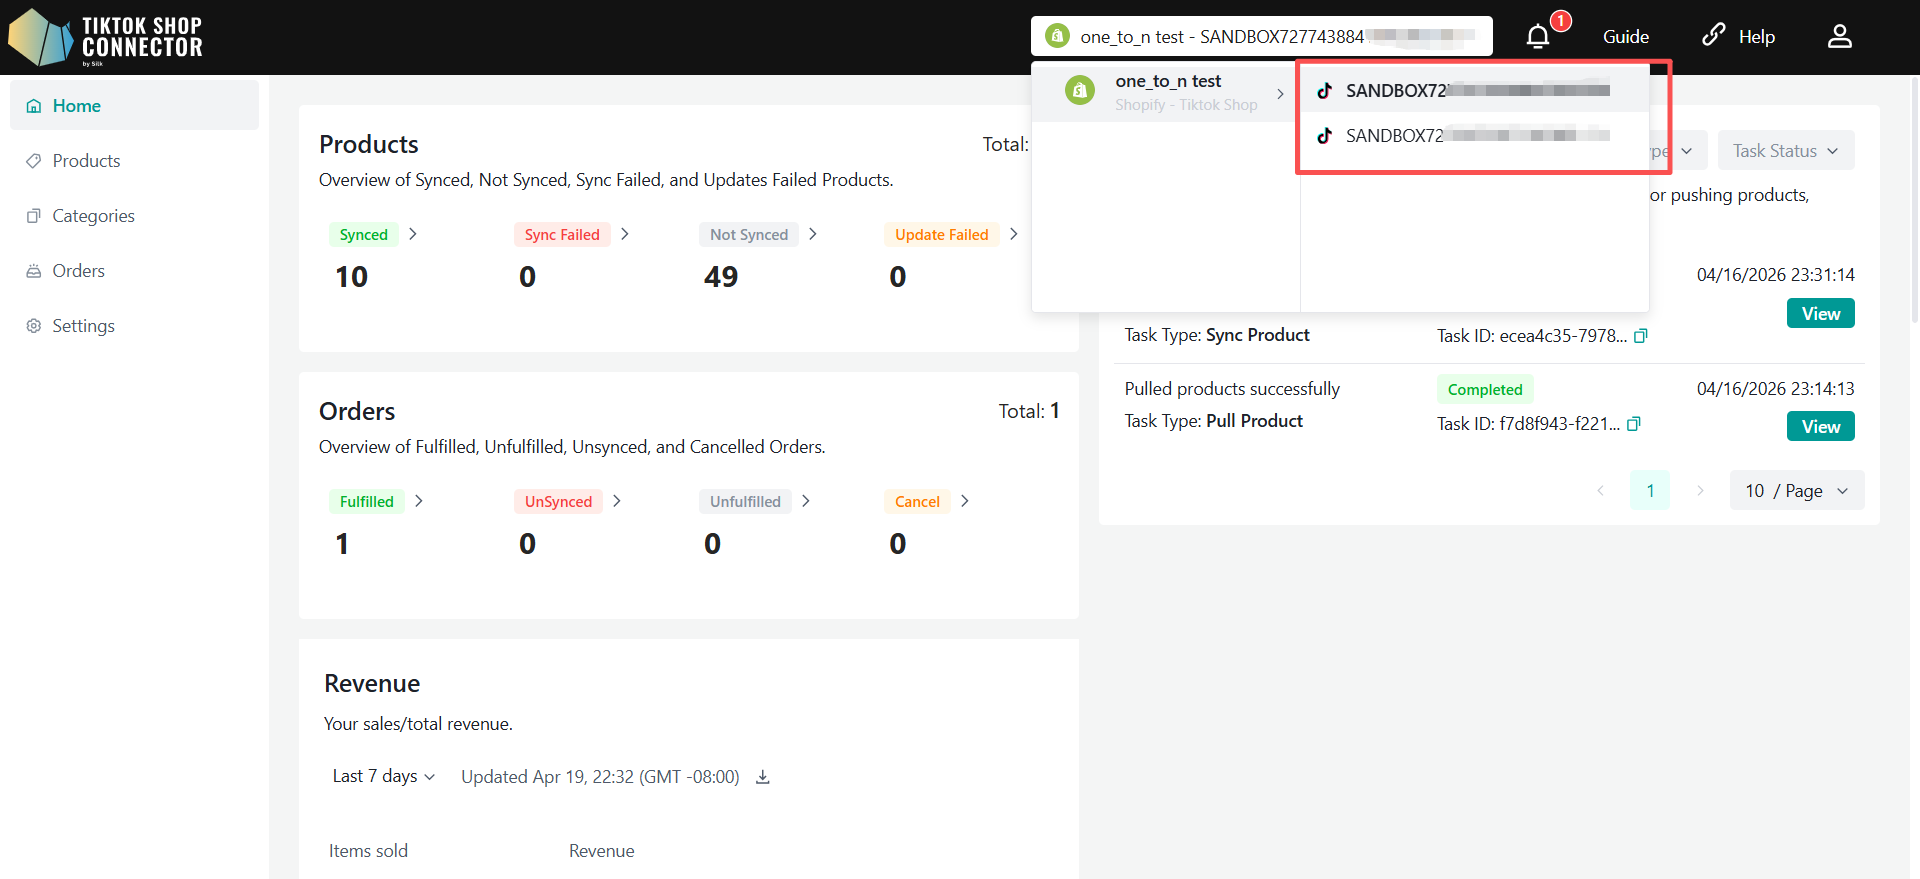
When multiple TikTok Shop stores are connected:
- Navigate to the top-right corner of the interface
- Click on the Connection selector
- A second-level dropdown will appear (only for connections with multiple TikTok Shop stores)
- Select a specific TikTok Shop Store Name to switch context
All data and configurations will be updated based on the selected TikTok Shop store.
Data & Configuration Scope
Each TikTok Shop store connection is managed independently, including:
- Product: Product listing and synchronization
- Order: Order synchronization and status updates
- Fulfillment: Shipment and delivery handling
- Mapping: Category and attribute mapping
- Settings: Sync rules and configuration
Changes made in one TikTok Shop store do not affect others.
Data Flow Logic
- All TikTok Shop stores sync data independently
- The Shopify store remains the single source of truth
- Data from multiple TikTok Shop stores is processed separately but ultimately linked back to the same Shopify store
How to Sync Products
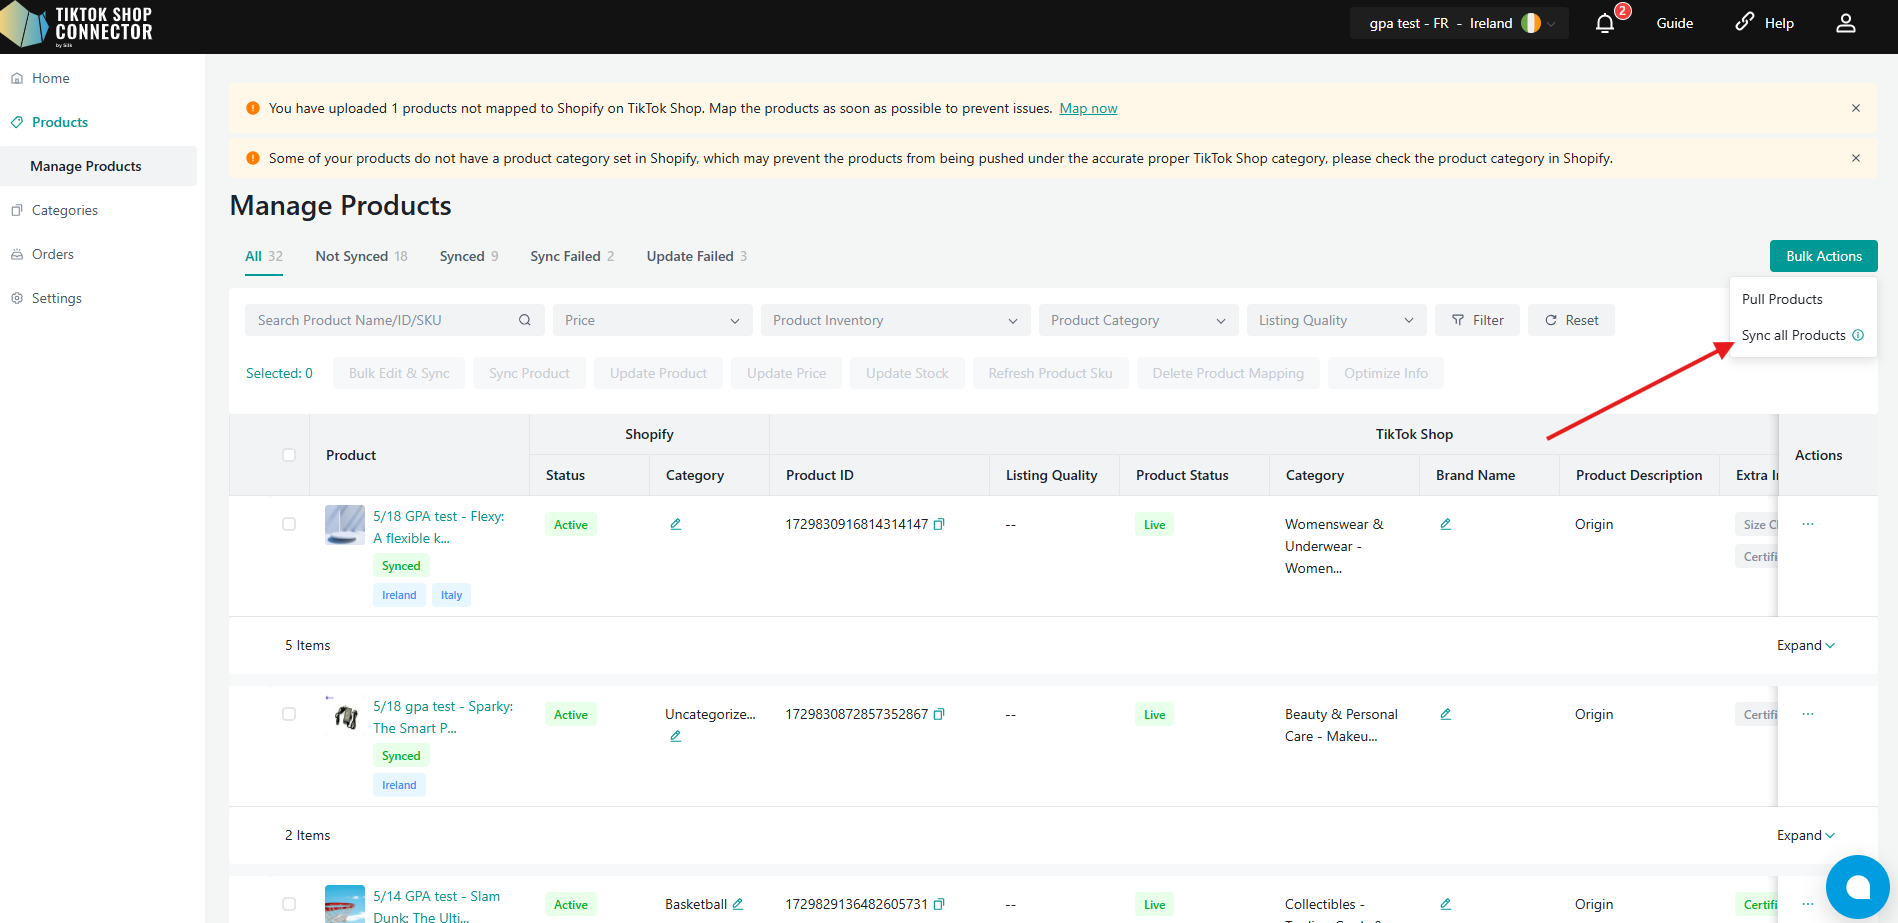
Pull Products:
When you first access your new connection, your products and dashboard tabs will be blank. You will need to "pull" products from Shopify into the Connector for the first time and then "push" them to TikTok Shop.
Note on Shopify API Rate Limiting:
Due to Shopify's API rate limits, retrieving product information for multiple items may take some time. We appreciate your patience during the product pull process.
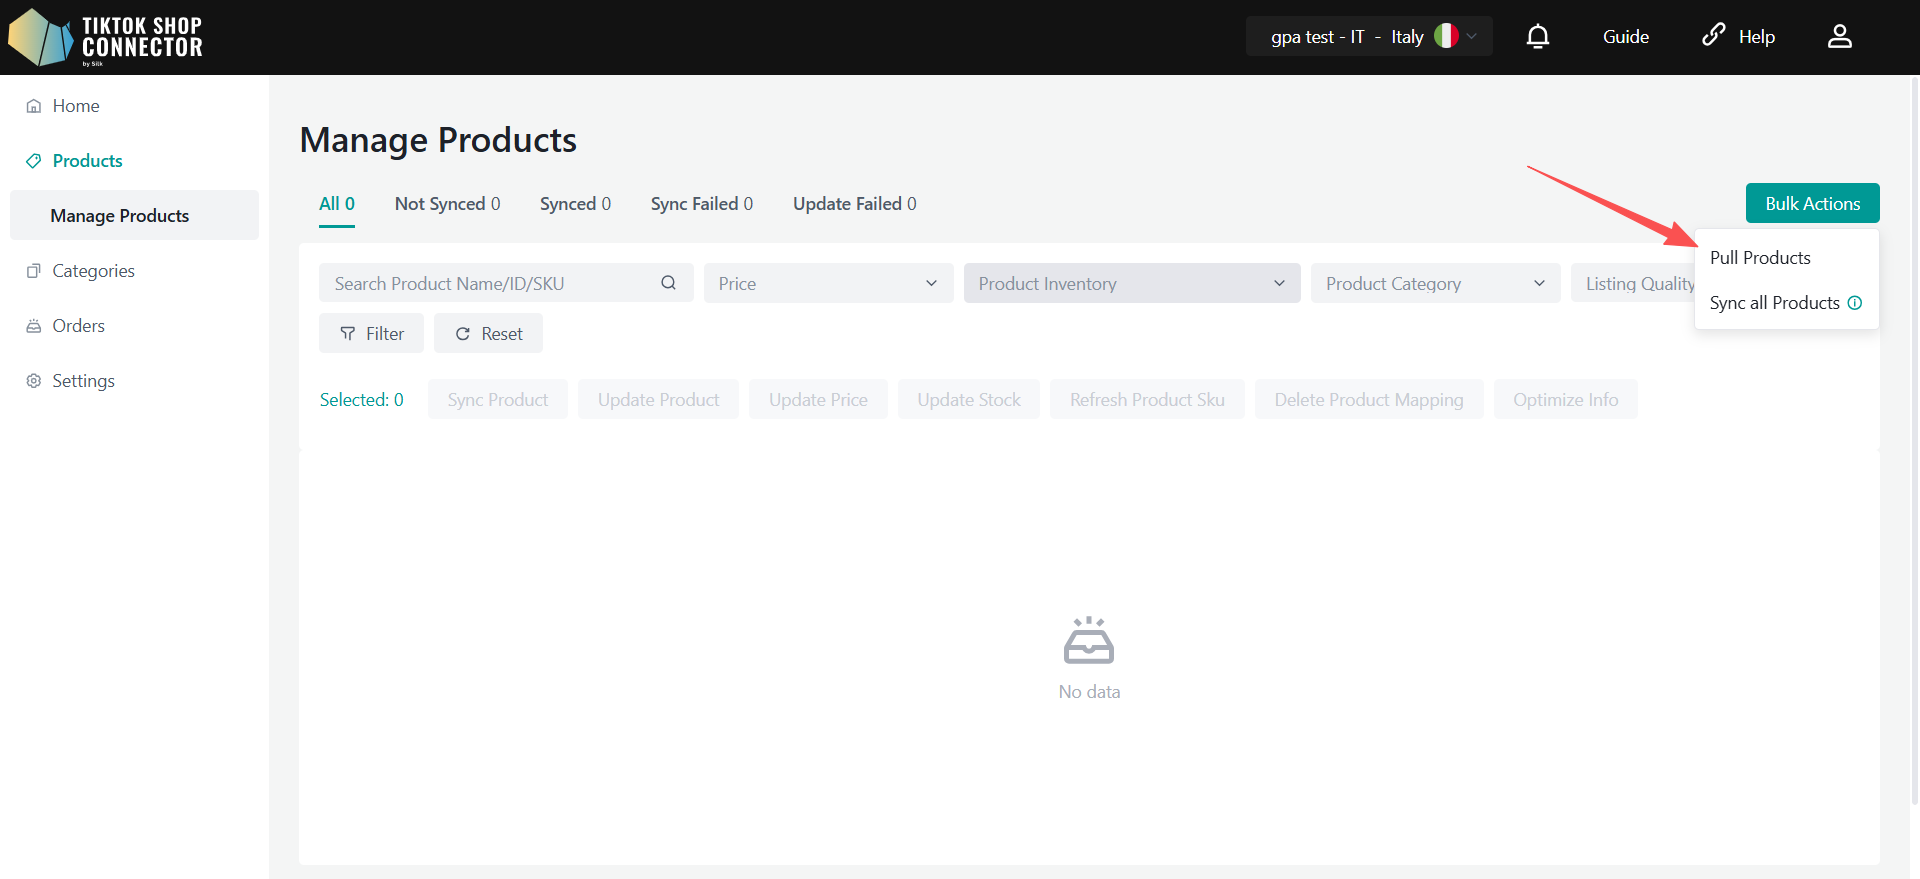
To "pull" products from Shopify into the Connector:
Products tab -> Bulk Actions -> Pull Products
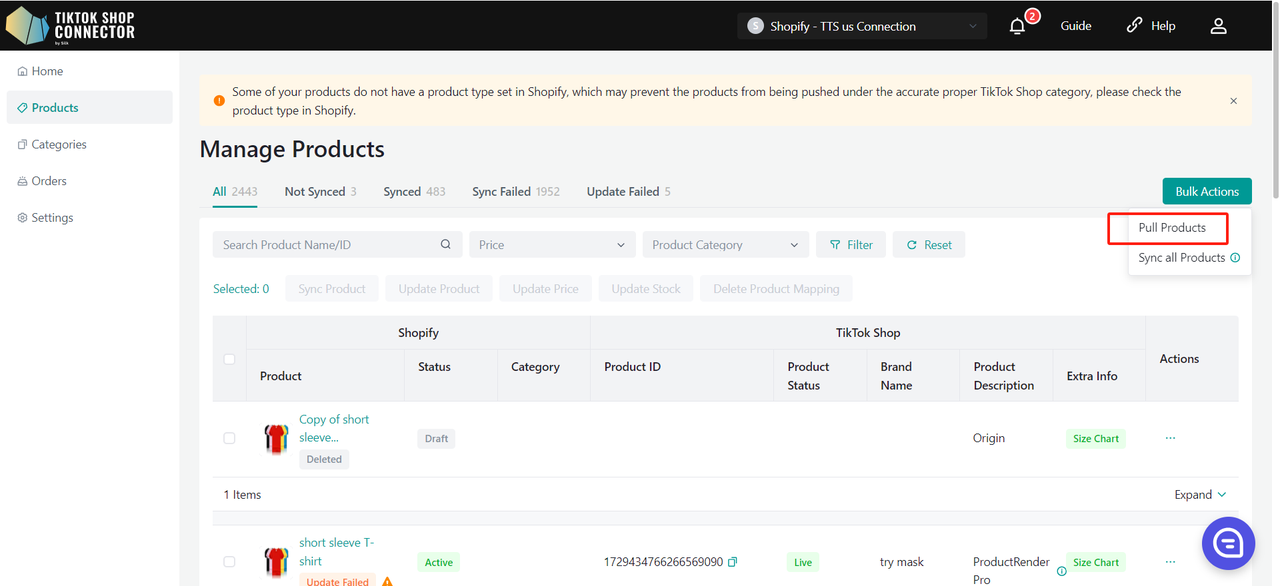
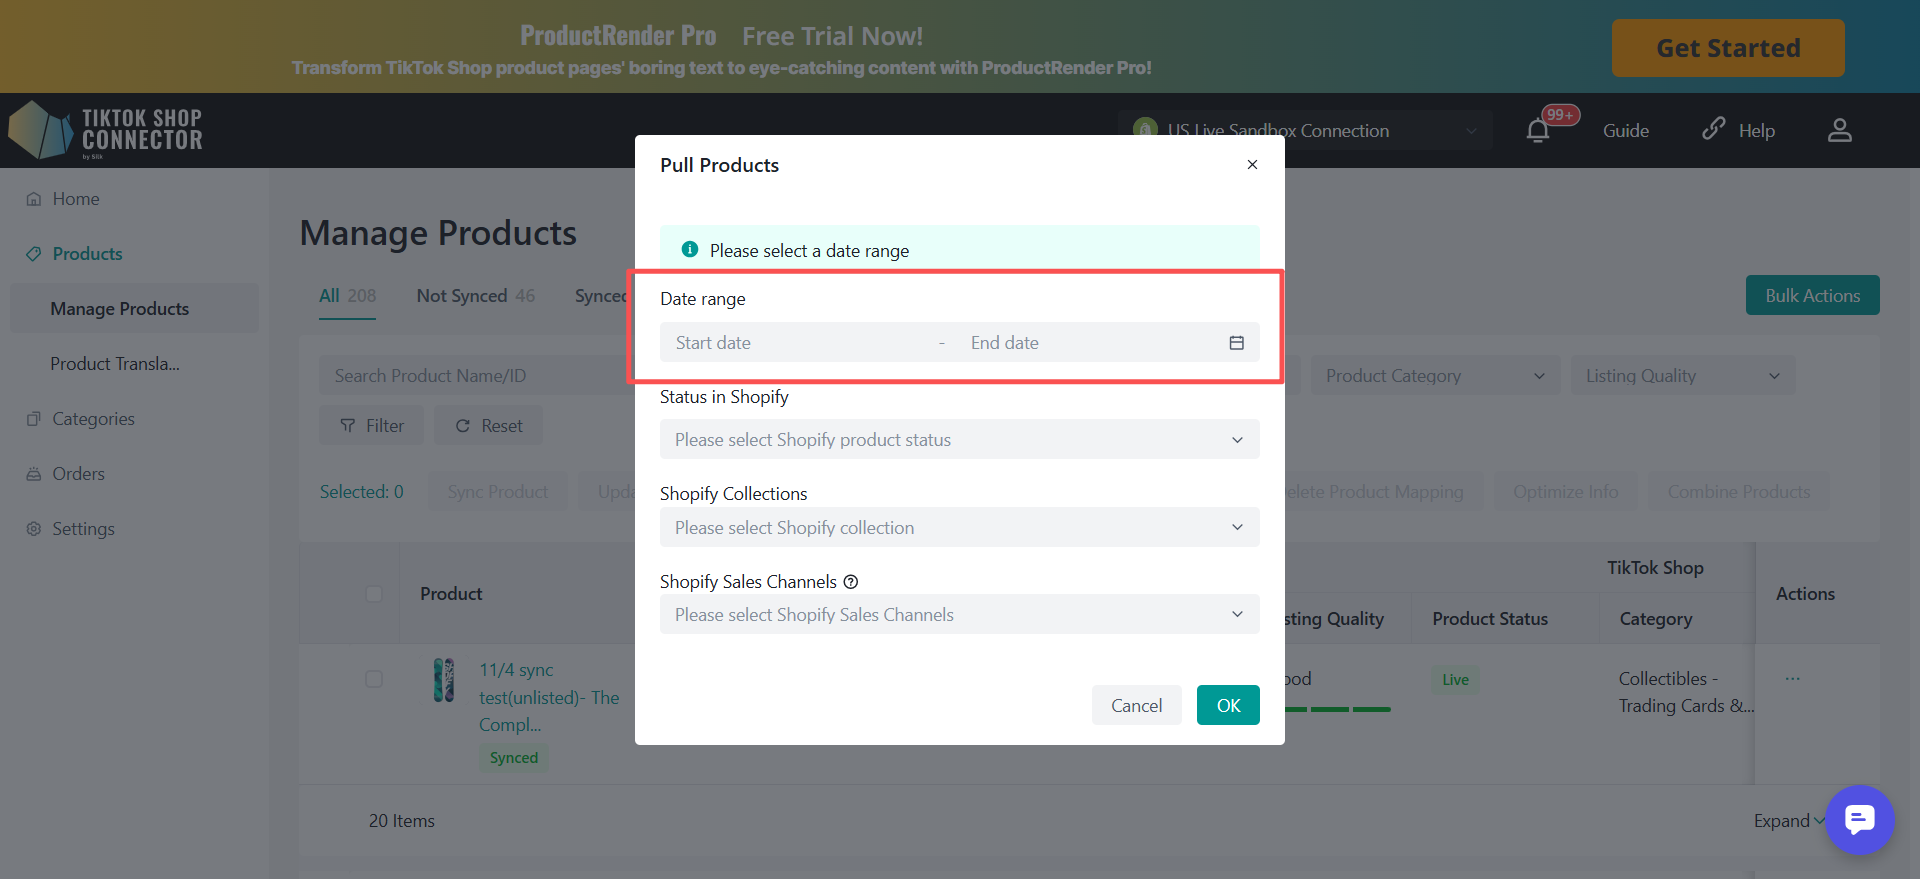
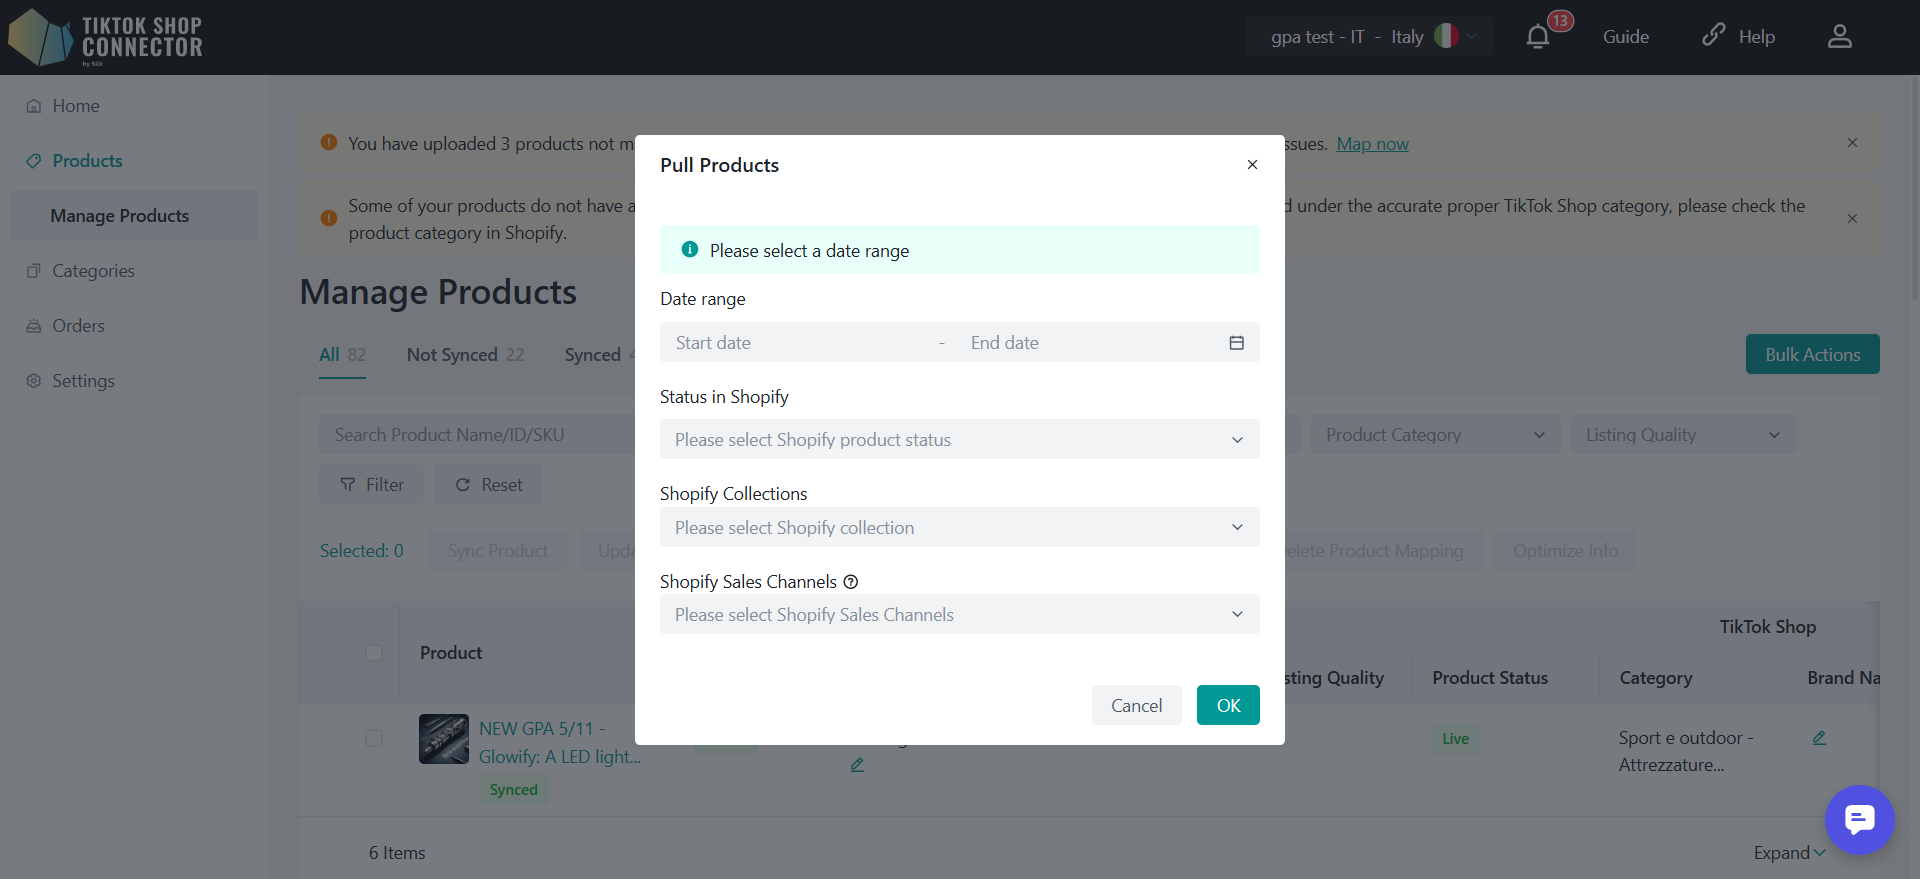
You can filter and retrieve products from Shopify based on the following information.
1. Date Range
Select a date range to filter products based on their creation or last updated time in Shopify.
Choose the date range to pull products from Shopify.
Recommended: Choose a start date from 2-3 years back OR when you first started your Shopify store. Choose the end date as today’s date.
If you are pulling in products for the first time, select the date range starting from years back or when you first started your store (This is to ensure that all products are pulled into the Connector). After that, any product updates you make in Shopify will only have to be pulled from when you last updated the product.
2. Status in Shopify
Choose which product statuses you want to pull from Shopify:
- Active
- Draft
- Archived
3. Shopify Collections
Filter products by Shopify collections.
- Select one or more collections to retrieve only products belonging to those collections.
Important: Due to Shopify API limitations, Collections and Sales Channels cannot be used together in the same query. If you select a collection, the Sales Channel filter will be disabled, and vice versa.
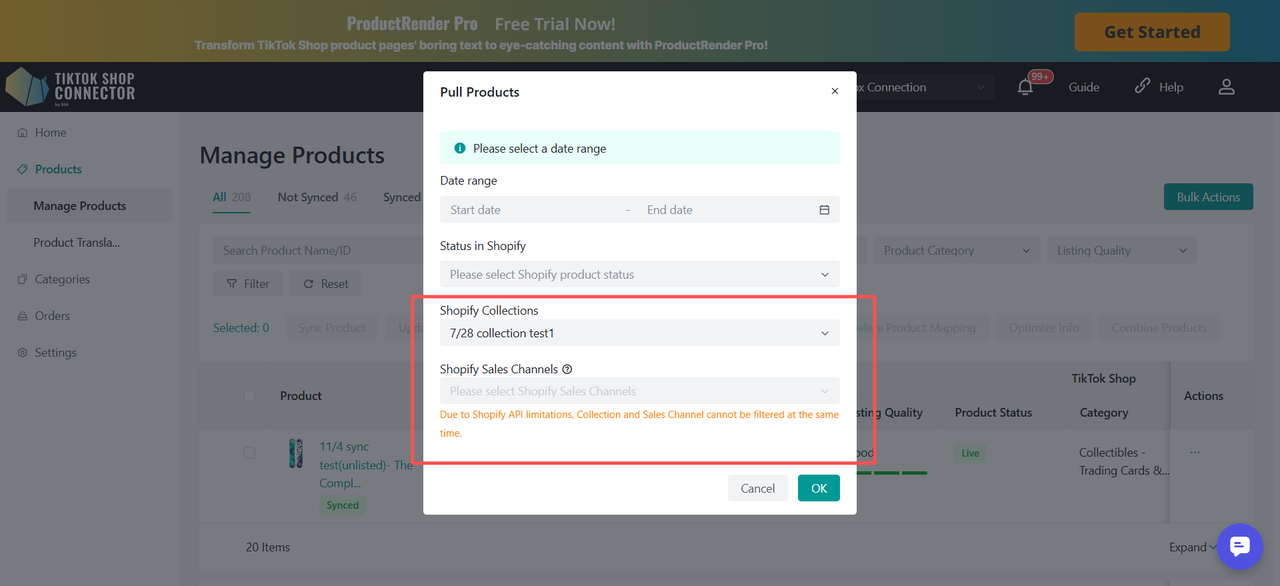
4. Shopify Sales Channels
The Sales Channel filter allows you to retrieve products based on their availability in specific Shopify sales channels such as:
- Online Store
- POS
- Custom sales channels
First-Time Authorization Required:
When using the Shopify Sales Channels filter for the first time, you will be prompted to re-authorize the Shopify App. This step is required so that the TikTok Shop Connector can access your store's sales channel and product availability data.
Once authorization is completed, you will be able to use the Sales Channel filter normally.

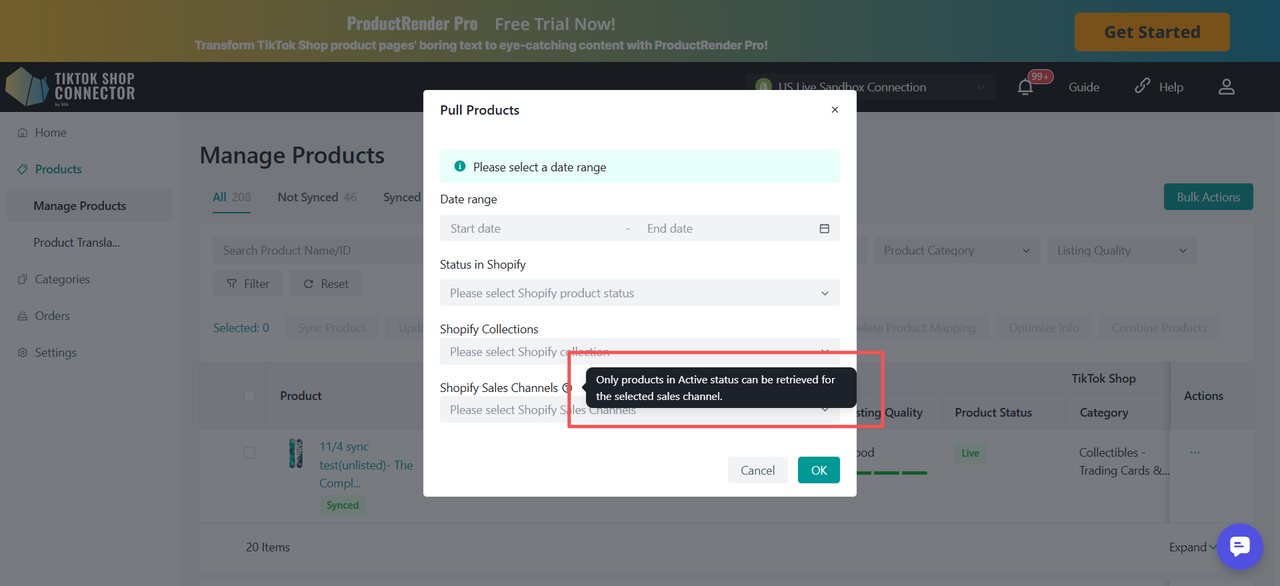
Important:
Only products in Active status can be retrieved for the selected sales channel.
This means:
- When you filter by Sales Channel, only Active products available in that channel can be synchronized.
- Products in Draft or Archived state cannot be pulled for sales-channel-based queries.
Click OK to retrieve products using the selected filters.
Click Cancel to exit without changes.
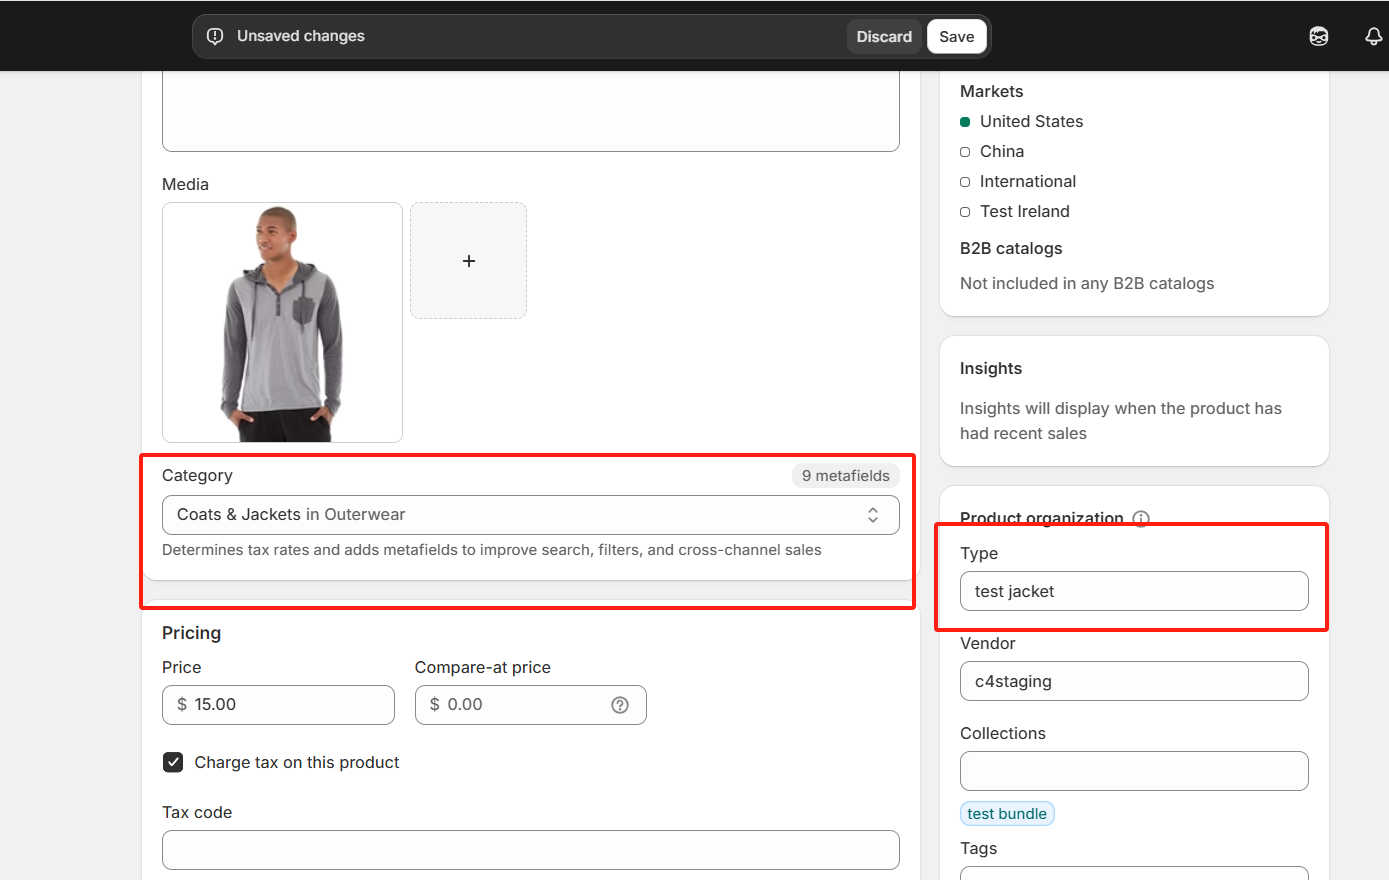
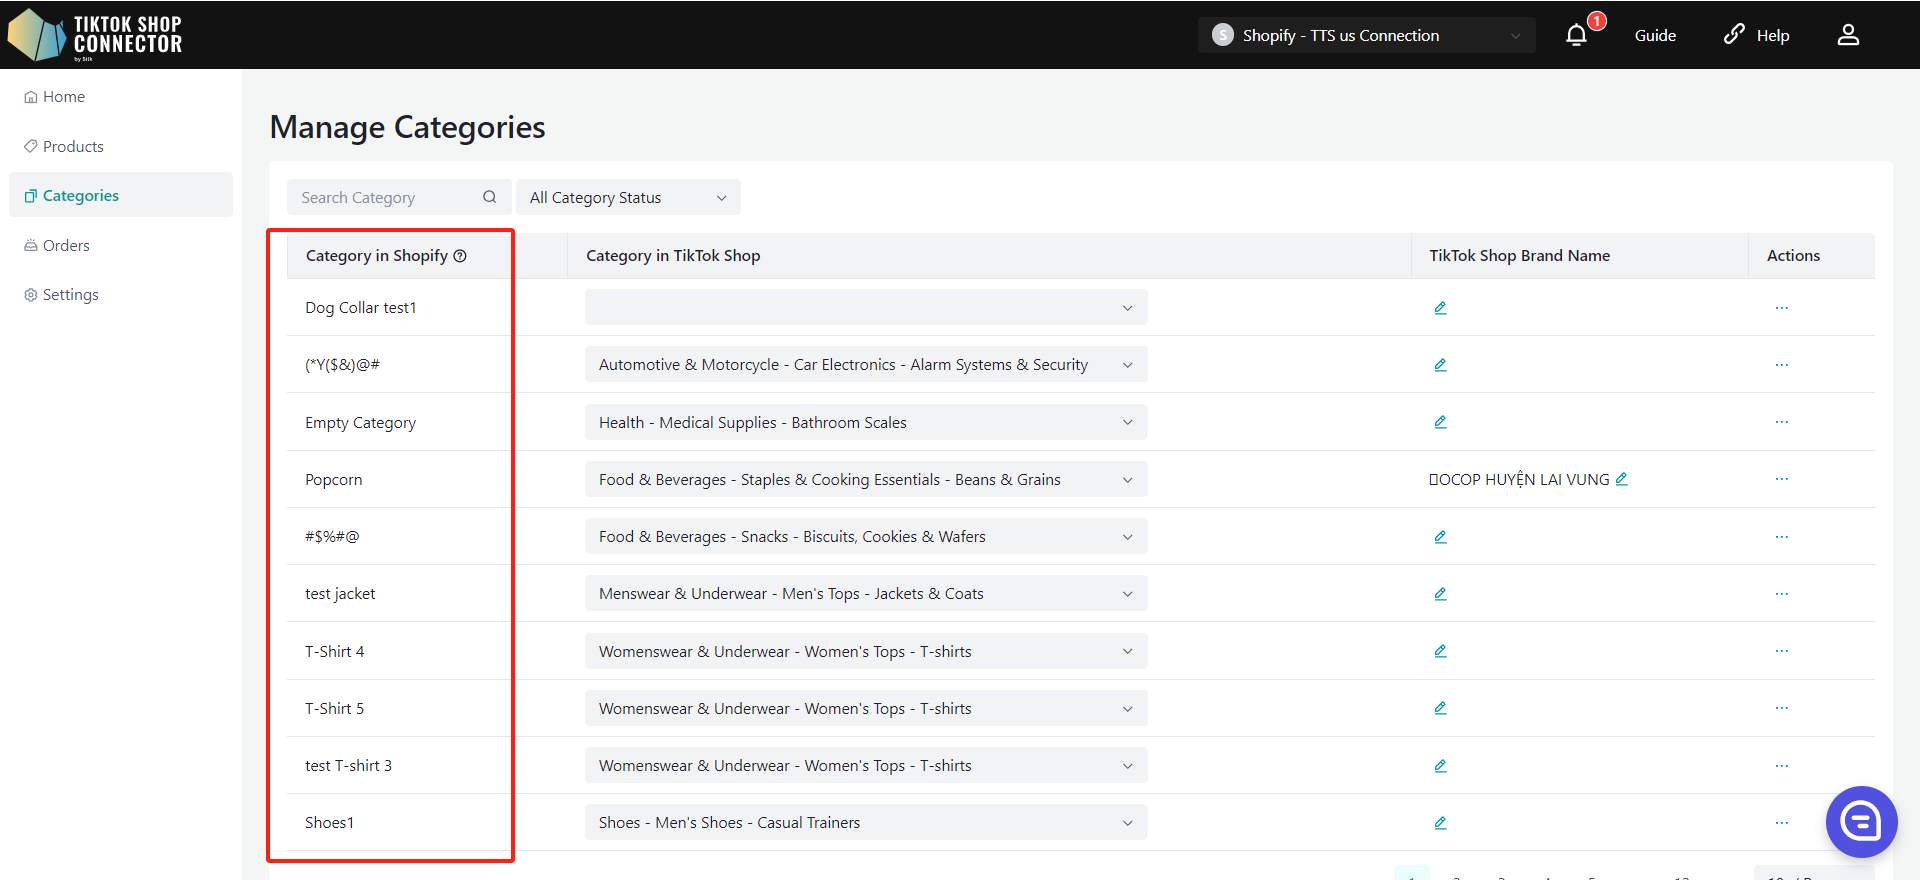
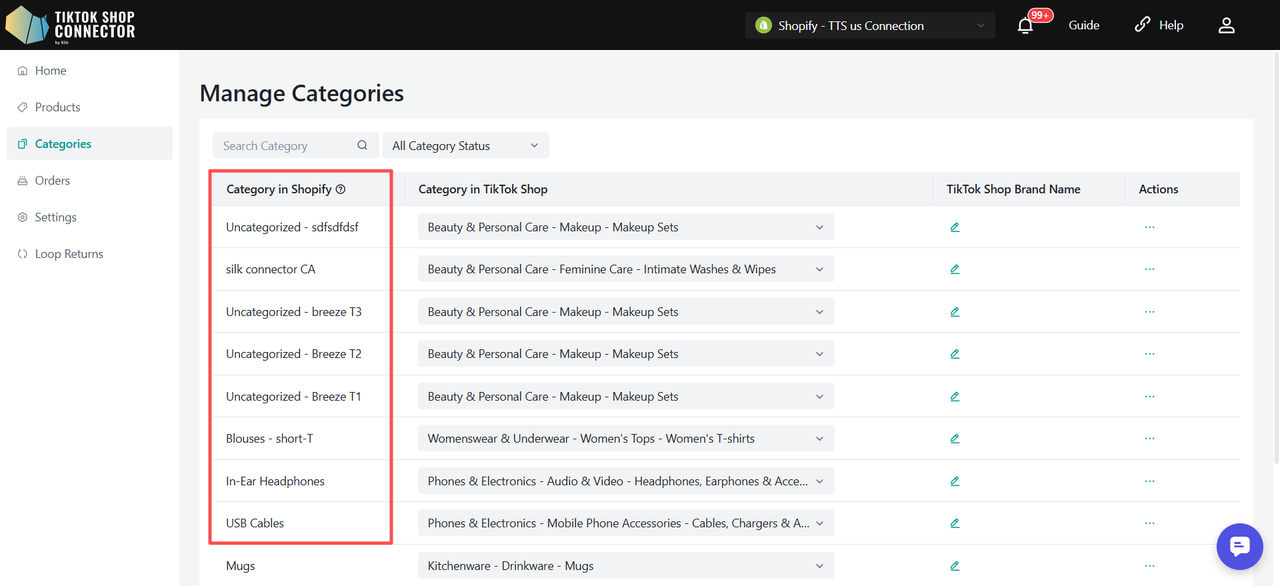
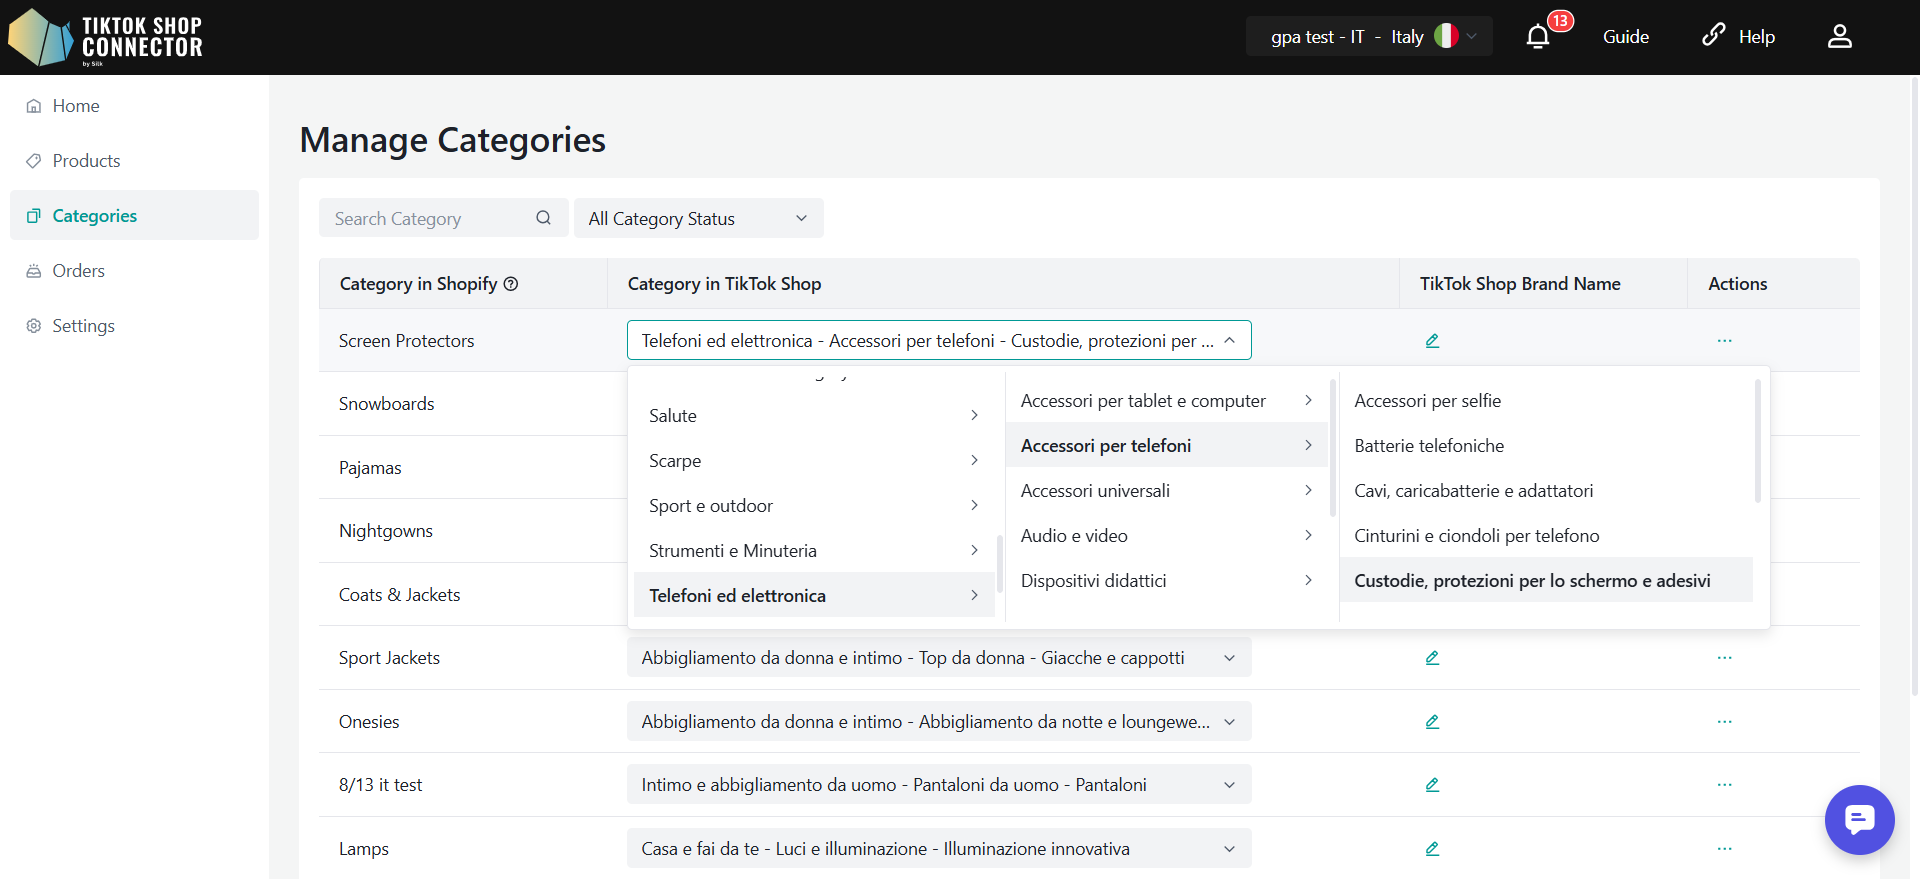
Required: Category Mapping
All products must have the "product type/category" filled out in Shopify. The Connector uses this field as the "Category in Shopify" to map it to the "Category in TikTok Shop"
The source is either the product type or category, depending on the source you selected in the product settings.
| Product Type/Category in Shopify | "Category in Shopify" for Connector by Silk |
|---|---|
 |  |
Sync Products:
"Pushing" a product will sync your product from the Connector to TikTok Shop.
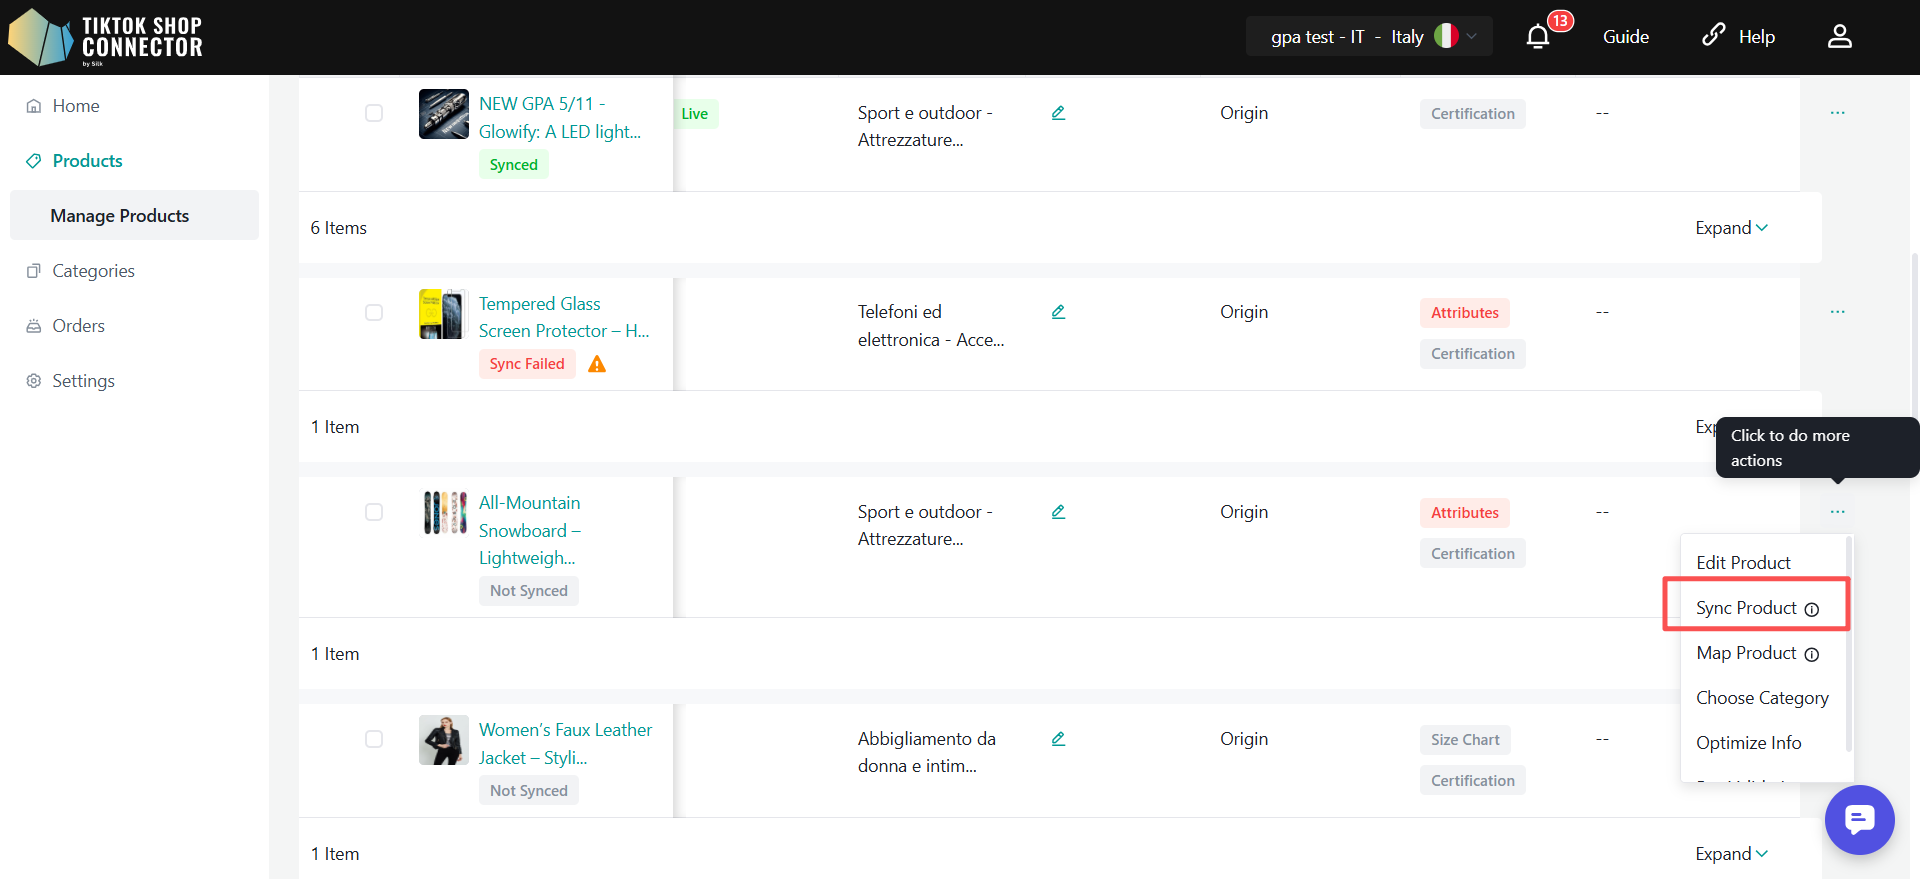
Sync One Product:
Check off the box next to the product image -> (...) under 'Actions' -> "Sync Product"
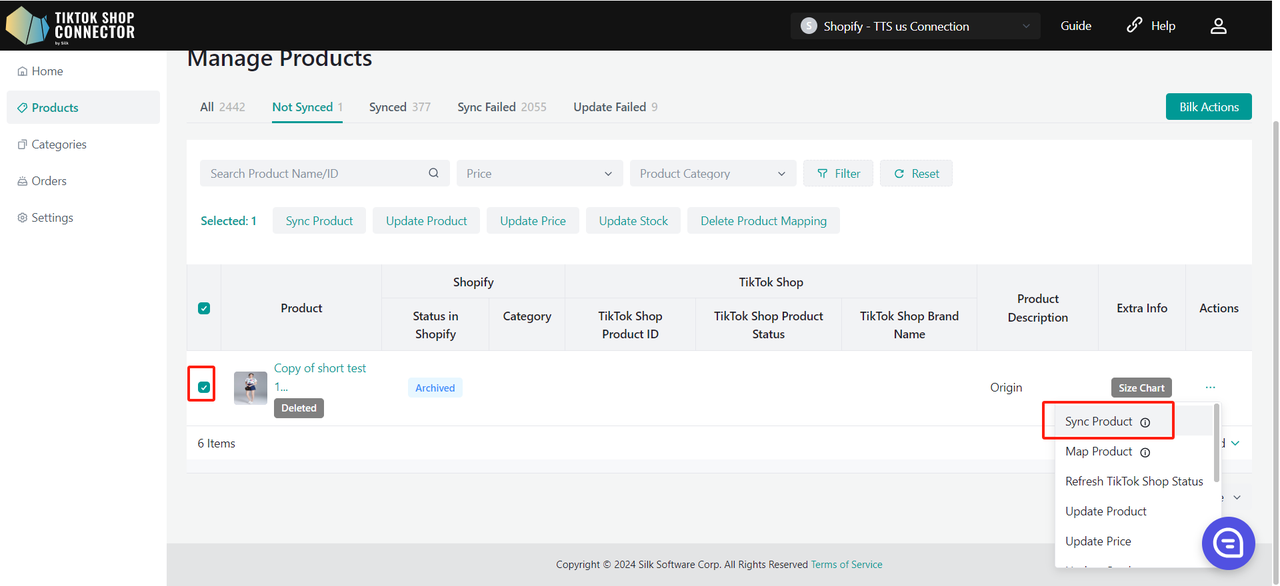
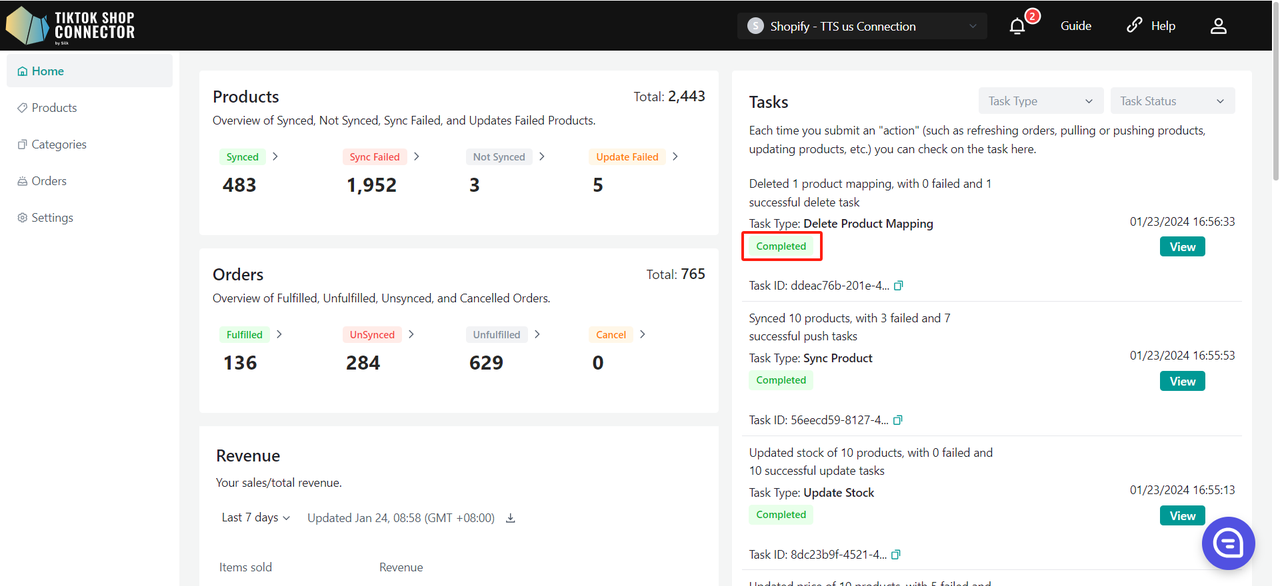
To check on the "task" you have just submitted: Dashboard -> Check on the "status"
Note: A "completed" status does NOT mean that the product was successfully "synced" to TikTok Shop. This just confirms that you submitted an action and the "task" was completed.

Go back to the Products tab -> check on the product you pushed
If the product says "synced" and has a "TTS Product ID" and a "TTS Product Status" you have successfully pushed the product to TikTok Shop.
You can check for the product in your TikTok Shop Seller Center.
Please click on this link (https://seller-us.tiktok.com/product/manage) to view the synced product in your TikTok Shop Seller Center.

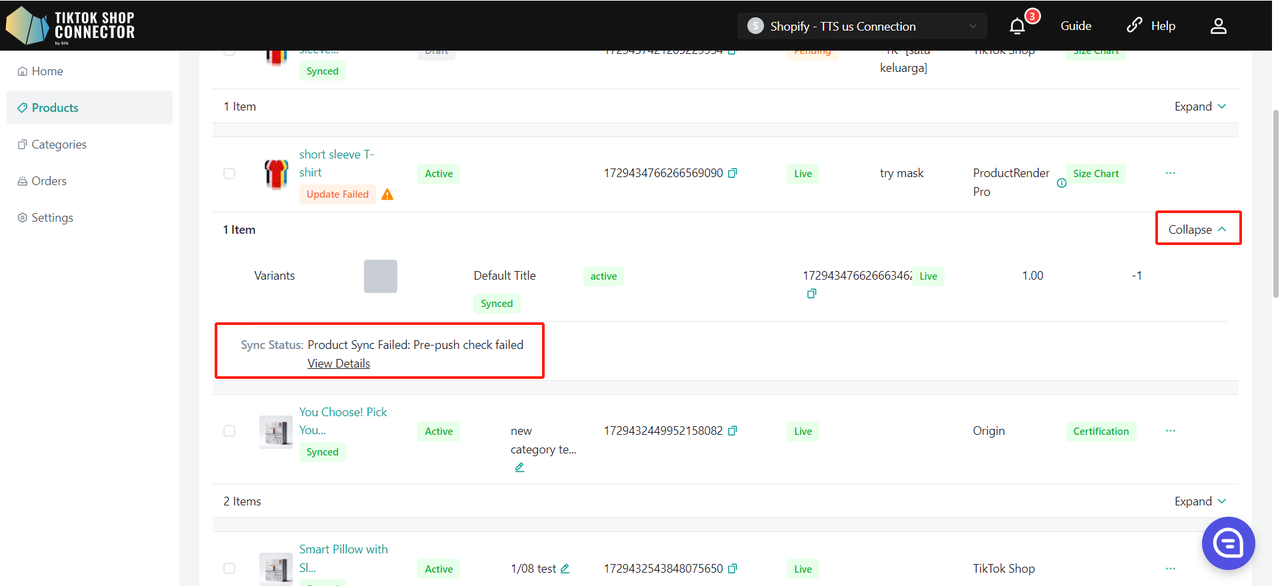
If the product says "unsynced" click on the blue arrow next to the product image -> check the "sync status" for a description of why the push was unsuccessful.
You can then troubleshoot and update anything from Shopify -> re-pull and re-push the product in the Connector.

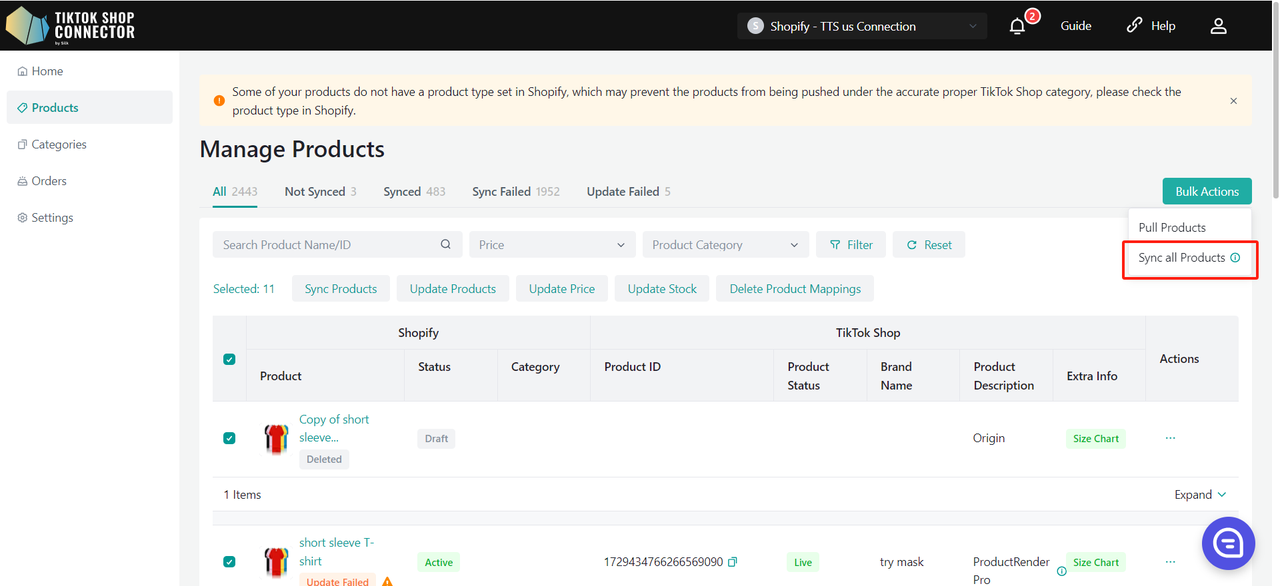
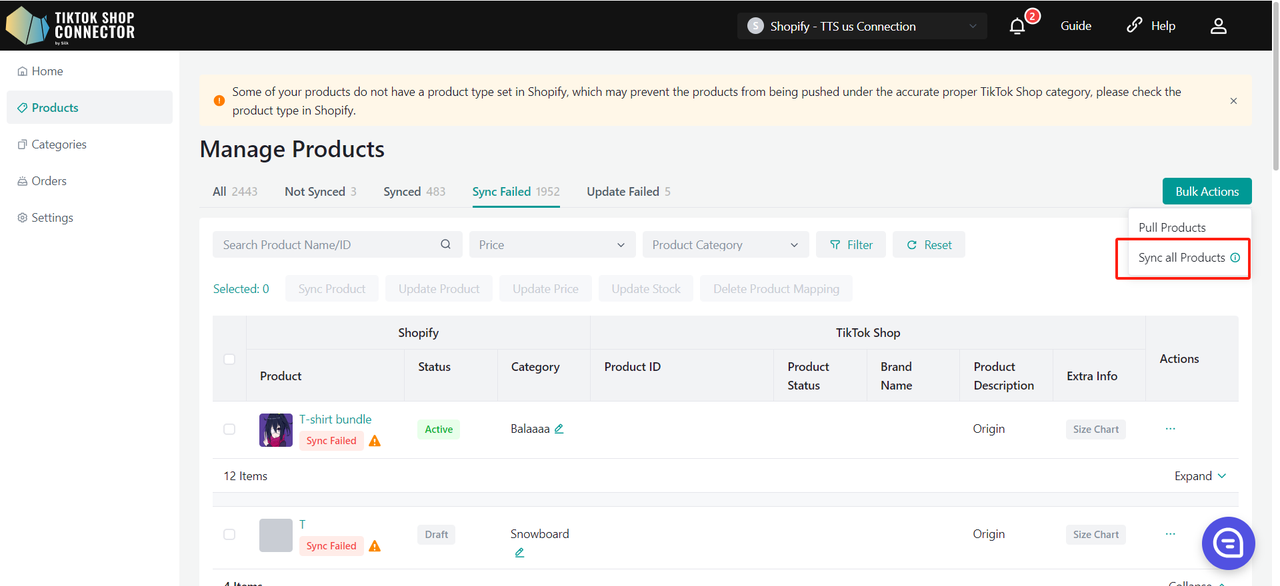
Push Multiple Products - One Page:
Select each product individually, select all products on one page, or push all pages.
Click "Actions" -> Sync all Products
To check on the "task" you have just submitted: Dashboard -> Check on the "status"
Note: A "completed" status does NOT mean that the product was successfully "synced" to TikTok Shop. This just confirms that you submitted an action and the "task" was completed.
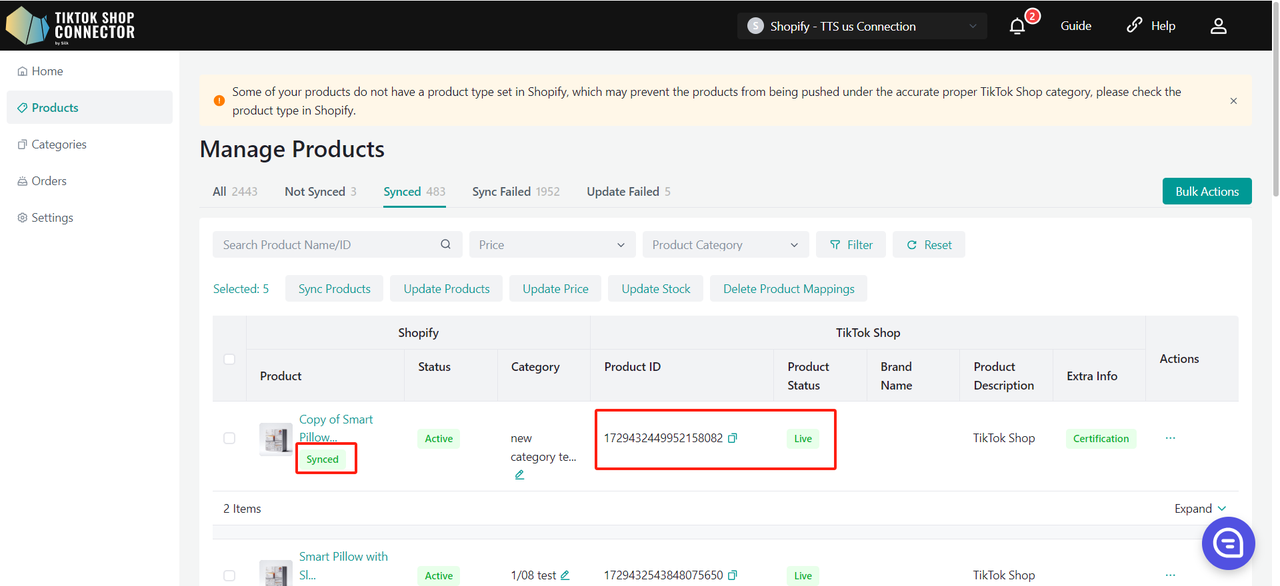
Go back to the Products tab -> check on the products you pushed
If the products say "synced" and have a "TTS Product ID" and a "TTS Product Status", you have successfully pushed the products to TikTok Shop.
You can check for the products in your TikTok Shop Seller Center.
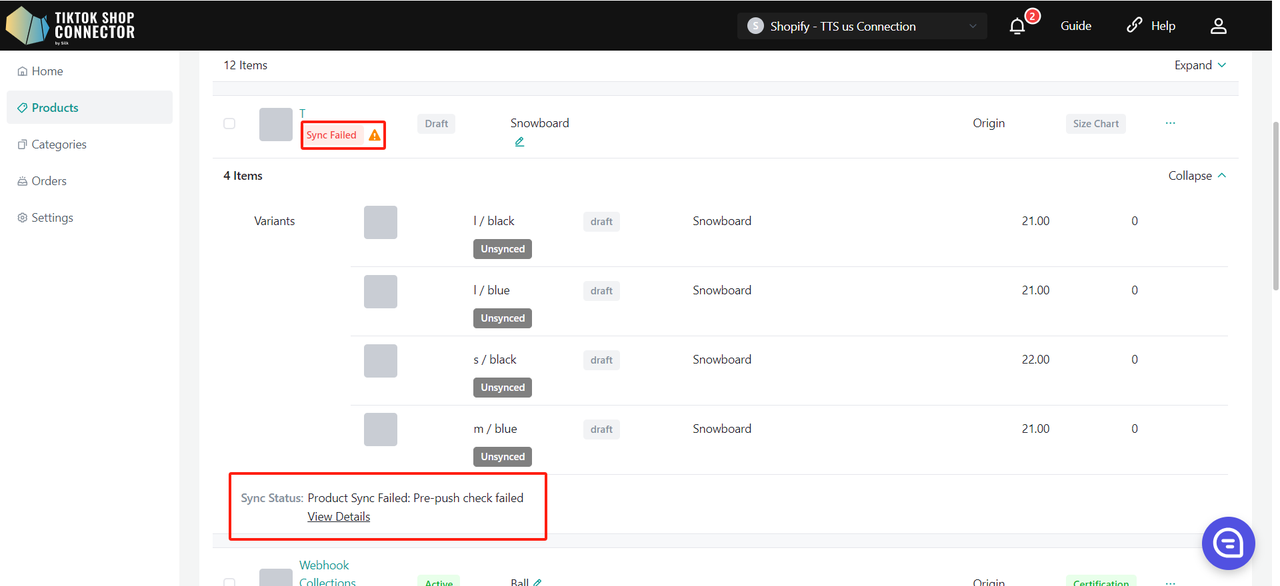
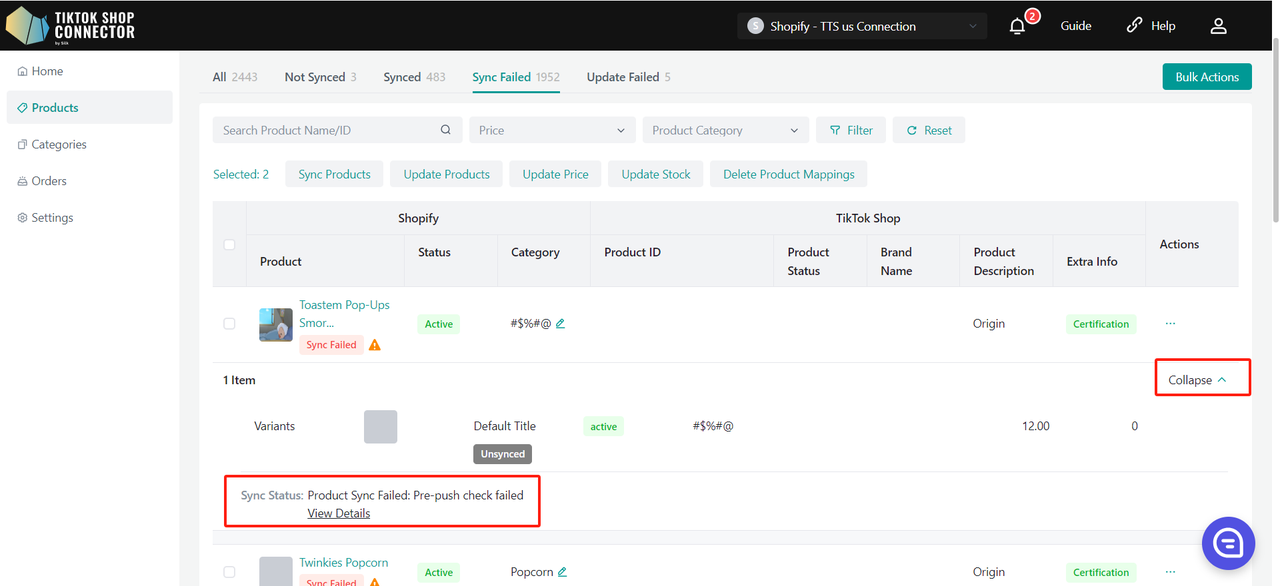
If the products say "Sync Failed", click on the blue arrow next to the products' image -> check the "sync status" for a description of why the push was unsuccessful.
You can then troubleshoot and update anything from Shopify -> re-pull and re-push the products in the Connector.
Push Multiple Products - All Pages:
Click "Actions" -> Sync All Pages
To check on the "task" you have just submitted: Dashboard -> Check on the "status"
Note: A "completed" status does NOT mean that the product was successfully "synced" to TikTok Shop. This just confirms that you submitted an action and the "task" was completed.

Go back to the Products tab -> check on the products you pushed
If the products say "synced" and have a "TTS Product ID" and a "TTS Product Status", you have successfully pushed the products to TikTok Shop.
You can check for the products in your TikTok Shop Seller Center.
If the products say "Sync Failed", click on the blue arrow next to the products' image -> check the "sync status" for a description of why the push was unsuccessful.

You can then troubleshoot and update anything from Shopify -> re-pull and re-push the products in the Connector.
Certificates/Required Attributes
If your product requires specific certifications or attributes in order to be uploaded to TikTok Shop, you will see a "sync status" stating that the product is missing certificate files or attributes.
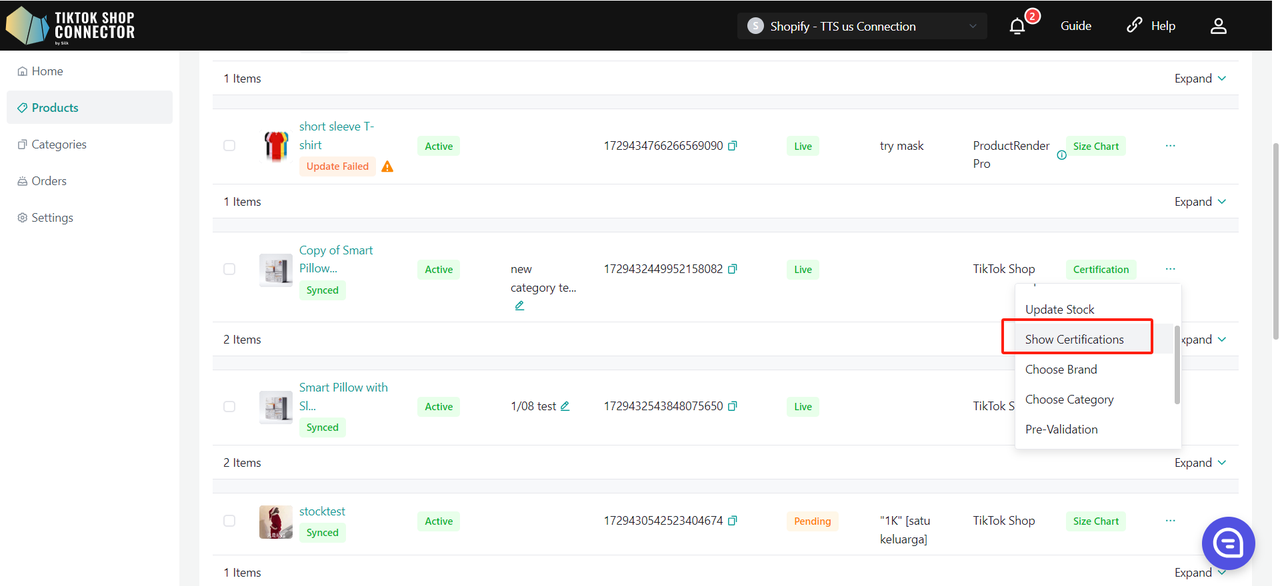
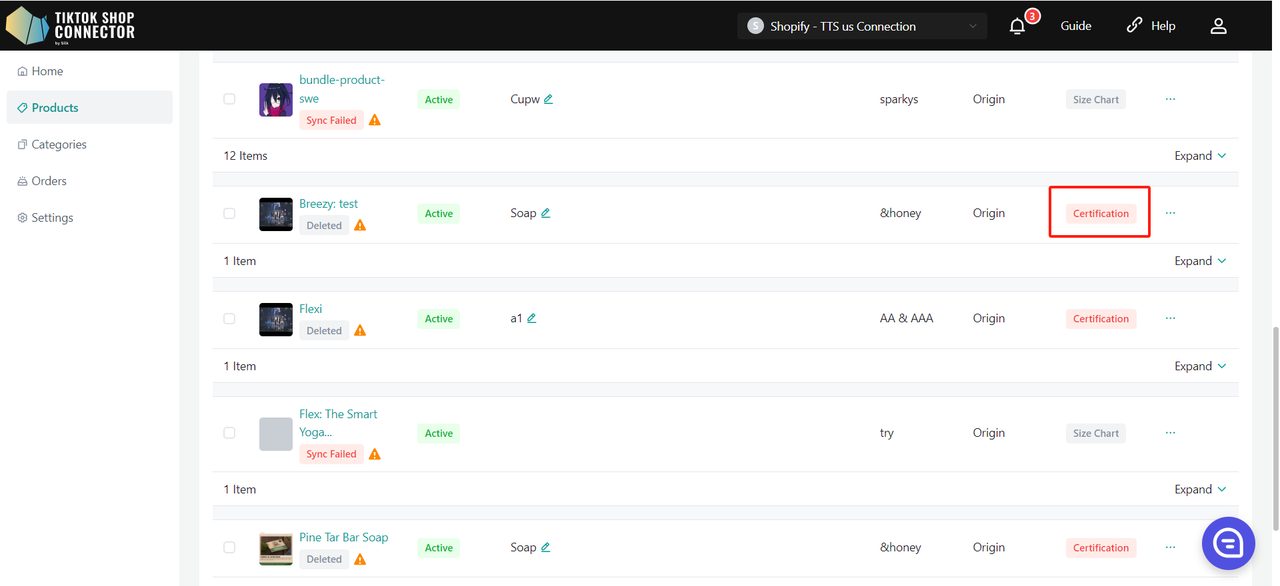
Certificates:
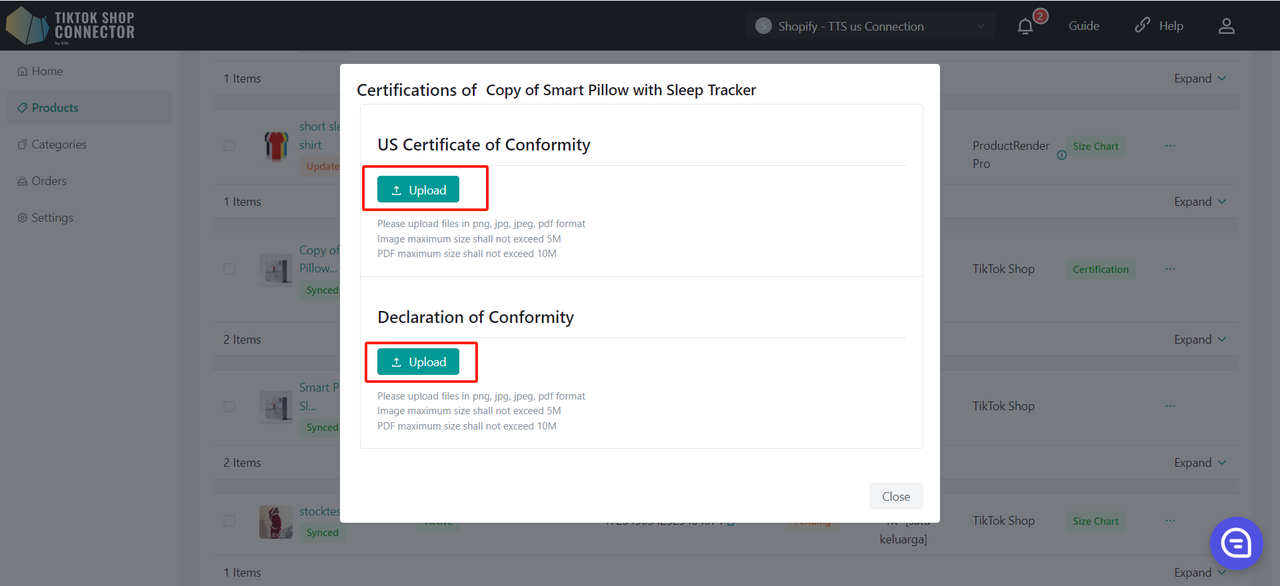
To upload your certificate for the product: Click (...) under "actions" for the product -> "show certifications"
Upload the required certification here:
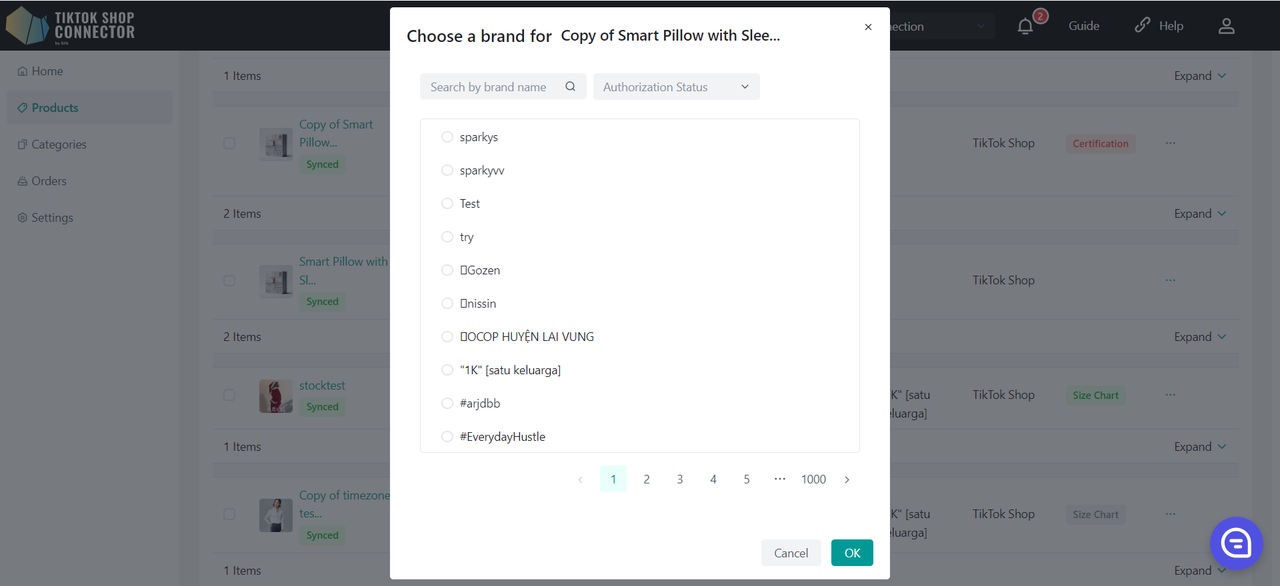
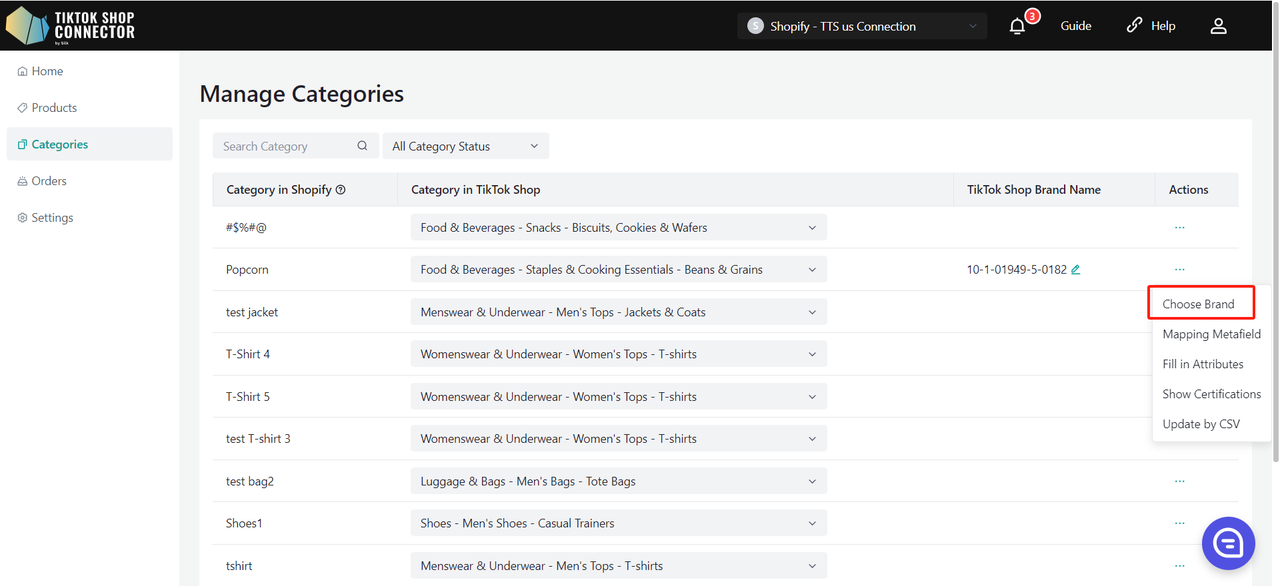
Choose Brand:
Click (...) under "actions" for the product -> Choose brand
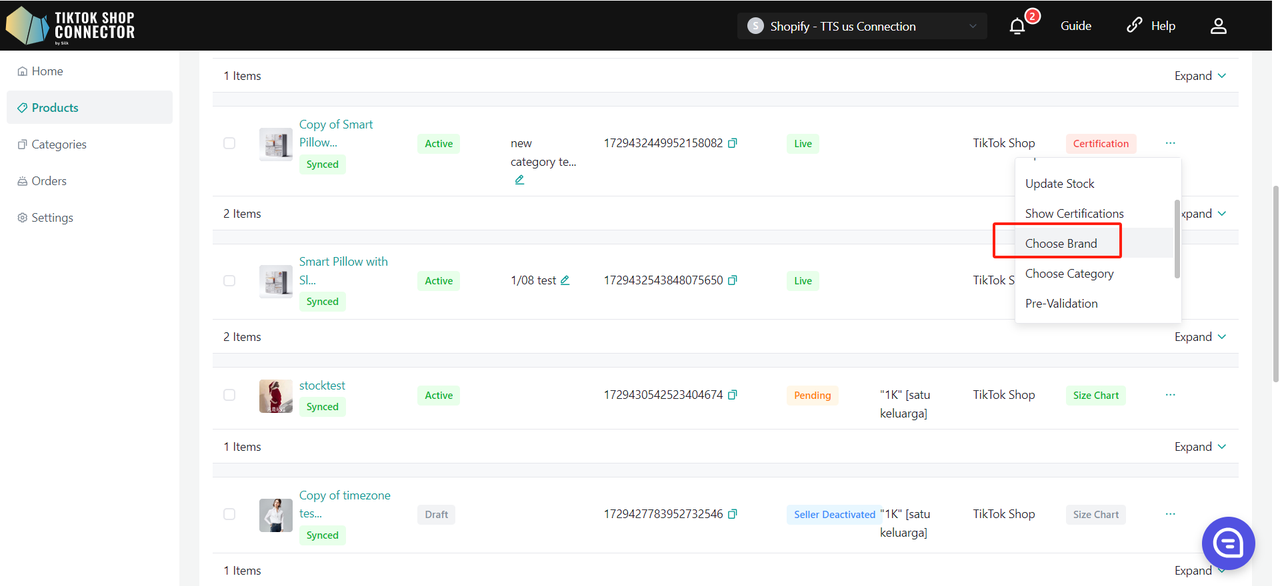
Type to "Search by brand name" -> Confirm -> re-push product
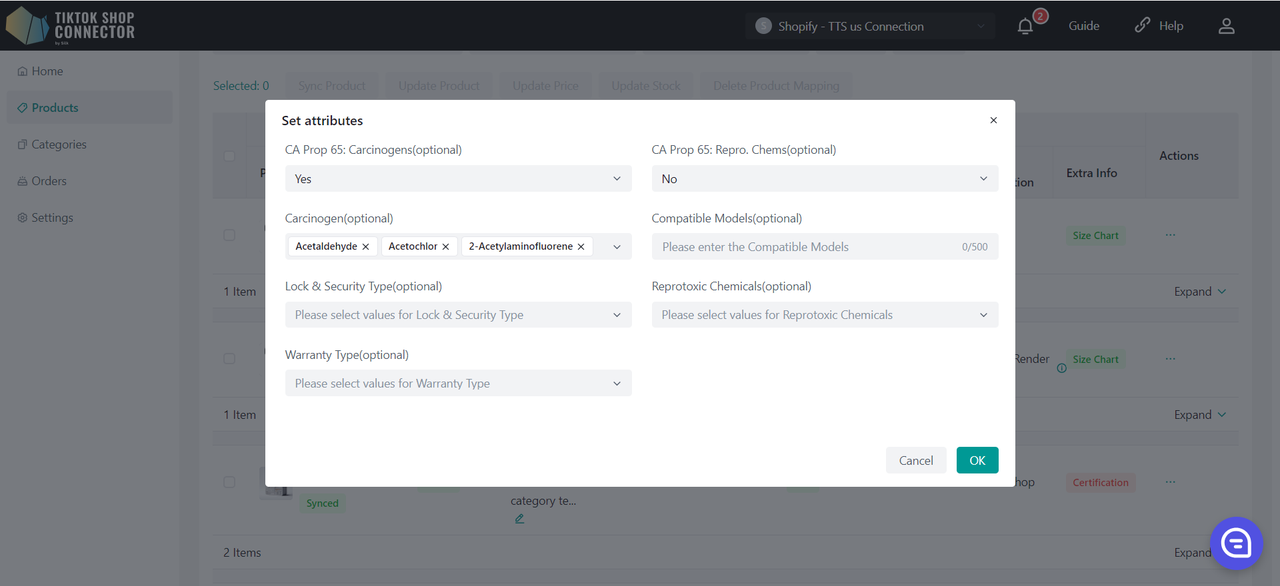
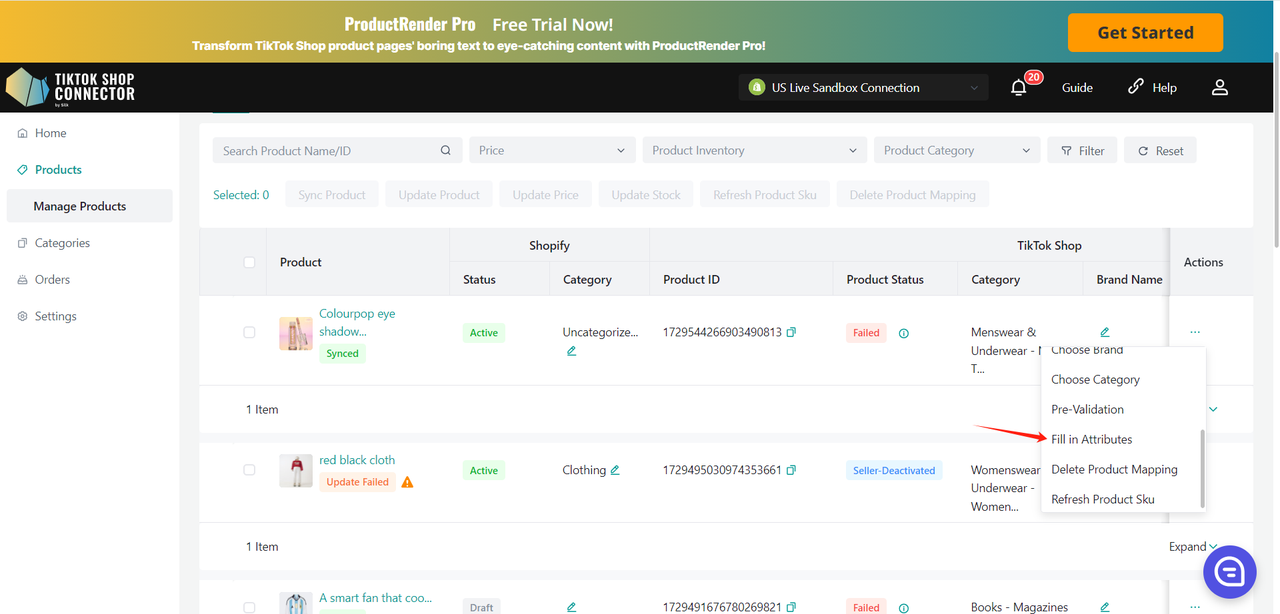
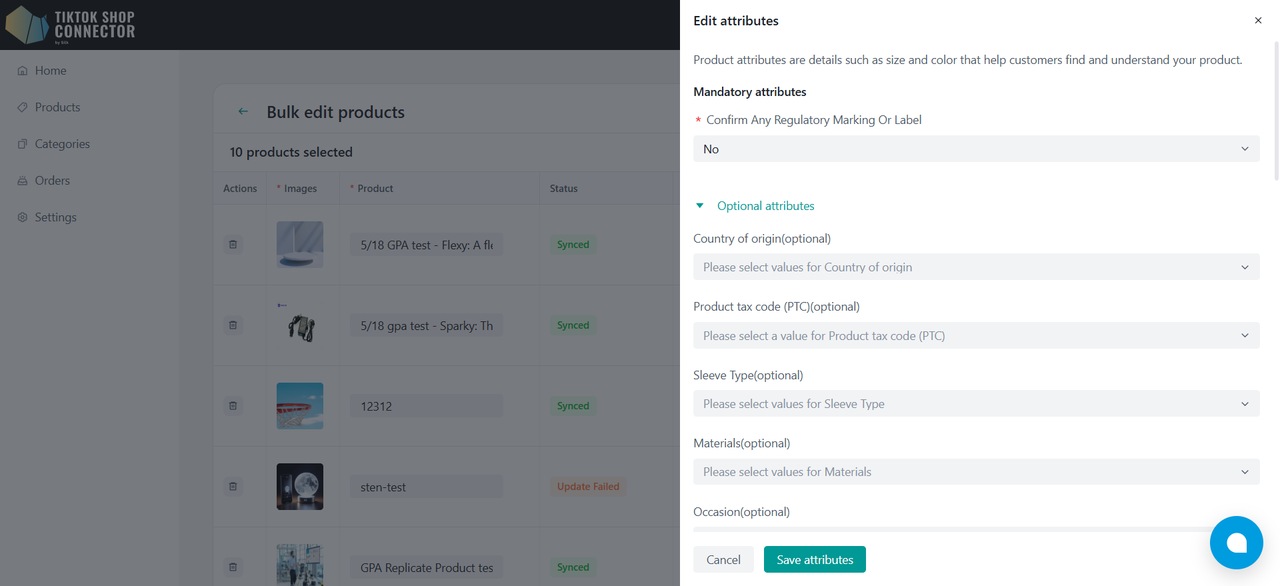
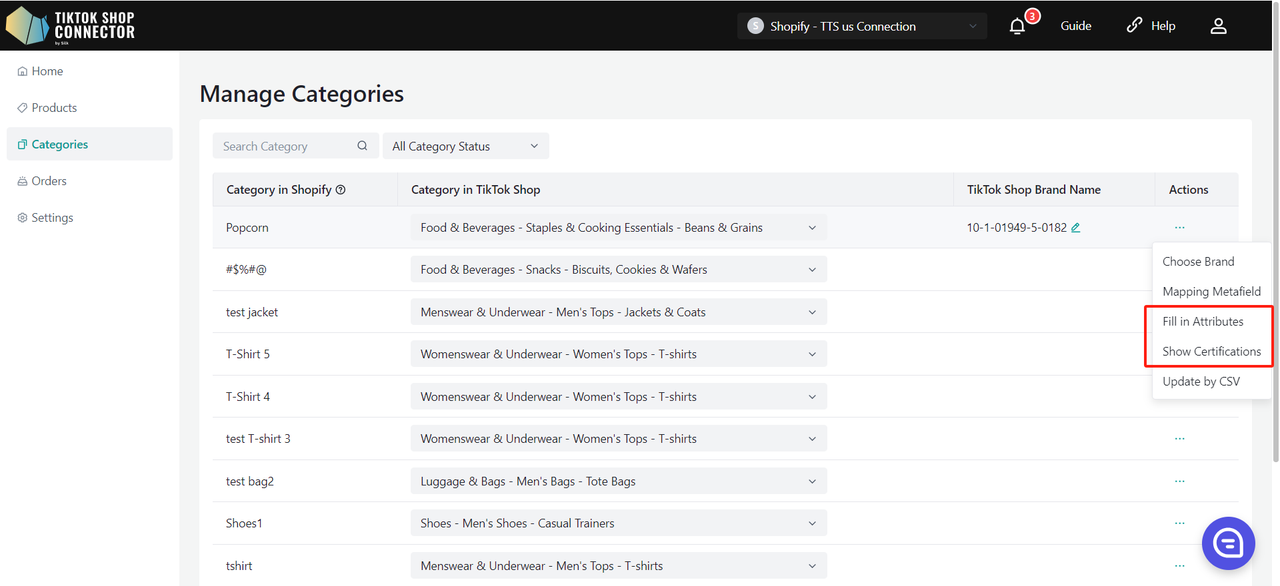
Fill in Attributes:
Click (...) under "actions" for the product -> "Fill in attributes"

Fill in all fields with the red asterisk* -> re-push the product
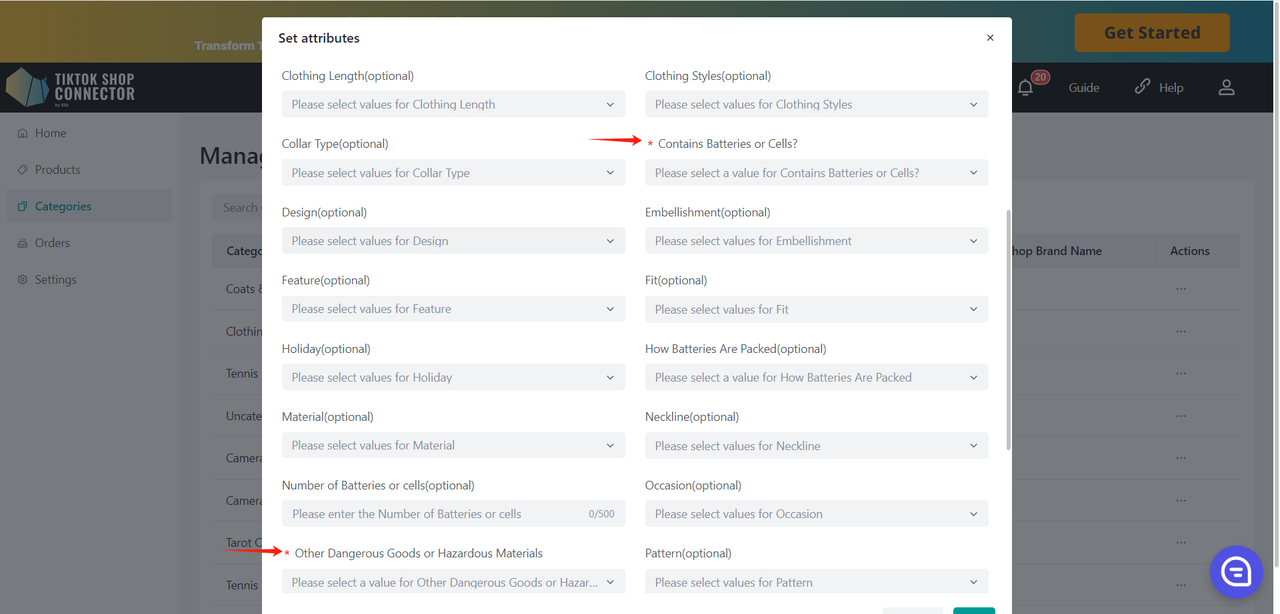
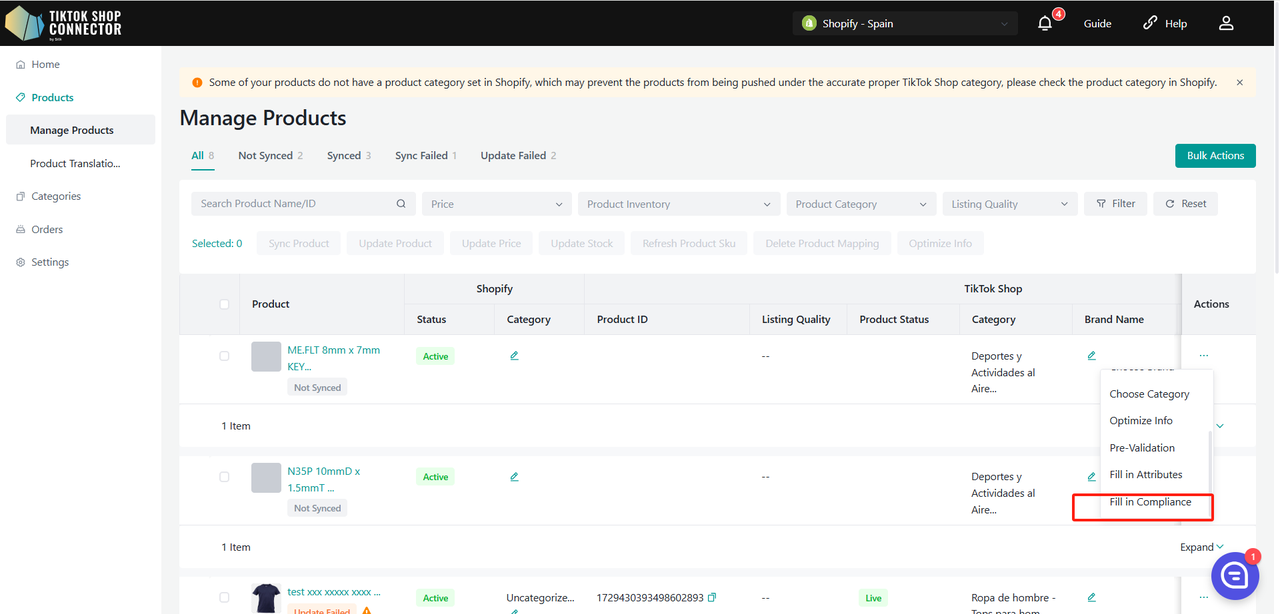
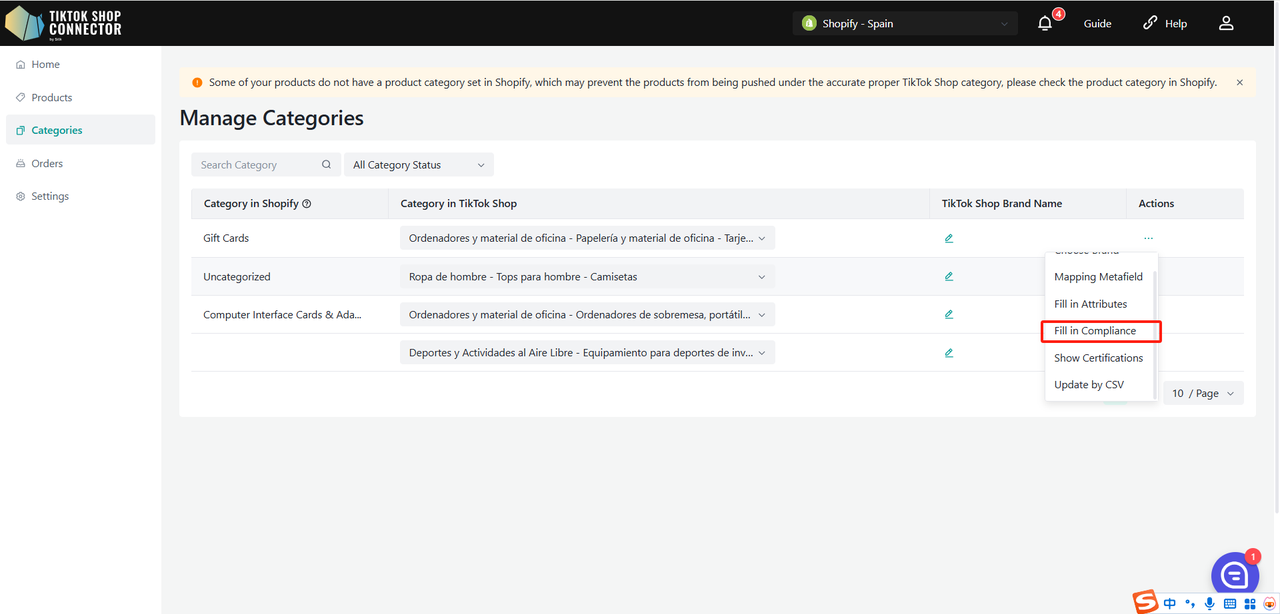
Fill in Compliances:
Click (...) under "actions" for the product -> "Fill in attributes"
Fill in the following fields:
- Contains Batteries or Cells?
- Other Dangerous Goods or Hazardous Materials
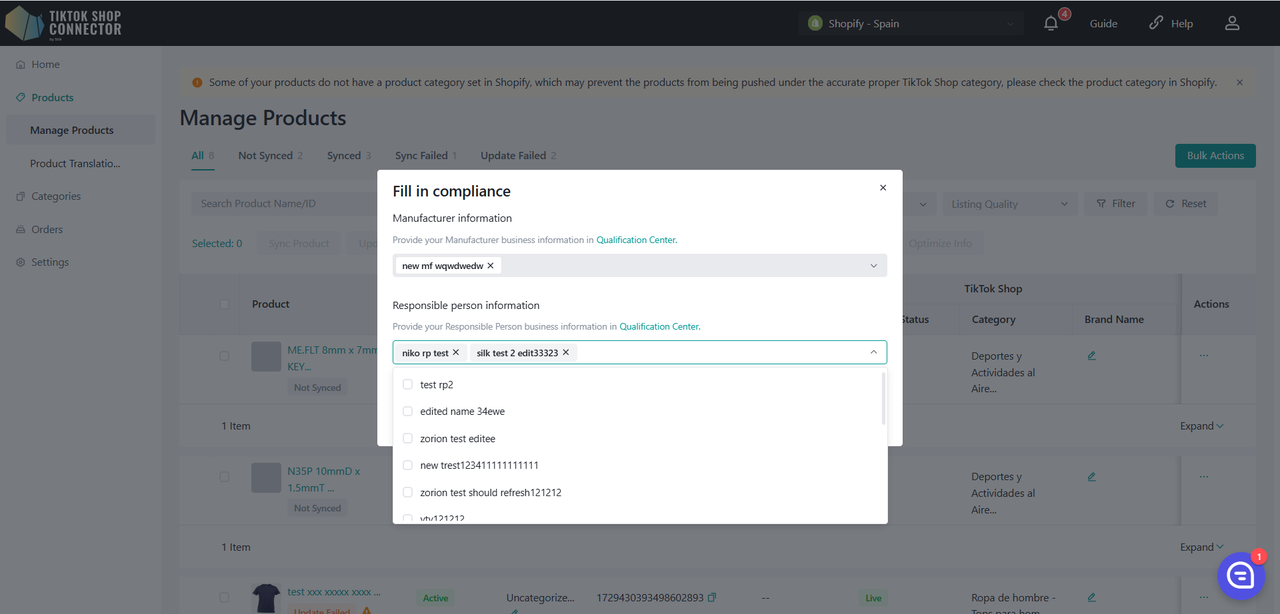
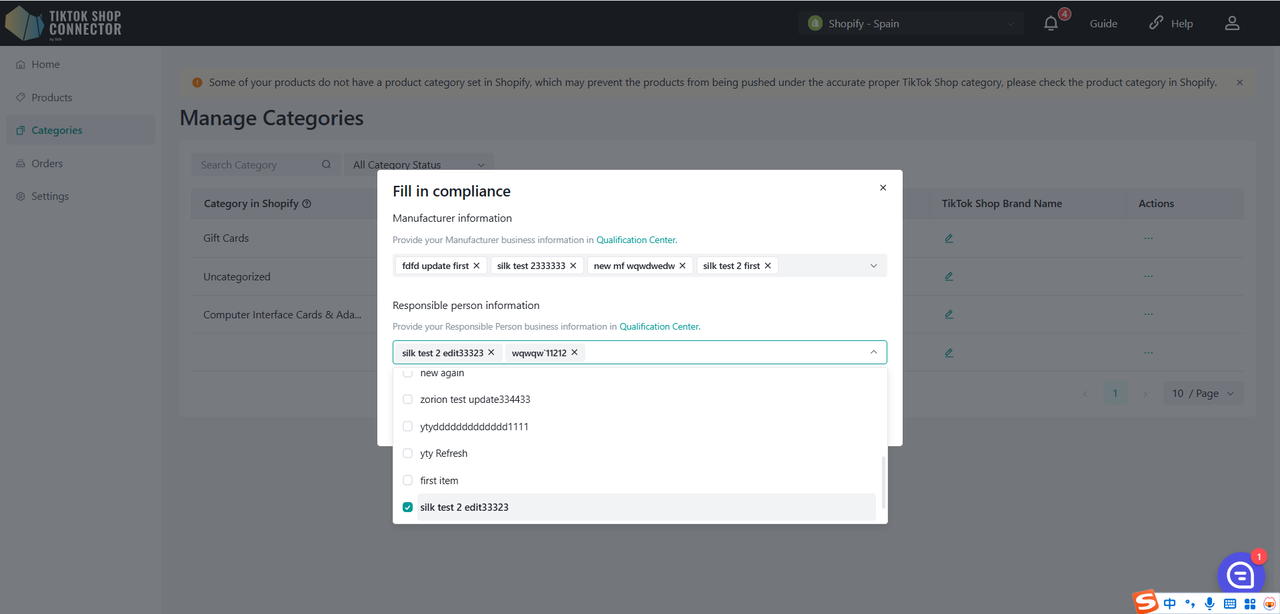
Click (...) under "actions" for the product -> "Fill in compliance" Adding, Modifying, or Deleting Responsible Person/Manufacturer for a single product:
Add/Modify Responsible Person/Manufacturer:
- Add: Select the currently added Responsible Person/Manufacturer from the dropdown menu.
- Modify: Select the Responsible Person/Manufacturer from the dropdown (if already added) and edit the fields as needed.
- Delete: Select the Responsible Person/Manufacturer and click the "×" button.
Click on "Qualification Center" to navigate to the corresponding tab on the "setting->Qualification Center" page.
The configuration priority follows the same rule as attributes, where the product level has higher priority than the category level, and the category level has higher priority than the store level.
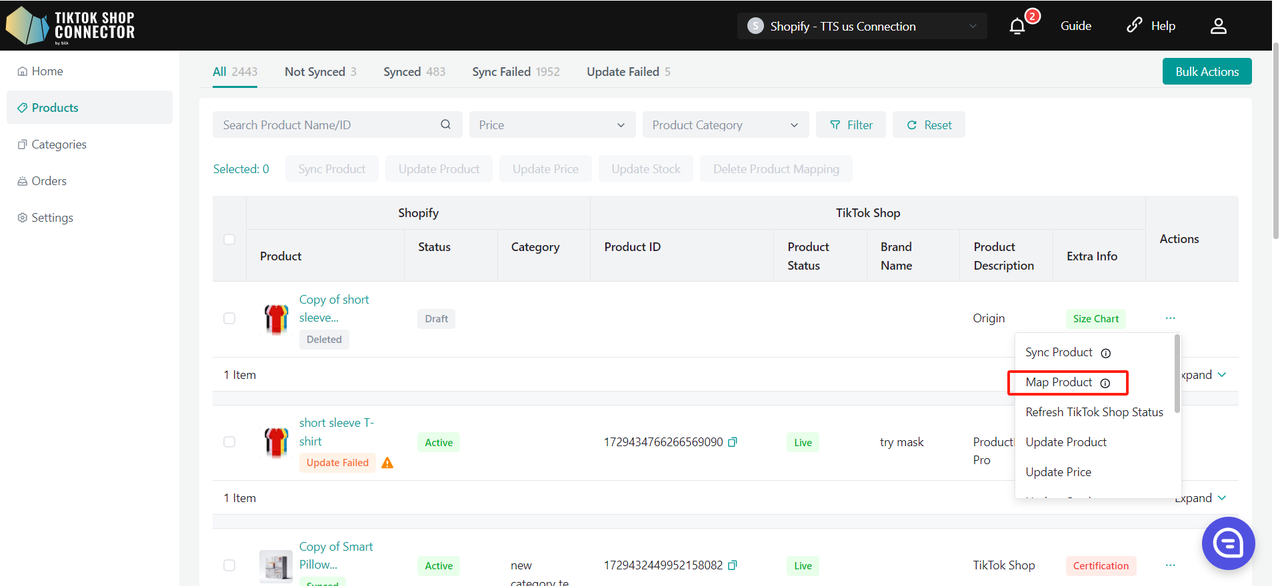
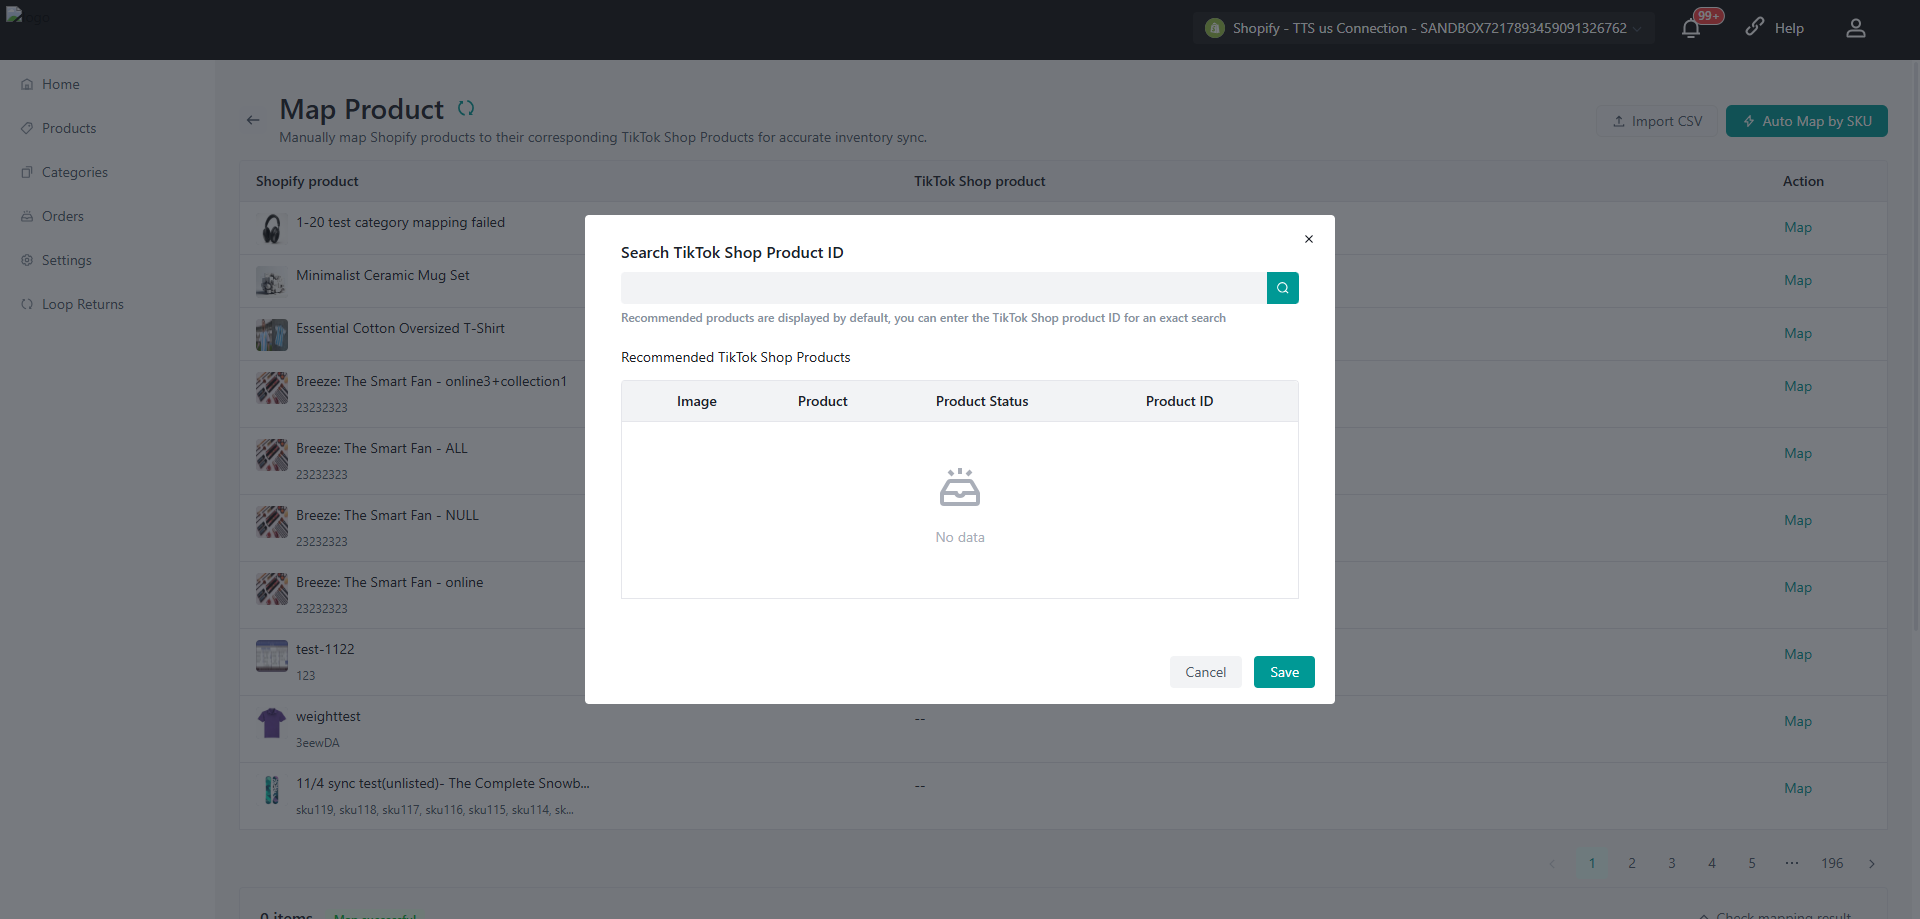
Map Products:
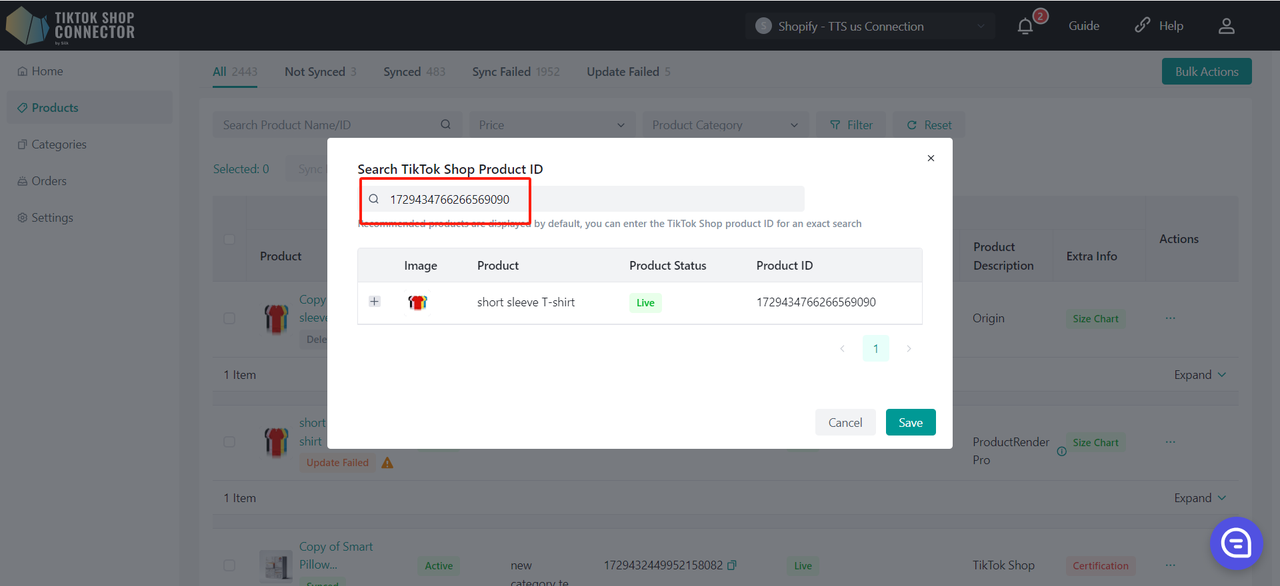
If you manually added a product in TikTok Shop, map your existing TikTok Shop product with your Shopify product via the Connector. This ensures that products on your Shopify and TikTok Shop match for orders to sync through.
Click on the (...) under "Actions" next to the product that is in TikTok Shop -> "Map Product"
You can then copy & paste your TikTok Shop Product ID number into the search bar to find the product.
Map the SKU in TikTok Shop to a SKU in Shopify -> click "Save"
Updating Products:
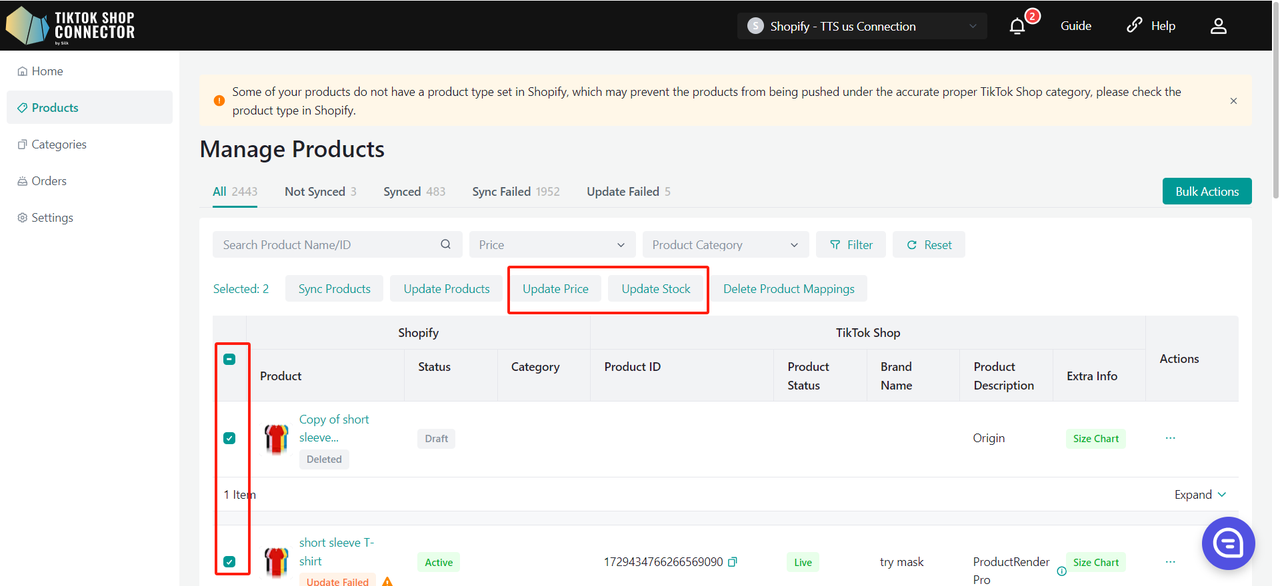
Note: Inventory/pricing updates will happen automatically. Any updates to inventory/pricing in Shopify will automatically update in TikTok Shop.
"Update Price" and "Update Stock" in the Connector if changes to the price or inventory in Shopify are not showing in TikTok Shop.
Check off the the products you would like to update the price or stock for -> "actions" -> "update stock" or "update price" -> updates will be made to TikTok Shop
All other updates made to products in Shopify must be re-pulled and re-pushed.
Updates made in Silk's Connector (Uploading Certificates, Brands, Attributes, Size Charts) must also be synced to TikTok Shop.
Check off the products you would like to update -> "Update Products"
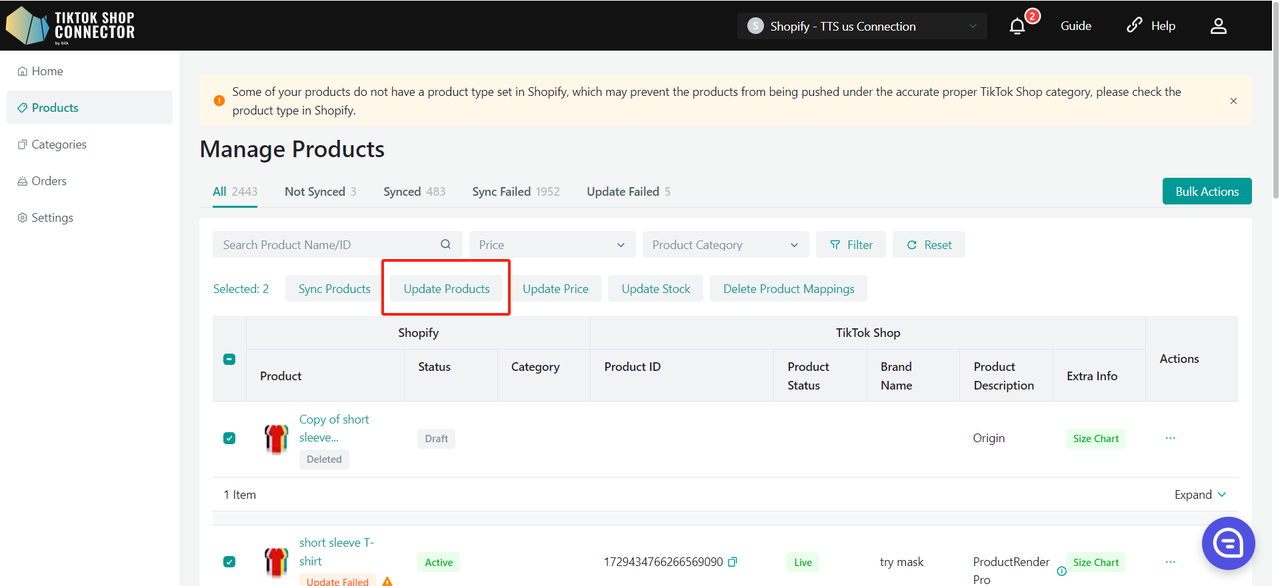
If the products say "Update Failed", click on the blue arrow next to the products’ image -> check the "sync status" for a description of why the update was unsuccessful.
You can then troubleshoot and update anything from Shopify -> update the products in the Connector.
Product Details:
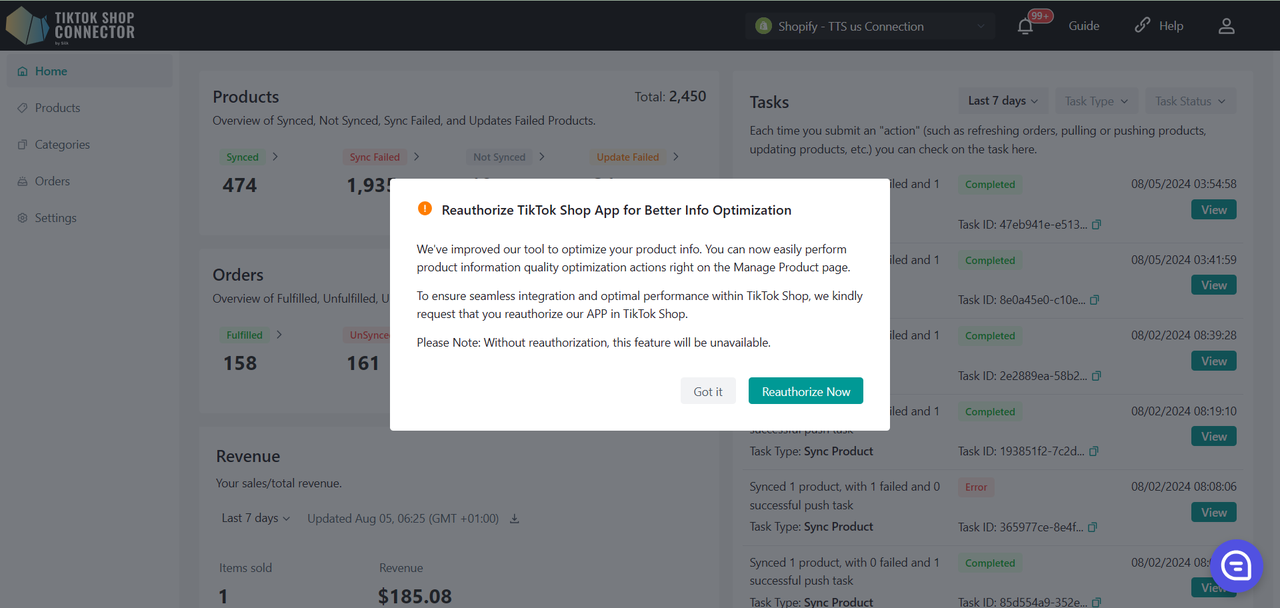
Optimize Info
Please reauthorize our TikTok Shop APP before optimizing the info.
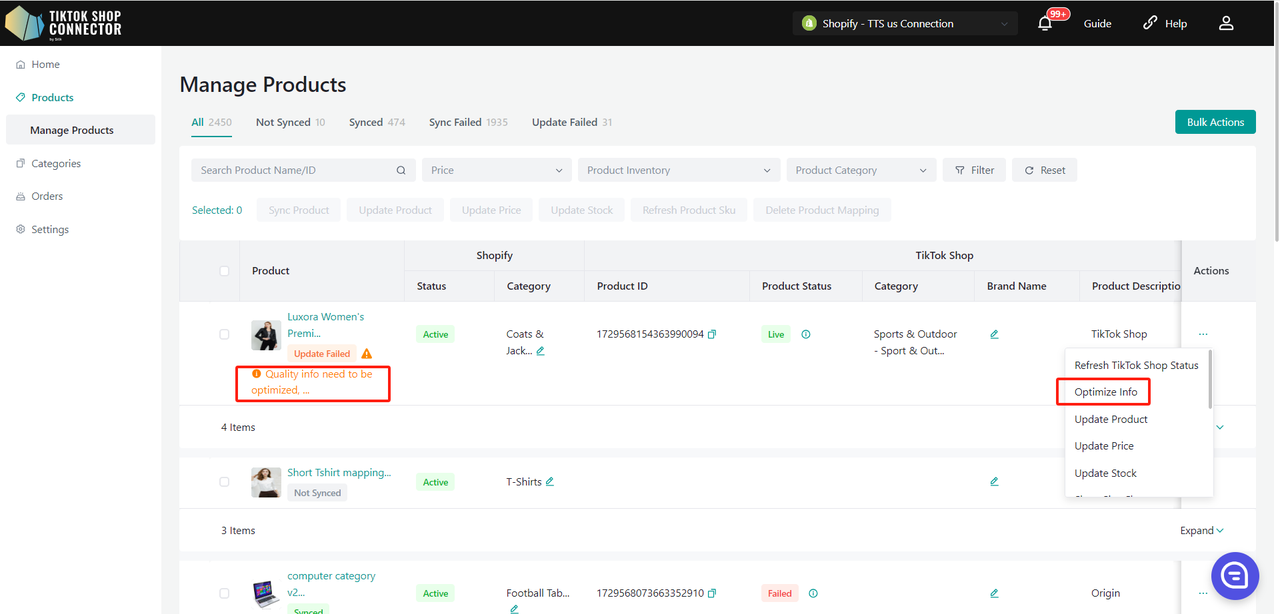
We provide an interface in the Silk Connector background to allow merchants to perform information quality improvement
- On the Product List page, locate products marked with an "Optimize Info" prompt. Click the "Optimize Info" button next to the product.
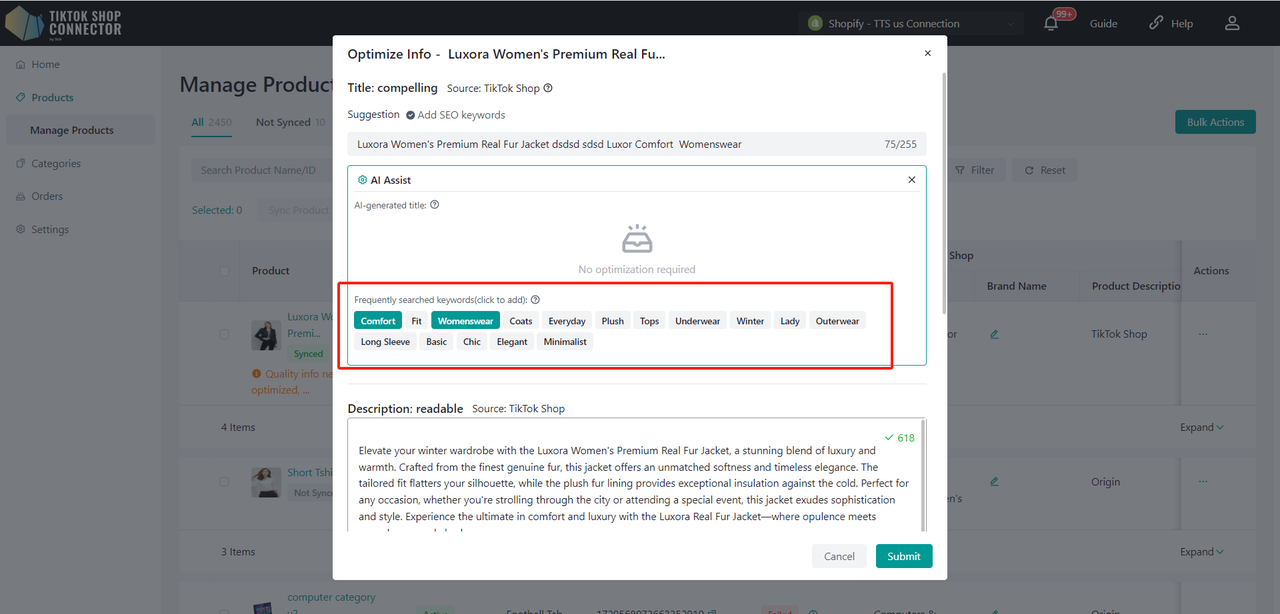
- In the pop-up window, review and modify the product information, including the title, description, images. Ensure the information is accurate, complete, and engaging.
For US/UK only
Optimization consists of three parts: Title, Description, Image
- Apply AI-generated Title/Description
- Click to add the generated keywords to the Title
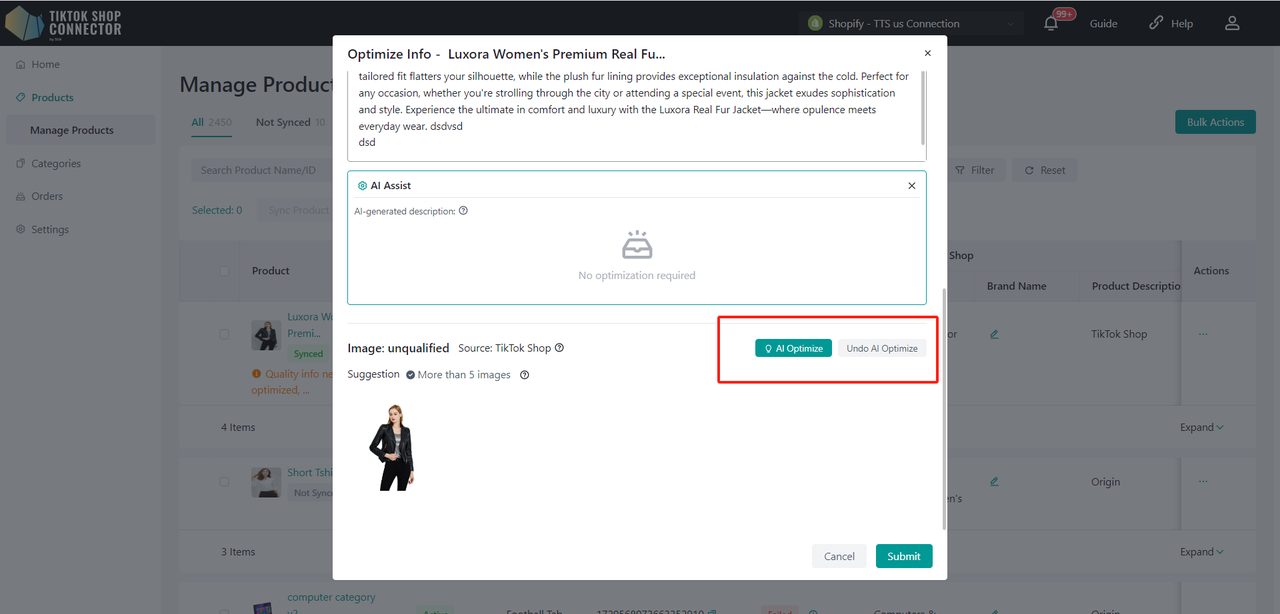
- Click "AI Optimize" to Optimize the main image, and click "Undo AI Optimize" to undo the optimization
- Note : Currently, Silk Connector supports optimization exclusively for the product's main image. For other product image suggestions, please update your product information in your Shopify store and then update the products from Silk Connector to TikTok Shop. If your sync rule for the 'Product media' field is set to 'TikTok Shop', please kindly update your product information directly in your TikTok Shop store.
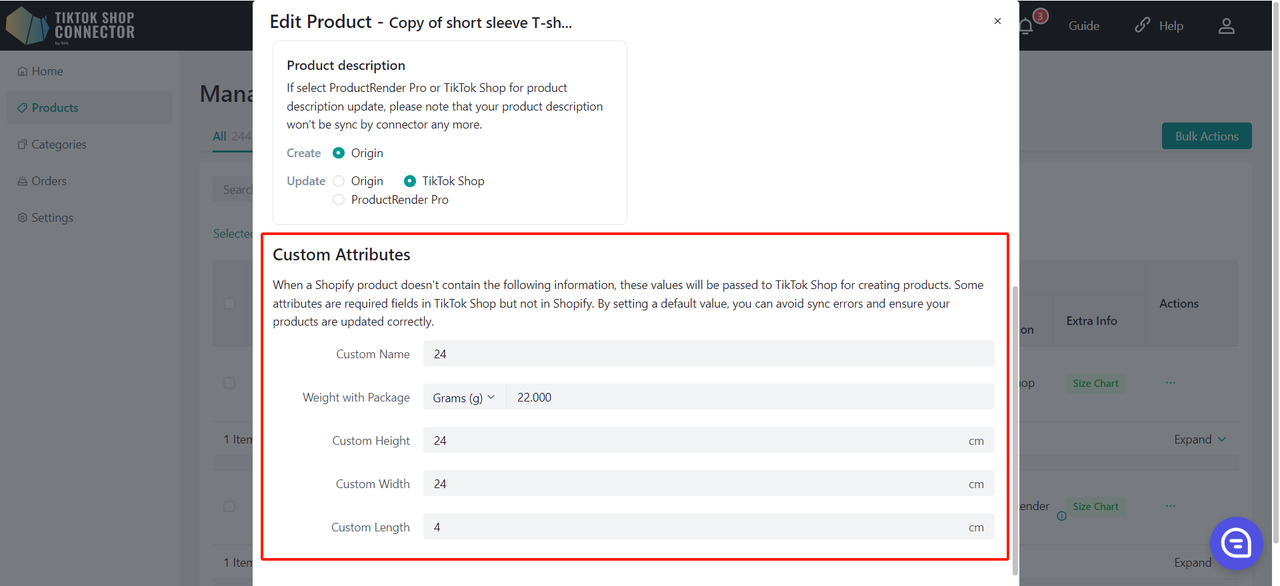
Custom Attributes
Values can be entered in both metric and imperial units.
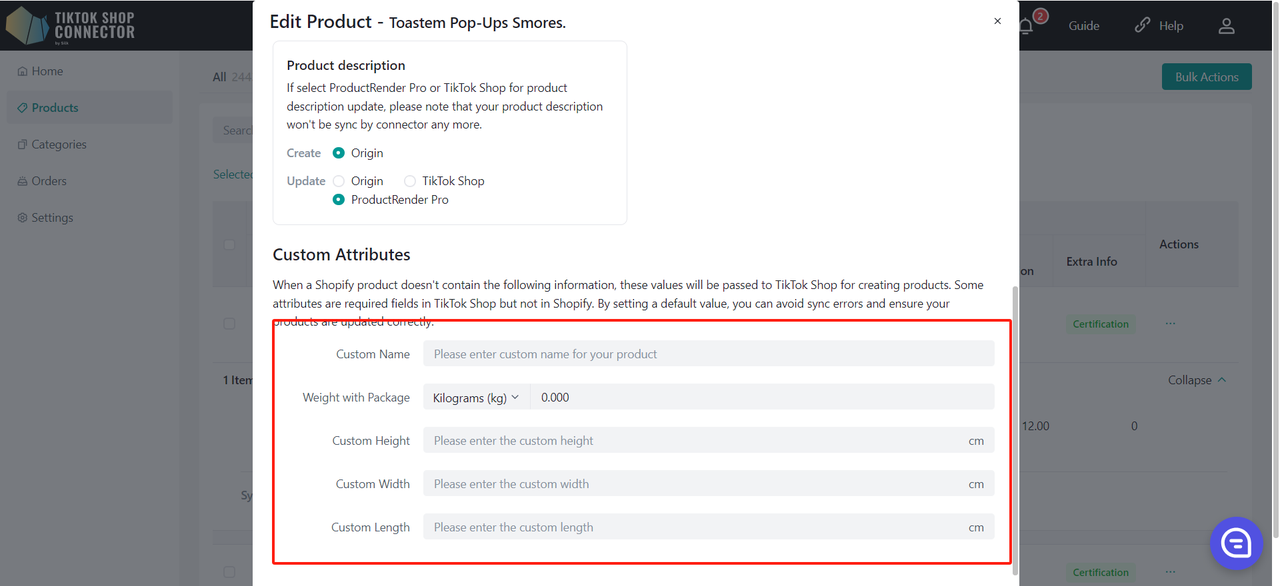
Values can be entered in both metric and imperial units.
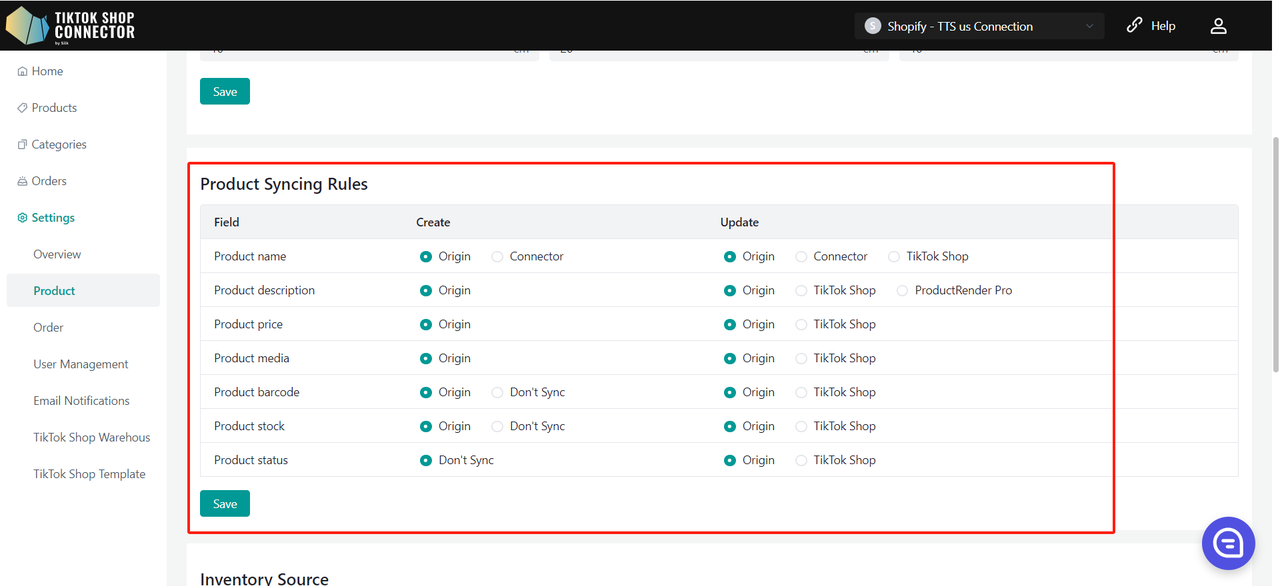
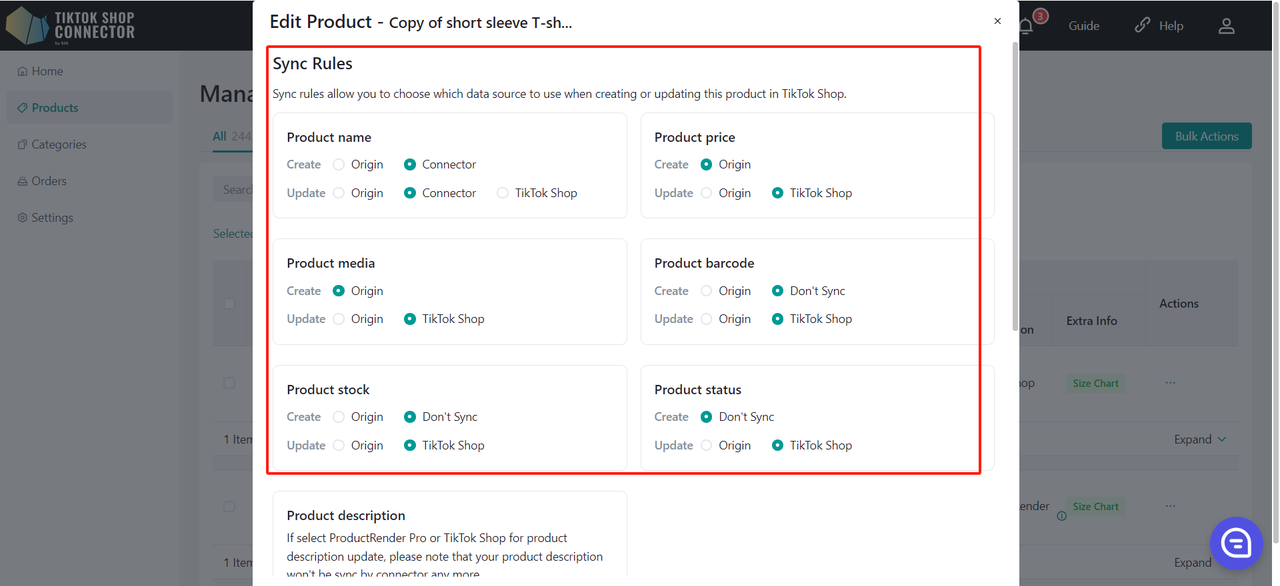
Sync Rules
Sync Rules allow you to have different product names in TikTok, Shopify, and our connector.
| Origin | Connector | TTS | |
|---|---|---|---|
| Create - This is for your initial push, your products are not in TikTok Shop yet | Your TikTok products will take the Shopify Name | Your TikTok products will take the Connector Name | x |
| Update - This is when you want to update your products with a different name | Your TikTok products will take the Shopify Name | After changing the product name in Silk, the Shopify Name and Silk name will not change, but the TikTok name will | Your TikTok product name will stay the same regardless of what name changes happen in Silk or Shopify |
Sync Rules can be set for all products in the Settings tab:
How to Map Products
Product Mapping allows you to link your Shopify products with existing TikTok Shop products to enable accurate inventory synchronization and order processing.
This feature is designed for scalability and supports three mapping methods:
- Manual Mapping
- Auto Mapping (by SKU)
- CSV Bulk Mapping
You can manage all mapping activities in a centralized Map Product page and track progress via the Tasks module.
Prerequisites
Before using Product Mapping, ensure:
- Your Shopify store is connected
- Your TikTok Shop is authorized
- TikTok Shop products have been successfully pulled into the connector
- There are unmapped Shopify SKUs available
Accessing the Map Product Page
- Go to the Products module
- Click the "Map Product" banner at the top
- You will be redirected to the Map Product page
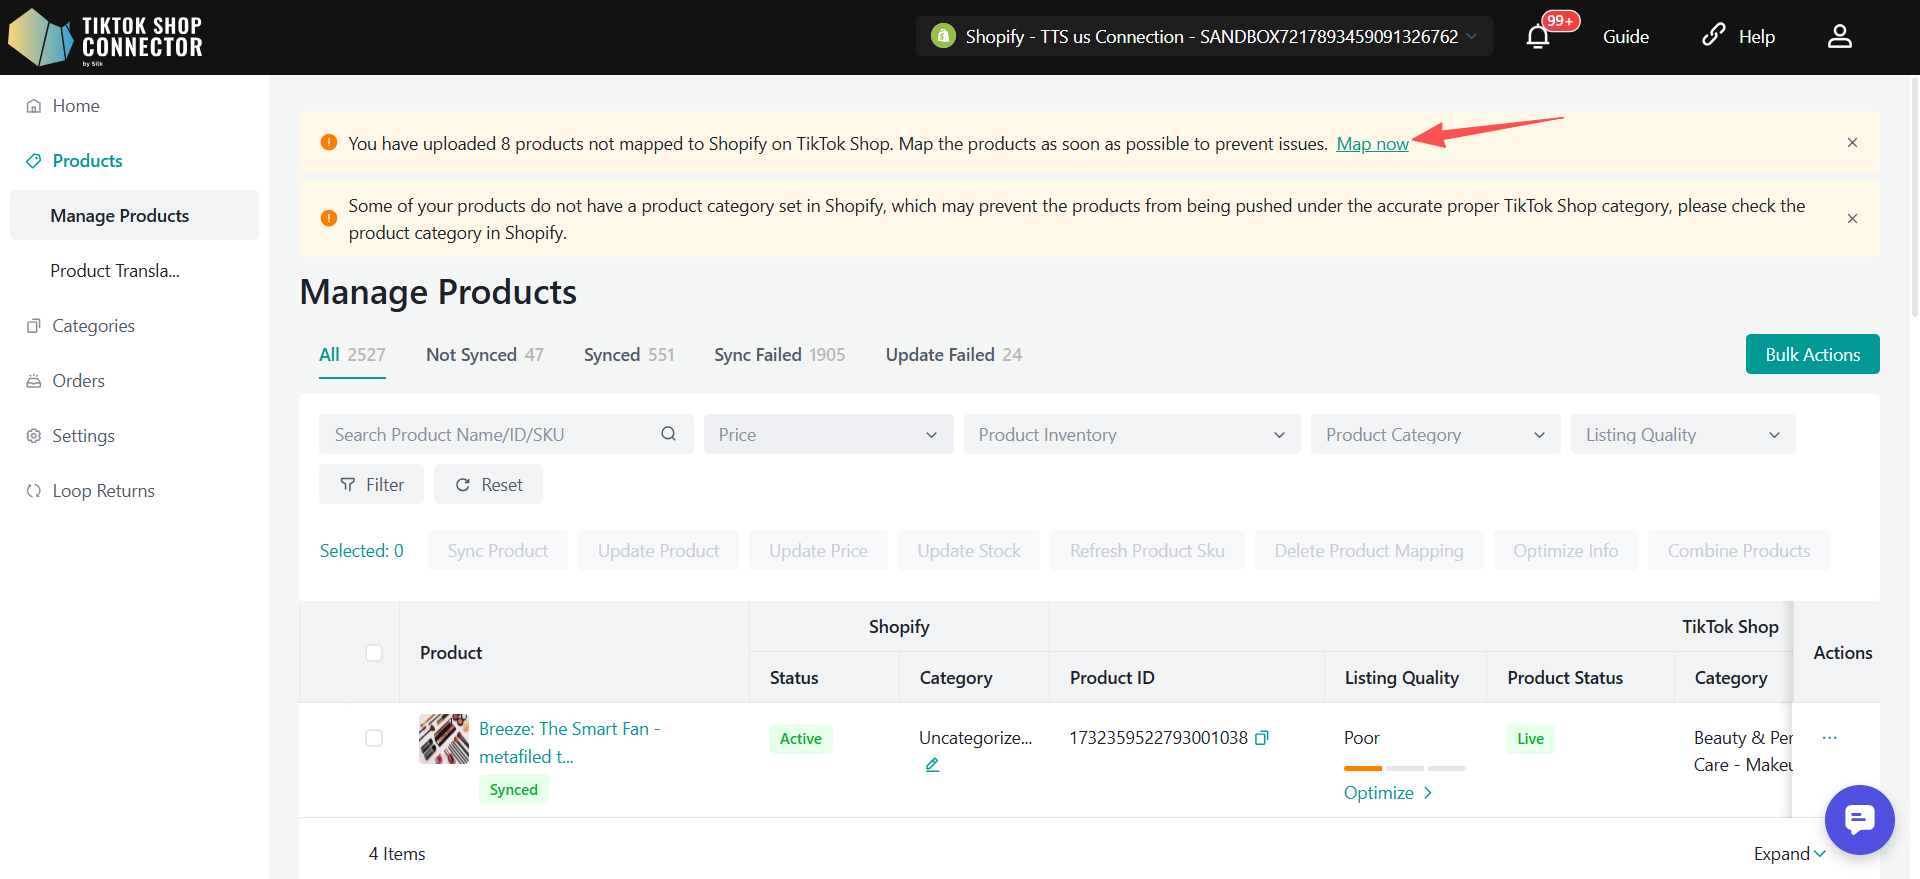
Page Structure
The Map Product page consists of two main sections:
Unmapped Products (Top Section)
- Displays all Shopify SKUs that have not yet been mapped
- Columns include:
- Shopify Product
- TikTok Shop Product (shows
--if not mapped) - Action
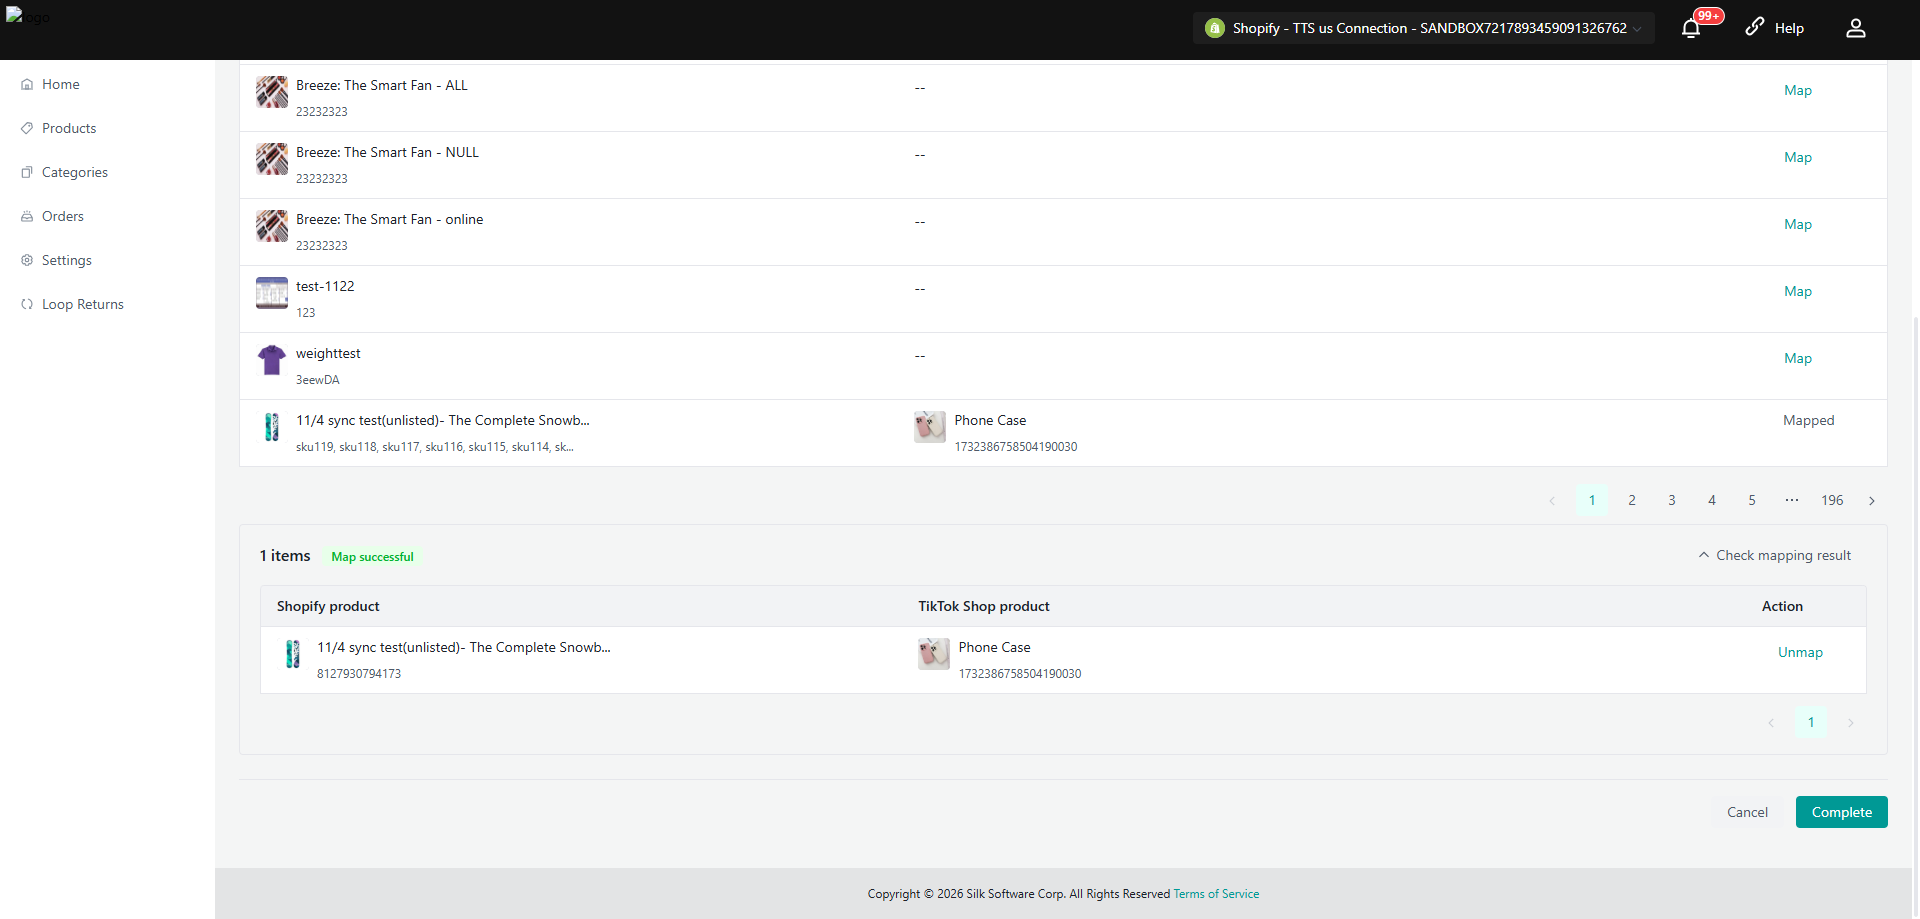
Mapped Products (Bottom Section)
- Displays all successfully mapped records
- Includes:
- Shopify product info
- TikTok Shop product info
- Action (Unmap)
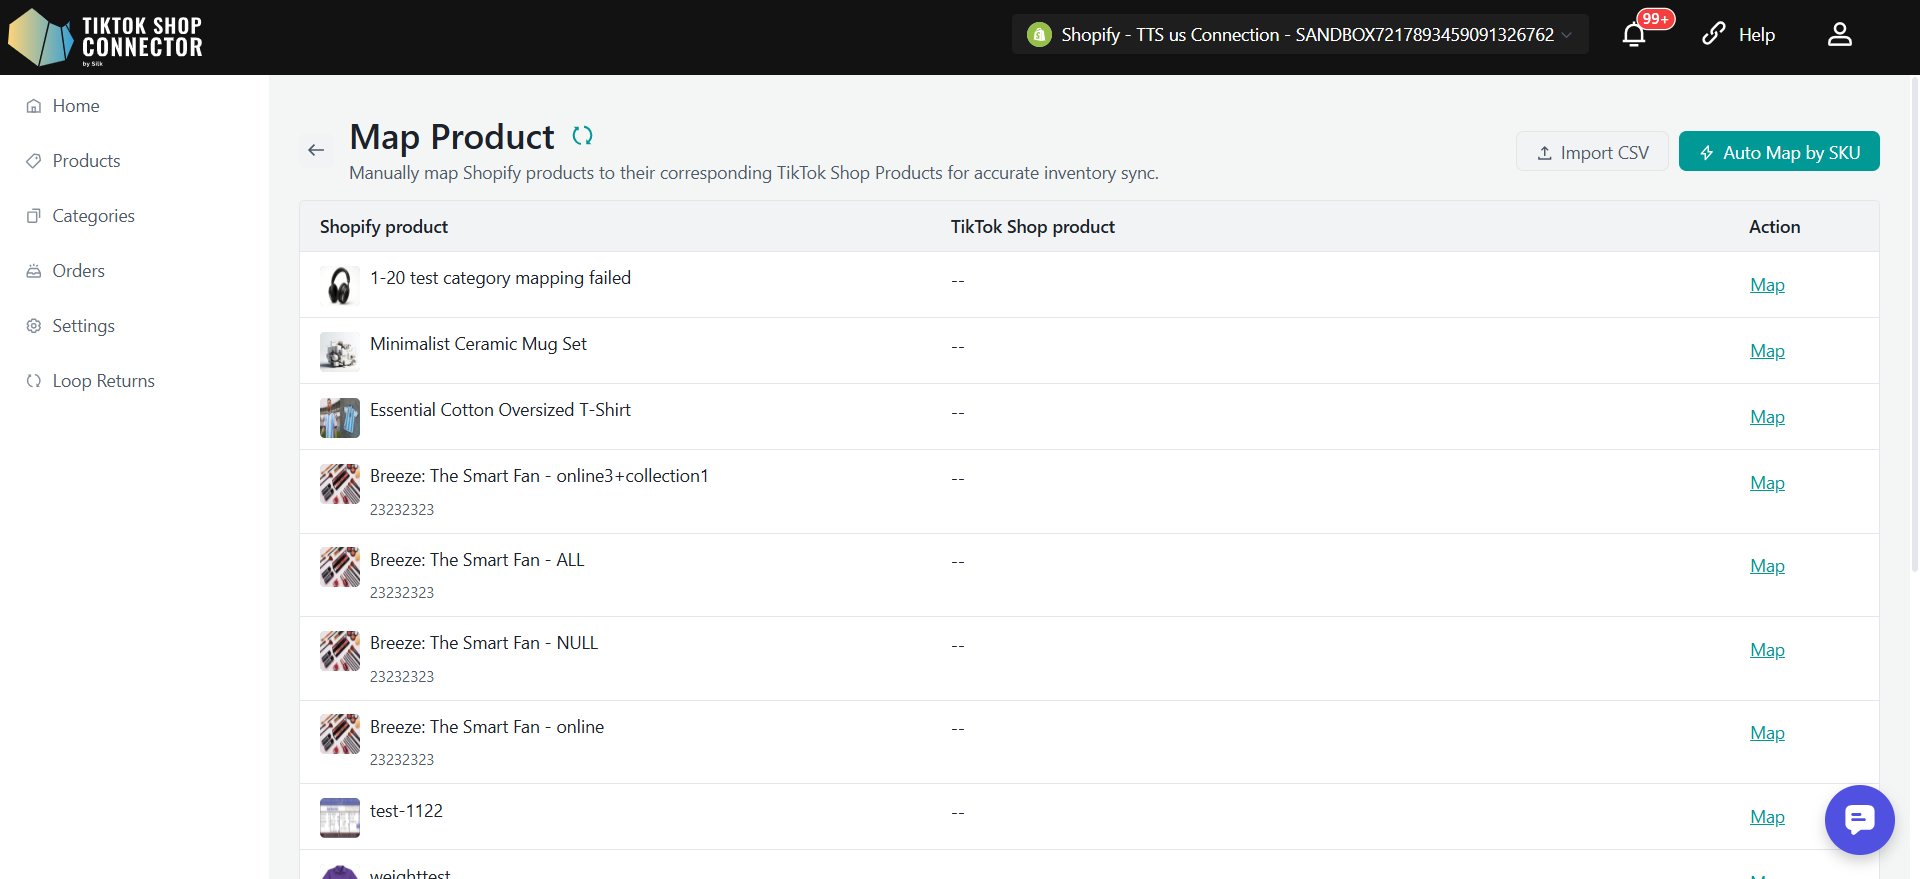
Mapping Methods
Manual Mapping
Use this method to map products one by one.
Steps:
- Click "Map" next to a Shopify product
- In the popup:
- Search for a TikTok Shop product (by ID, name, or SKU)
- Select the correct product
- Click Save

Result:
- The mapping is created immediately
- The record moves to the Mapped section
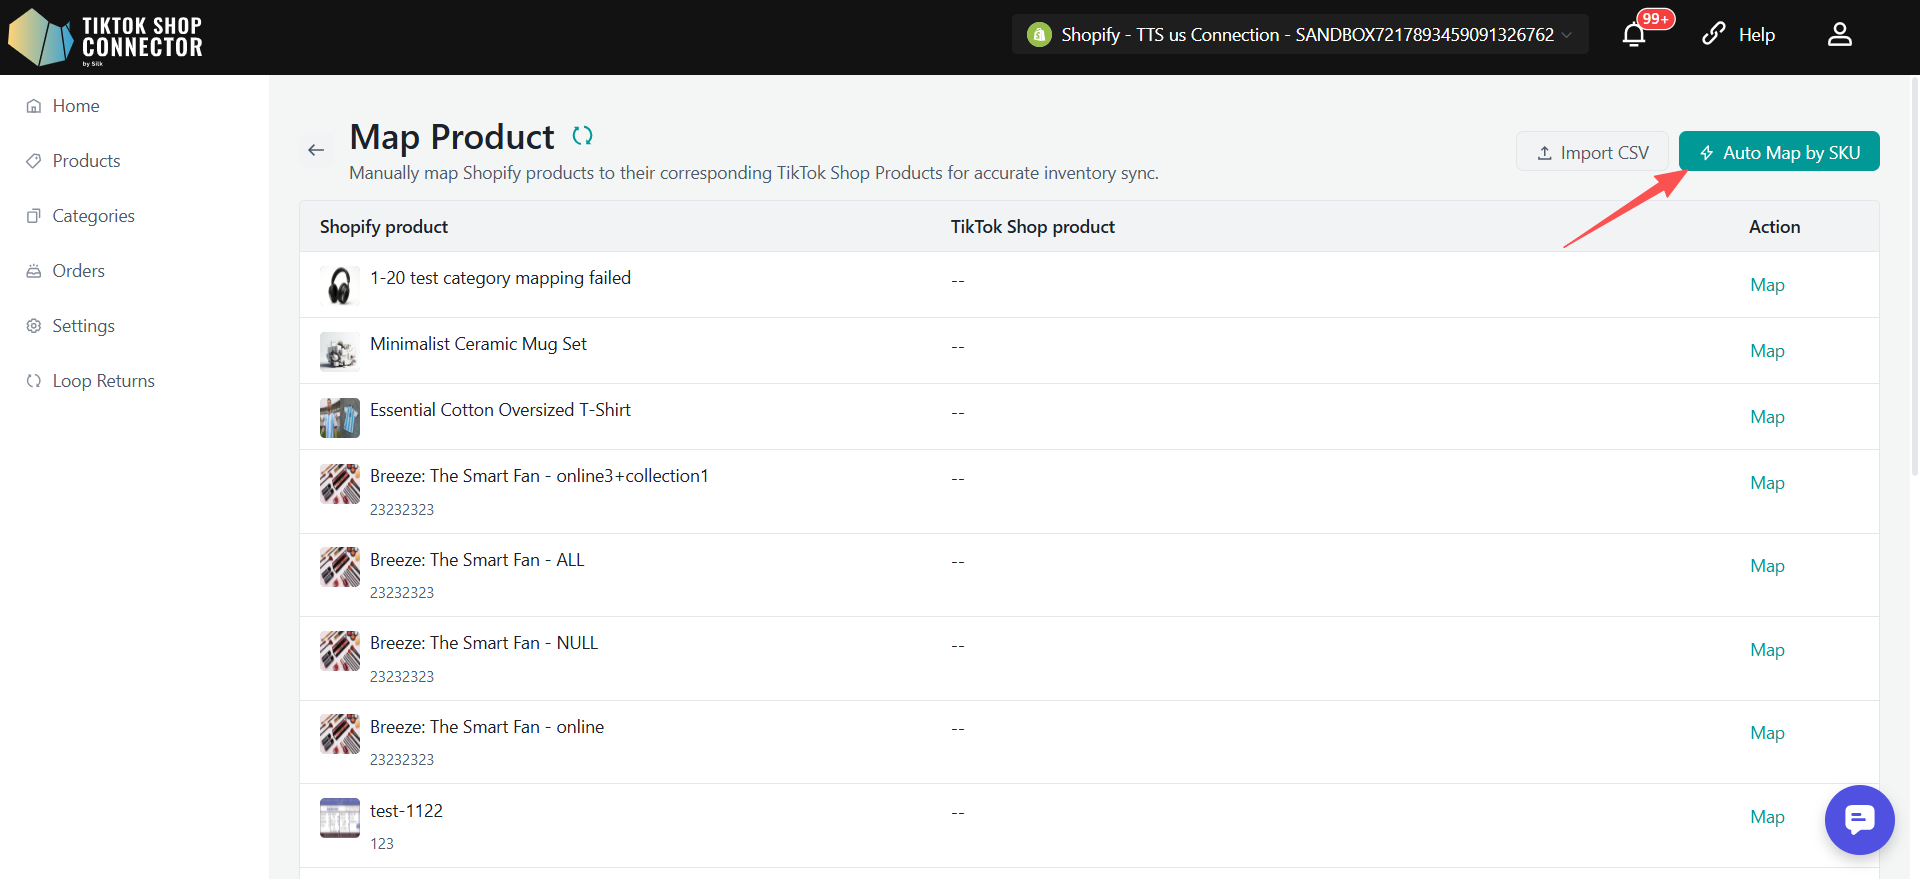
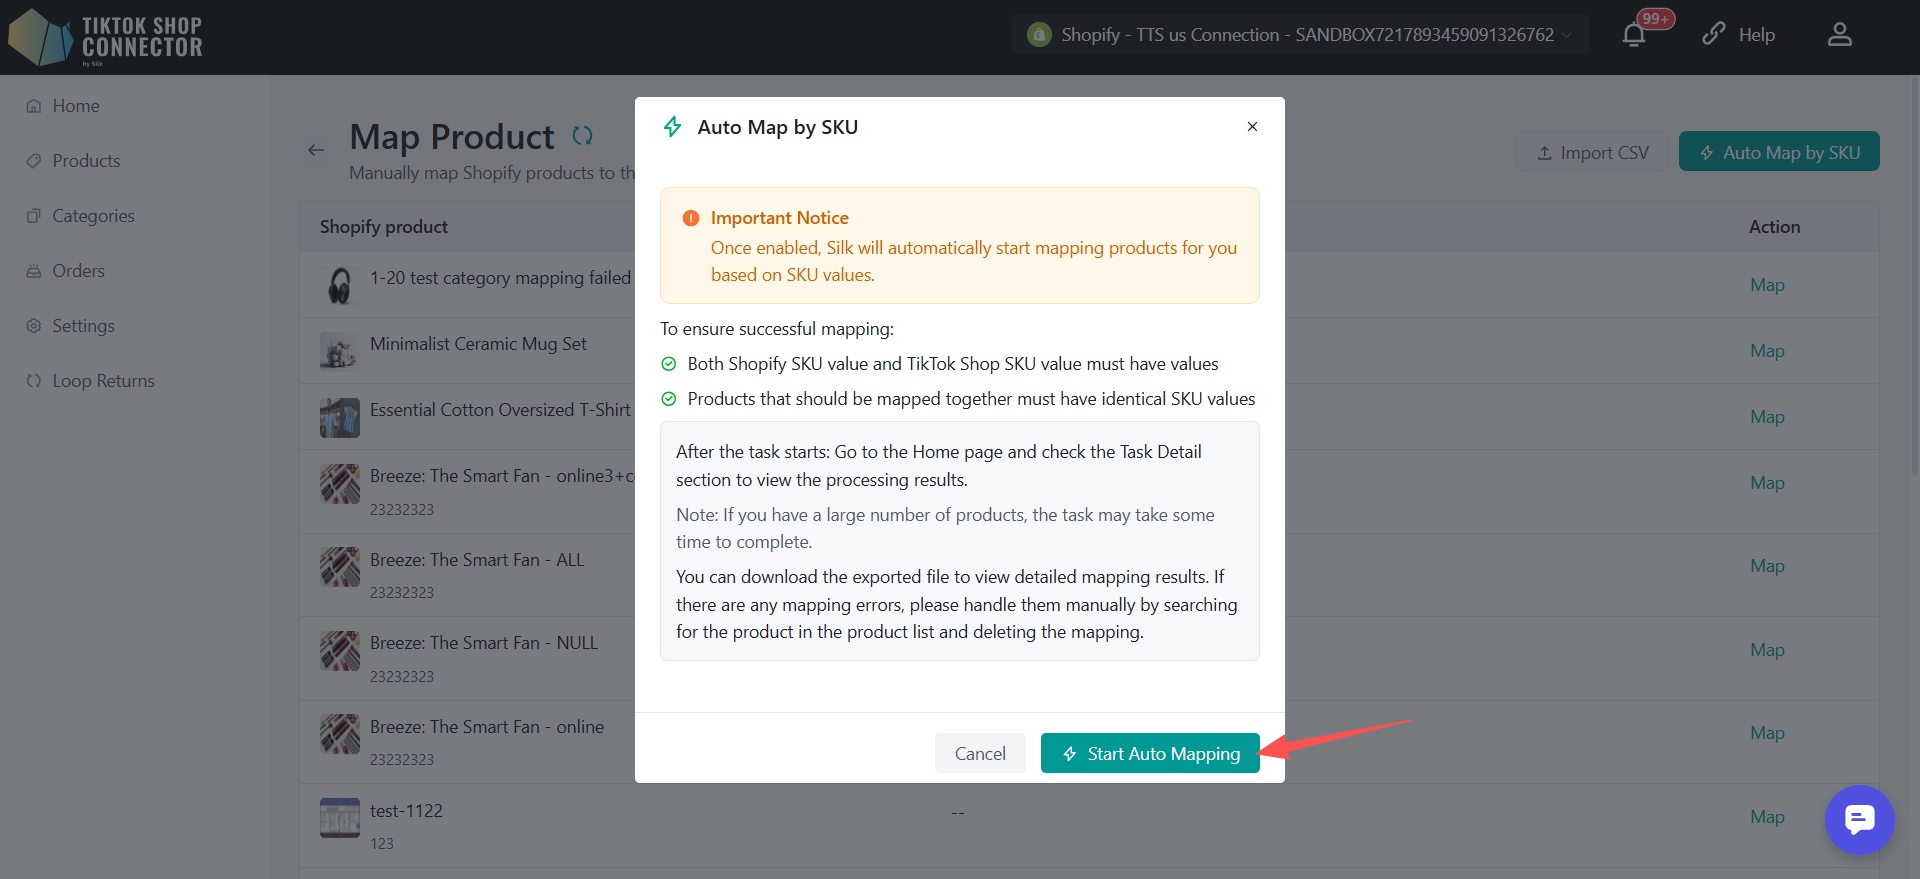
Auto Mapping (by SKU)
Automatically map products where SKU values match exactly.
How it works:
- Matches Shopify SKU value = TikTok Shop SKU value
- Only applies when:
- Both SKUs are not empty
- Values match exactly
- The match is unique
- Target SKU is not already linked
Steps:
- Click "Auto Map by SKU"
- Review the confirmation dialog
- Click "Start Auto Mapping"
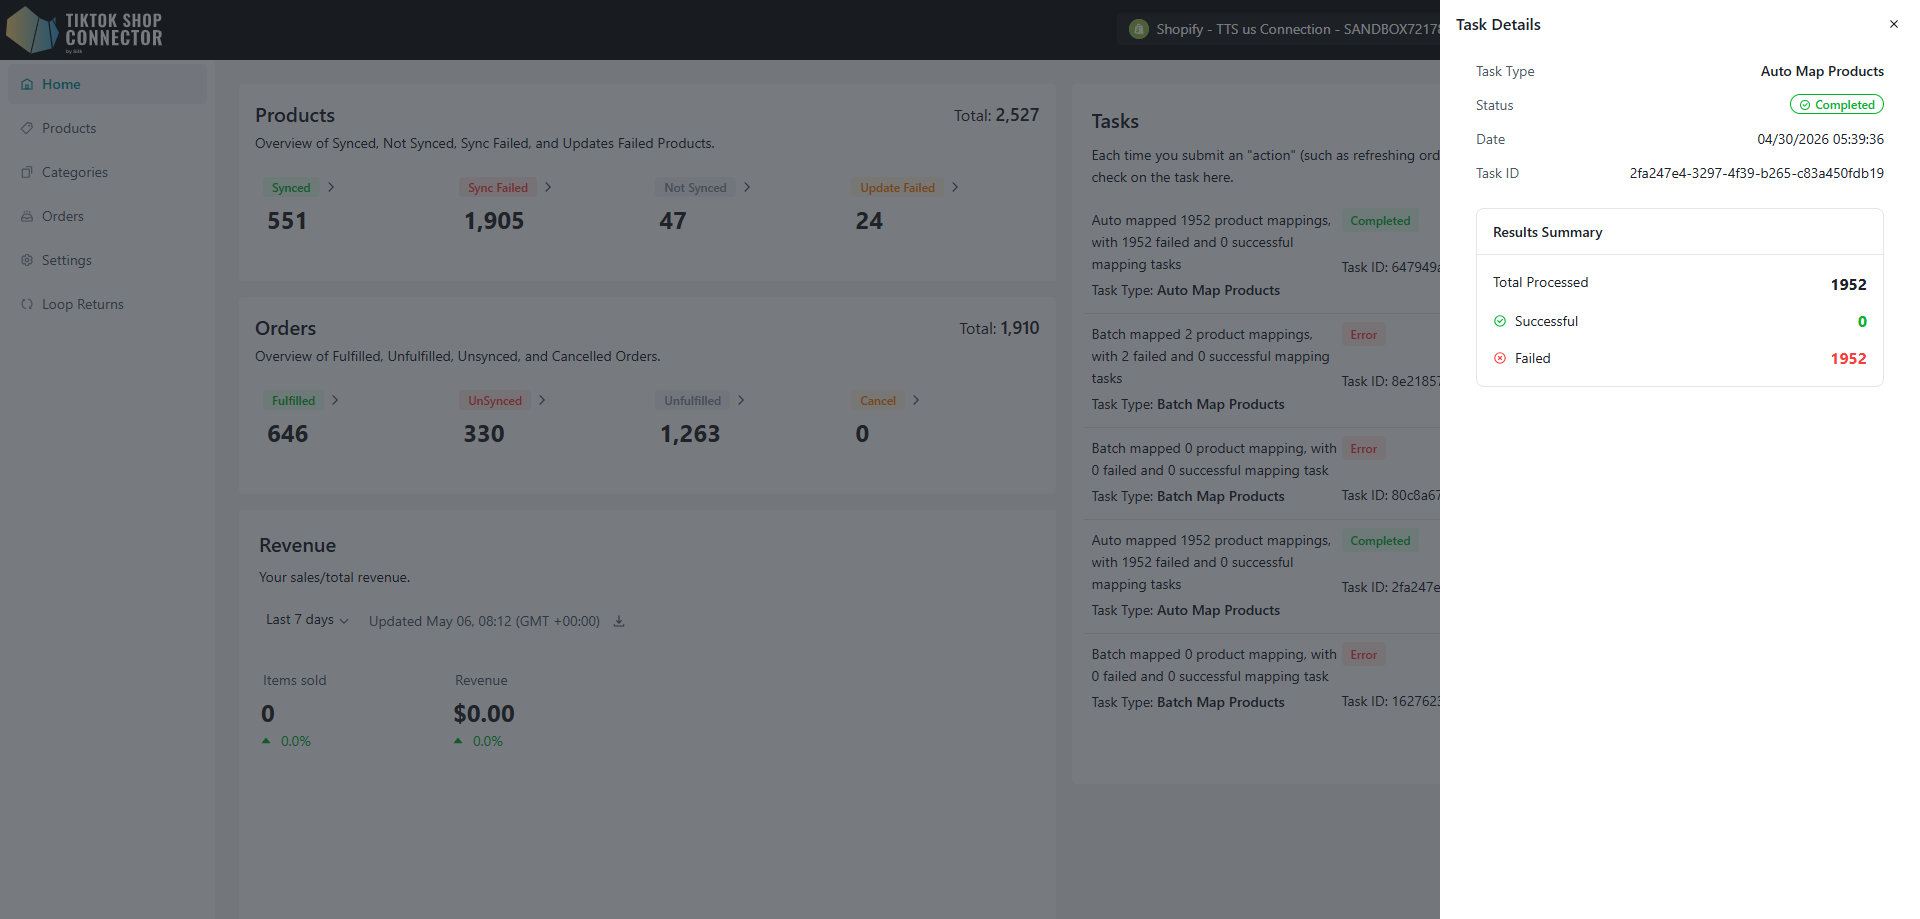
Result:
- A background task is created.
- Once auto-mapping starts, results can be viewed in the task list on the Home page.
- Successful and failed records can be reviewed in Task Details
Note:
- Auto Mapping is not fuzzy matching. It requires exact SKU matches.
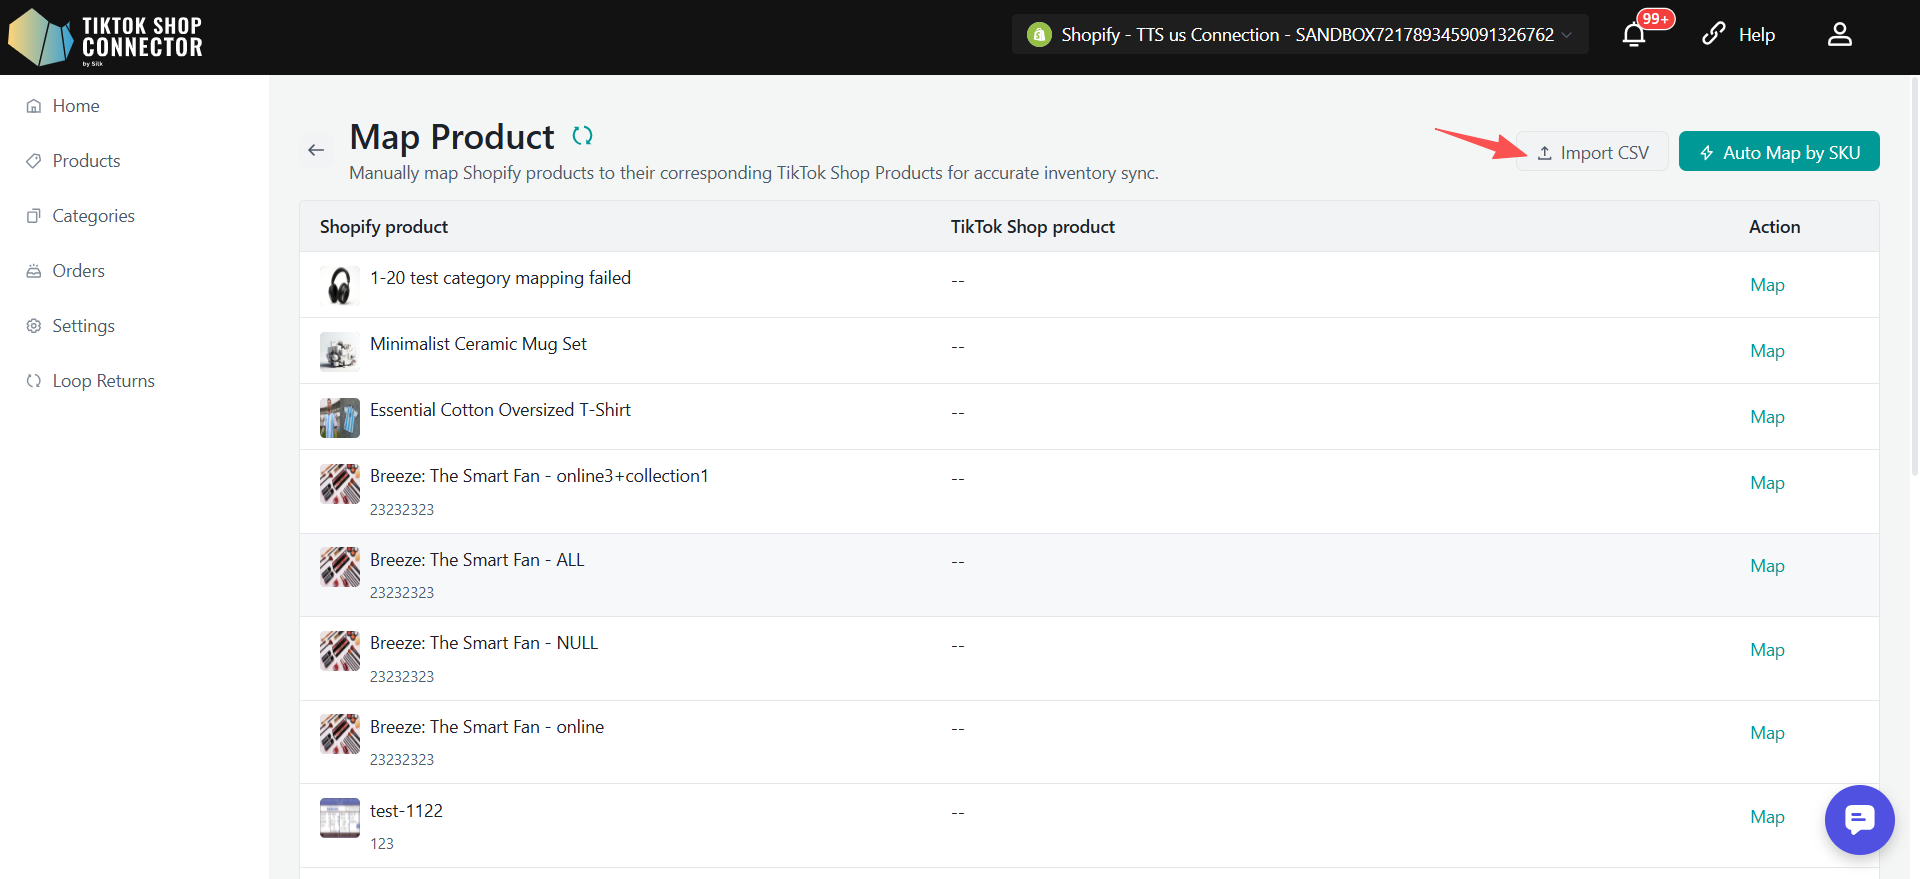
CSV Bulk Mapping
Use this method for large-scale mapping.
Steps:
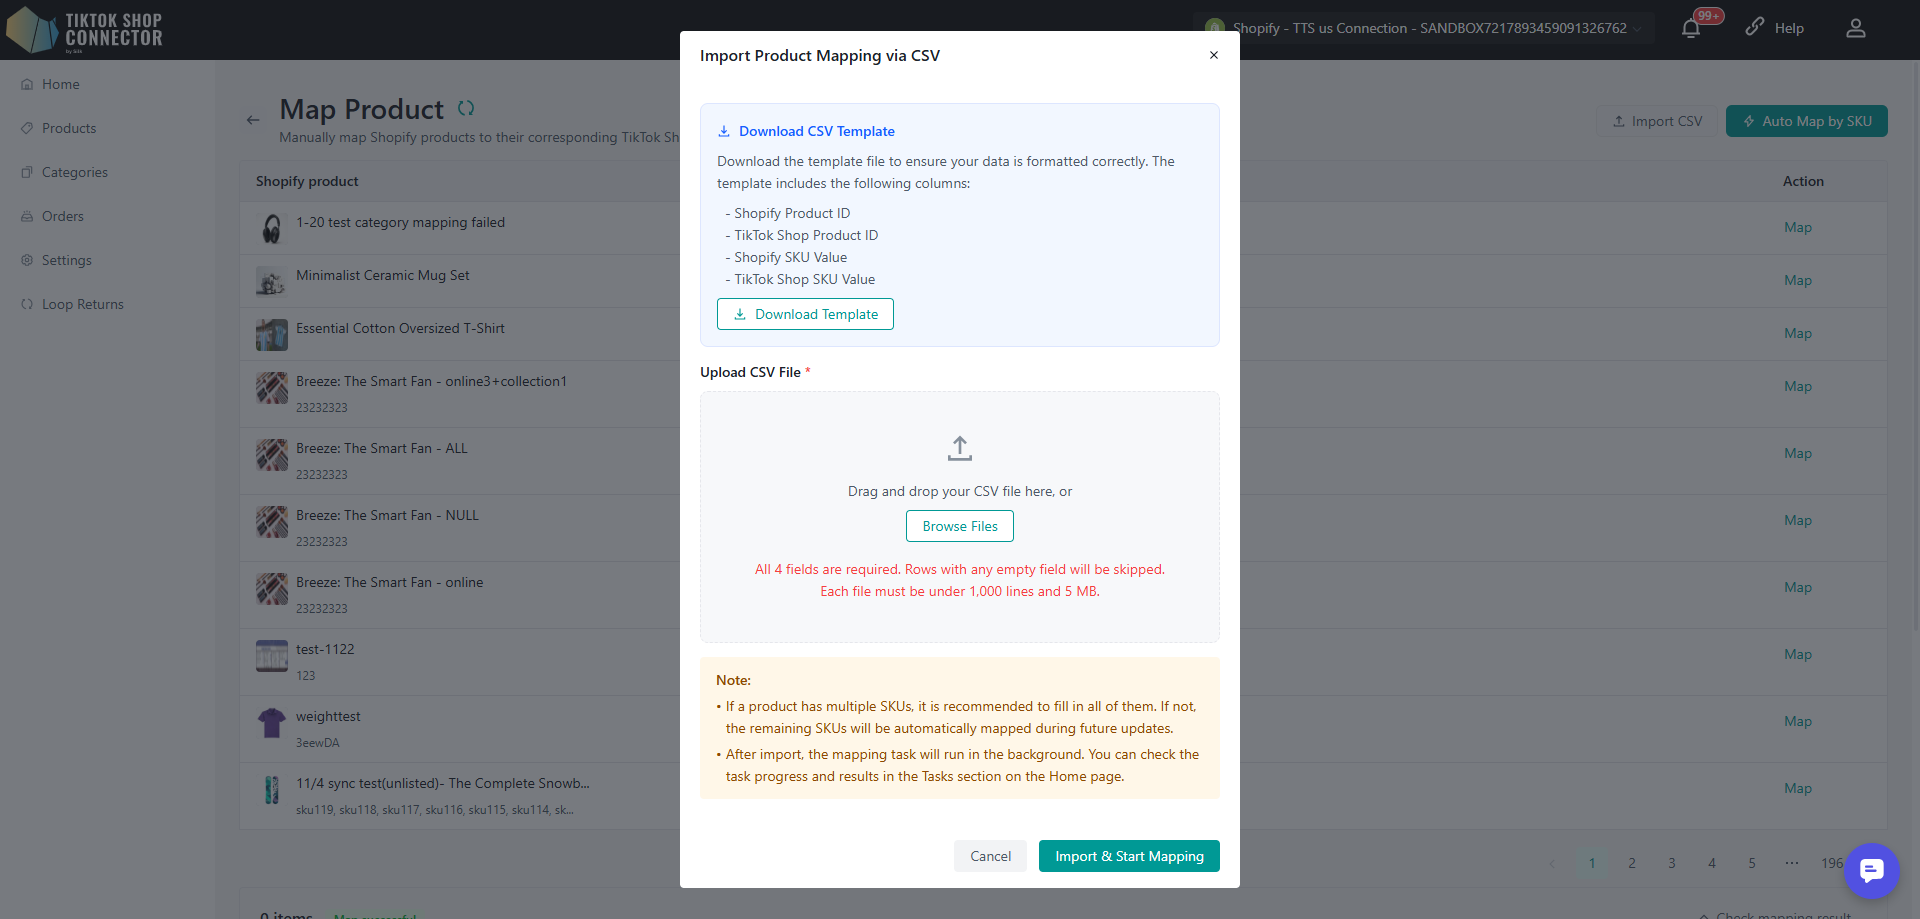
- Click "Import CSV"
- Download and fill in the template with:
- Shopify Product ID
- TikTok Shop Product ID
- Shopify SKU
- TikTok Shop SKU
- Upload the CSV file
- Click "Import & Start Mapping"
Validation includes:
- File format must be CSV
- Required fields must be complete
- IDs and SKUs must be valid
- No duplicate or conflicting mappings
- All 4 fields in the CSV are required. Rows with any empty field will be skipped
- Each file must be under 1,000 lines and 5 MB
Result:
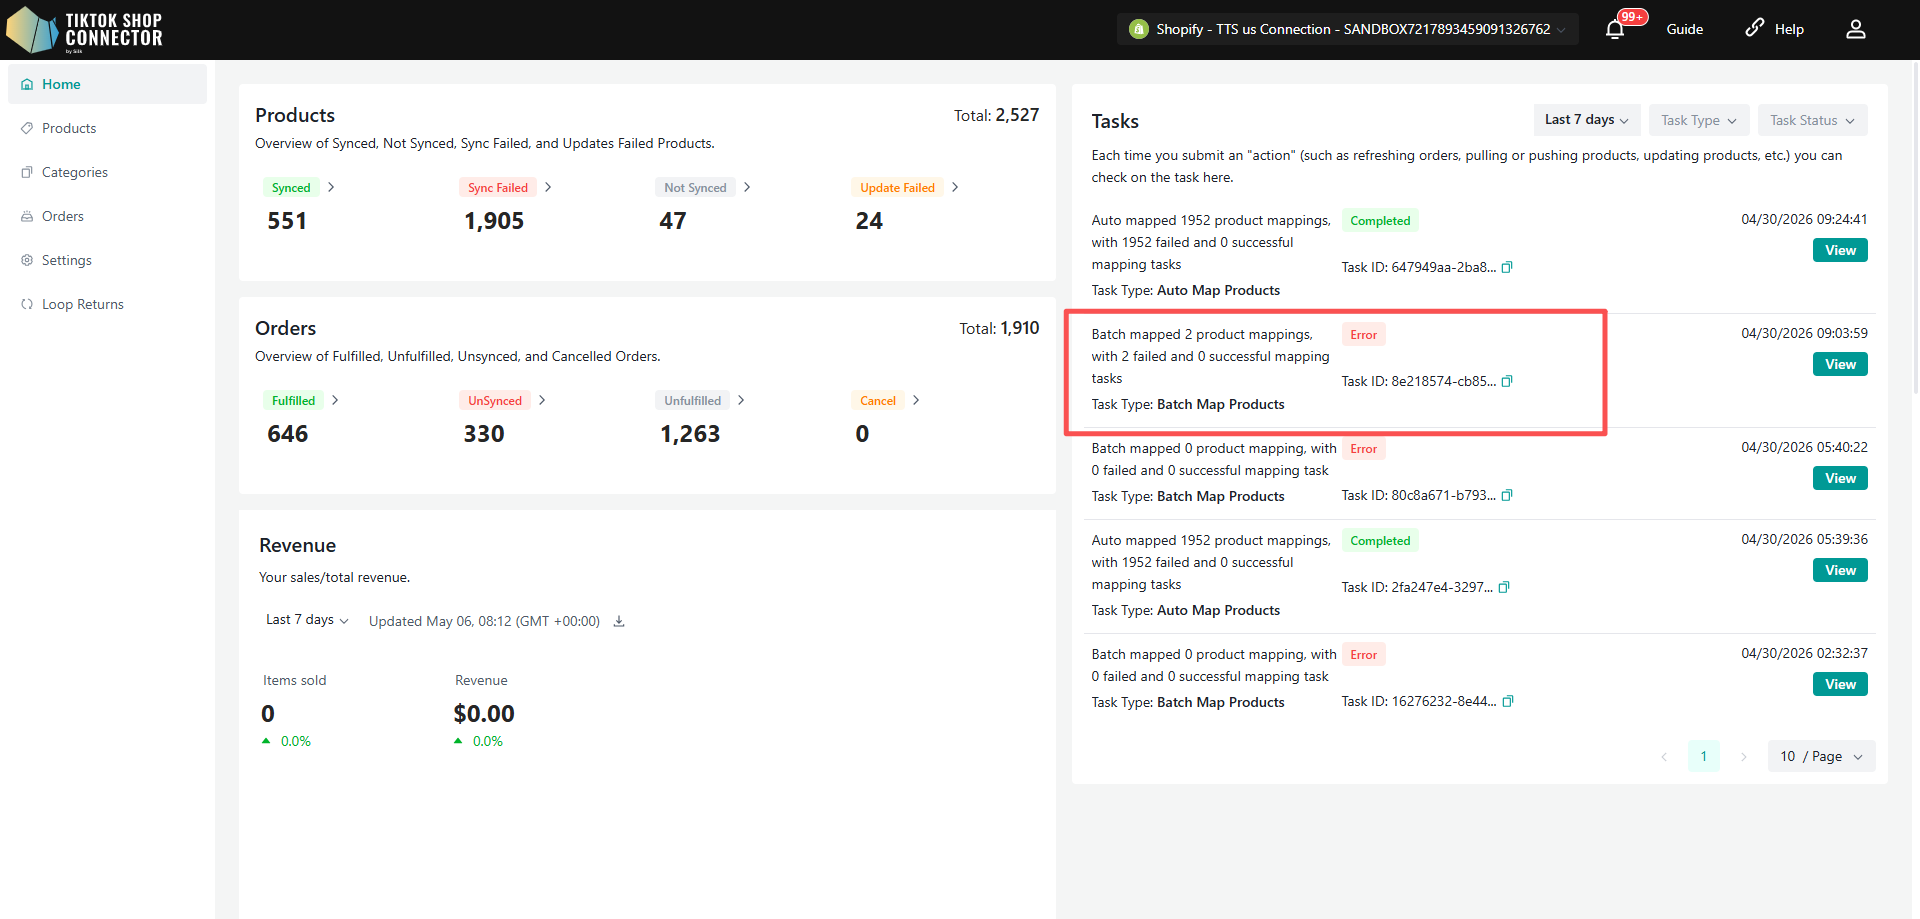
- A background task is created
- Once mapping starts, results can be viewed in the task list on the Home page.
- Successful and failed records can be reviewed in Task Details
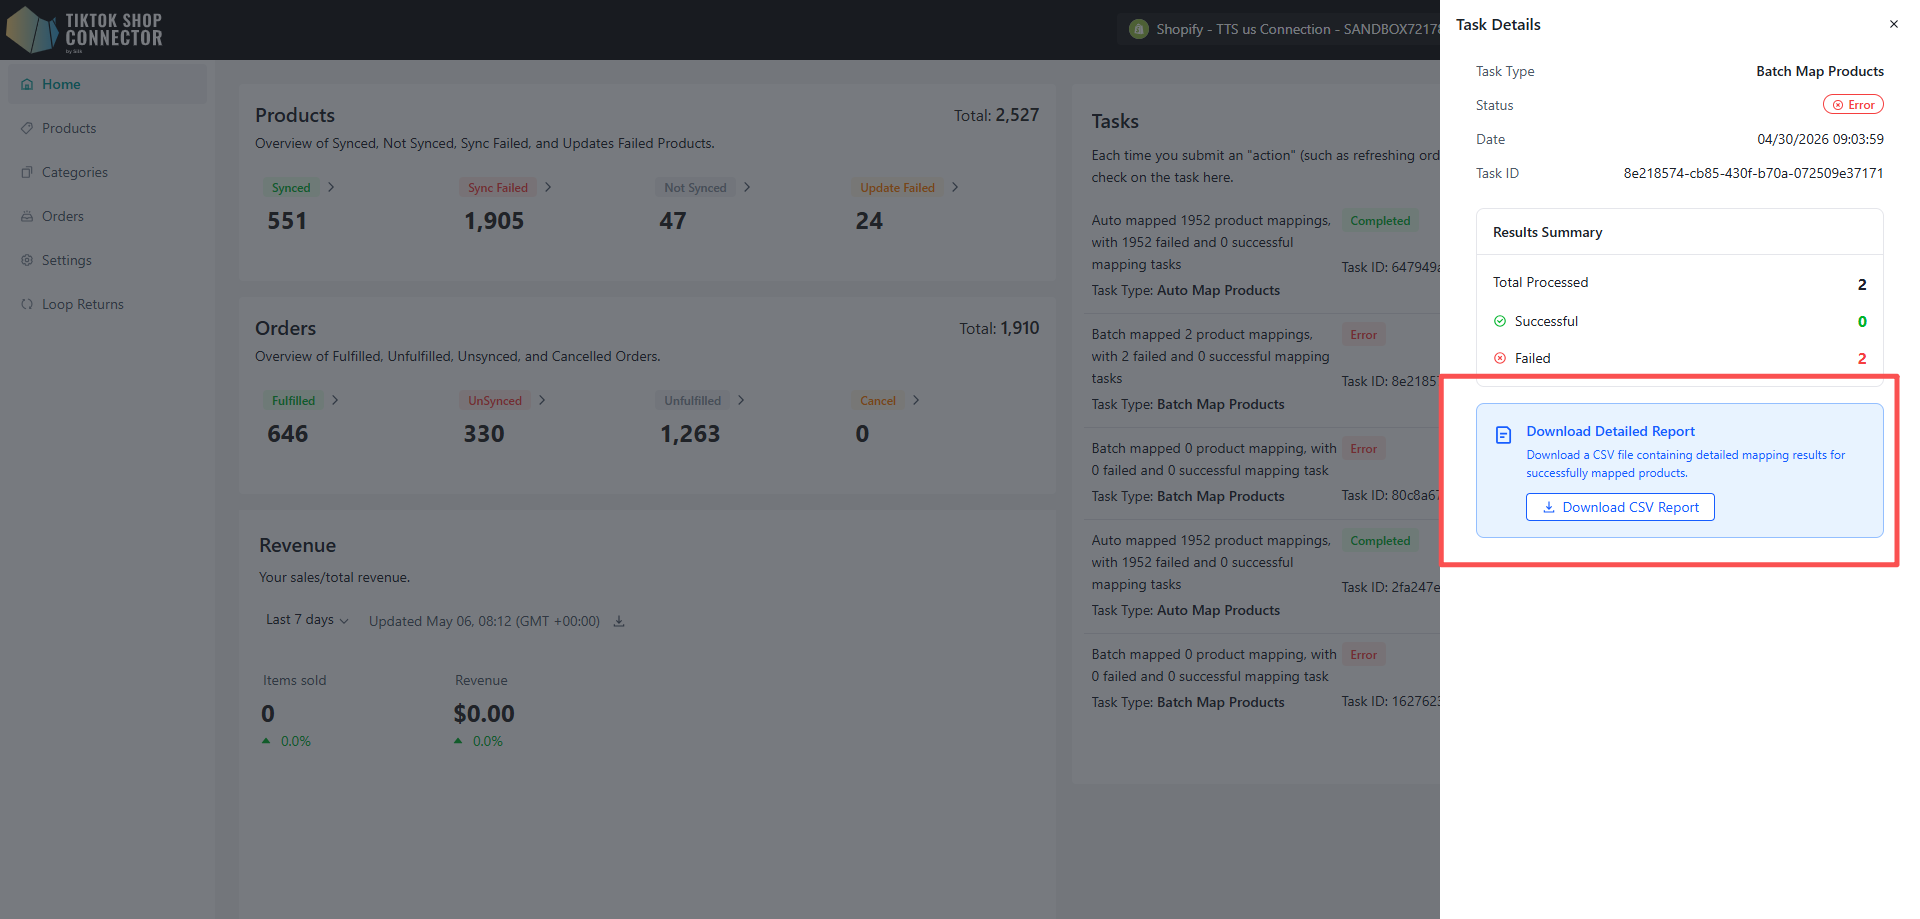
Download Detailed Report
You can download a detailed report of the mapping results for further review.
- Click Download Detailed Report to export the results as a CSV file
- The report includes detailed information for all successfully mapped products
- Only products with exact SKU matches are included in the report
Note:
- If a product has multiple SKUs, it is recommended to fill in all of them. If not, the remaining SKUs will be automatically mapped during future updates.
- After import, the mapping task will run in the background. You can check the task progress and results in the Tasks section on the Home page.
Managing Mapped Records
Unmap
If a mapping is incorrect:
- Go to the Mapped section
- Click "Unmap"
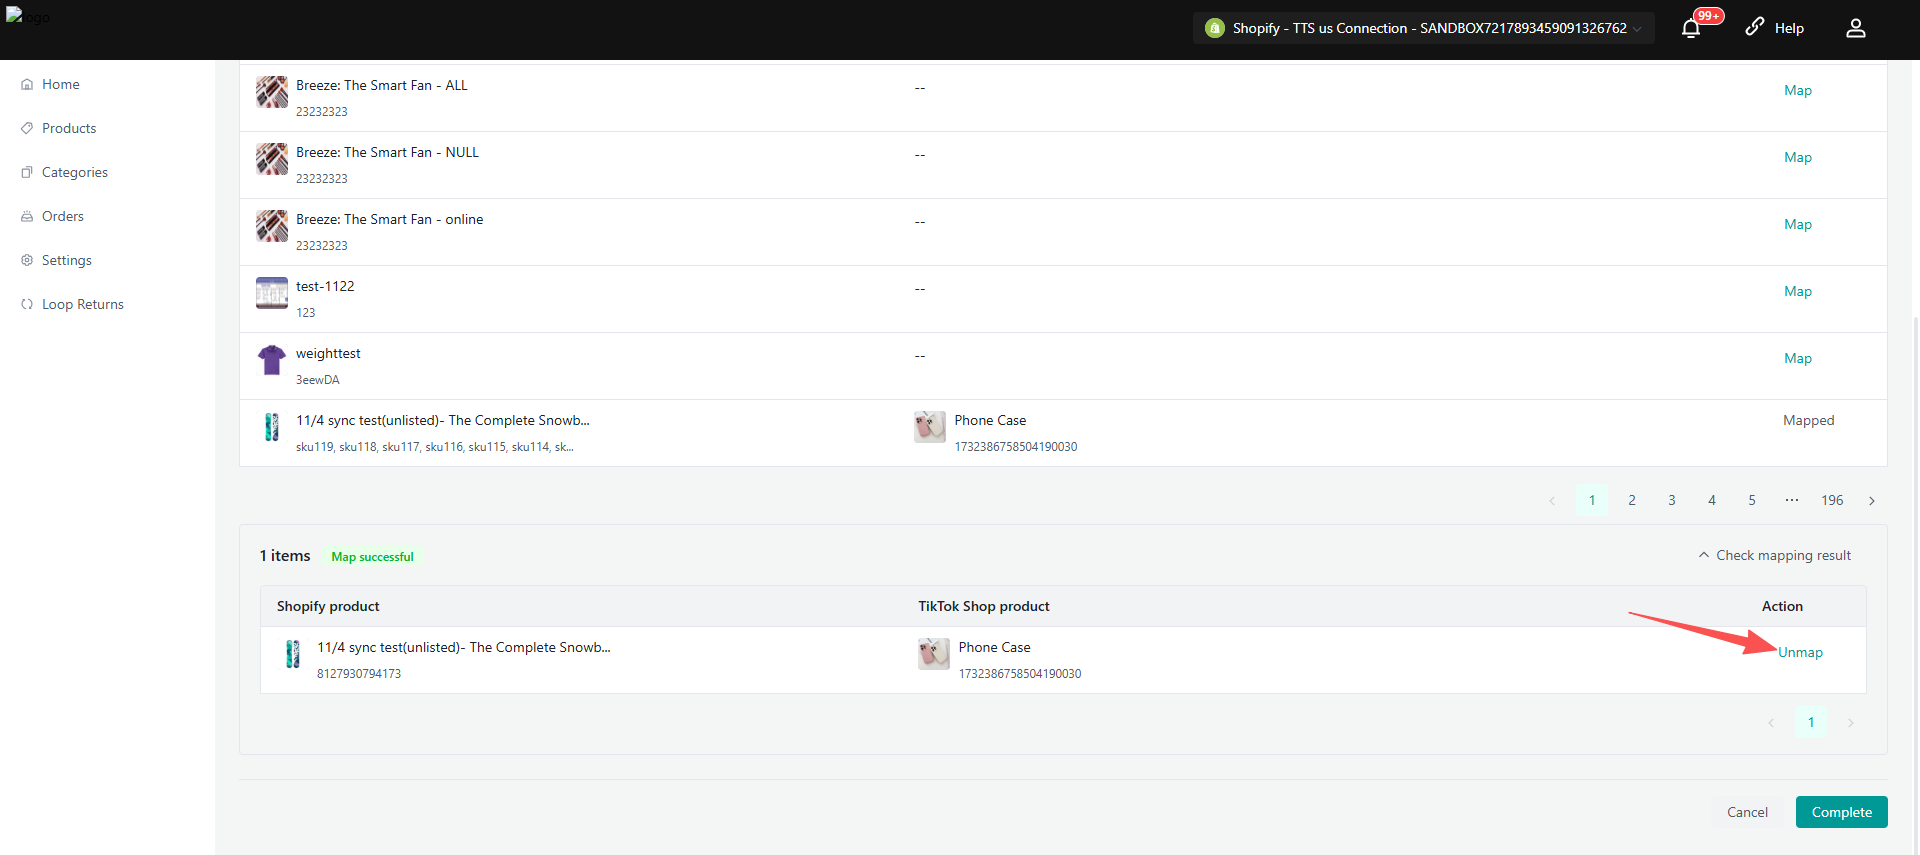
Result:
- Mapping is removed
- The product returns to the Unmapped list
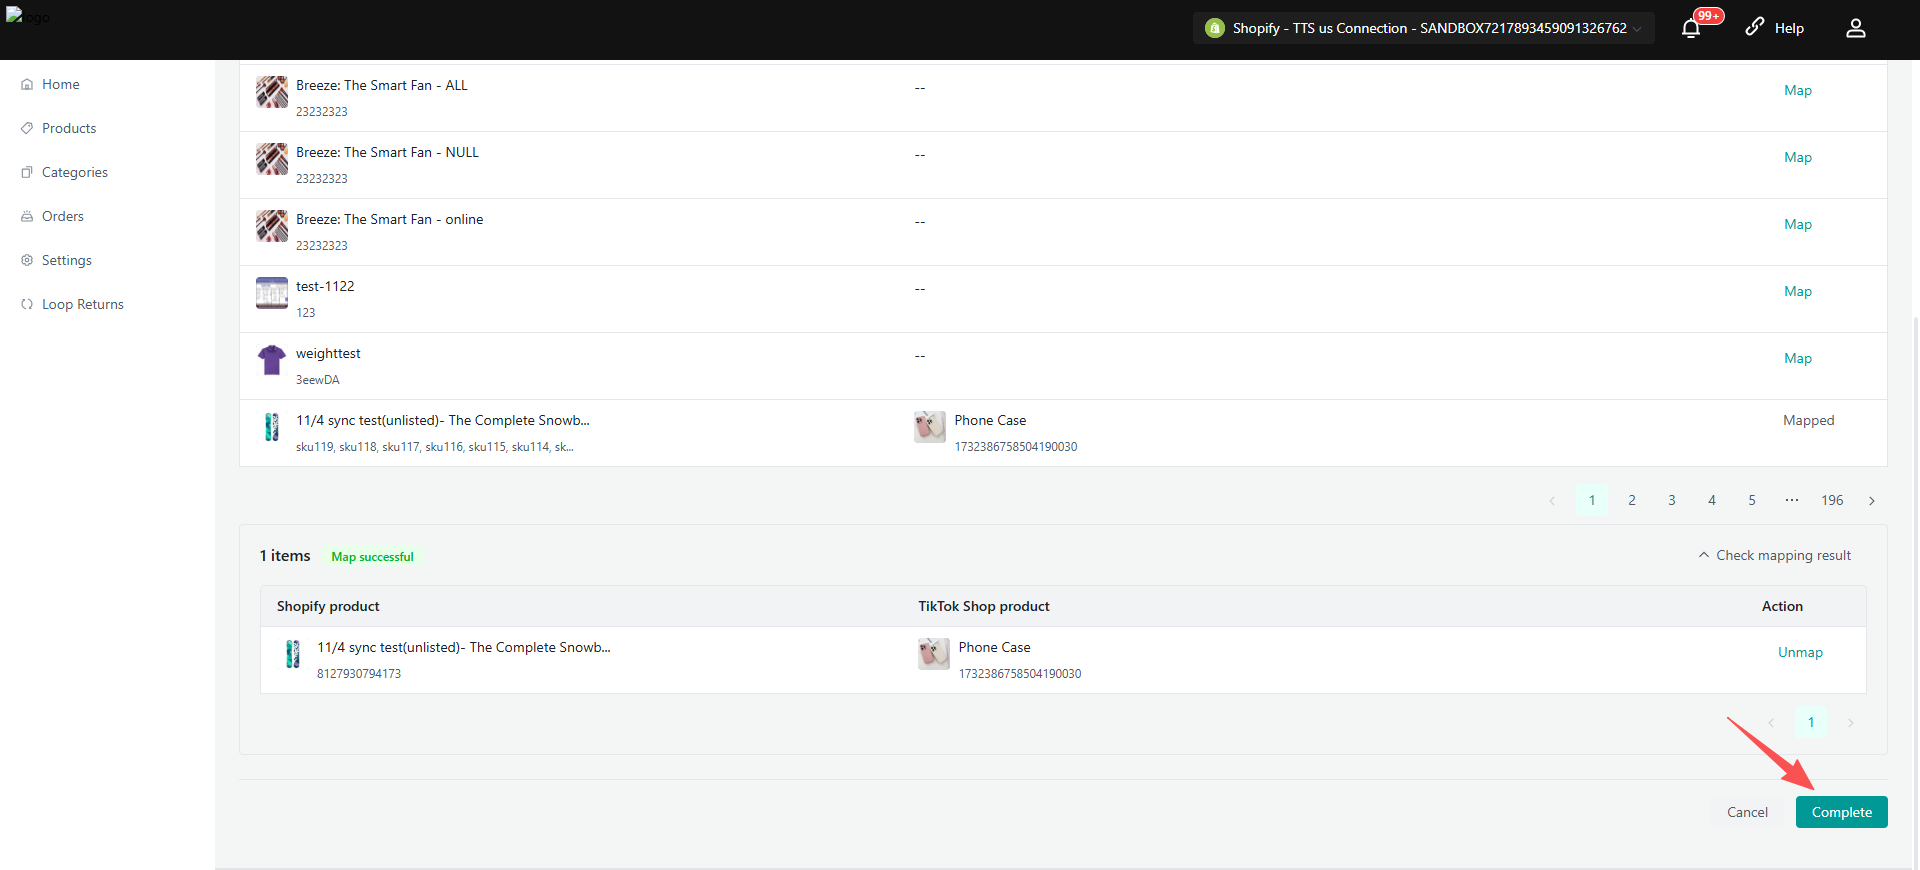
Completing or Cancelling Mapping
Complete Mapping
- Click "Complete" at the bottom of the page
- Confirm submission
Result:
- A mapping task is submitted
- Processing happens in the background

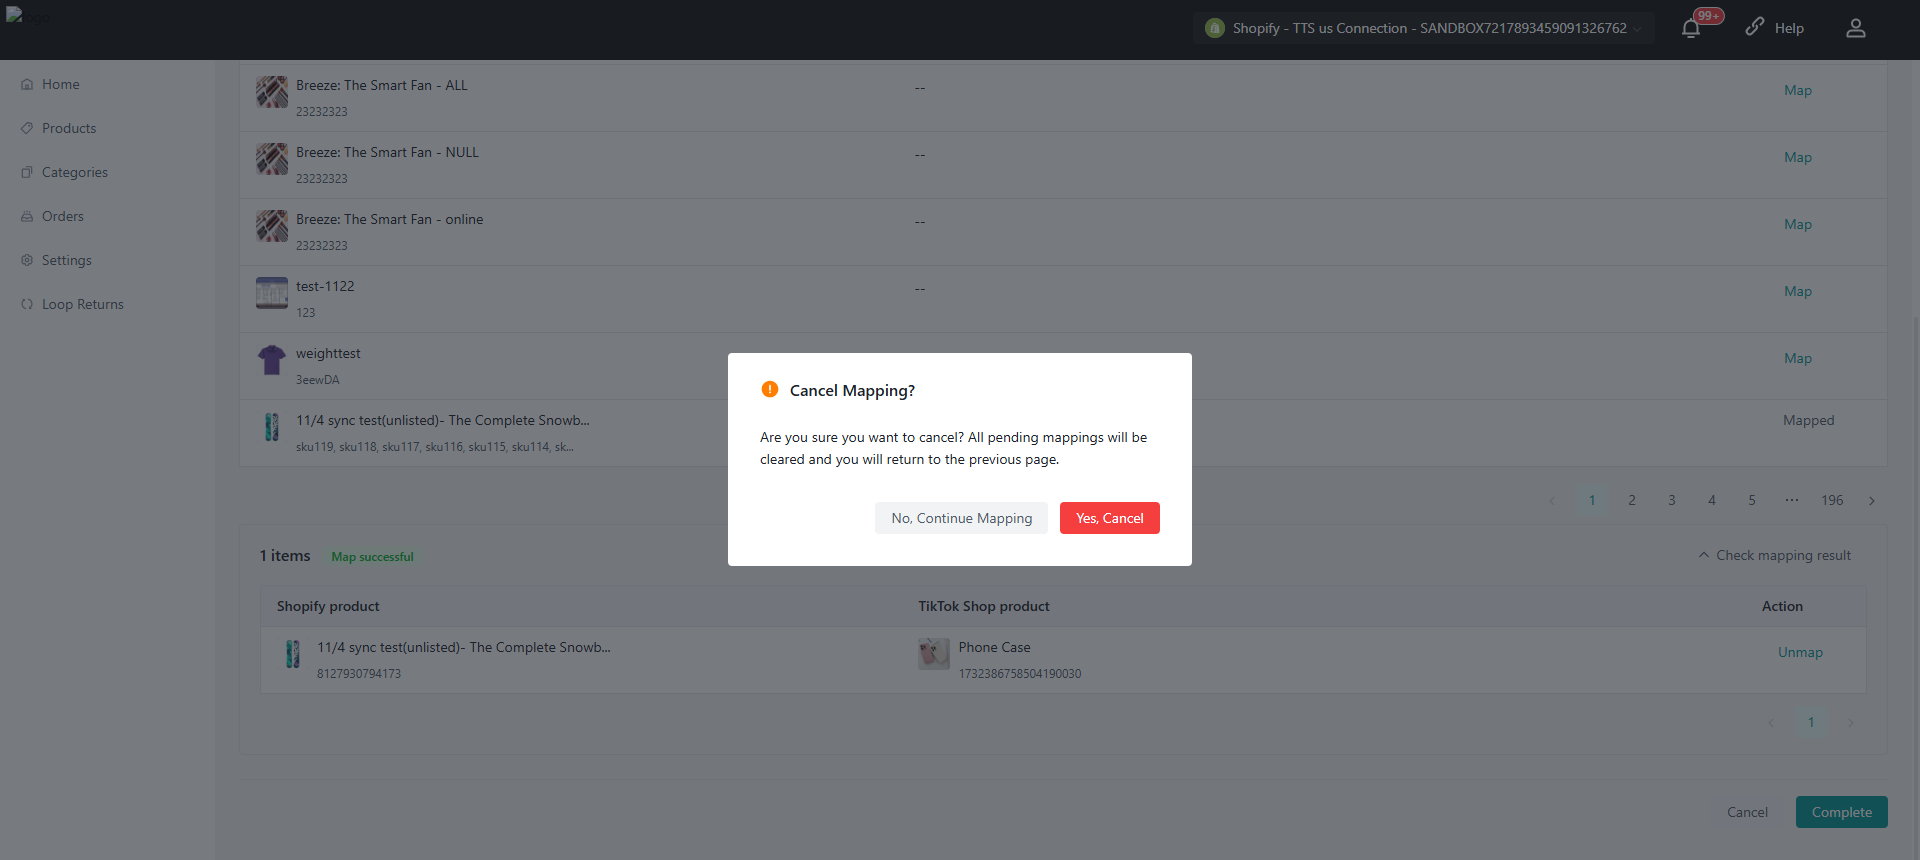
Cancel Mapping
- Click "Cancel"
- Confirm action
Result:
- All pending mappings are cleared
- You exit the mapping flow
Important Rules
Mapping is done at SKU (variant) level, not product level
- 1:1 relationship only:
- One Shopify SKU ↔ One TikTok Shop SKU
- Auto Mapping only works on exact SKU matches
- CSV Mapping relies on IDs and template fields, not automatic matching
Best Practices
- Use Auto Mapping first to handle exact matches quickly
- Use CSV Import for large datasets
- Use Manual Mapping for exceptions
- Regularly check the Tasks module for errors and results
How to sync promotion
Silk Connector supports synchronizing eligible Shopify discounts to TikTok Shop promotions for the current connection.
Promotion Sync is managed based on the selected TikTok Shop account or market. If multiple markets or regions are available, sellers should first switch to the target market, and then review or manage promotions for that market.
Supported Promotion Types
Silk Connector supports the following Shopify promotion types for Promotion Sync when they meet TikTok Shop requirements:
Amount off products
Amount off orders
Free shipping

Note: Supported promotion details may vary depending on Shopify discount configuration, TikTok Shop promotion requirements, product eligibility, promotion time range, and market restrictions.
Configure Auto Promotion Sync
Configuration Path:
Settings → Product Settings → Promotion Sync
The Promotion Sync section allows sellers to control whether eligible Shopify promotions are automatically synchronized to TikTok Shop.
Available settings include:
- Promotion Sync master switch
- Amount off products
- Amount off orders
- Free shipping

When the Promotion Sync master switch is turned on, Silk Connector can automatically pull and synchronize newly created or updated eligible Shopify promotions according to the selected promotion types.
When the Promotion Sync master switch is turned off, Silk Connector will not create new automatic promotion sync operations for the current connection.
Turning off automatic Promotion Sync does not delete promotions that have already been synchronized to TikTok Shop.
Pull promotions
In general, the connector pulls and updates Shopify promotions automatically.Sellers can also click Pull Promotion on the Promotion Sync page to manually pull all Shopify promotions into Silk.

After the action is submitted, a Pull Promotions task will be generated automatically. Sellers can go to Home → Tasks to view the task result.
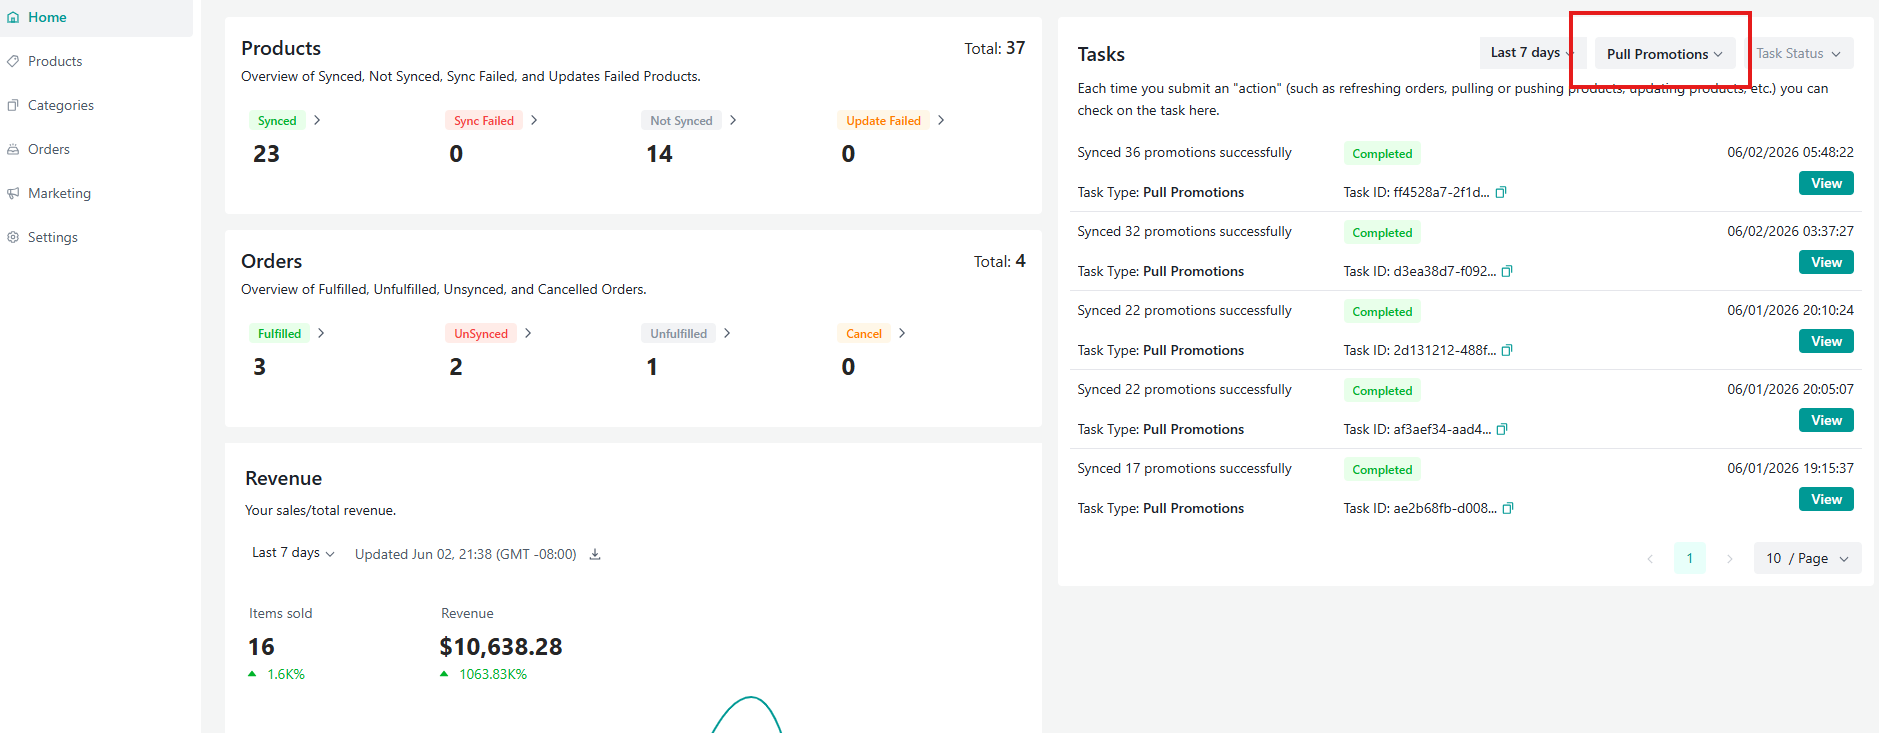
The task details show the total number of promotions processed, including successful and failed records. Once completed, the latest Shopify promotions will appear on the Promotion Sync list with their current sync status.

Manual Promotion Sync
On the Promotion Sync page, sellers can review the promotion list and confirm the discount type, scope, time range, related products, and current sync status.
- To manually sync a promotion, click Sync under the Action column for an eligible promotion.

- For promotions that previously failed, sellers can correct the related issue first and then click Retry.
- For promotions that do not need to be synchronized, sellers can click Ignore.
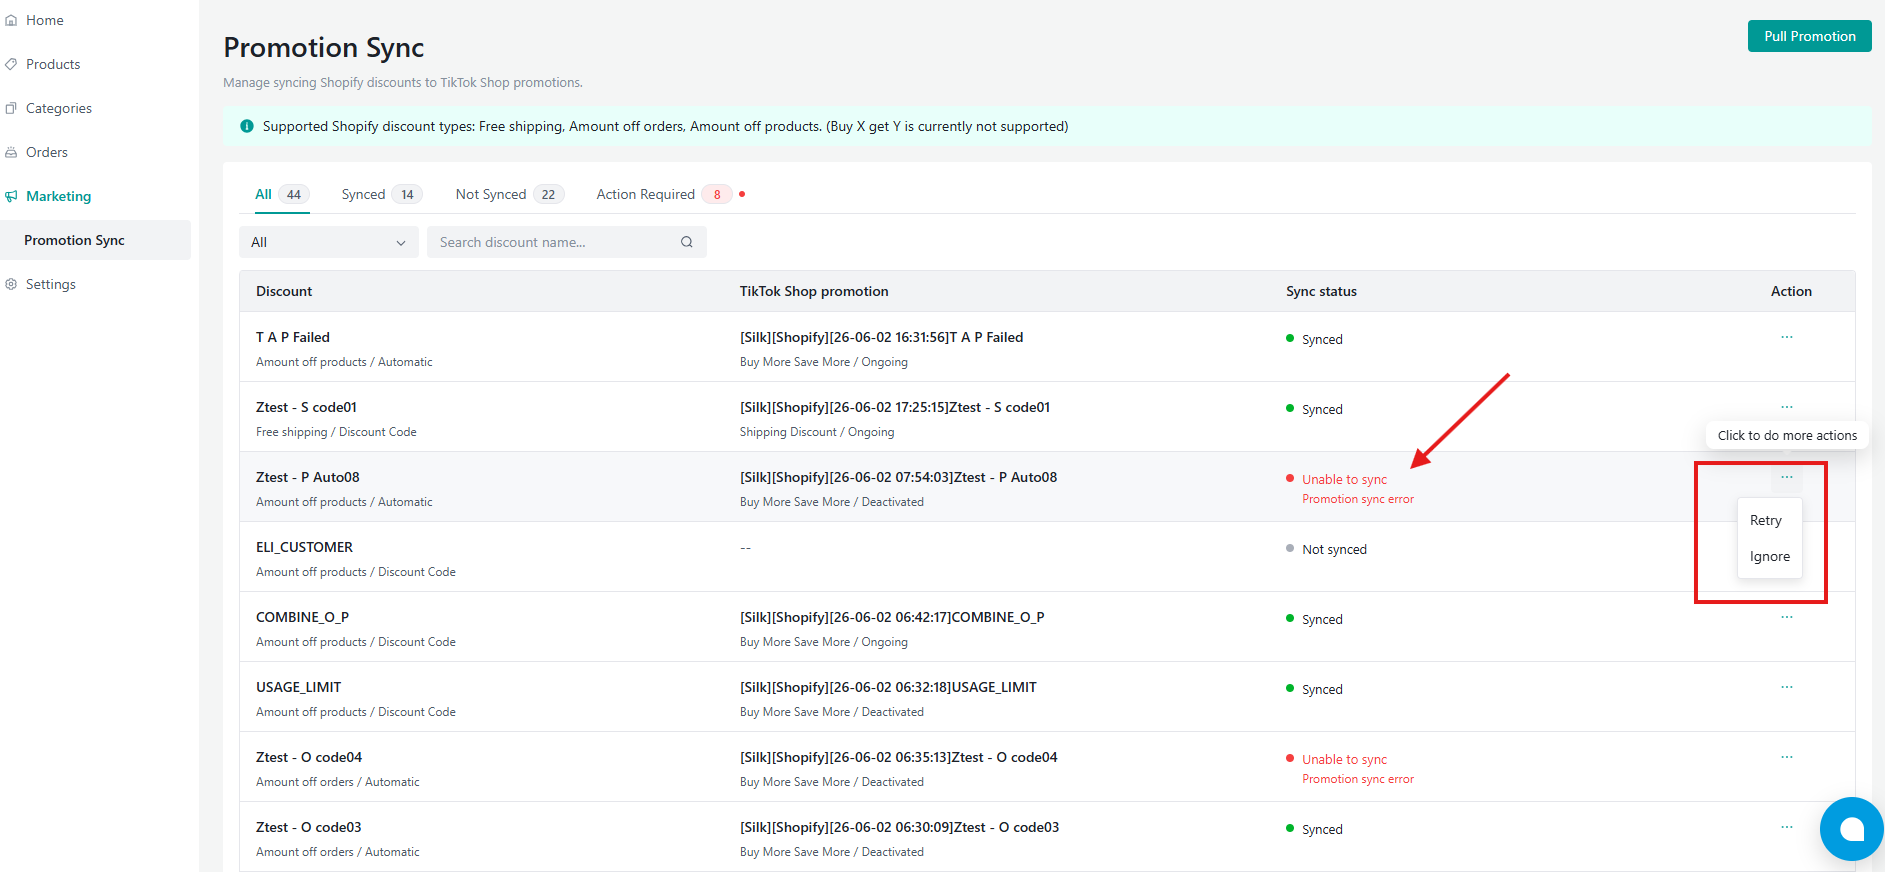
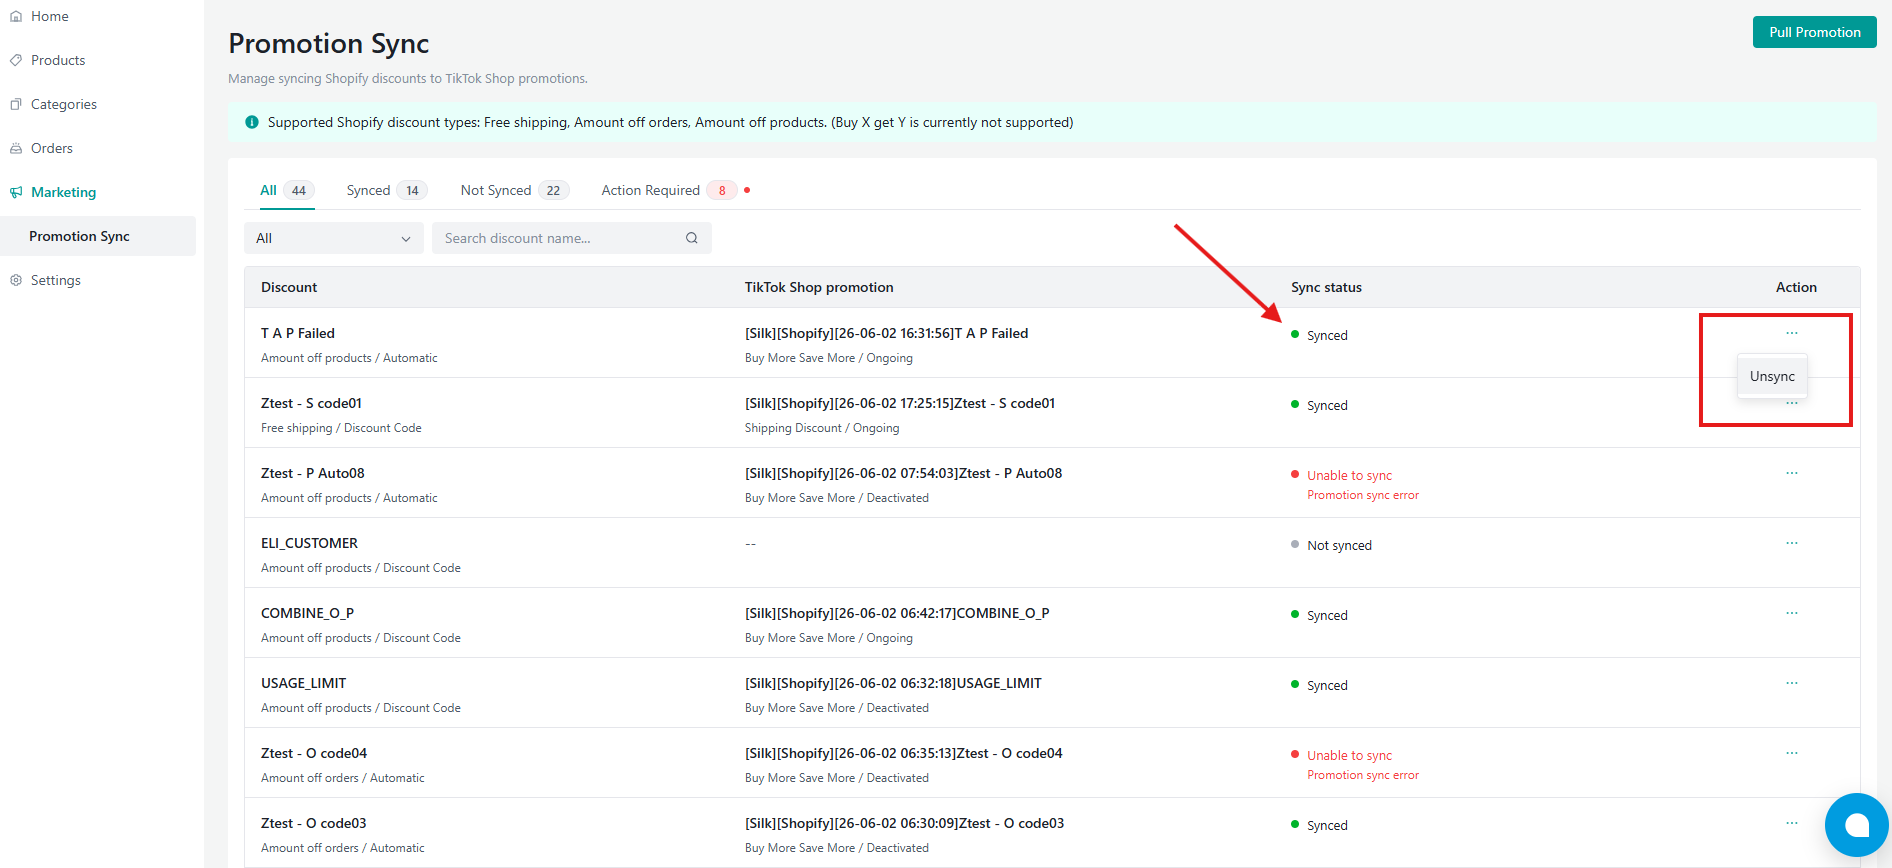
- When available, sellers can use Unsync to remove or unlink a synchronized promotion from TikTok Shop.
Note: If automatic Promotion Sync is disabled, sellers can still use manual sync for eligible promotions when the Sync action is available.
Promotion Sync Status
The Marketing page displays the synchronization status for each promotion.
Not Synced
The promotion has been pulled from Shopify but has not been synchronized to TikTok Shop.
Synced
The promotion has been successfully synchronized to TikTok Shop.
Action Required
The promotion cannot be synchronized until required information is completed or corrected.
Sync Failed
The promotion sync request was submitted but failed due to TikTok Shop validation, API restrictions, product linkage issues, discount configuration issues, or other platform requirements.
Product-Level Promotion Requirements
For product-level promotions, the related Shopify products and SKUs should already be synced or linked to TikTok Shop under the current connection.
If a promotion references products that have not been synced or linked to TikTok Shop, the promotion may enter Action Required or Sync Failed status.
Order-level promotions and free shipping promotions may not require specific product linkage, but they still need to satisfy TikTok Shop promotion rules and market requirements.
Promotion Update and Unsync Behavior
When a supported Shopify promotion is updated, Silk Connector can synchronize eligible updates to TikTok Shop according to the Promotion Sync settings and selected promotion type.
If a promotion is no longer needed on TikTok Shop, sellers can use Unsync when available. Unsync does not delete the original Shopify discount.
If a promotion fails to sync, review the failure reason, correct the Shopify discount configuration or product relationship, and then retry the synchronization.
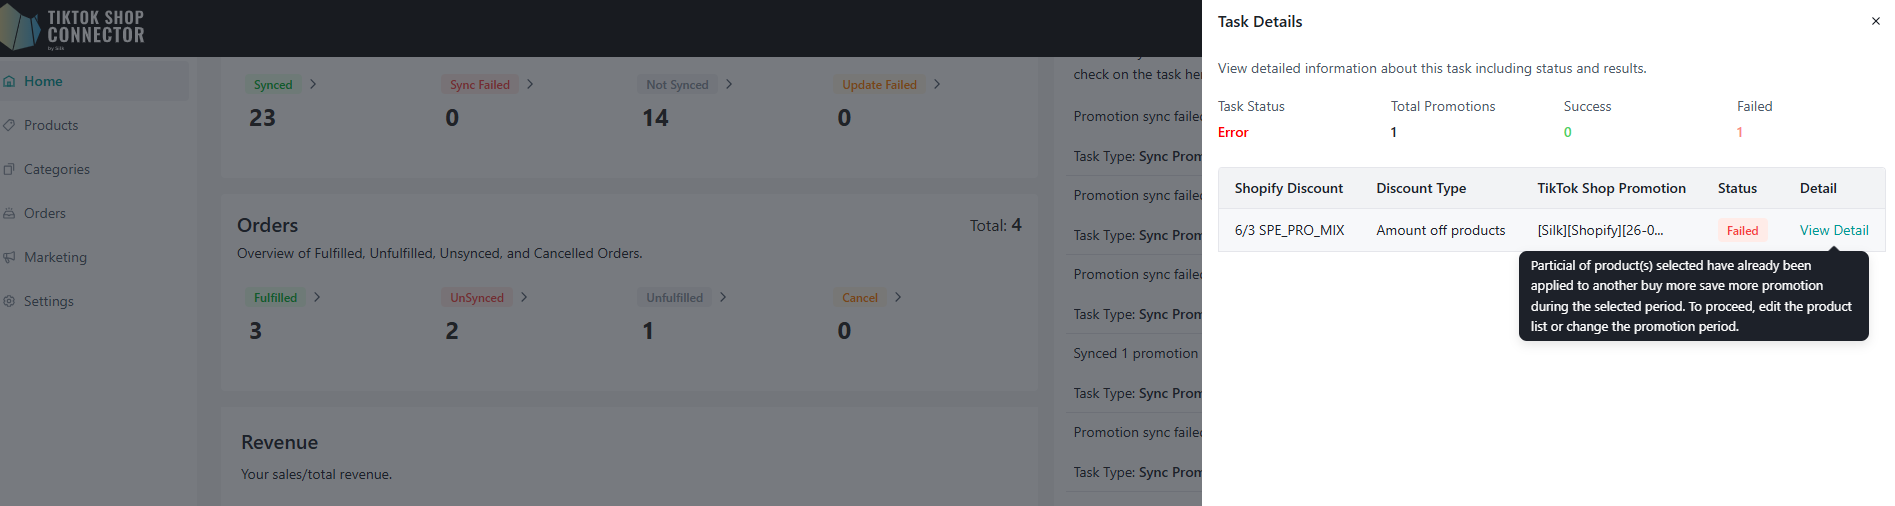
Promotion Sync Task Status
Promotion sync results are shown on the Marketing page. If a task record is generated, sellers can also review the result from:
Home → Tasks →view
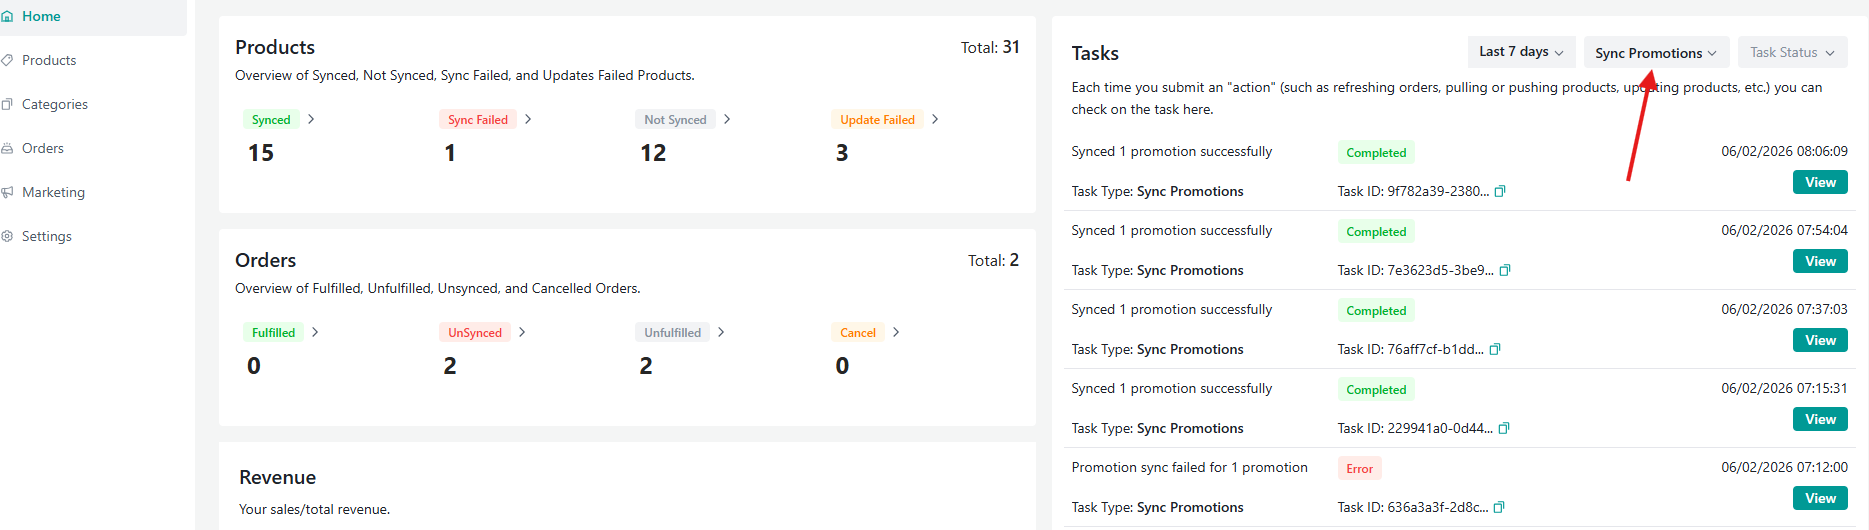
The task result may include processing status, successful promotions, failed promotions, and failure reasons.

Important Notes
- Promotion Sync settings are managed independently for each connection or selected TikTok Shop market.
- Promotion Sync only supports eligible Shopify discount types that meet TikTok Shop requirements.
- Product-level promotions require the related products or SKUs to be synced or linked to TikTok Shop under the current connection.
- Unsupported promotions or incomplete discount configurations may require manual correction before synchronization.
- Turning off automatic Promotion Sync does not remove existing synchronized TikTok Shop promotions.
- Some promotions may fail to sync if they conflict with TikTok Shop promotion rules, product eligibility, promotion time range, or market-specific restrictions.
How to Sync Orders
*Note: To sync orders successfully from TikTok Shop to Shopify, your products must be linked from Shopify to TikTok Shop via our Connector. Any orders that contain unsynced products will NOT sync back to Shopify.
Manually uploaded products in TikTok Shop:
a. If you uploaded a TikTok Shop product manually (NOT through the Connector) then you will have to map the product from TikTok Shop in our Connector to sync orders to Shopify. (See "Map Products" in the User Guide).
OR
Synced products via our Connector
a. If the products are "pulled" from Shopify and "pushed" to TikTok Shop, orders will sync automatically.
Creating Orders
Automatic creation: The Connector will relay orders and automatically update Shopify when an order is placed and paid for in TikTok Shop
- order status = 'awaiting for shipment'
- If the order status is "unpaid" -> order will NOT sync to Shopify
- Order ID will be blank in the Connector
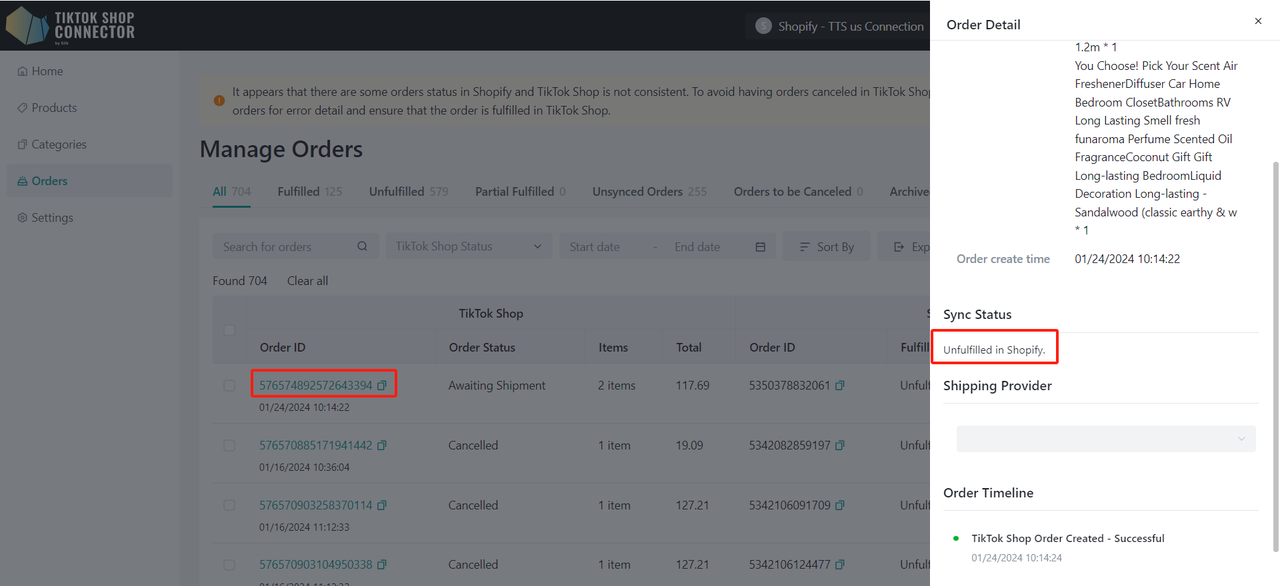
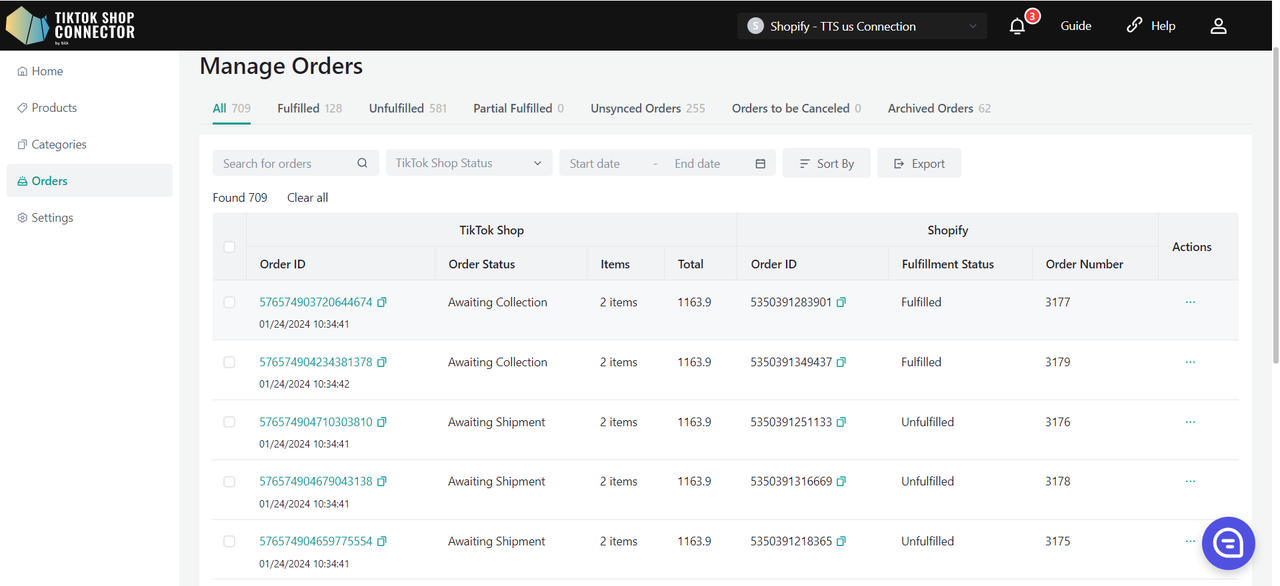
To Check on Orders:
Click on the TTS Order ID or search for the order by the TTS Order ID.
Payment & Fulfillment Status
| Status in Shopify | Connector by Silk | Status in TikTok Shop | |
|---|---|---|---|
| When you have NOT fulfilled the order in Shopify | Payment Status: Paid Fulfillment Status: Unfulfilled | Automatic Sync <-> | Awaiting Shipment |
| When you have fulfilled and shipped the order in Shopify | Payment Status: Paid Fulfillment Status: Fulfilled | Automatic Sync <-> | Awaiting Collection |
To Fulfill an order in Shopify:
Click on the order -> "Fulfill Item"
Fill in Tracking Information -> "Fulfill Item"

Shipping Status & Delivery
| Shipping Status | Delivery/Complete |
|---|---|
| TikTok Shop will track the delivery status. Transit status will be updated to 'In Transit' automatically when the order is shipped from Shopify. | The order status in the TikTok Shop store will be updated to 'Delivered/Completed' by default when the order is delivered. |
Order Cancellations
Order cancellations will sync bidirectionally via the Connector.
Orders canceled in Shopify will be canceled in TikTok Shop. Orders canceled in TikTok Shop will be canceled in Shopify.
| Cancellation in Shopify | Cancellation in TikTok Shop |
|---|---|
| To cancel an order placed in TikTok Shop from Shopify: 1. Cancel the order in the Shopify. 2. Order cancellation will automatically sync through the connector and cancel the corresponding order in TikTok Shop. | To cancel or deny orders placed in TikTok Shop from TikTok Shop Seller Center. 1. Buyers from TikTok Shop will submit a cancellation request. 2. You can accept or decline the cancellation request in TikTok Shop Seller Center. 3. Accept cancellation request -> order status will be updated in the connector’s portal, and the corresponding order will be canceled in the Shopify. |
Syncing TikTok Shop Special Order Types and Tags to Shopify
To help sellers manage TikTok Shop (TTS) orders more efficiently in Shopify, Silk Connector supports syncing special order types and labels from TTS to Shopify Order Tags. Based on the TTS Order API, the system automatically detects specific order attributes and applies corresponding tags to the Shopify order:
| TTS Order Type | Shopify Order Tags |
|---|---|
| Replacement Order | replacement, replaced_from:{replaced_order_id} |
| Exchange Order (UK/US only) | exchange, exchanged_from:{exchange_source_order_id} (optional) |
| Pre-Order | pre_order |
| Made-to-Order | made_to_order |
| Backorder | back_order |
| Zero Lottery | zero_lottery |
| Regular Order | No tags |

Connector Overview
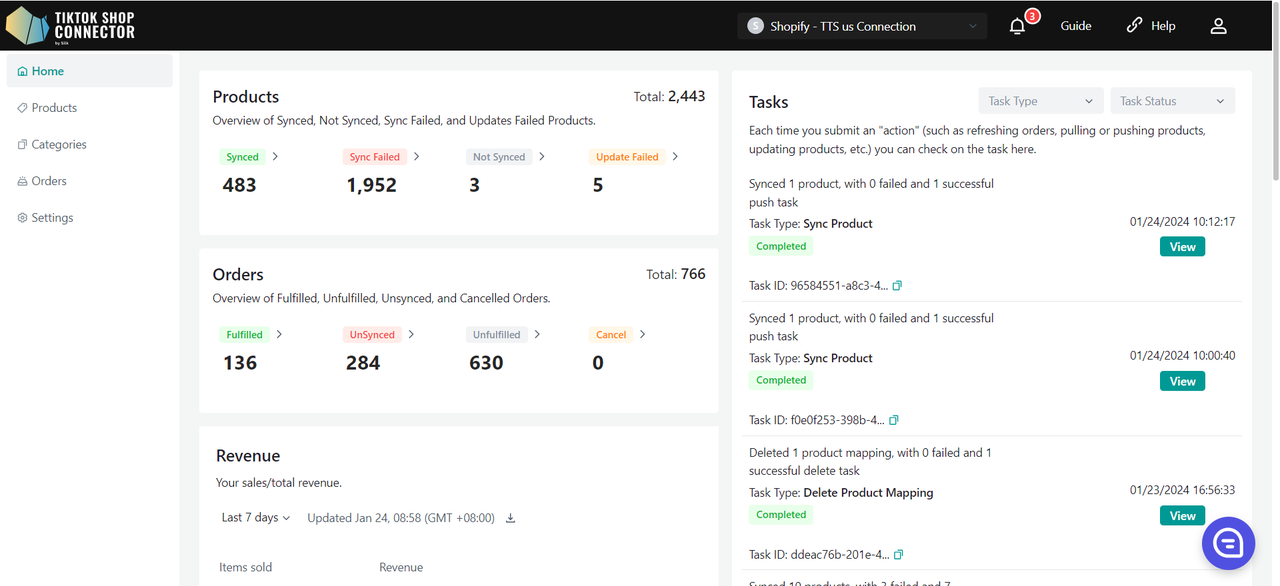
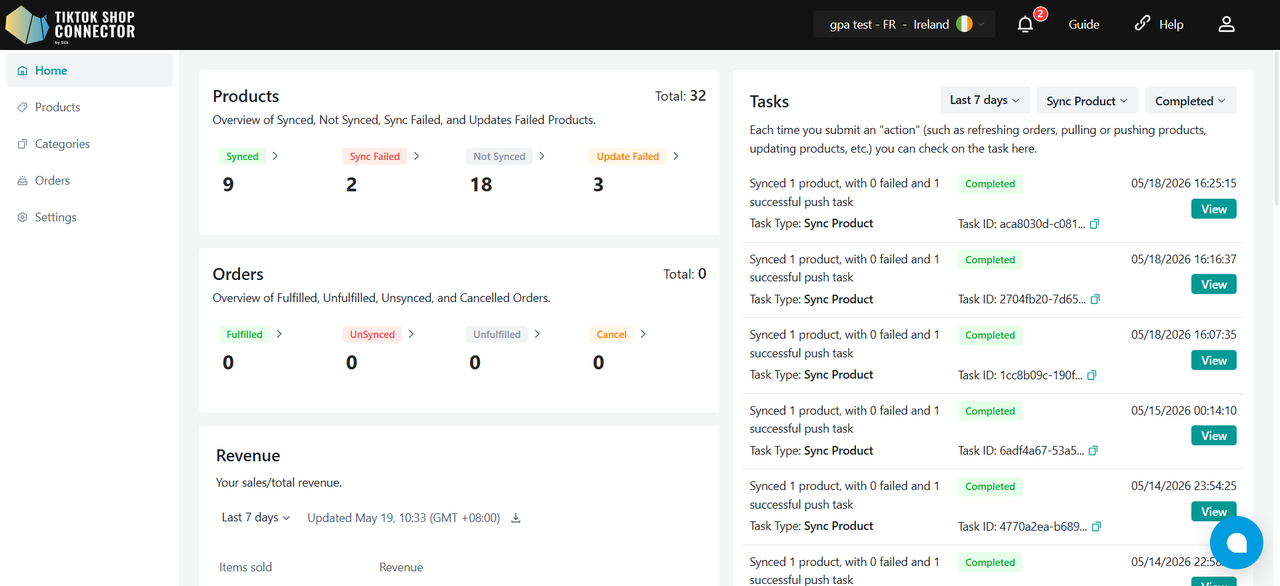
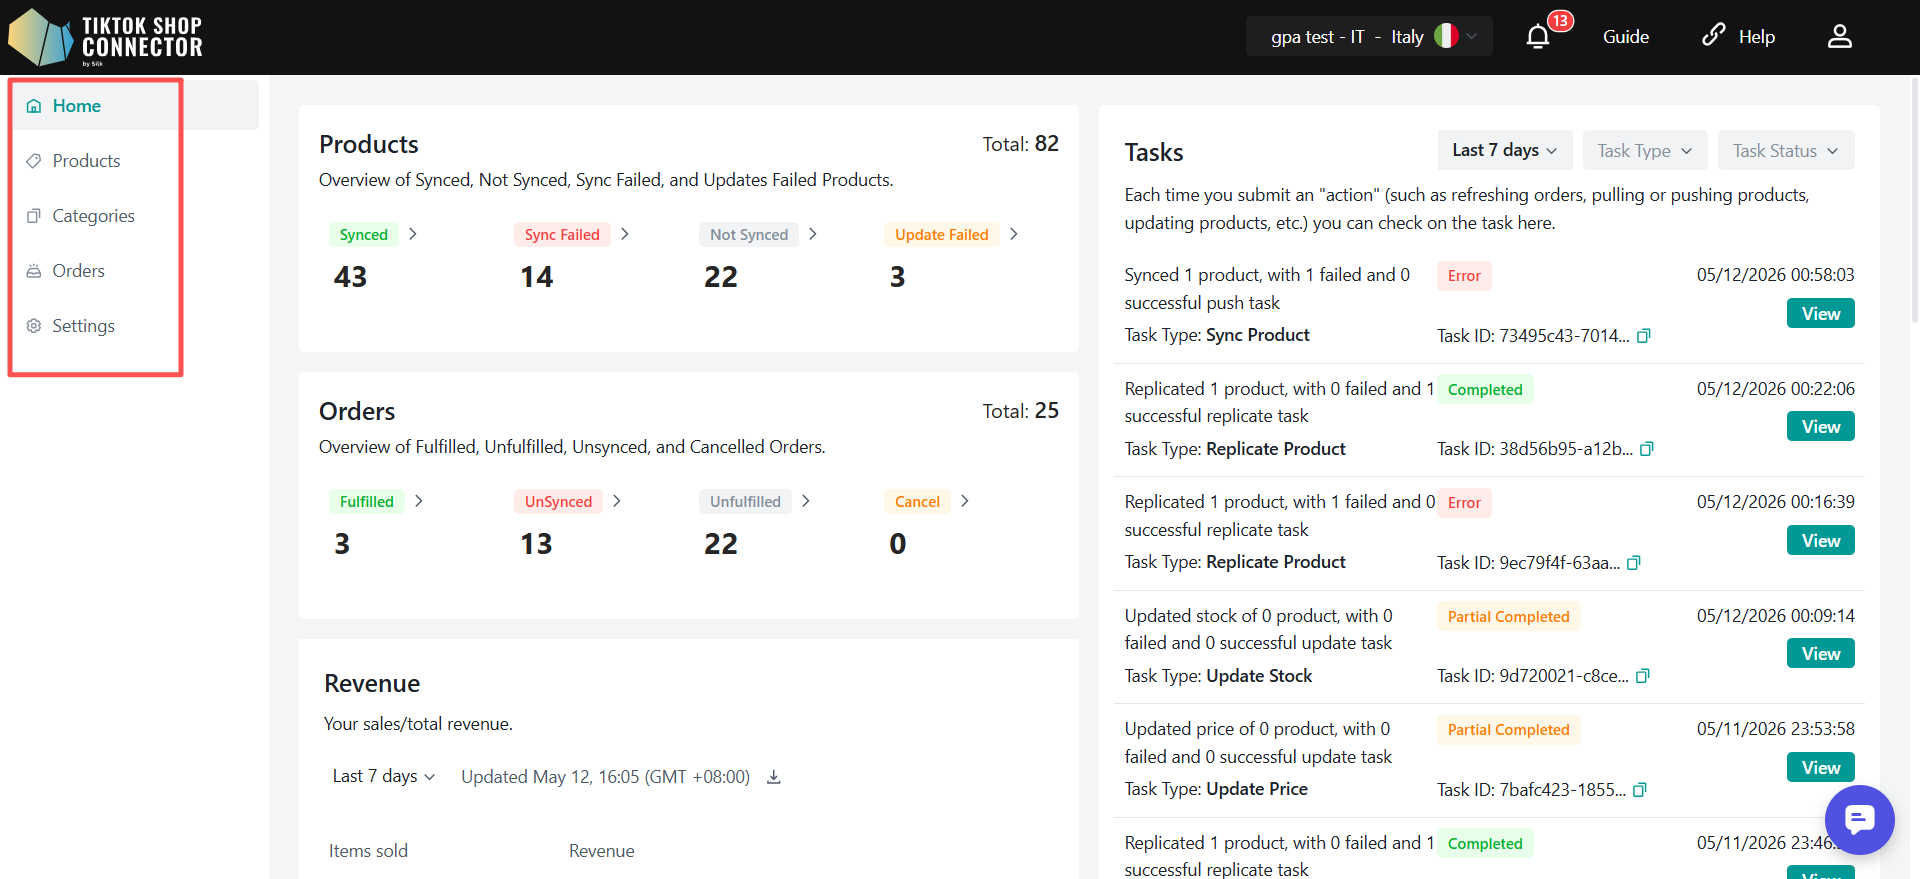
Home
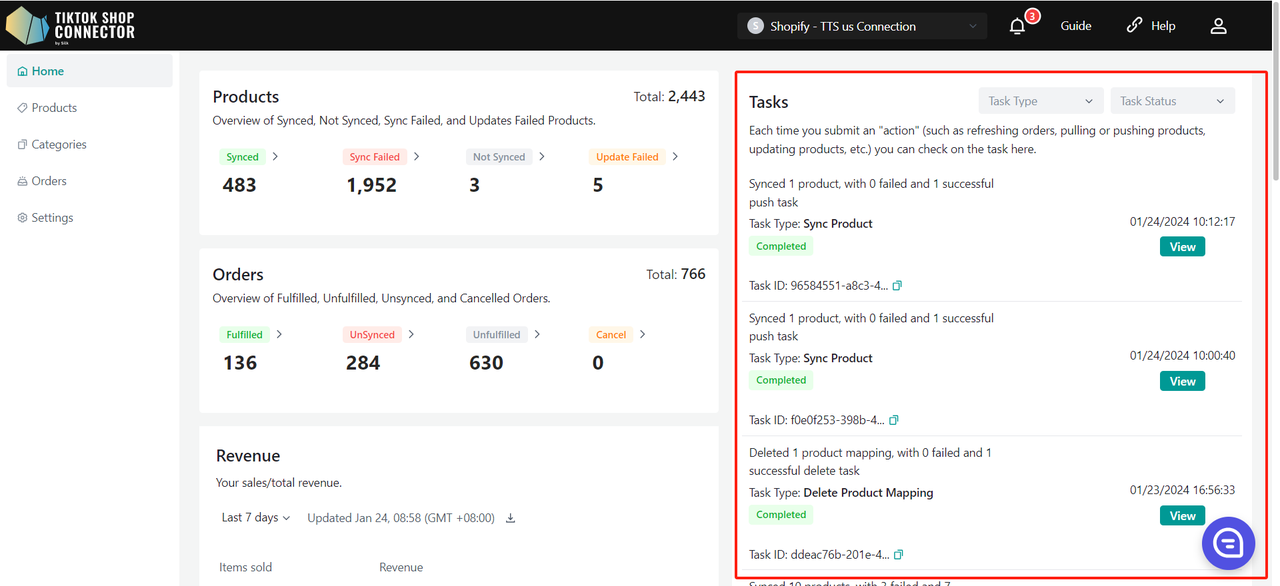
There is one block to show the product information about your connection:
- Products: Overview of Synced, Not Synced, Sync Failed, and Updates Failed Products
- Orders: Overview of Fulfilled, Unfulfilled, Unsynced, and Cancelled Orders
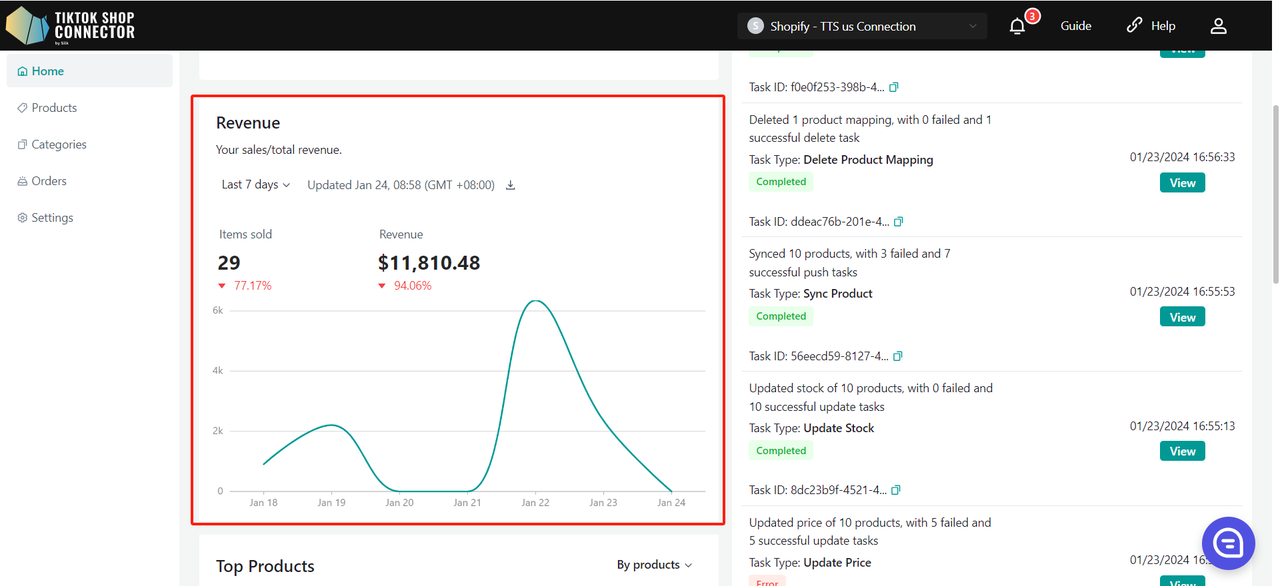
- Revenue: Your sales/total revenue
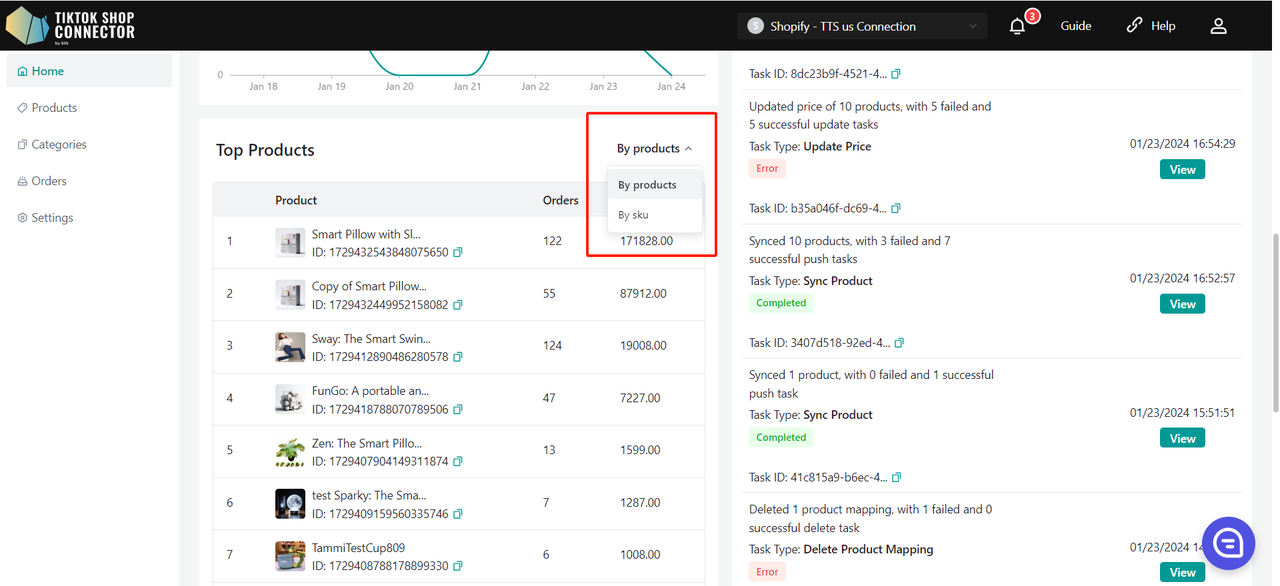
- Top Products: Your top 10 best sellers
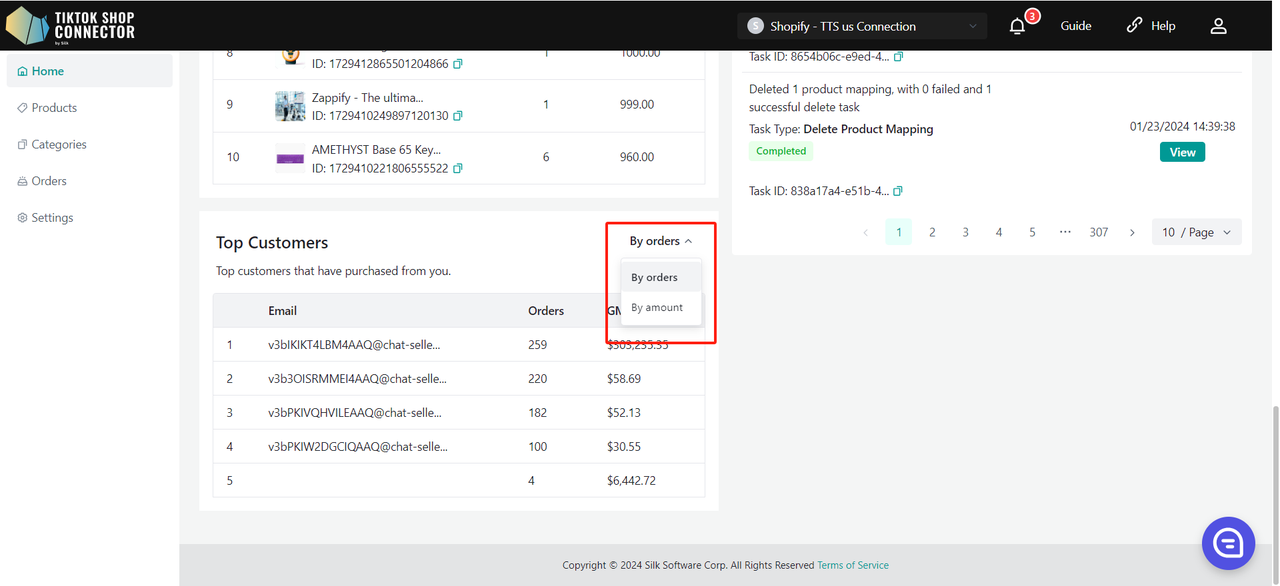
- Top Customers: Top customers that have purchased from you
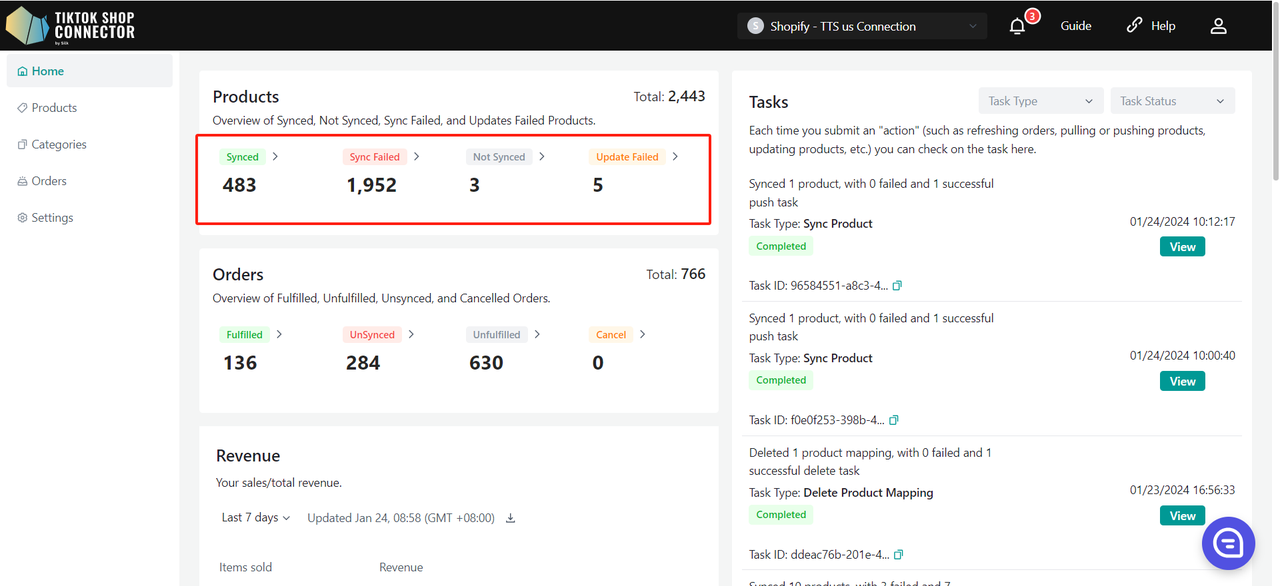
Products
- Overview of Synced, Not Synced, Sync Failed, and Updates Failed Products
- Click the number that will take you to the corresponding product status tab
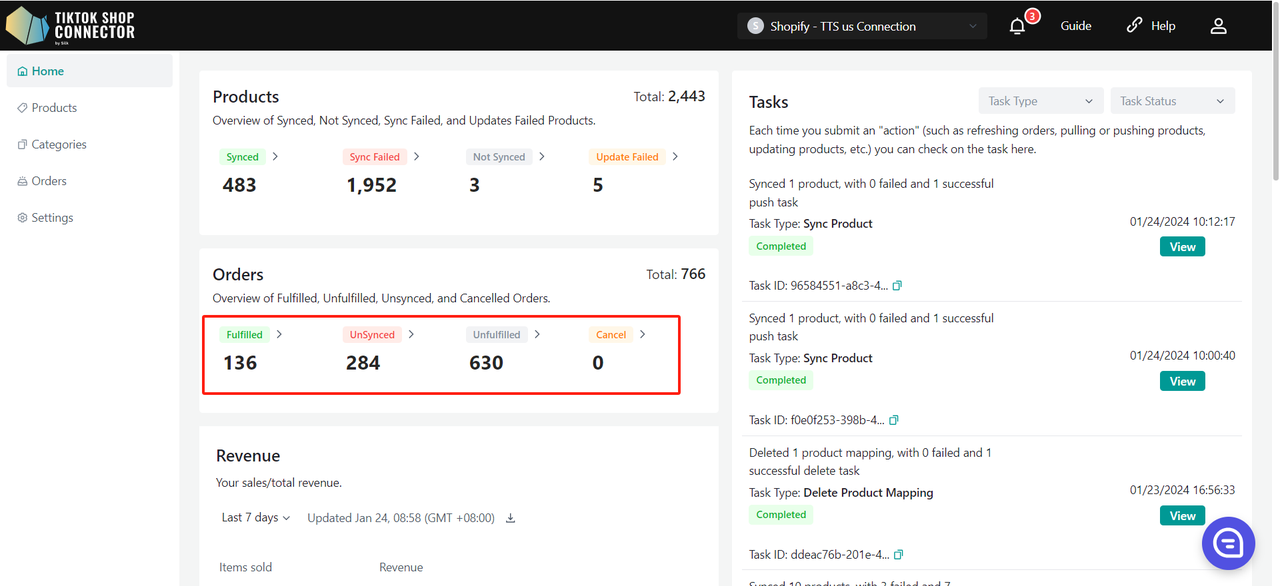
Orders
- Overview of Fulfilled, Unfulfilled, Unsynced, and Cancelled Orders
- Click the number that will take you to the corresponding order status tab
Revenue
- Your sales/total revenue
- Click the Download button to download the data for the current time period
Top Products
- Your top 10 best sellers
- By number of dollar amount
- You can choose to sort by product or sku
Top Customers
- Top customers that have purchased from you
- By number of orders or dollar amount
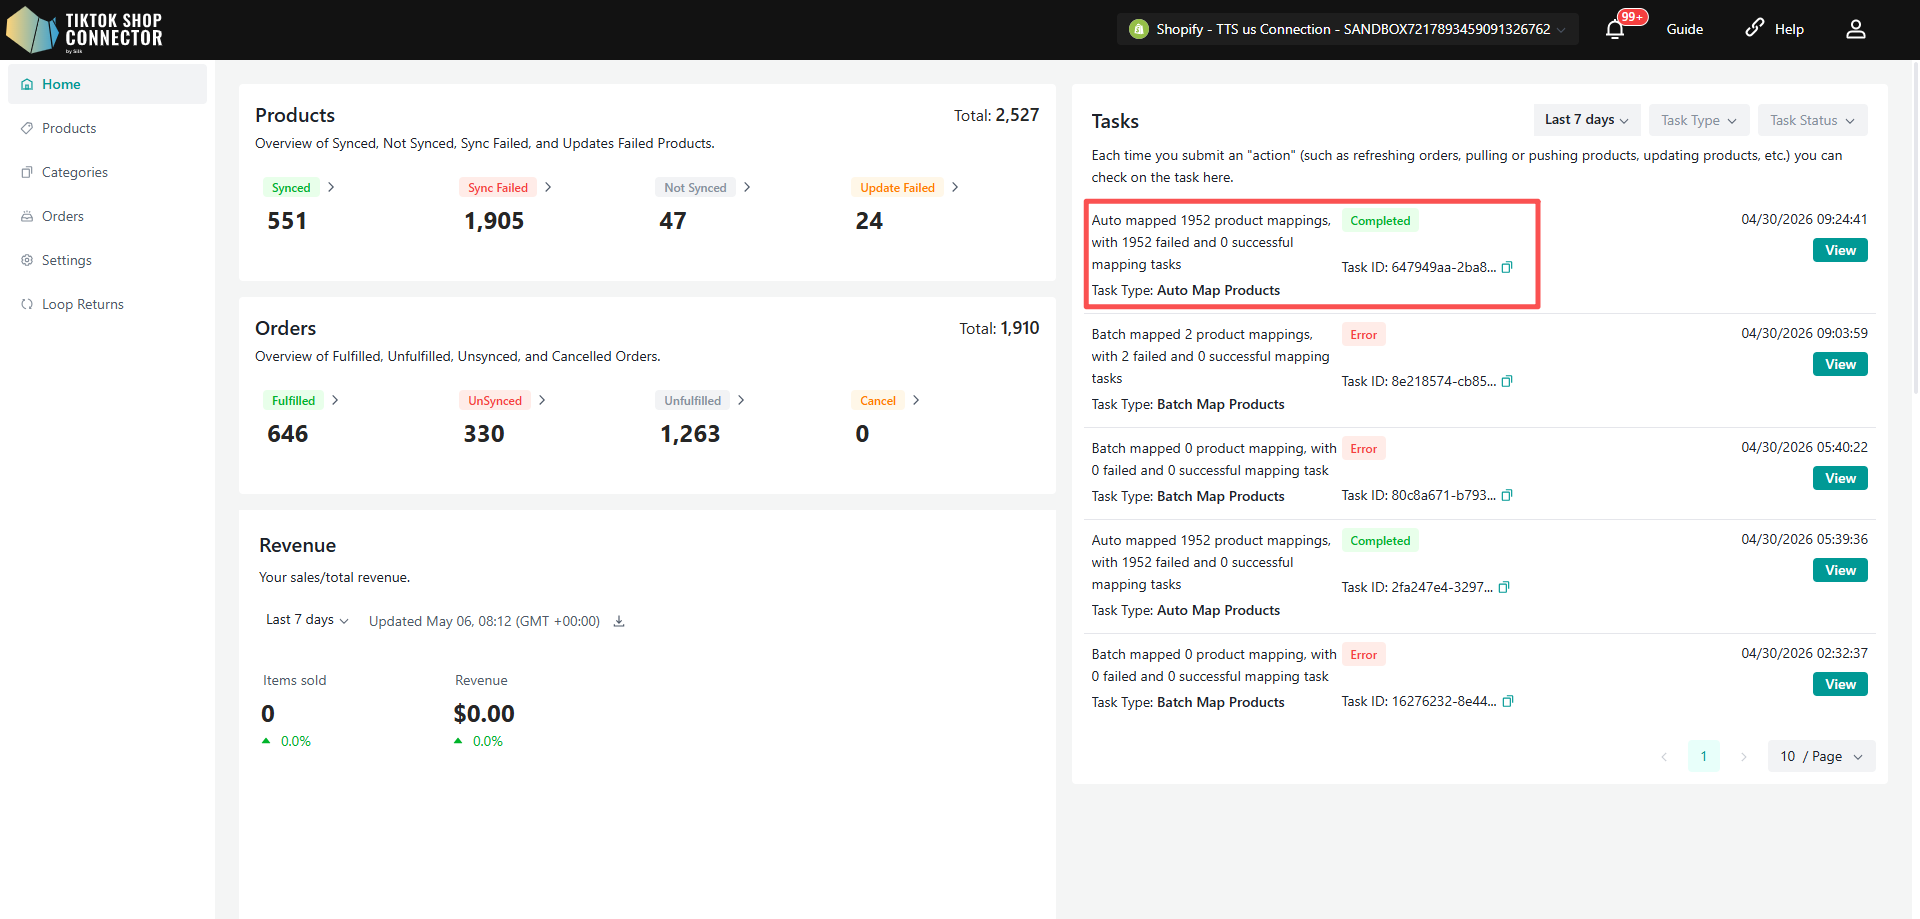
Tasks
Each time you submit an "action" (such as refreshing orders, pulling or pushing products, updating products, etc.) you can check on the task here.
- Displays the task type
- Summary of "actions"
- Task Status (Running, Completed, Error)
- "View Details" will display the task detail
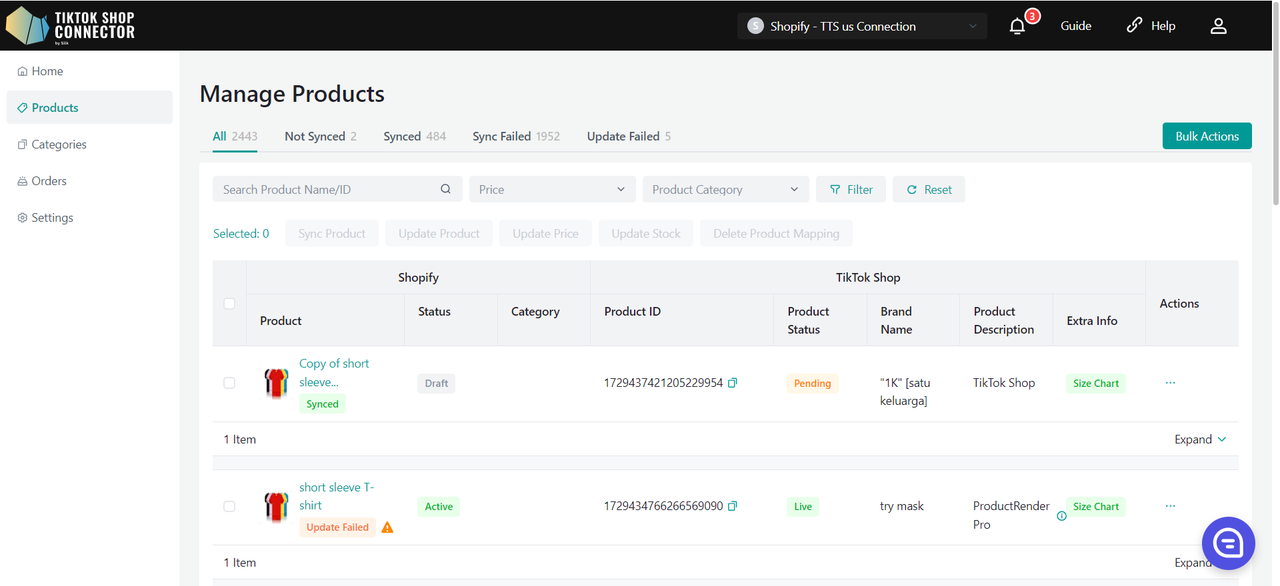
Products
- Displays all products "pulled" in from Shopify
- Shows whether your product has been successfully synced to TikTok Shop
- Actions that can be completed in the products tab:
- Pull Products
- Push Products
- Add Size Chart Images
- Add Certifications/Attributes
- Check Sync Statuses
- Add TTS Brand
- Add TTS Category
- Update TTS Status/Product
Custom Attributes
Values can be entered in both metric and imperial units.
Sync Rules
Sync Rules allow you to have different product names in TikTok, Shopify, and our connector.
| Origin | Connector | TTS | |
|---|---|---|---|
| Create - This is for your initial push, your products are not in TikTok Shop yet | Your TikTok products will take the Shopify Name. | Your TikTok products will take the Connector Name | x |
| Update - This is when you want to update your products with a different name | Your TikTok products will take the Shopify Name. | After changing the product name in Silk, the Shopify Name and Silk name will not change, but the TikTok name will. | Your TikTok product name will stay the same regardless of what name changes happen in Silk or Shopify |
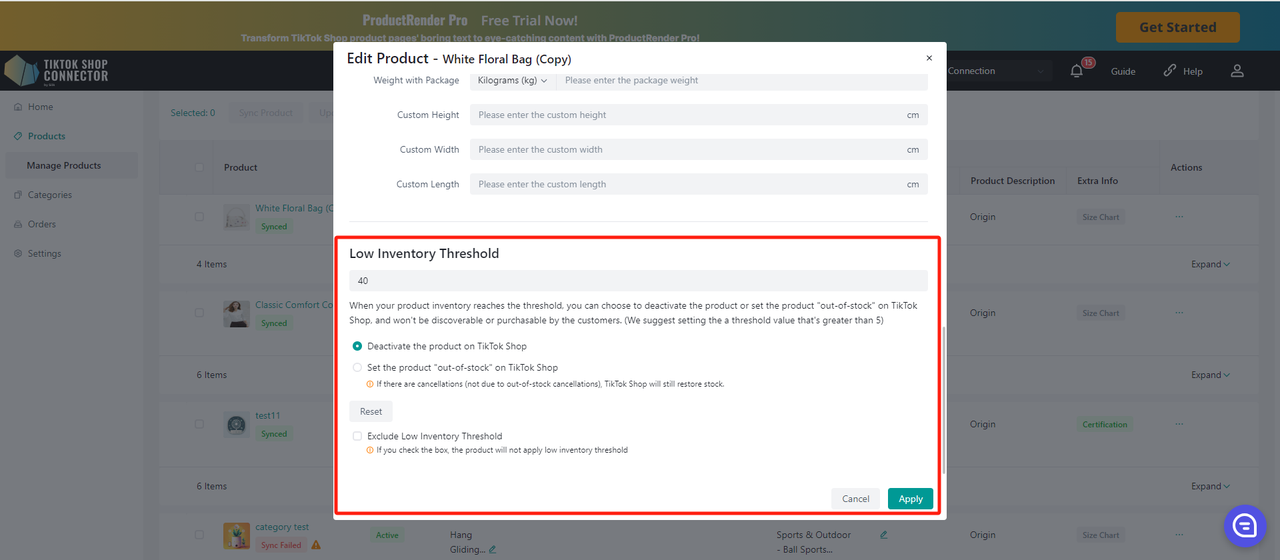
Low Inventory Threshold
When using Intra-EU, this setting applies only to products published from Local to Local, not from Global to Local.
Like the sync rule logic, product level configuration takes priority over connector level configuration.
Deactivate the product on TikTok Shop.
- When the inventory of a SKU below the preset safety threshold, the system will directly remove the product from the shelves.
- If the product has multiple SKUs, when one SKU reaches the threshold, the system will take down the entire product in TTS.
- If the user increases the sku inventory in DTC to above the safety threshold and all SKUs of the product are above the threshold, the system can activate the product in TTS.
Set the product "out-of-stock" on TikTok Shop.
- When the inventory of a SKU below the preset safety threshold, the system sets the inventory of TTS to 0.
- If the product has multiple SKUs, when a certain SKU reaches the threshold, the system sets the inventory of that SKU to 0.
- Note:If the inventory is changed to 0 and there is a cancellation of the order (not OOS), it is still possible for the inventory to be added back in TTS (the number of cancelled products exceeds the quantity)
Exclude Low Inventory Threshold.
- If you check the box, the product will not apply a low inventory threshold.
Troubleshooting "Product Push":
Click on the "blue arrow" next to the product -> View "Sync Status"
This displays the reason as to why your product was not successfully pushed to TikTok Shop. Update the product in Shopify -> Re-pull & Re-push product in the Connector
Bulk product editor
Overview
The Bulk Product Editor allows sellers to manage multiple products in a single workflow, improving operational efficiency and reducing repetitive manual work.
With this feature, sellers can:
- Select multiple products directly from the Product List
- Batch edit supported product fields
- Complete missing category mappings before editing
- Save product information as drafts in Silk
- Save and Sync products to TikTok Shop
Steps to bulk edit:
- Go to the Product List page and select products using the checkboxes on the left side.
- Products can be selected across multiple pages.
- Up to 50 products can be edited in one session.
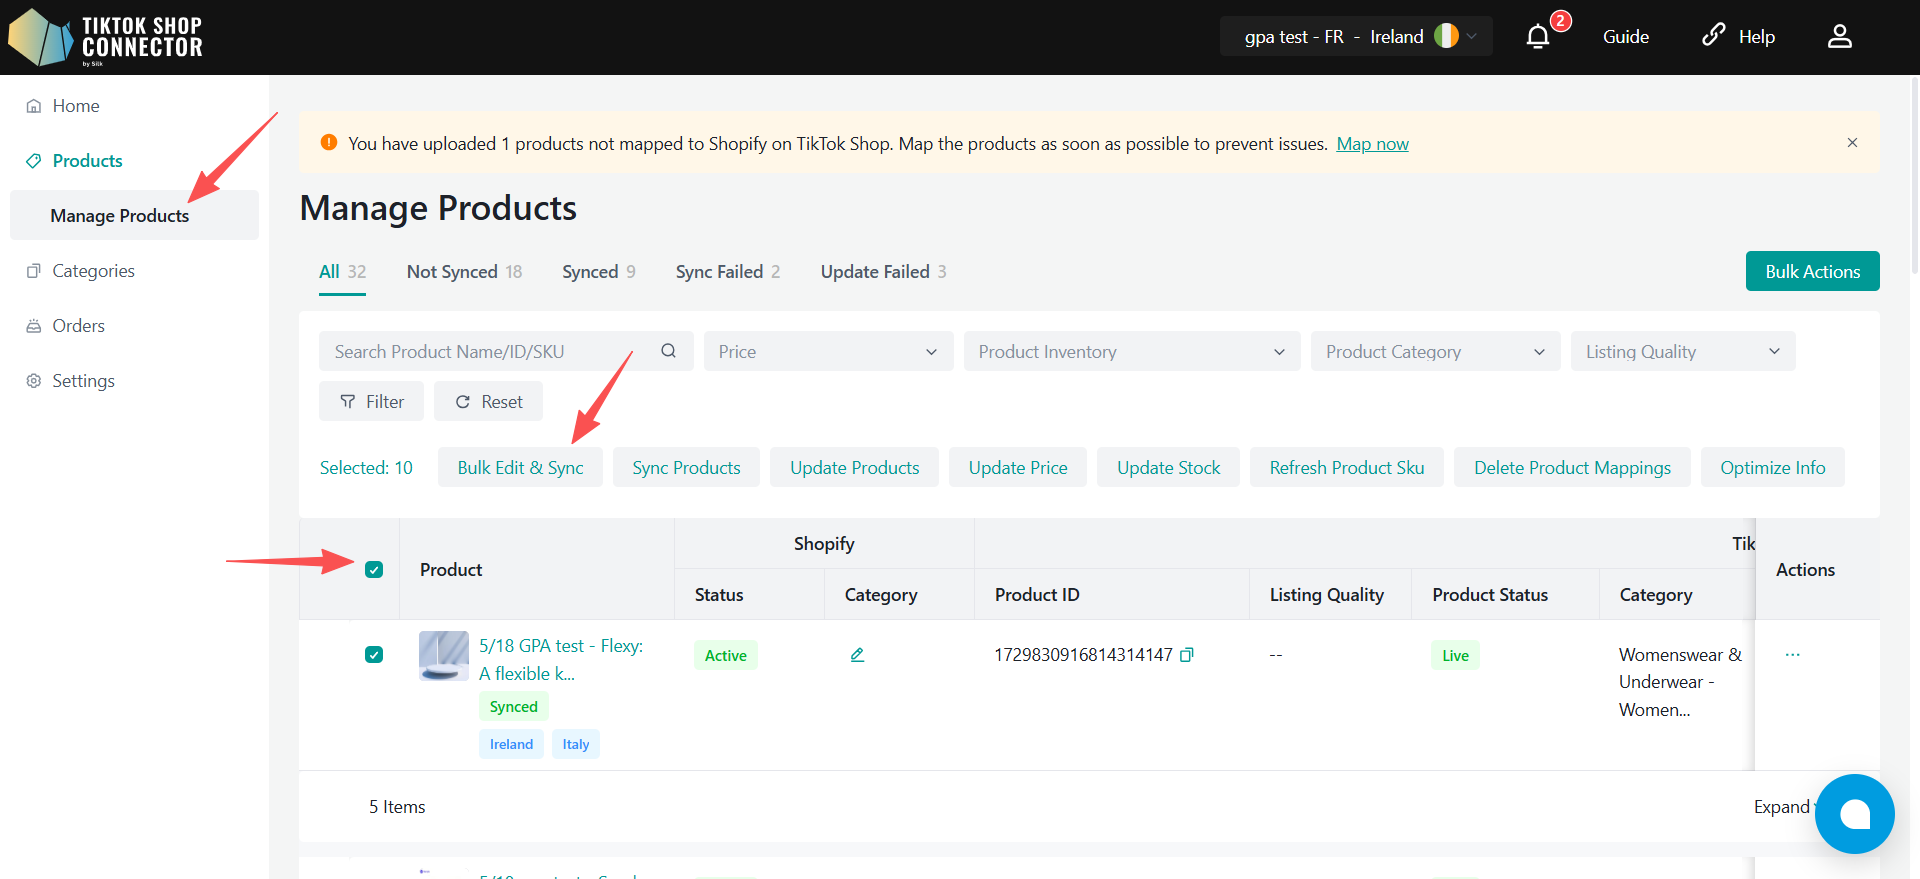
- Click Bulk Edit & Sync in the action bar.
- Before entering the editor, Silk validates whether all selected products already have TikTok Shop categories assigned.
- If any products are missing categories, sellers must complete category mapping first.
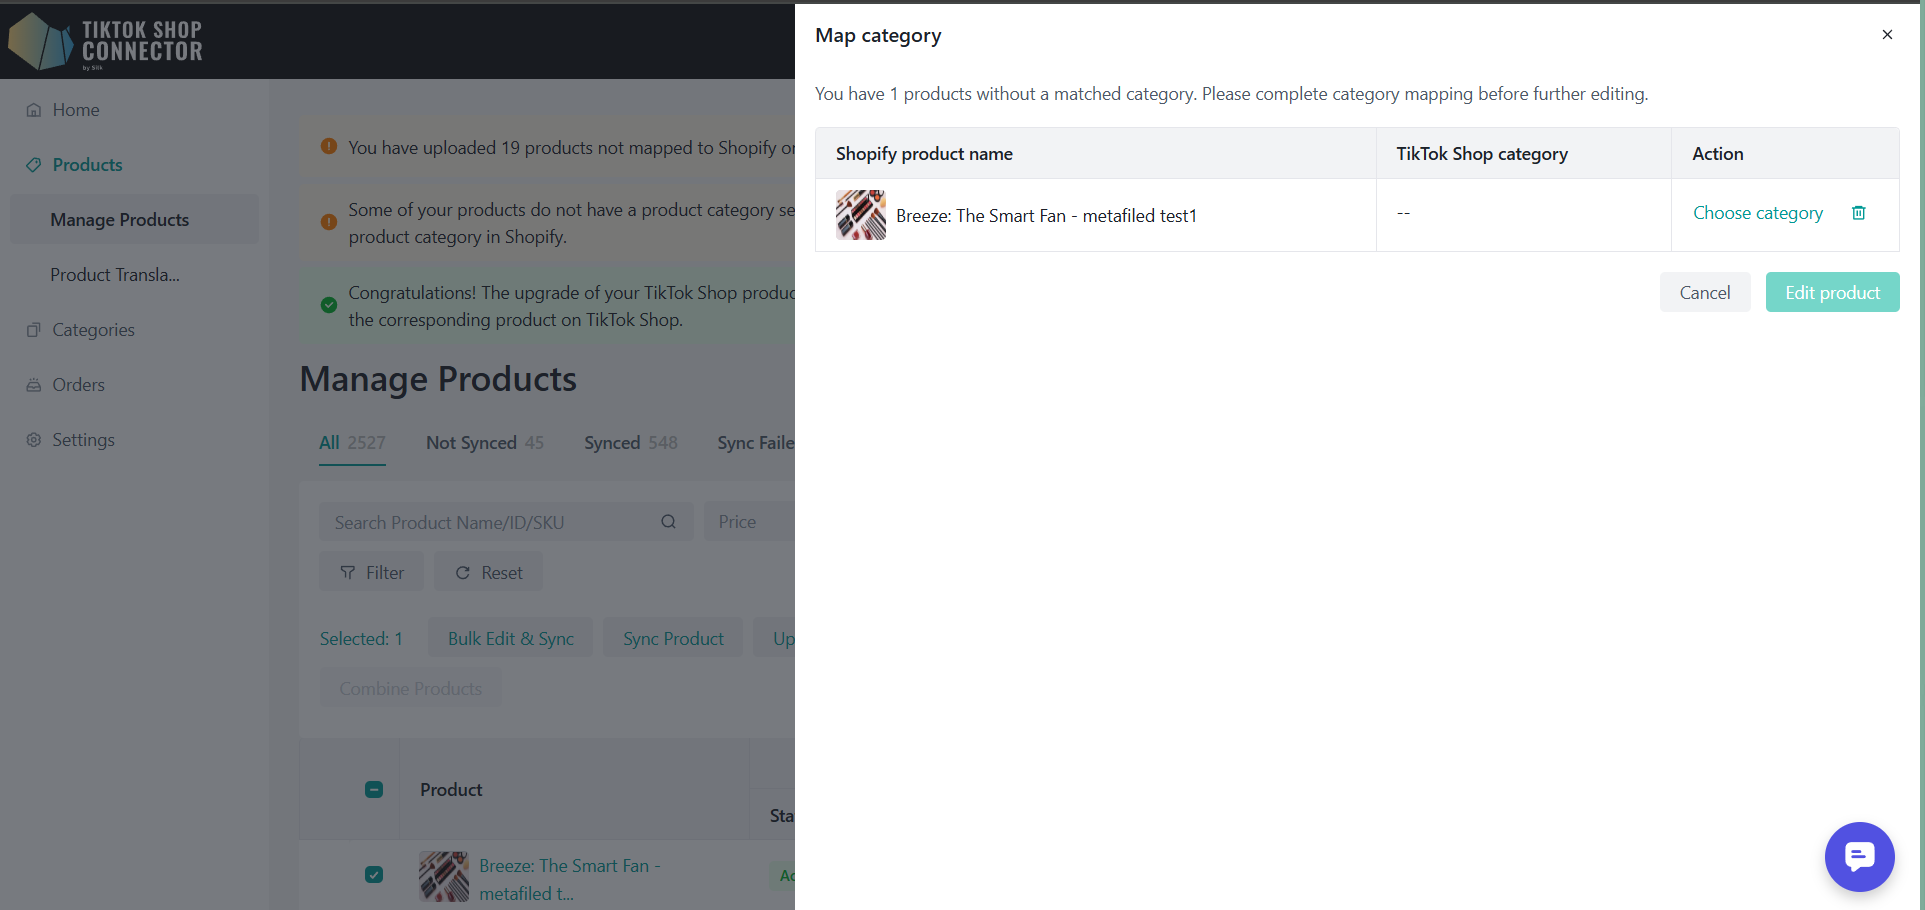
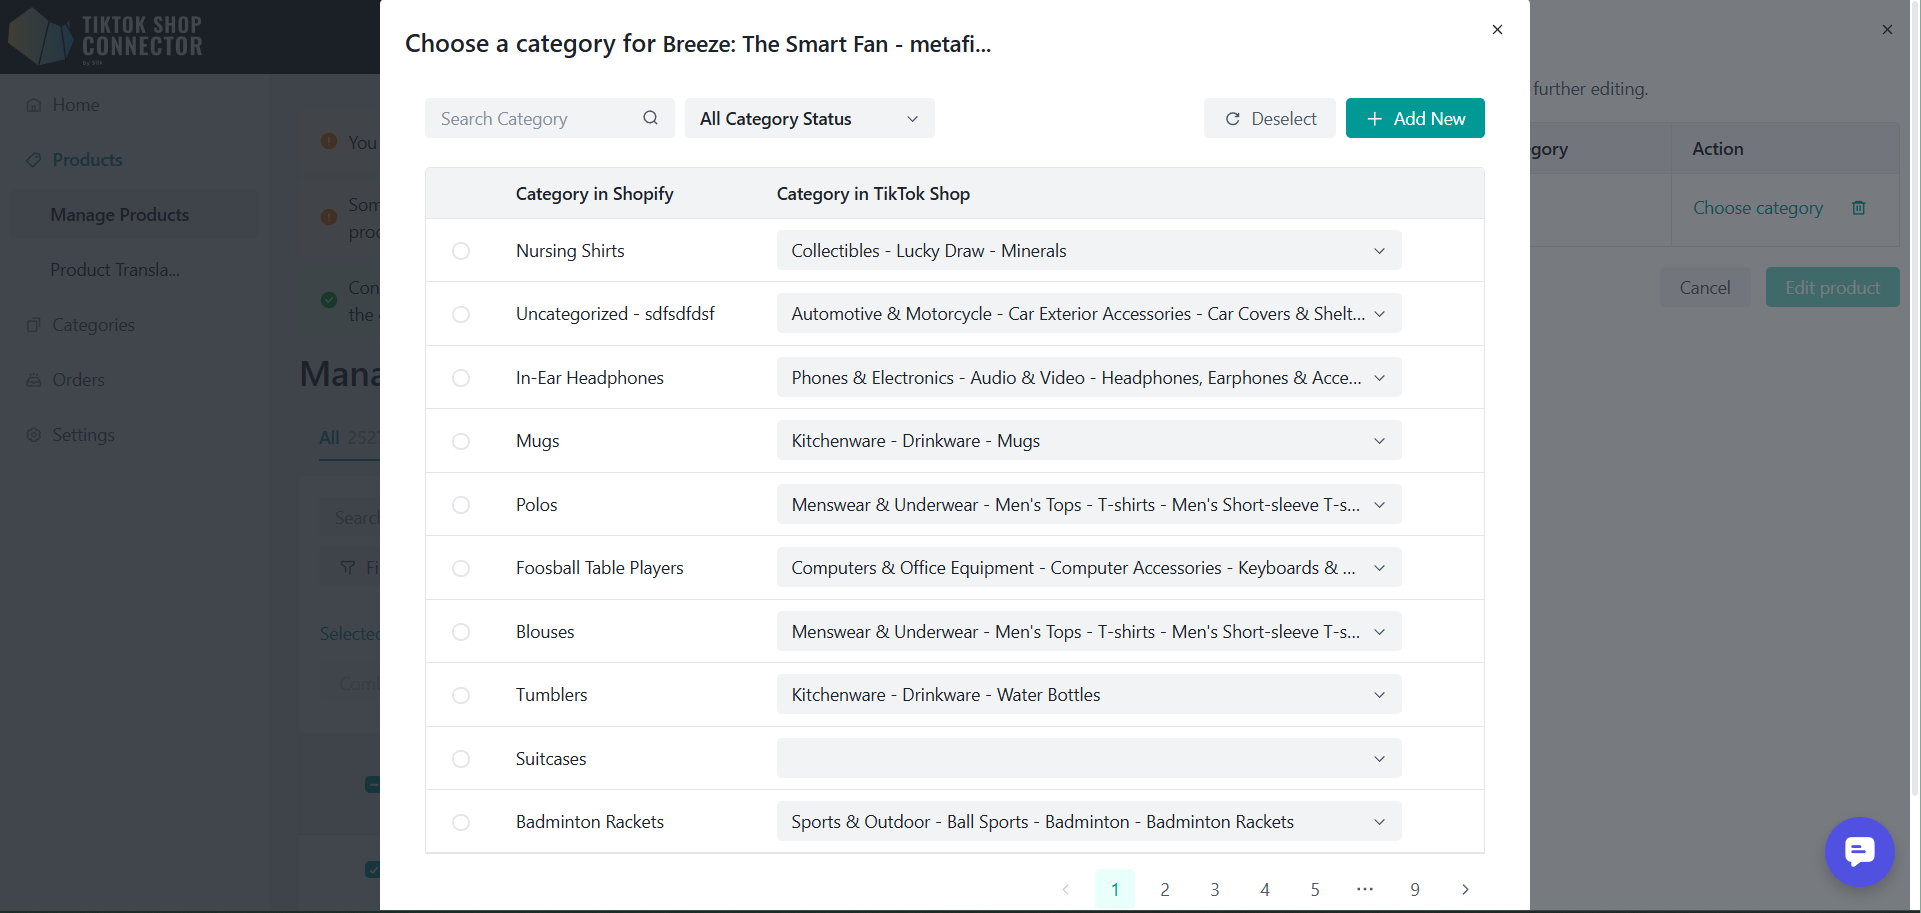
- Enter the Bulk Edit page to manage all selected products in a single table view.
- Each row represents one product.
- Each column represents an editable field.
- The table supports horizontal scrolling for additional fields.
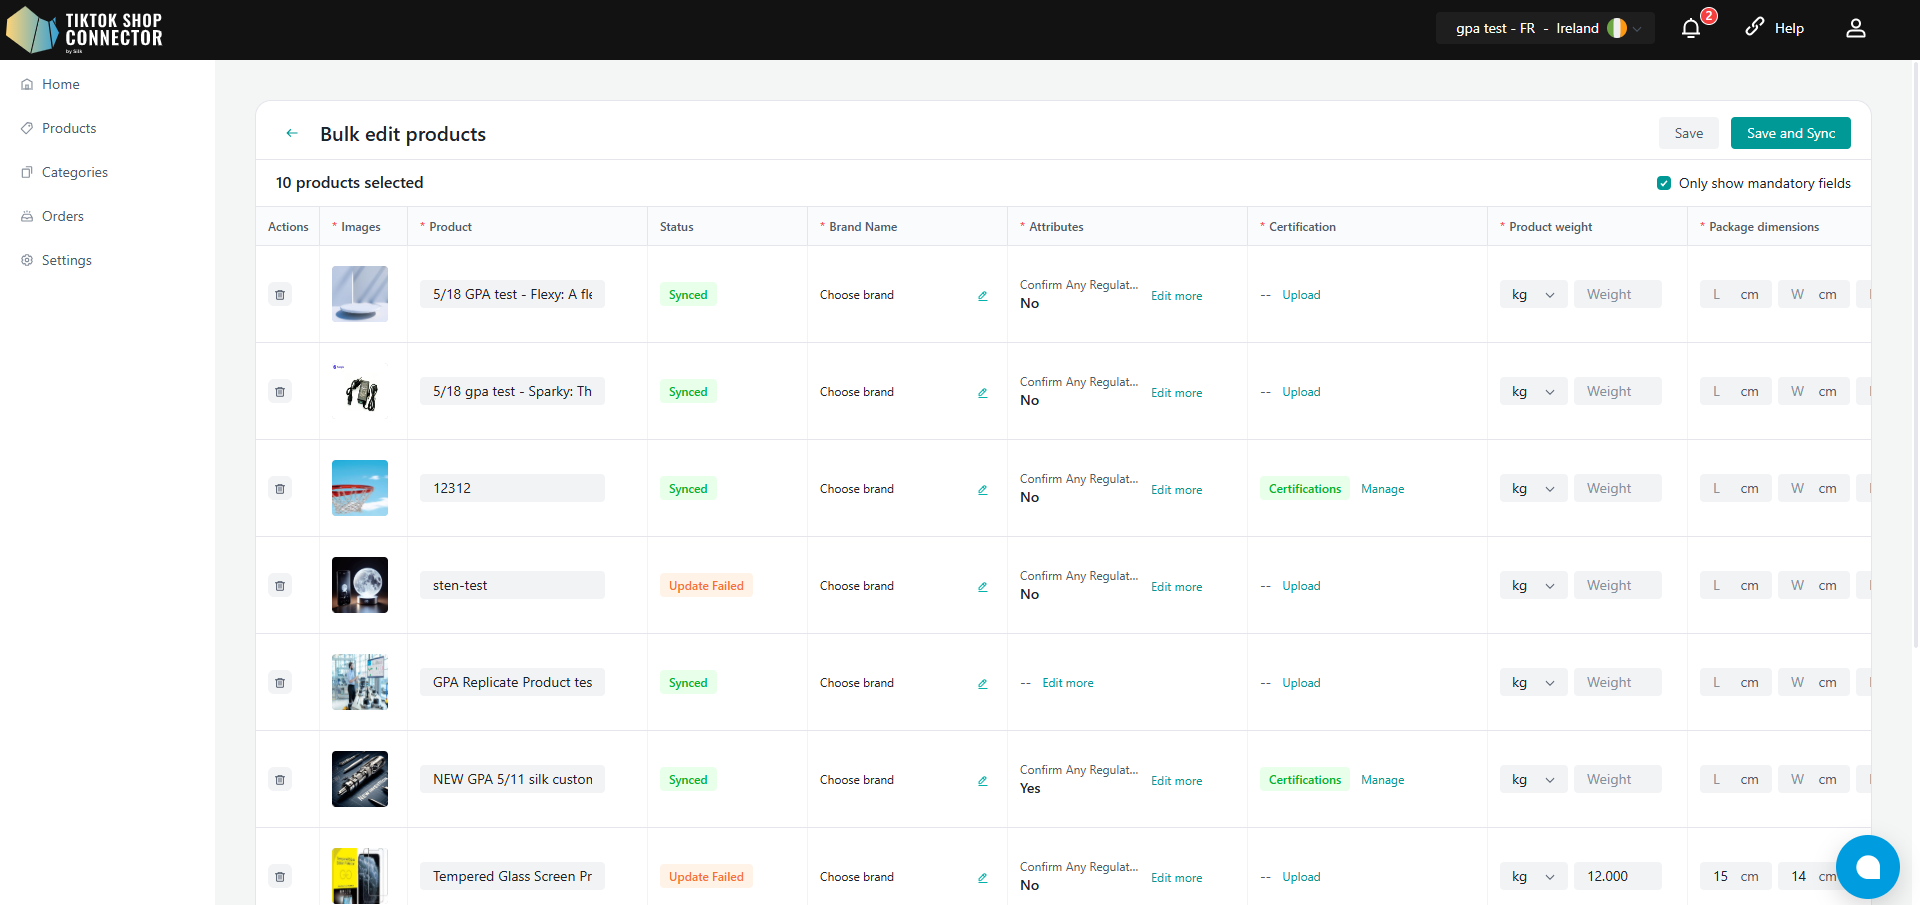
- Edit product information directly on the table. Supported fields include:
- Product Title
- Brand
- Product Attributes
- Product Category
- Product Weight
- Product Dimensions
- Certification Upload
- Size Chart
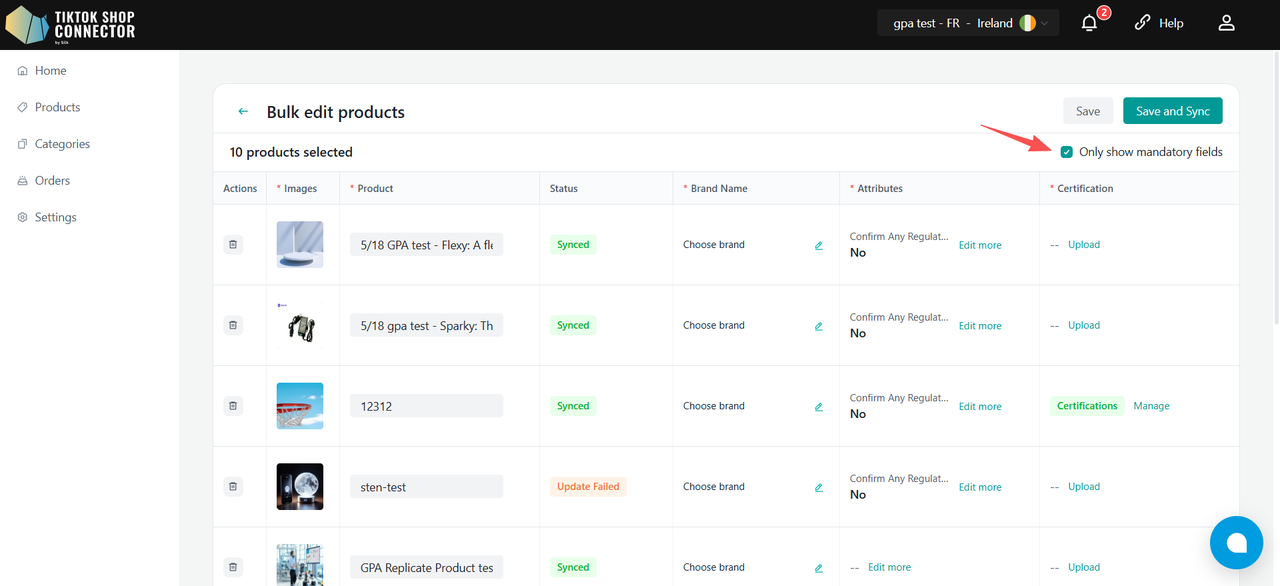
- Complete all required fields before syncing.
- Required fields are marked clearly.
- Sellers may only show mandatory fields to display only required columns.
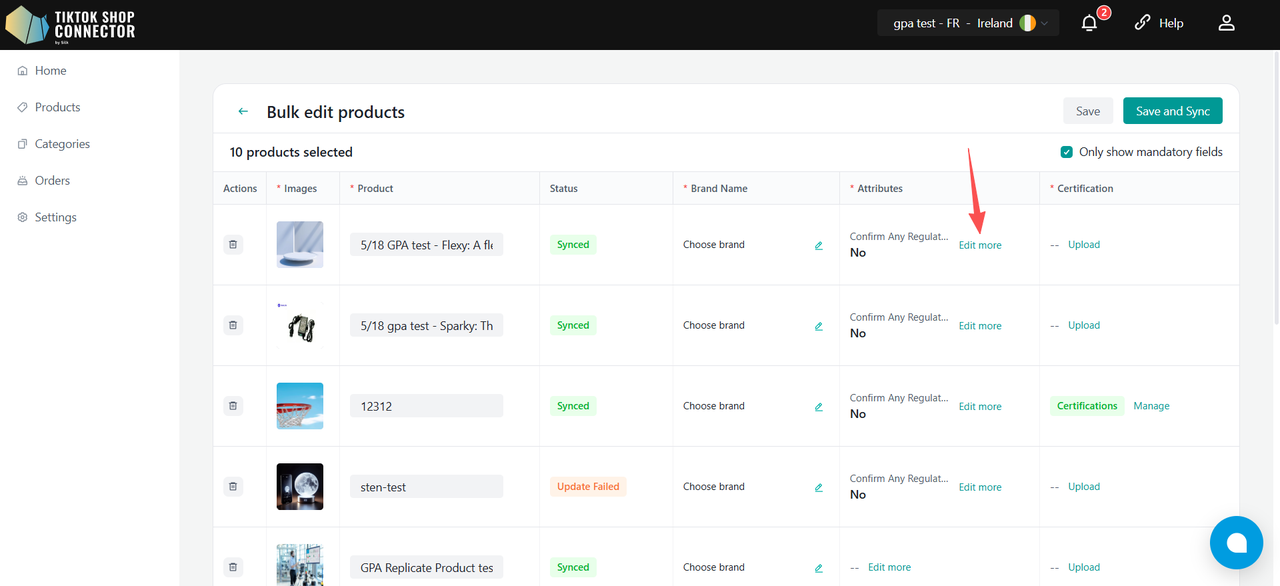
- For products with many attributes, click Edit more to open the Attribute Drawer and manage all attributes.
- Choose one of the following actions:
- Save: Save changes in Silk only without syncing to TikTok Shop.
- Save & Sync: Save changes and sync products to TikTok Shop.
- Synced products will be updated.
- Unsynced products will be created in TikTok Shop.

- After submission, sellers can review sync results in:
- Home → Task → Sync Product
Categories
- Maps the "Product Type/Category" in Shopify as the "Category in TikTok Shop" to the "Category in TikTok Shop"
- Automatically suggests a category in TTS
- Can be changed or mapped to TikTok Shop categories manually
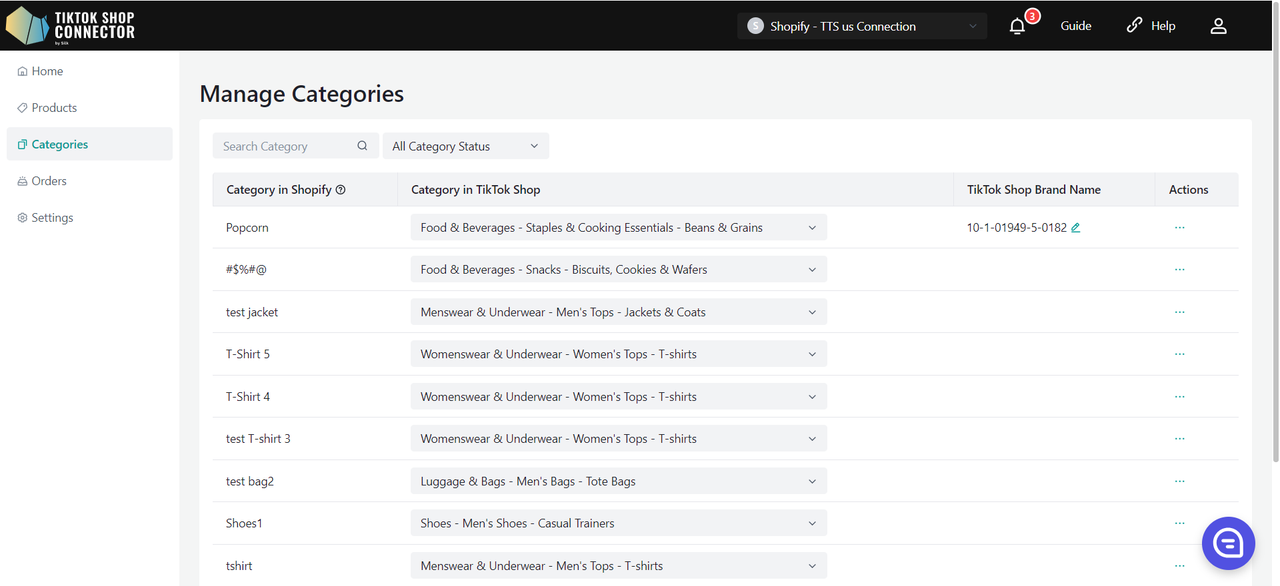
Required: Category Mapping
All products must have the "product type/category" filled out in Shopify. The Connector uses this field as the "Category in Shopify" to map it to the "Category in TikTok Shop"
| Product Type/Category in Shopify | "Category in Shopify" for Connector by Silk |
|---|---|
 |  |
Bulk Upload Certifications/Attributes/Compliances at the Category Level
All products under the category will have the same attributes/certifications/Compliances.
If the products in this category require a certificate and attribute, the extra info column in the PLP will display red tags for the certificate and attribute.
You can click on the red tag to update the required fields.
Bulk Choose Brand at the Category Level
All products under the category will have the same brand.
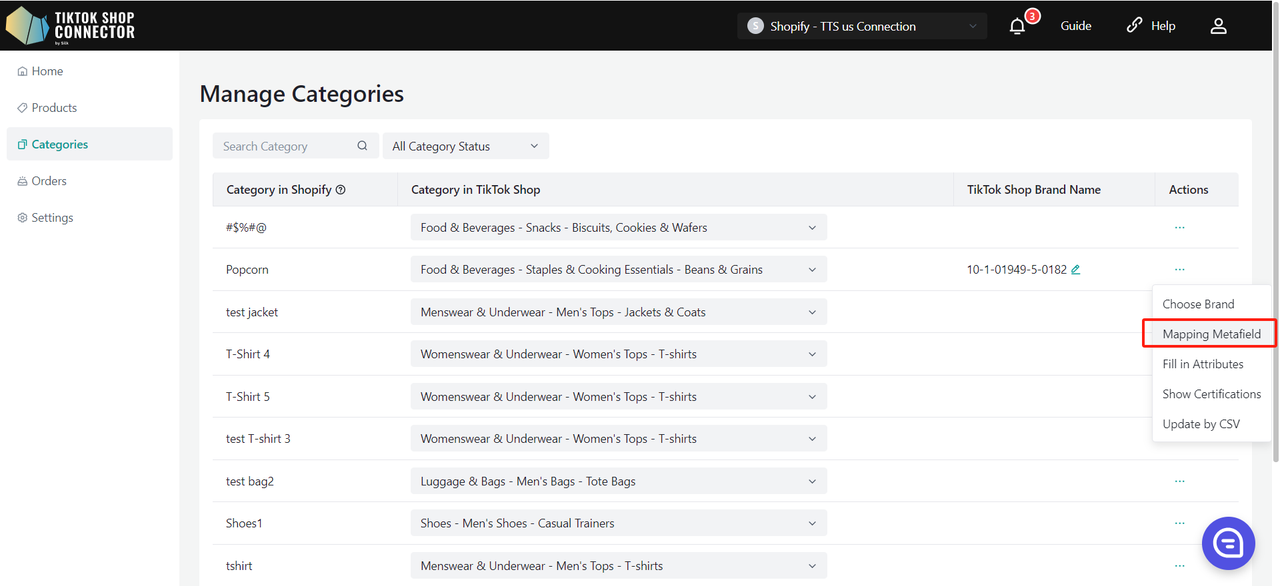
Bulk Matefield Mapping at the Category Level
All products under the category will have the same matefield mapping.
Update attributes, brand for products by CSV at category level
In the update by csv, you can use csv files to update product attributes and brands in batches.
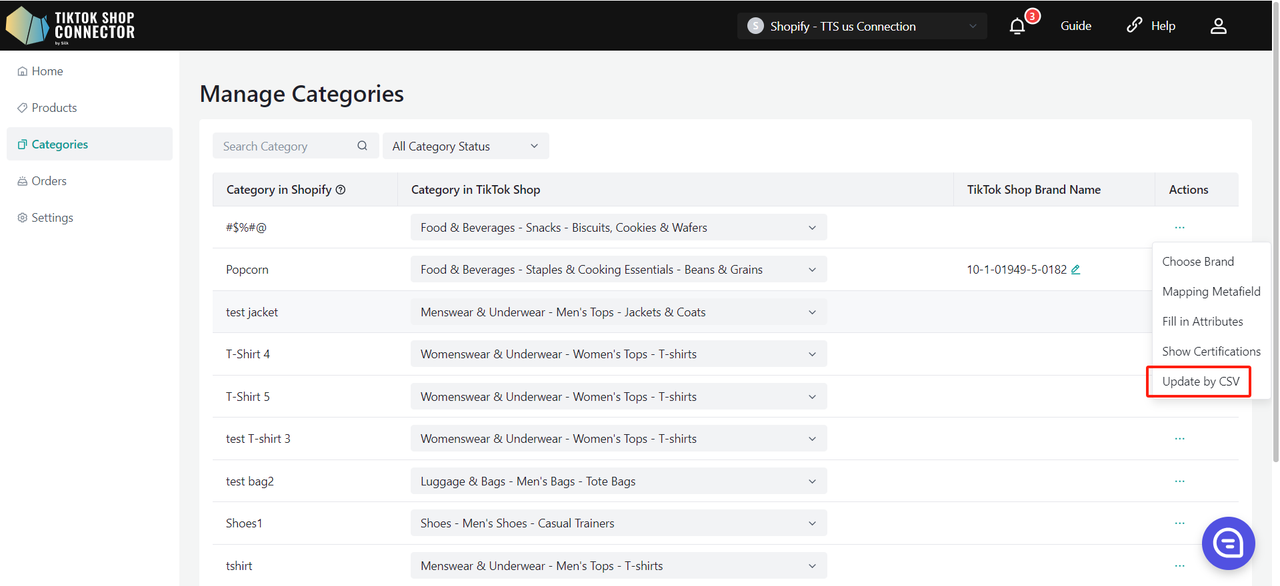
First, you need to download the template, which contains all the product information in the category.
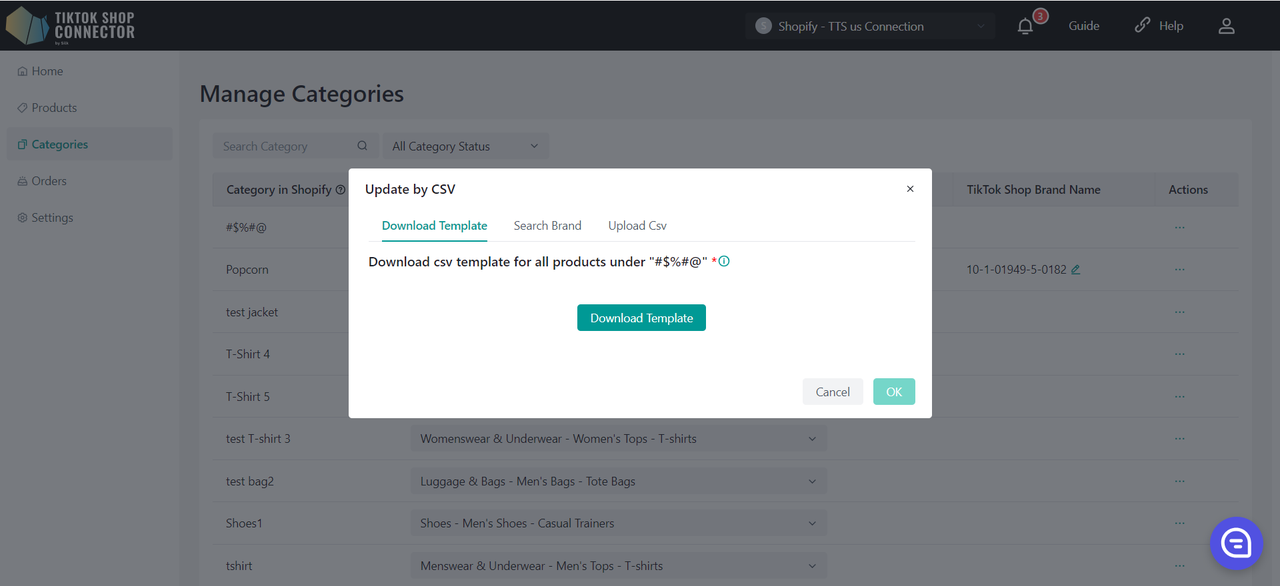
Then you need to fill in the correct information in the downloaded template. Since you need to fill in the brand ID in the CSV, the search brand module is used to help you find the brand ID information in the TTS.

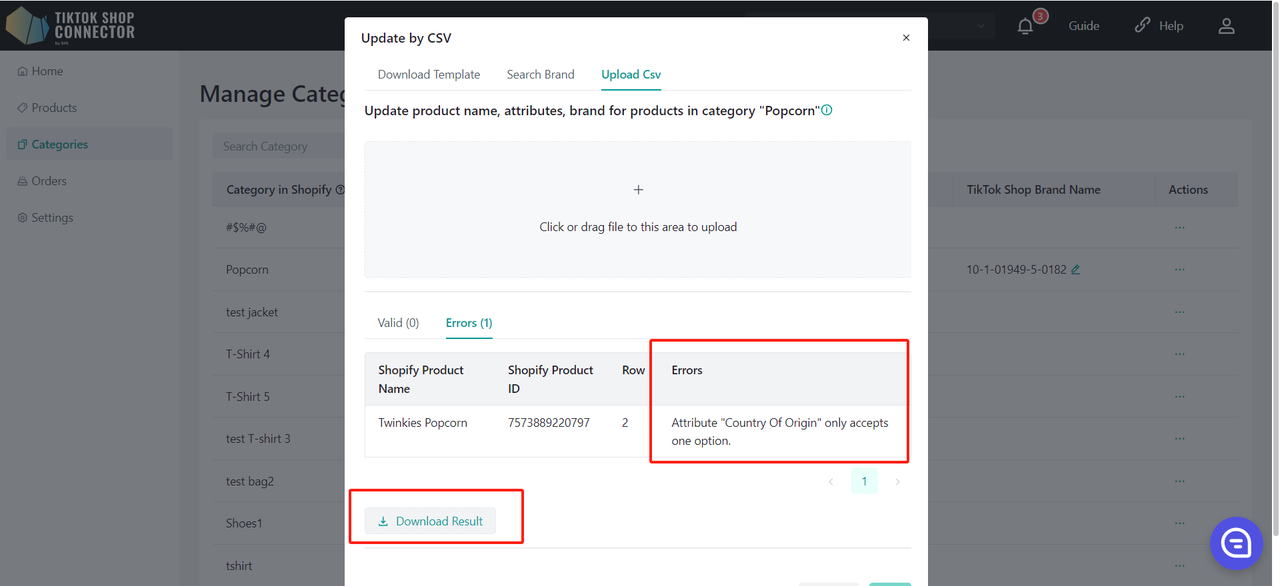
When you have filled in all the information, upload the CSV file. The following is the file verification result, where valid is the product data that can be updated through the verification.
Error indicates the data that cannot be updated after the verification fails. The error module will cause failure. You can also download the file to view the cause of failure.
Click (...) under "actions" for the product -> "Fill in compliance" Adding, Modifying, or Deleting Responsible Person/Manufacturer for the products under this category:
Add/Modify Responsible Person/Manufacturer:
- Add: Select the currently added Responsible Person/Manufacturer from the dropdown menu.
- Modify: Select the Responsible Person/Manufacturer from the dropdown (if already added) and edit the fields as needed.
- Delete: Select the Responsible Person/Manufacturer and click the "×" button.
Click on "Qualification Center" to navigate to the corresponding tab on the "setting->Qualification Center" page.
The configuration priority follows the same rule as attributes, where the product level has higher priority than the category level, and the category level has higher priority than the store level.
Orders
- Displays all orders placed in TikTok Shop
- Any orders that come from TikTok will be automatically synced into the Connector and then into Shopify
- Fulfill orders in Shopify
(See How to Sync Orders in the Integration Manual)
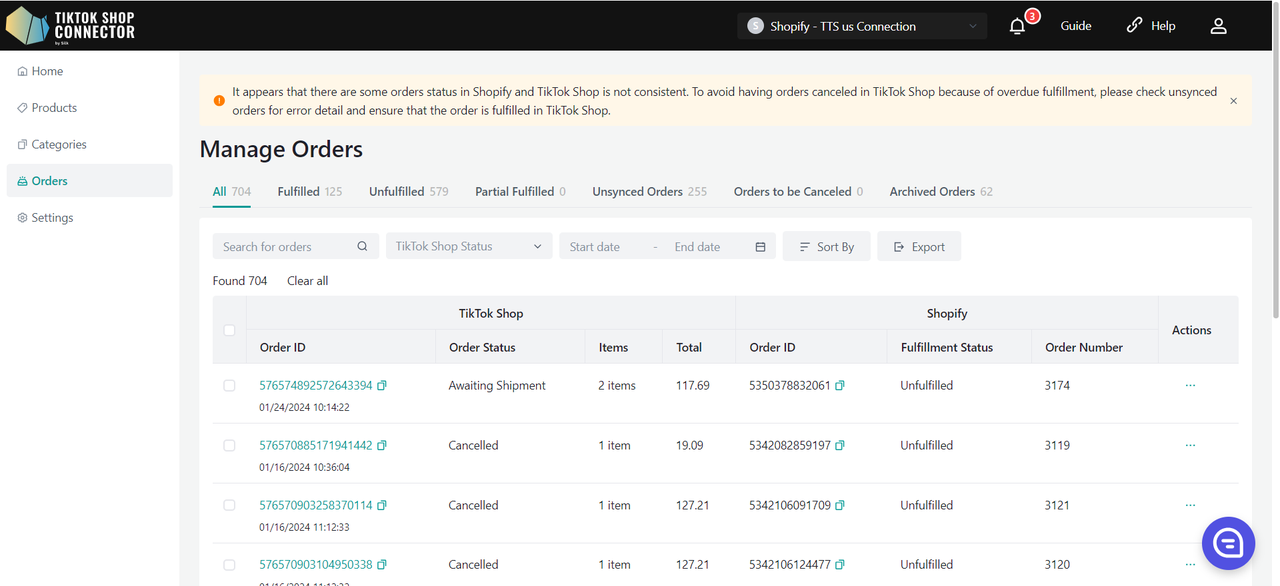
Order Tab Overview
The Order Tab allows merchants to view and manage orders based on their fulfillment and processing status. Each tab represents a different stage or condition of the order lifecycle:
| Tab Name | Description |
|---|---|
| All | Displays all orders across all statuses. |
| Fulfilled | Orders that have been fully fulfilled on the DTC platform. |
| Partial Fulfilled | Orders that have been partially fulfilled (some items shipped, others pending). |
| Unfulfilled | Orders that have not yet been fulfilled. |
| Action Required | Orders that failed to sync or encountered blocking issues. Merchant intervention is required to resolve the issue before processing can continue. |
| System Flagged | Orders flagged by the system due to warnings or non-blocking issues. These may be automatically resolved through retries or system fixes. |
| Order to be Cancelled | Orders that are scheduled to be cancelled by TikTok Shop. |
| Archived Orders | Orders that have been manually archived by the merchant using the "Archive" action. These are stored for reference and excluded from active workflows. |
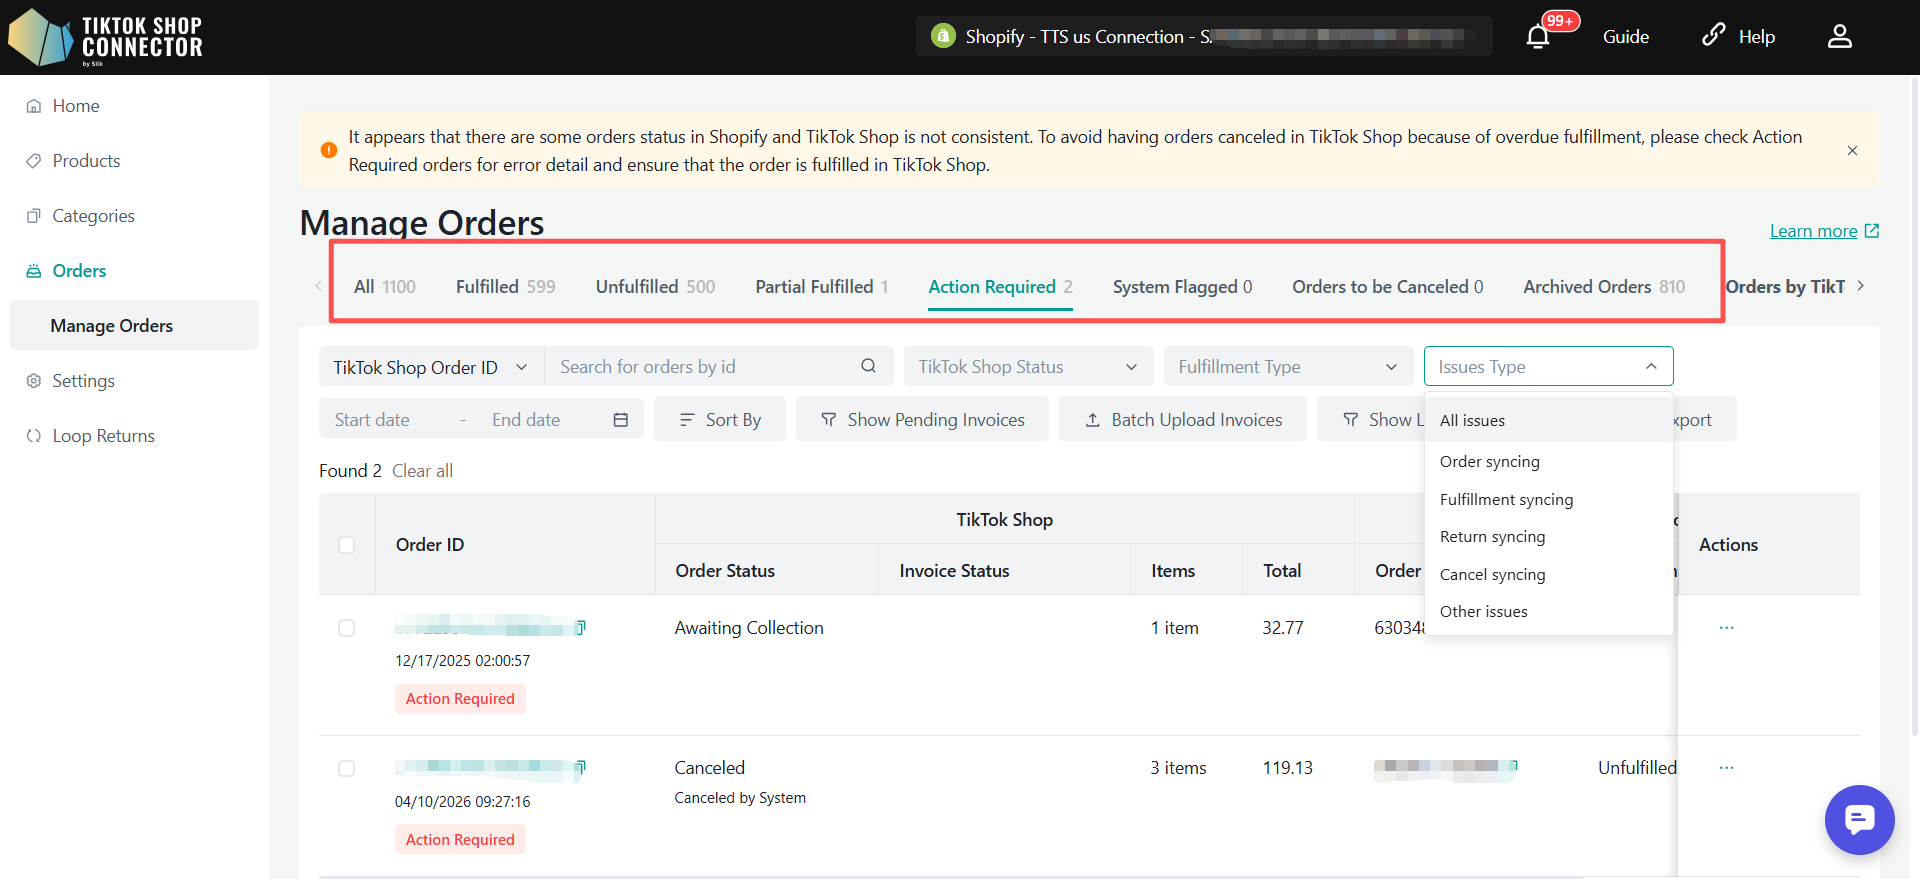
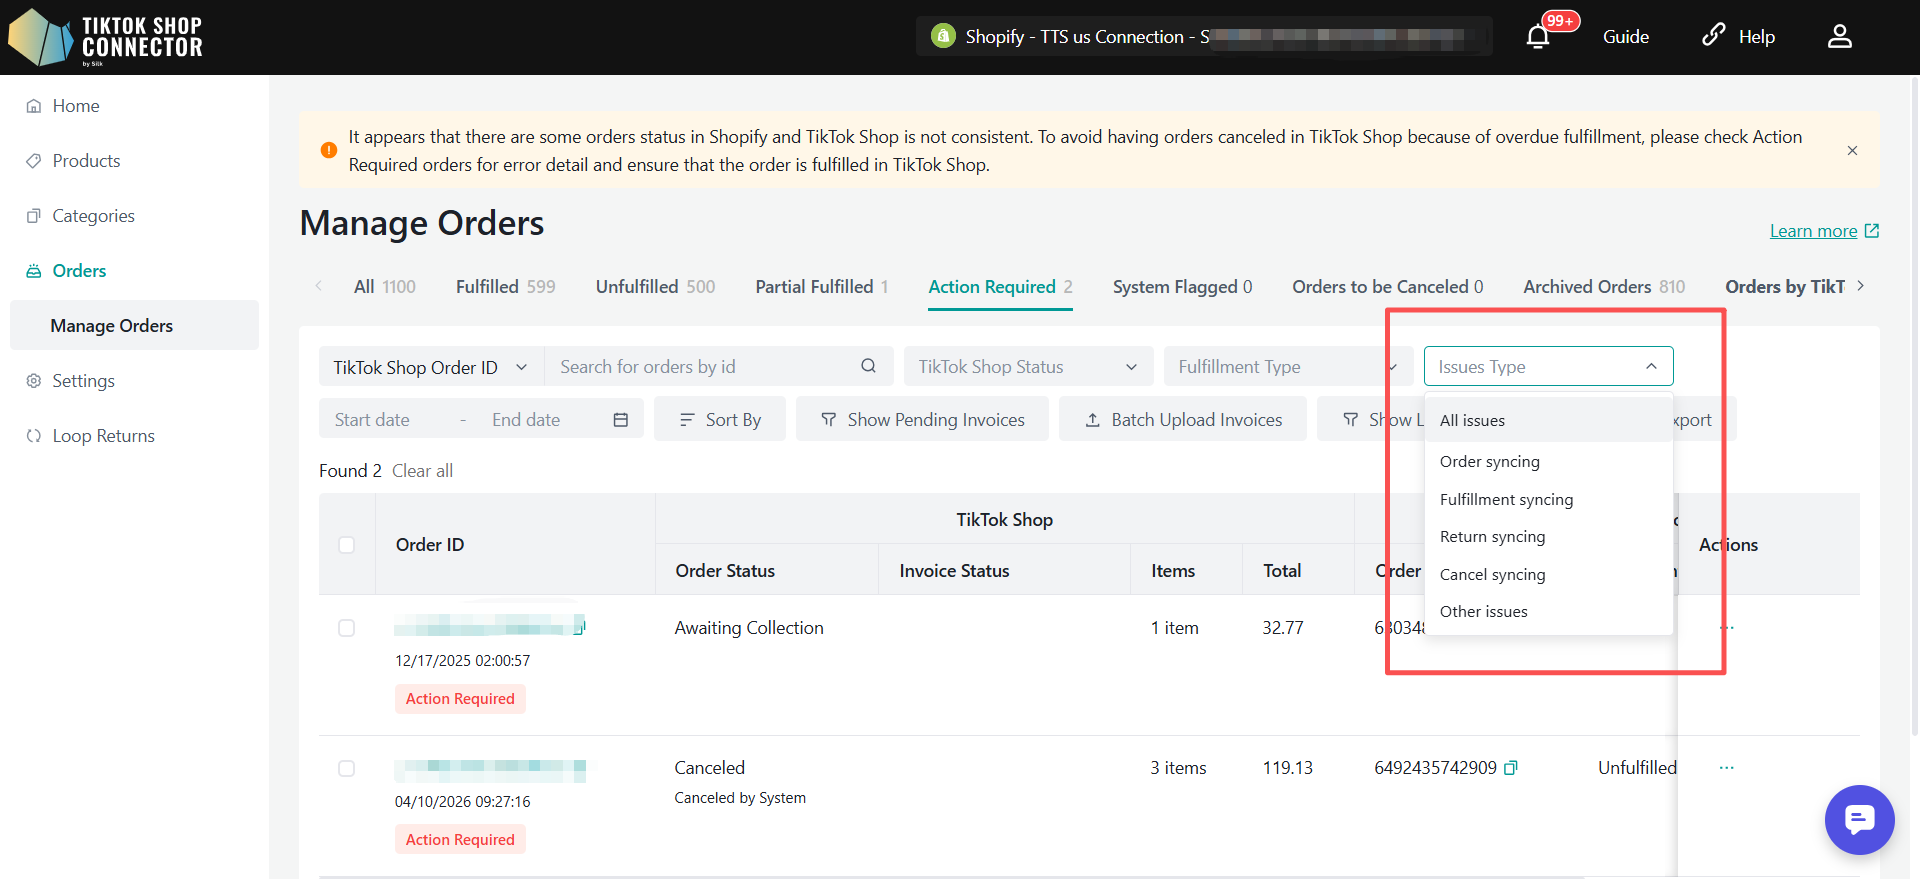
Issues Type Filter
The Issues Type filter is available in the Order → Action Required tab and allows merchants to quickly identify and manage orders based on the type of issue encountered.
| Option | Description |
|---|---|
| All issues | Displays all orders with any type of issue. |
| Order syncing | Orders with issues related to order data synchronization. |
| Fulfillment syncing | Orders with issues related to fulfillment synchronization. |
| Return syncing | Orders with issues related to return synchronization. |
| Cancel syncing | Orders with issues related to cancellation synchronization. |
| Other issues | Orders with issues that do not fall into the above categories. |
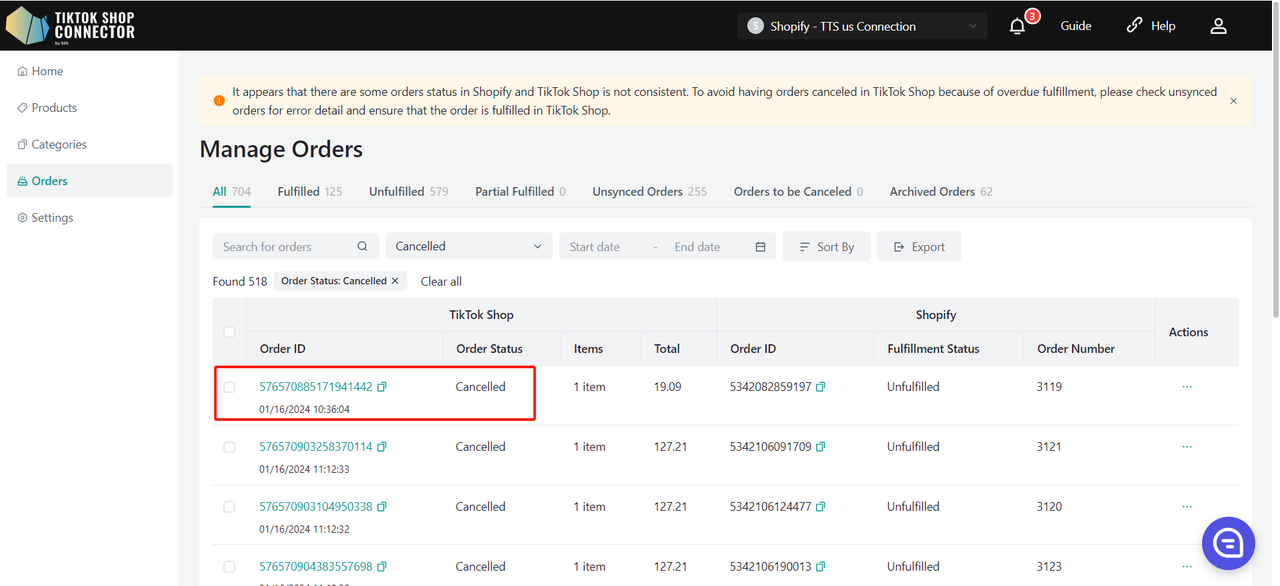
Order cancelled prompt
When the system discovers that one or more orders have been cancelled by TTS, Silk Connector will perform the following actions:
Warning in the top banner of the page: One or more orders have been canceled due to product unavailability. Click to view details.
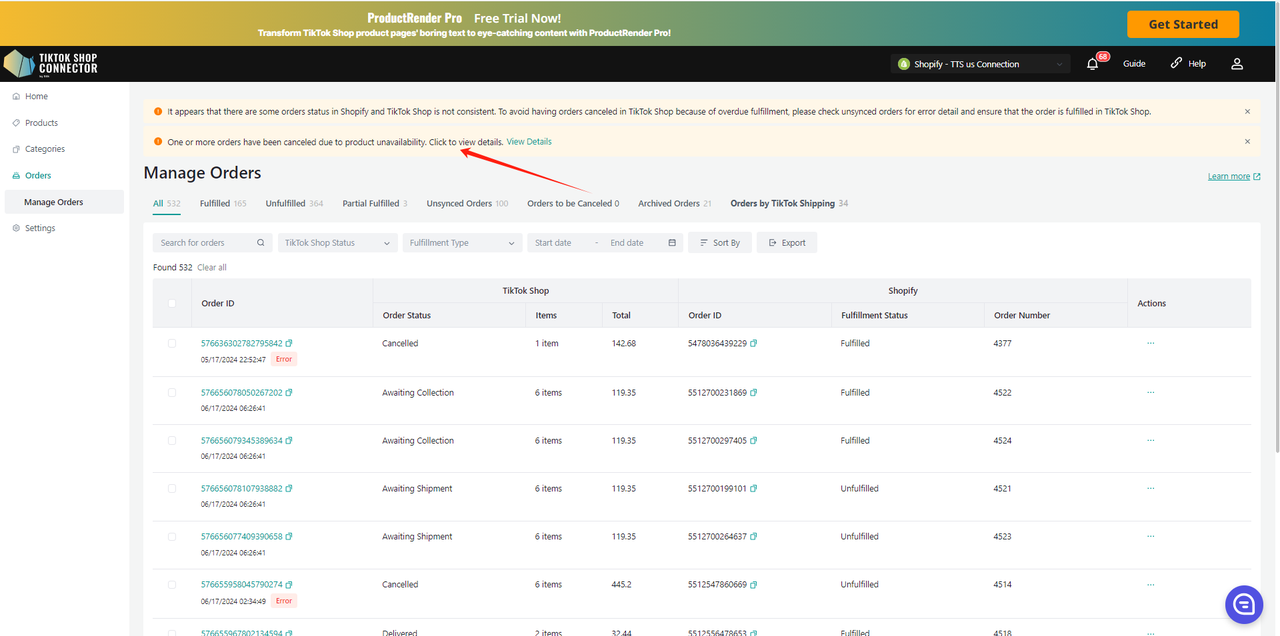
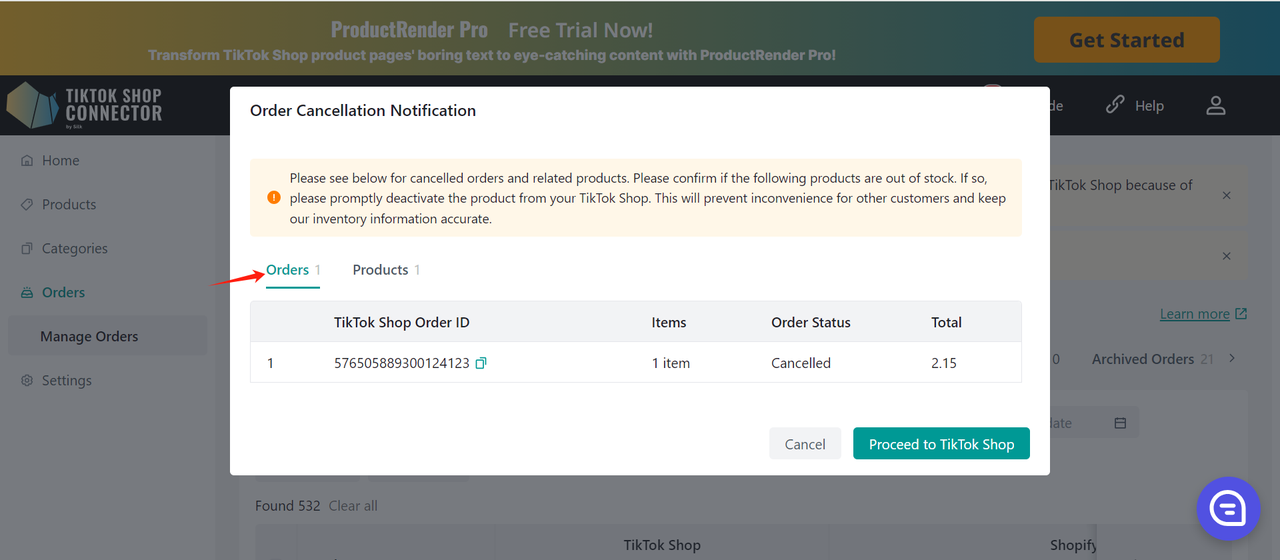
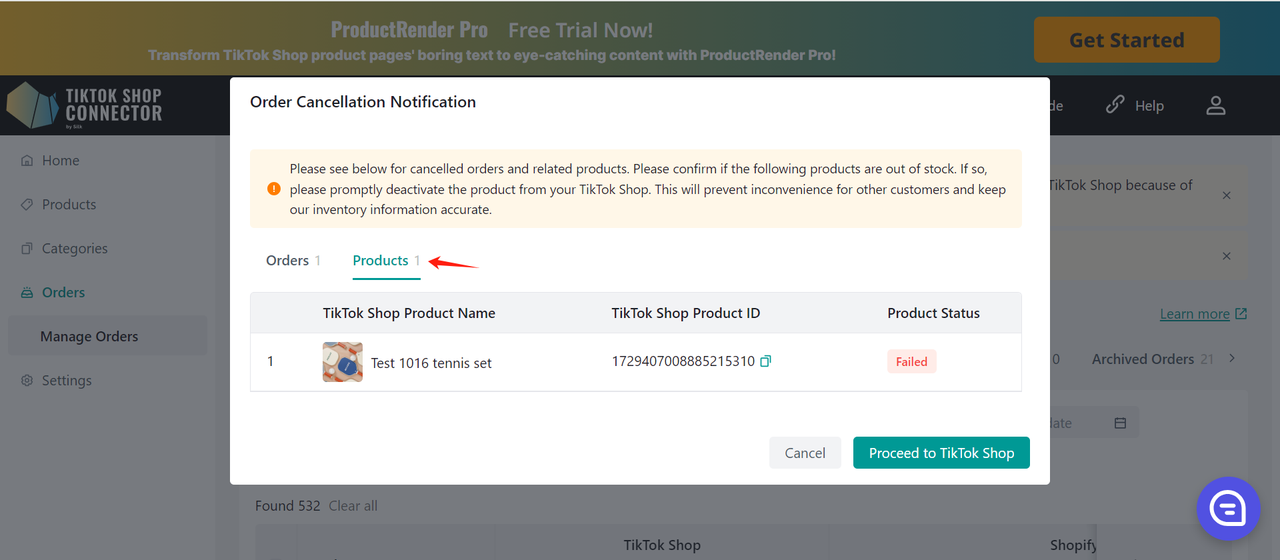
After clicking on the view detail, a pop-up will display the cancelled order information and product information in a separate tab. Please confirm whether the product is out of stock. If out of stock, the product needs to be taken down from TTS.
Click on the Process to TikTok Shop button: Open a new page to enter the TTS product management page.
Display all cancelled order information in the pop-up, and add the order to the list every time an oversold order is found. If the product is checked and no longer oversold, reduce it. Orders that have not been cancelled will not display banners.
Sync TikTok Shop 4PL Shipping Labels to Shopify
Applicable Regions: France, Italy, Germany, Spain, Ireland
This feature allows merchants on the Premium Plan to automatically sync TikTok Shop 4PL shipping labels back to Shopify.
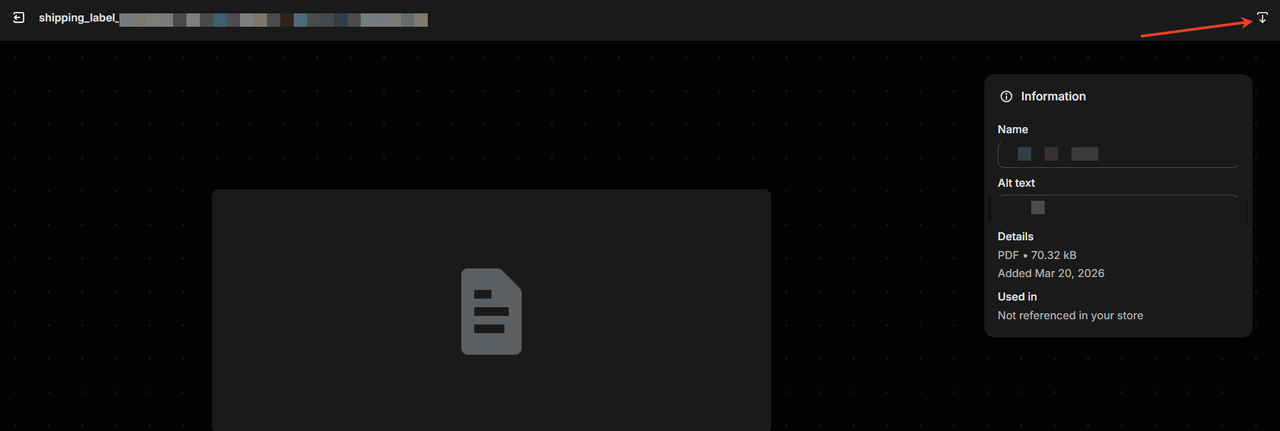
- The shipping label information is stored in the order metafield of each Shopify order.
- The label is uploaded in PDF format, in which merchants can access the return shipping label details directly from the order metafield in Shopify.
- This enables easier tracking and management of 4PL shipments without leaving the Shopify interface.
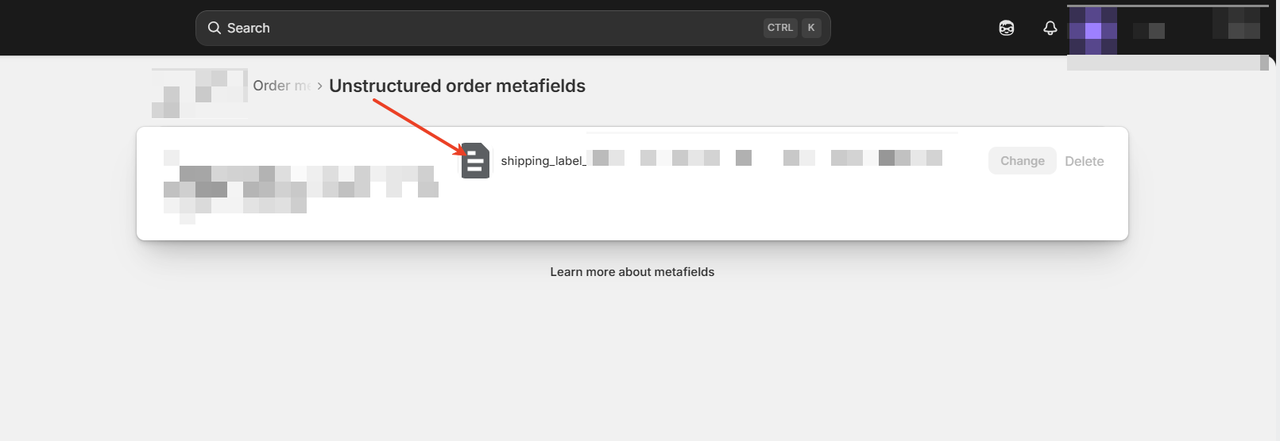
How to access the shipping label:
- Open the Shopify Order Detail page.
- Navigate to Metafields → View All → View Unstructured Metafields.
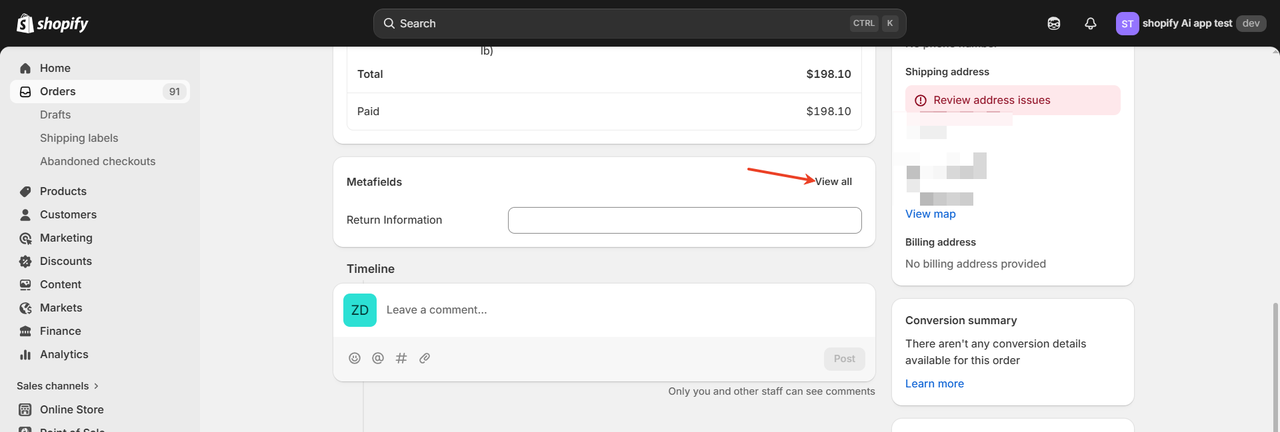
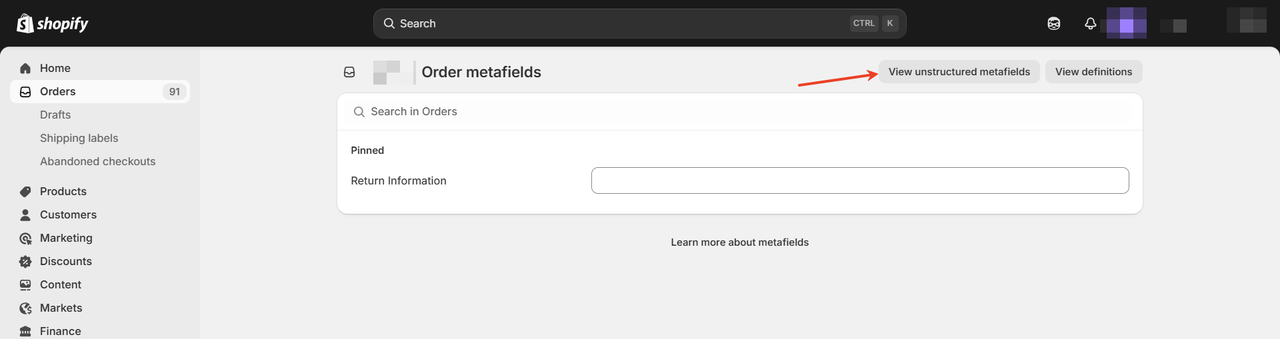
- Click the file icon to preview the PDF.
- Click the download button in the top-right corner to save the PDF.
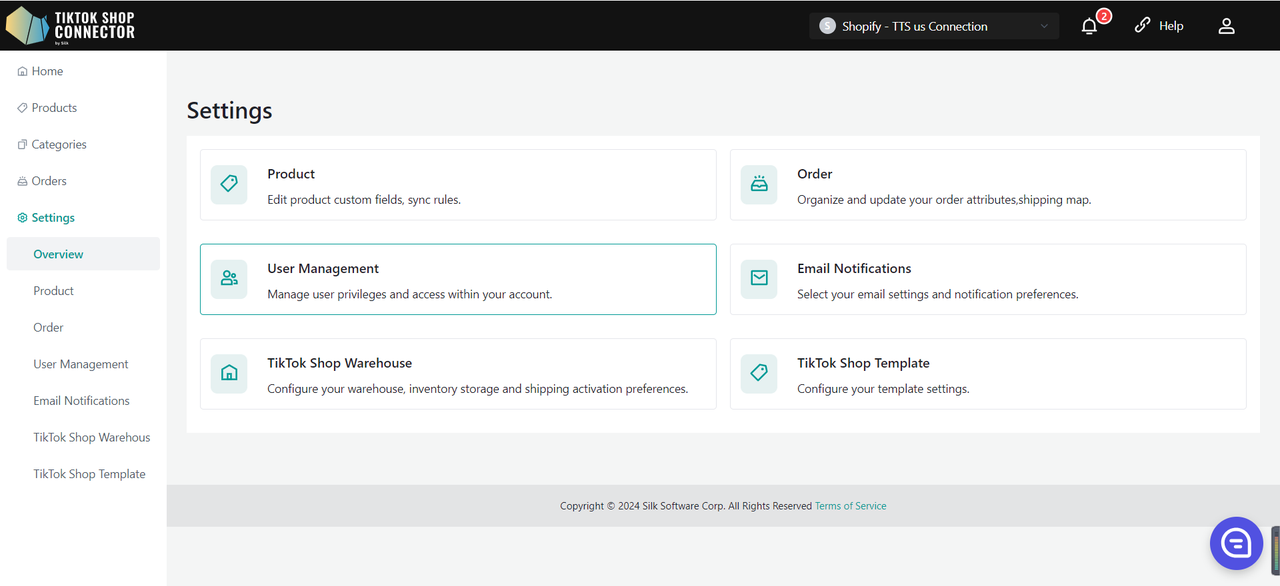
Settings
- Displays "Product Settings", "Order Settings", "User Management", "Email Notifications", "TikTok Shop Warehouse Setting" and "TikTok Shop Template Settings".
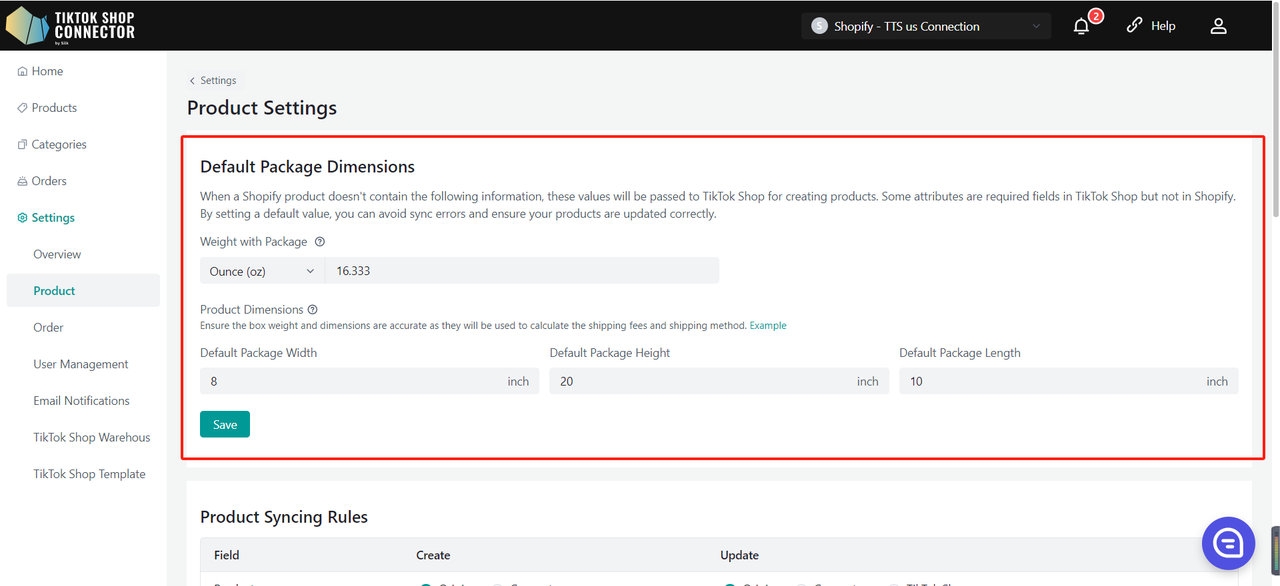
Product Settings
Custom Attributes
Fill in all required fields
TikTok Shop requires default package/product settings that are not in Shopify (even if you have multiple package sizes - TikTok Shop only requires one). You will be able to update your default package length, height, width, and weight here.
Length, height, width, and weight must be whole integers.
Sync Rules
These allow you to have different product names, descriptions, and prices in your TikTok Shop versus your Shopify Shop
Field Create: Used before pushing products Update: Used after product exists in TTS Product Name Original: Sets the TikTok Shop Product name
from the Shopify store.Create: Name can be changed in Silk,
the Silk name will be the product name in TikTok.Origin: Sets the TikTok Shop product
name as the Shopify product name.Connector: Name can be changed in Silk,
the Silk name will be the product name in TikTok.TTS: TikTok Product name will stay the same
regardless of Shopify or Silk name.Product Description Origin: Sets the product description
as the one from Shopify.X Origin: The TikTok Shop product
description is the Shopify product description.X TTS: The TikTok Shop product description is
what is set in TikTok.Product Price Origin: Sets the product price as the one
from Shopify.X The TikTok Shop product price is
the Shopify product price.X The TikTok Shop product price is what is set in TikTok. Product media Origin: Sets the product media as the one from Shopify. X Origin: Sets the TikTok Shop product media as the Shopify product media. X The TikTok Shop product media is what is set in TikTok. Product barcode Origin: Sets the product barcode as the one from Shopify. Don't sync: Do not sync product barcode from Shopify. Origin: Sets the TikTok Shop product barcode as the Shopify product barcode. X The TikTok Shop product barcode is what is set in TikTok. Product stock Origin: Sets the product stock as the one from Shopify. Don't sync: Do not sync product stock from Shopify. Origin: Sets the TikTok Shop product stock as the Shopify product stock. X The TikTok Shop product stock is what is set in TikTok. Product status X Don't sync: Do not sync product status from Shopify. Origin: Sets the TikTok Shop product status as the Shopify product stock. X The TikTok Shop product status is what is set in TikTok. Product video Origin: Sets the product video as the one from Shopify. Don't sync: Do not sync product video from Shopify. Origin: Sets the TikTok Shop product video as the Shopify product barcode. X The TikTok Shop product video is what is set in TikTok. Product brand X Connector: Brand can be changed in Silk, the Silk brand will be the product brand in TikTok. X Connector: Brand can be changed in Silk, the Silk brand will be the product brand in TikTok. TTS: TikTok Product brand will stay the same regardless of Shopify or Silk brand. 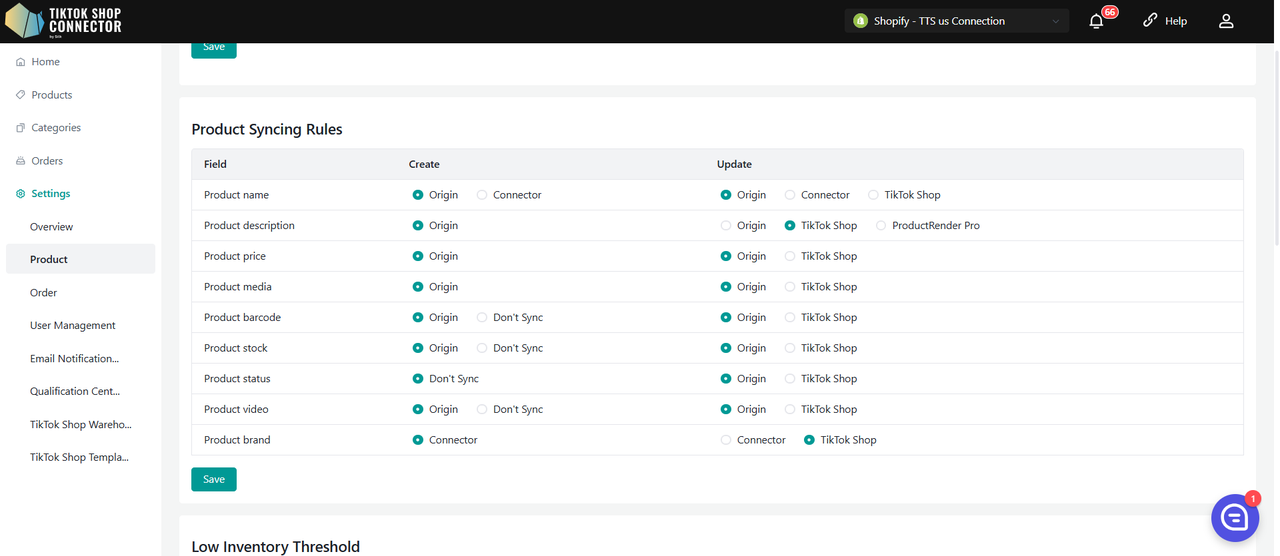
Low Inventory Threshold
When using Intra-EU, this setting applies only to products published from Local to Local, not from Global to Local.
When your product inventory reaches the threshold, you can choose to deactivate the product or set the product "out-of-stock" on TikTok Shop, and won't be discoverable or purchasable by the customers. (We suggest setting the a threshold value that's greater than 5)
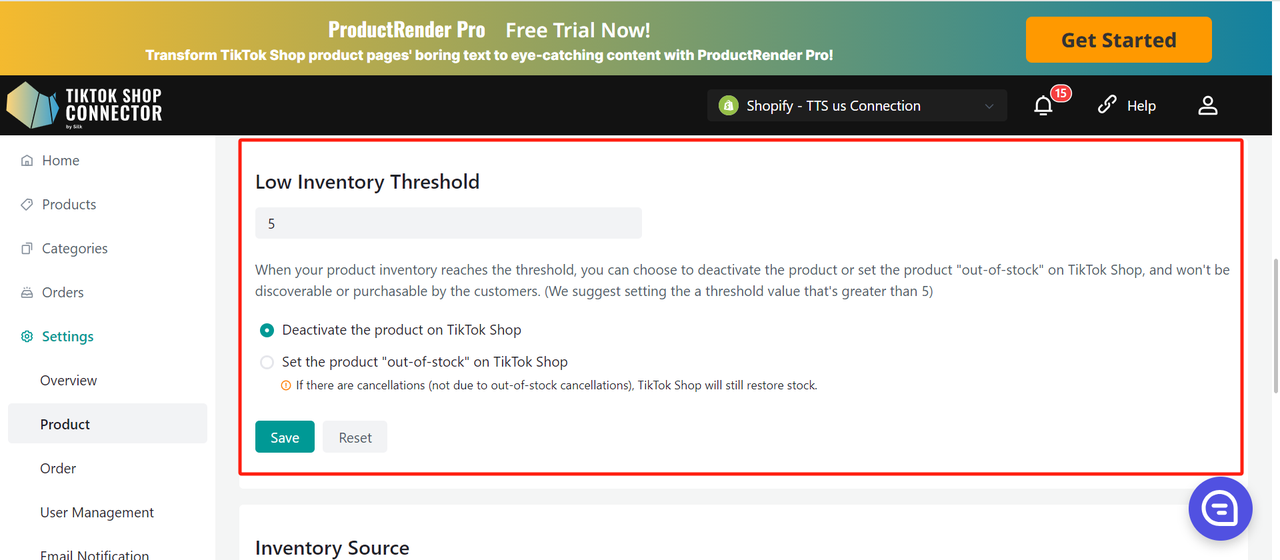
Deactivate the product on TikTok Shop
- When the inventory of a SKU below the preset safety threshold, the system will directly remove the product from the shelves.
- If the product has multiple SKUs, when one SKU reaches the threshold, the system will take down the entire product in TTS.
- If the user increases the sku inventory in DTC to above the safety threshold and all SKUs of the product are above the threshold, the system can activate the product in TTS.
Set the product "out-of-stock" on TikTok Shop.
- When the inventory of a SKU below the preset safety threshold, the system sets the inventory of TTS to 0.
- If the product has multiple SKUs, when a certain SKU reaches the threshold, the system sets the inventory of that SKU to 0.
- Note:If the inventory is changed to 0 and there is a cancellation of the order (not OOS), it is still possible for the inventory to be added back in TTS (the number of cancelled products exceeds the quantity)
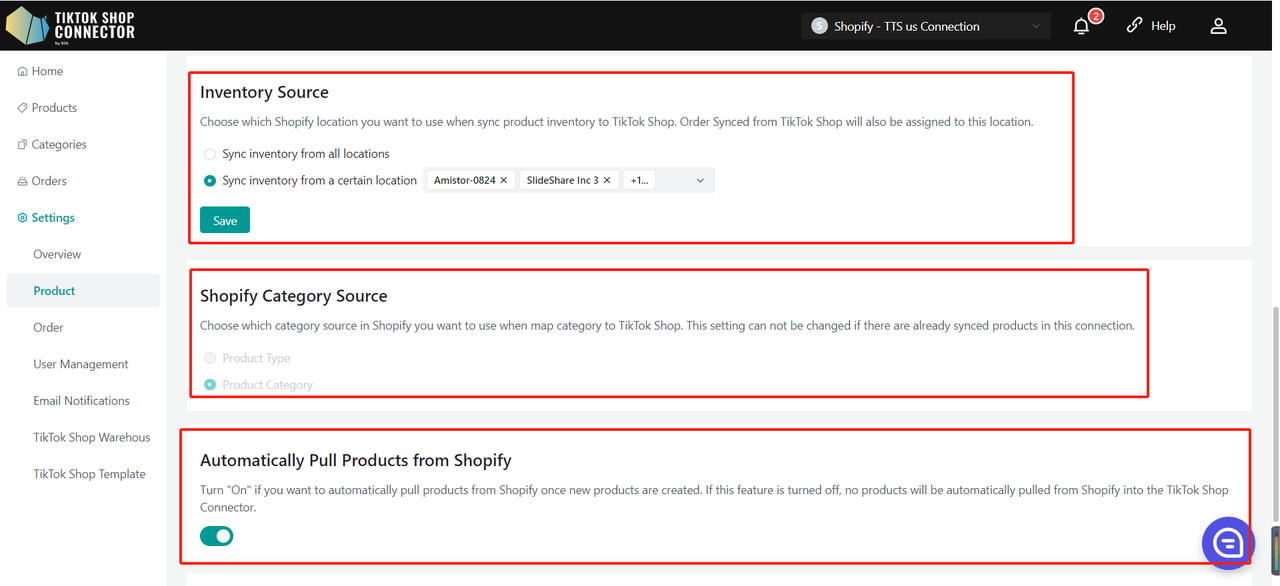
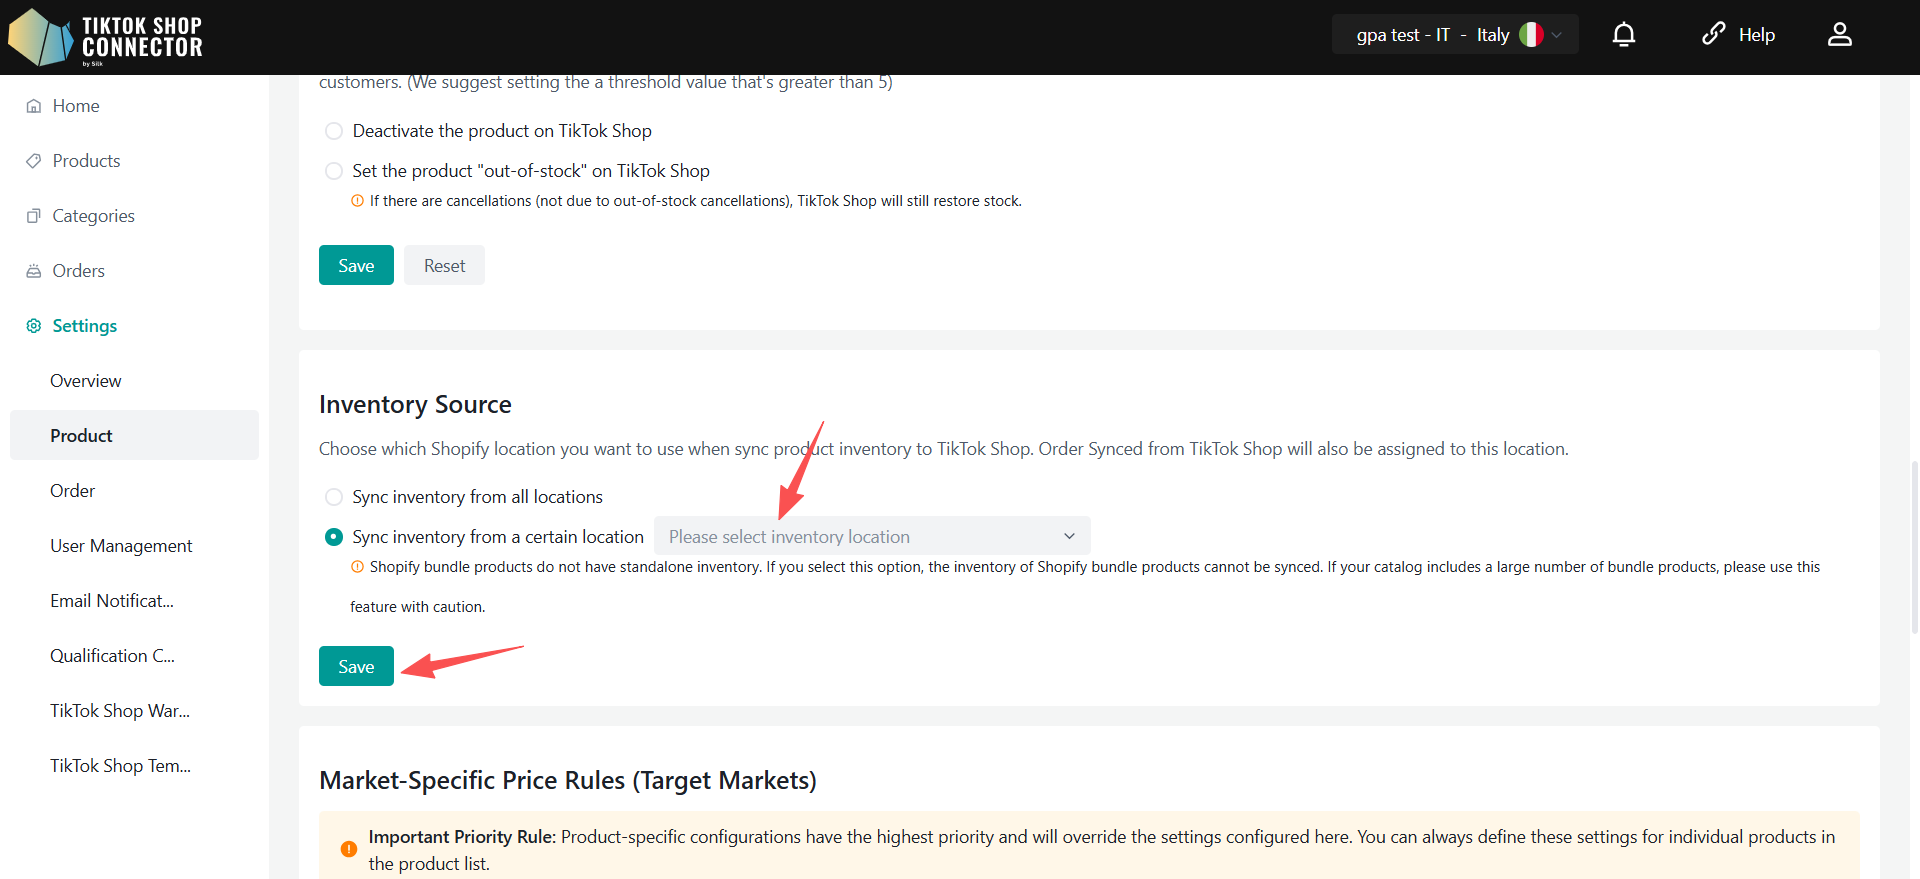
Inventory Location
Choose which Shopify location you want to use when sync product inventory to TikTok Shop. Order Synced from TikTok Shop will also be assigned to this location.
Note:Shopify bundle products do not have standalone inventory. If you select this option, the inventory of Shopify bundle products cannot be synced. If your catalog includes a large number of bundle products, please use this feature with caution.
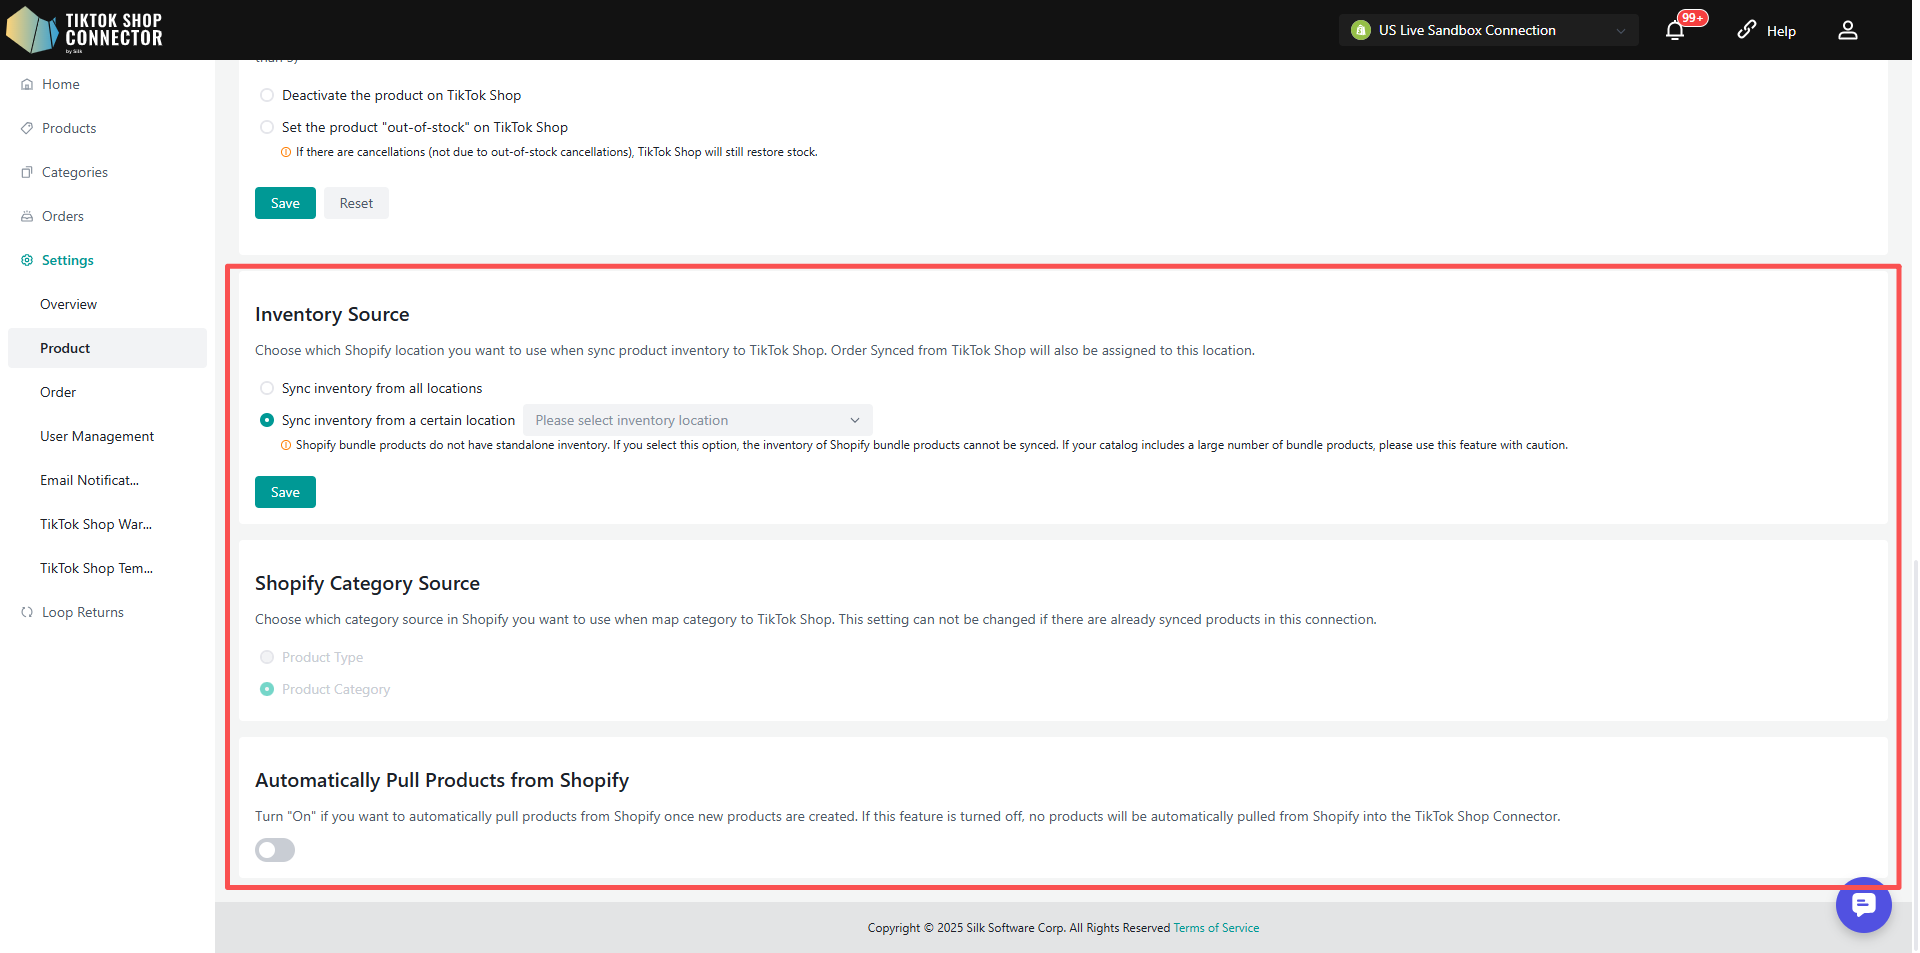
Categories Source
Choose which category source in Shopify you want to use when map category to TikTok Shop. This setting can not be changed if there are already synced products in this connection.
Pull Products
Turn "On" if you want to automatically pull products from Shopify once new products are created. If this feature is turned off, no products will be automatically pulled from Shopify into the TikTok Shop Connector.
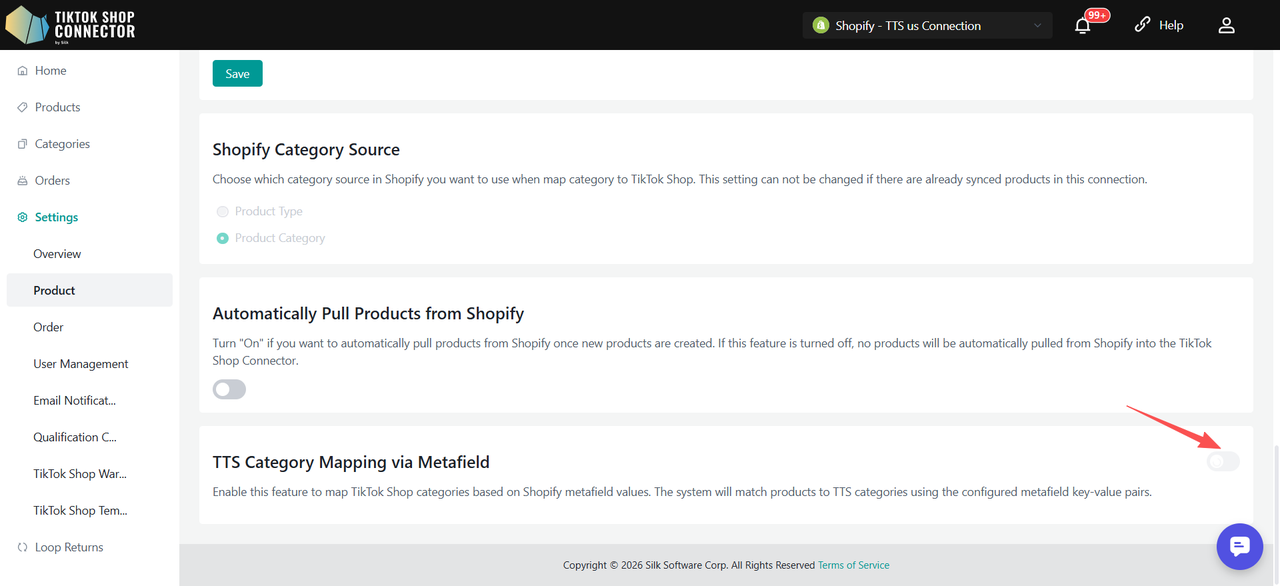
TikTok Shop Category Mapping with Metafield
This feature improves TikTok Shop category mapping accuracy by allowing the use of Shopify Metafields in addition to Shopify product categories.
How to Enable
Go to Connector → Product Settings
Locate TikTok Shop Category Mapping via Metafield
Turn on Enable Metafield as Category Reference
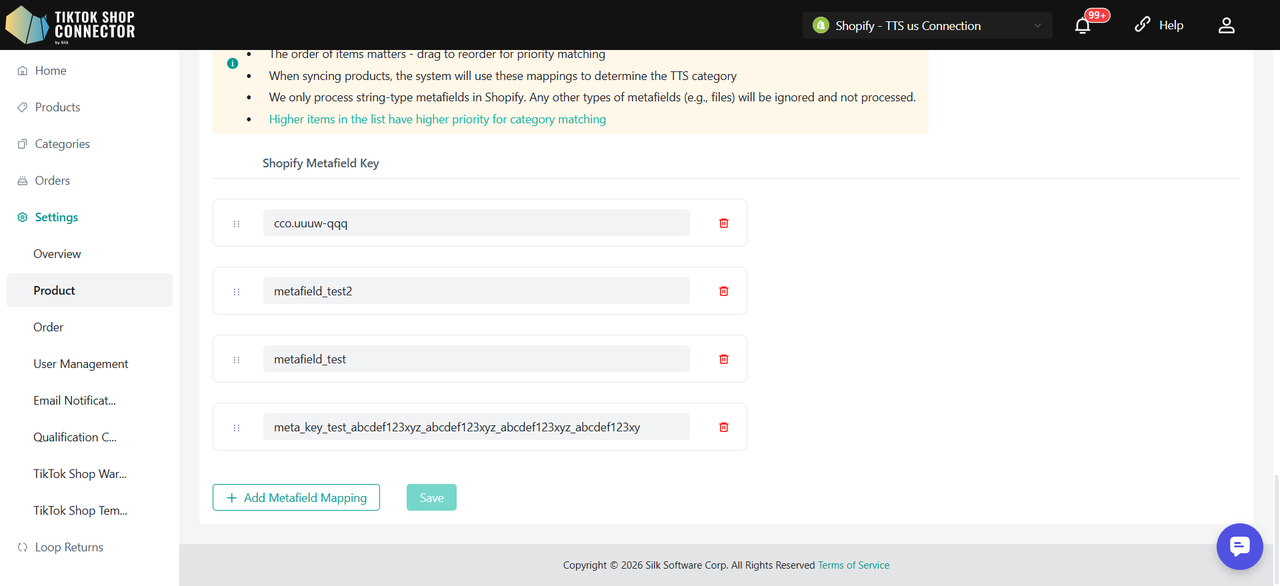
How to Configure
Click Add Metafield Mapping
Enter: Metafield Key
You can:
Add multiple rules
Edit or delete rules
Drag to reorder (top = higher priority)
Click Save to apply changes
How It Works
During product synchronization, the system applies the following logic:
When feature is ENABLED
- If Shopify Category exists:
- Use Shopify Category + Metafield for matching
- If Shopify Category does NOT exist:
- Use Metafield only for matching
When feature is DISABLED
Only Shopify Category is used for TTS category mapping
Order Settings
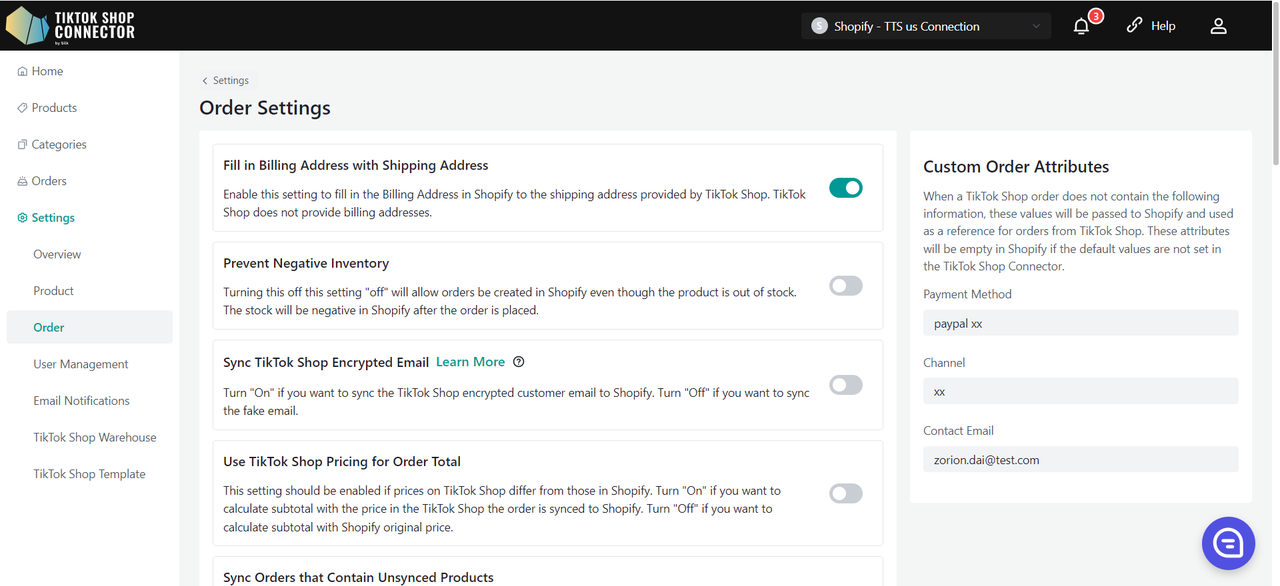
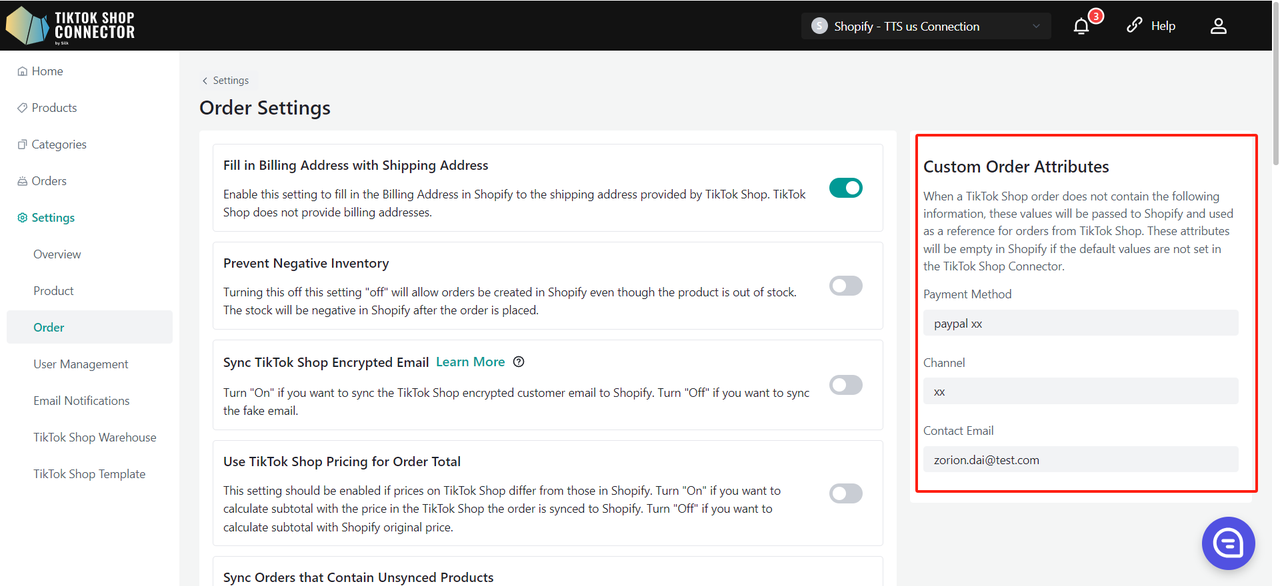
Customer attributes
"Payment Method" Set as TikTokPAY for default.
If you manage or maintain orders/data in Shopify via an ERP cloud or other data management system, set your payment method with any value that will mark/track TikTok Shop orders from Shopify.
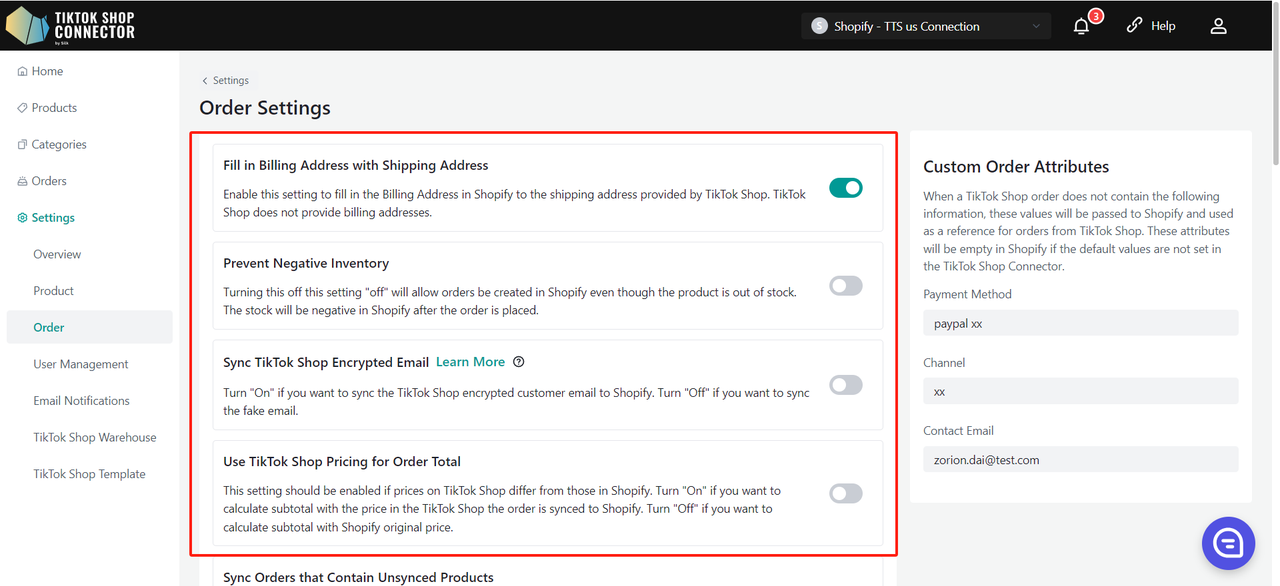
"Fill in Billing Address with Shipping Address"
Turn "On" if your third-party shipper requires a Billing Address.
"Prevent Negative Inventory
Turning this off, this setting "off" will allow orders to be created in Shopify even though the product is out of stock. The stock will be negative in Shopify after the order is placed.
Leave "On" if you DO NOT want inventory in Shopify to go below "0"
Turn "Off" if you WANT to allow negative stock in Shopify
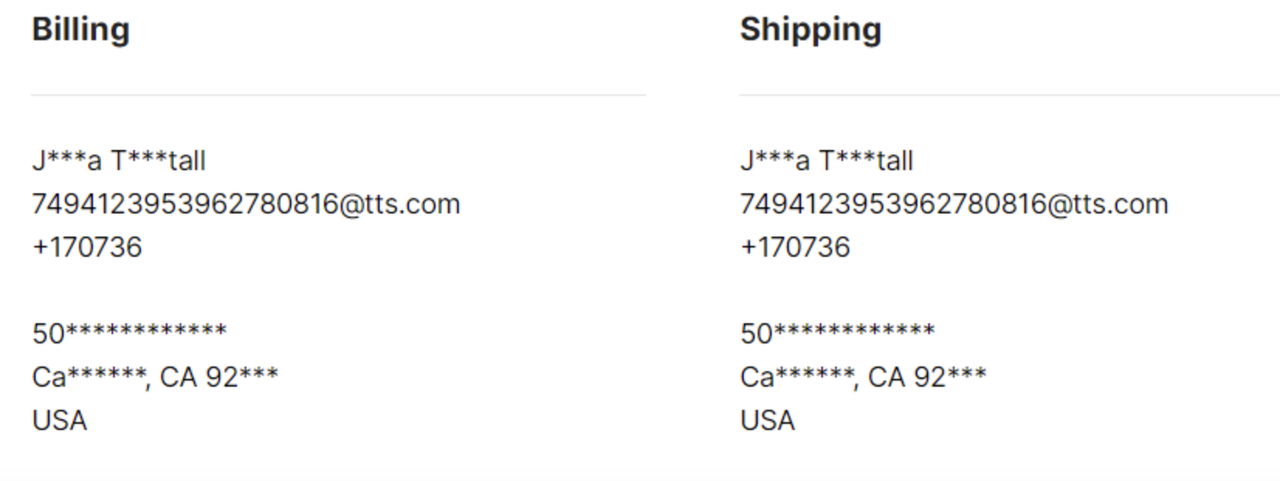
Sync TikTok Shop Encrypted Email
Turn "On" if you want to sync the TikTok Shop encrypted customer email to Shopify. Turn "Off" if you want to sync the fake email.
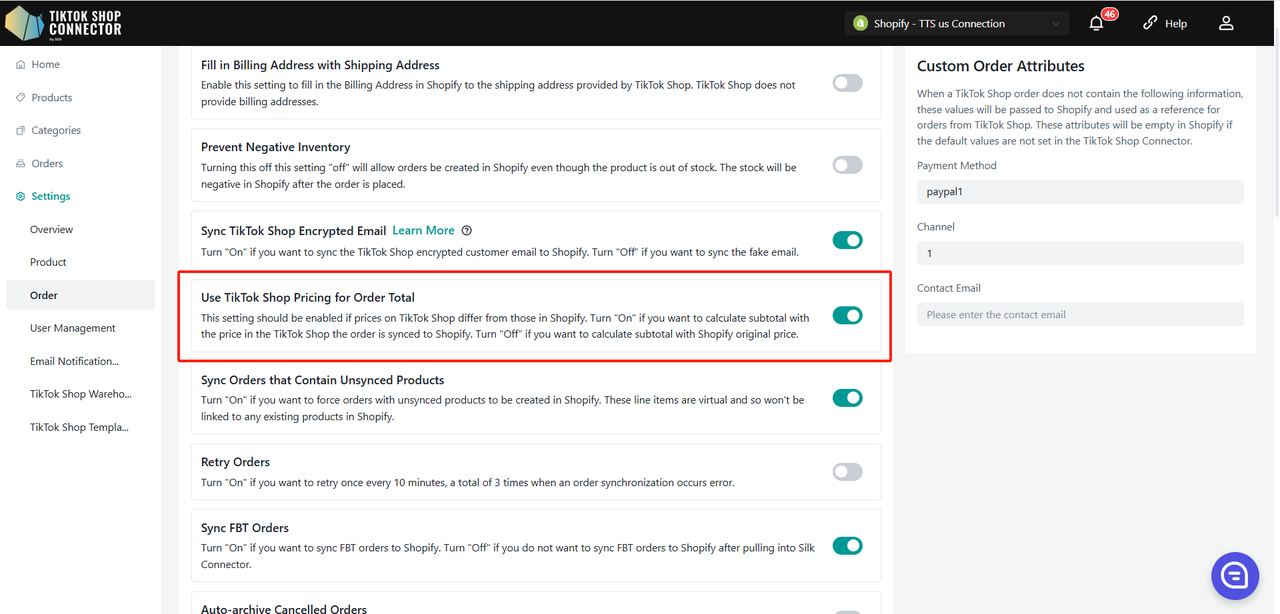
"Use TikTok Shop Pricing for Order Total"
This setting should be enabled if prices on TikTok Shop differ from those in Shopify. Turn "On" if you want to calculate the subtotal with the price in the TikTok Shop, the order is synced to Shopify. Turn "Off" if you want to calculate subtotal with Shopify original price.
"Sync Orders that Contain Unsynced Products"
Turn "On" if you want to force orders with unsynced products to be created in Shopify. These line items are virtual and so won't be linked to any existing products in Shopify.
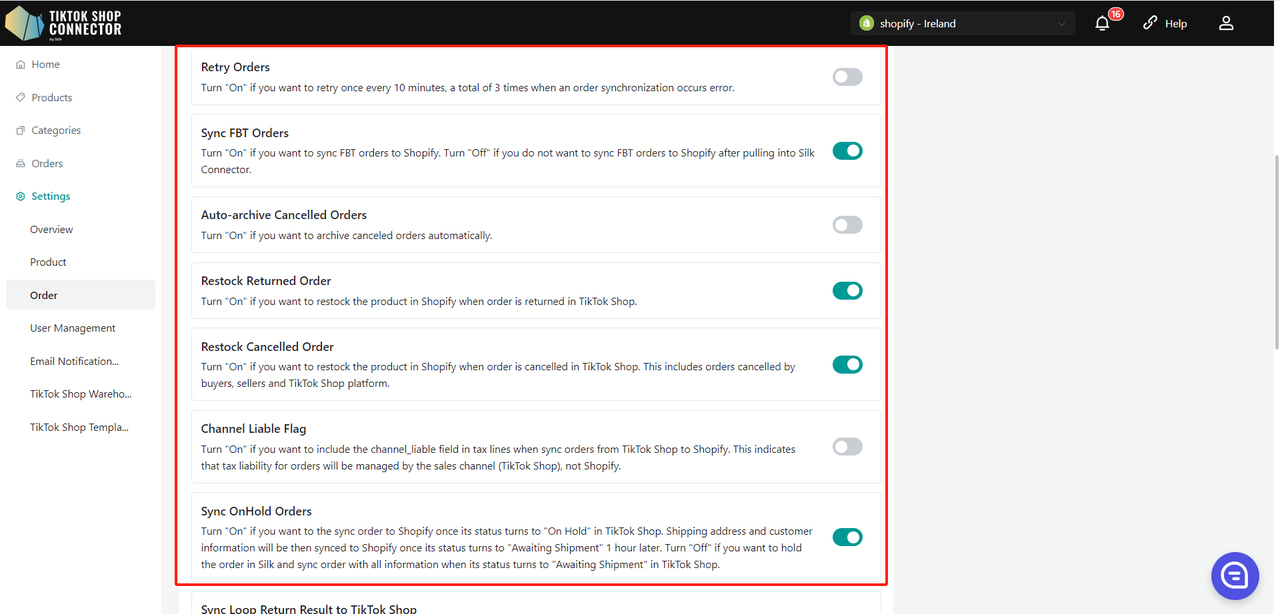
"Retry Orders"
Turn "On" if you want to retry once every 10 minutes, a total of 3 times when an order synchronization occurs error.
"Sync FBT Orders"
Turn "On" if you want to sync FBT orders to Shopify. Turn "Off" if you do not want to sync FBT orders to Shopify after pulling into Silk Connector.
"Auto-archive Cancelled Orders"
Turn "On" if you want to archive canceled orders automatically.
"Restock Returned Order"
Turn "On" if you want to restock **the product in Shopify when order is returned in TikTok Shop.
"Restock Cancelled Order"
Turn "On" if you want to restock the product in Shopify when order is cancelled in TikTok Shop. This includes orders cancelled by buyers, sellers and TikTok Shop platform.
"Order Liable Tax in Shopify"
Turn "On" if you want to include the channel_liable field in tax lines when sync orders from TikTok Shop to Shopify. This indicates that tax liability for orders will be managed by the sales channel (TikTok Shop), not Shopify.
"Sync OnHold Orders"
TikTok Shop provides a 1-hour grace period for customers to cancel orders.
Leave "On" if you WANT orders within the 1-hour grace period to appear as "On Hold" in Shopify - this is to avoid fulfilling possible cancellations.
Leave "Off" if you DO NOT want orders within the 1-hour grace period to appear as "On Hold in Shopify.
"1-Hour Hold for Awaiting Shipment Orders"
Leave On if you want to delay syncing orders that go directly from Unpaid → Awaiting Shipment for 1 hour before sending them to Shopify. This applies a mandatory 1-hour customer cancellation window.
Leave Off if you want all orders to sync to Shopify immediately once they enter the Awaiting Shipment status.

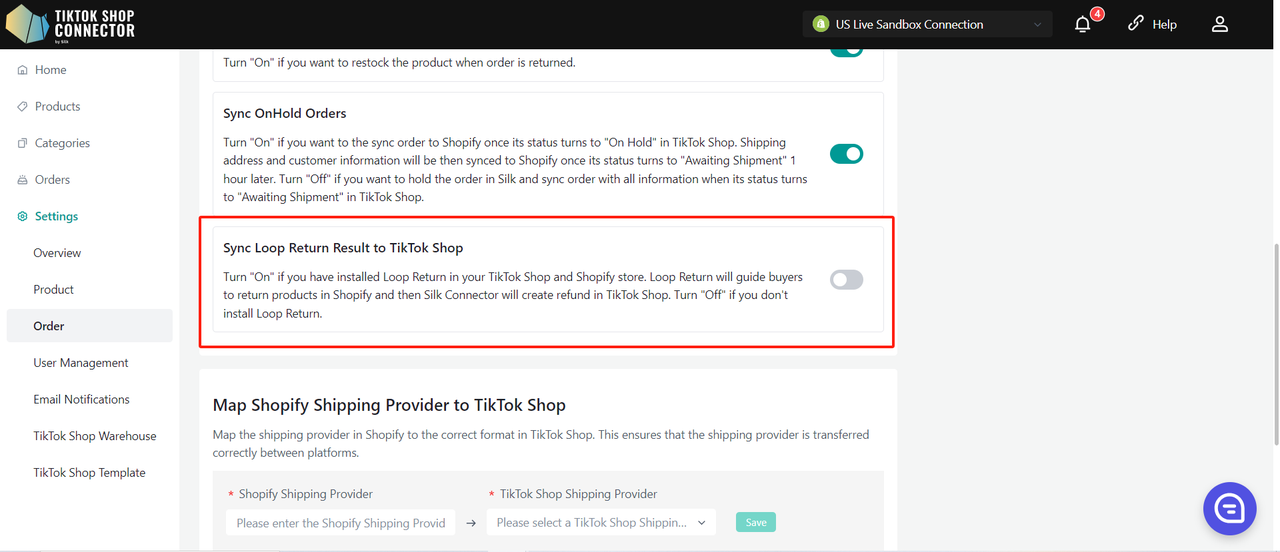
"Sync Loop Return Result to TikTok Shop"
Note: You must be approved by TikTok in order to leverage our loop integration. Please reach out to TikTok support for more information.
Turn "On" if you have installed Loop Return in your TikTok Shop and Shopify store. Loop Return will guide buyers to return products to Shopify and then Silk Connector will create a refund in TikTok Shop.
Turn "Off" if you don't install Loop Return.
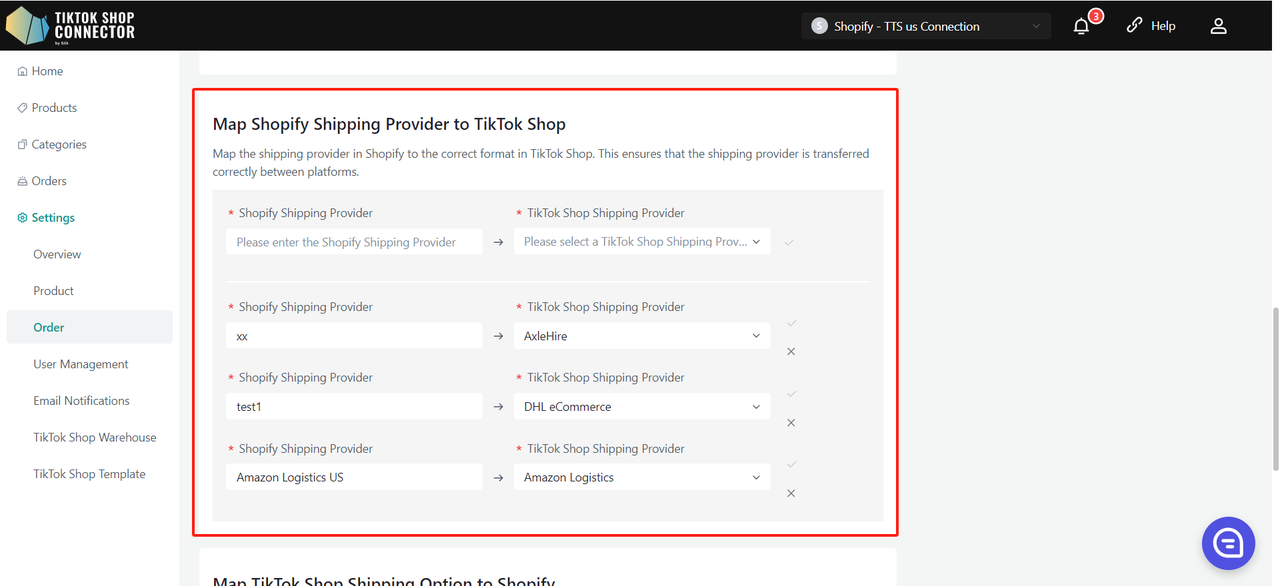
"Map Shopify Shipping Provider to TikTok Shop"
TikTok Shop has a list of Shipping Providers that may be different from that of Shopify. If the shipping providers are different for each of your shop platforms, you can map the shipping providers here to avoid syncing errors.
Please note, the Shopify Shipping Provider section must appear exactly as is in your Shopify.
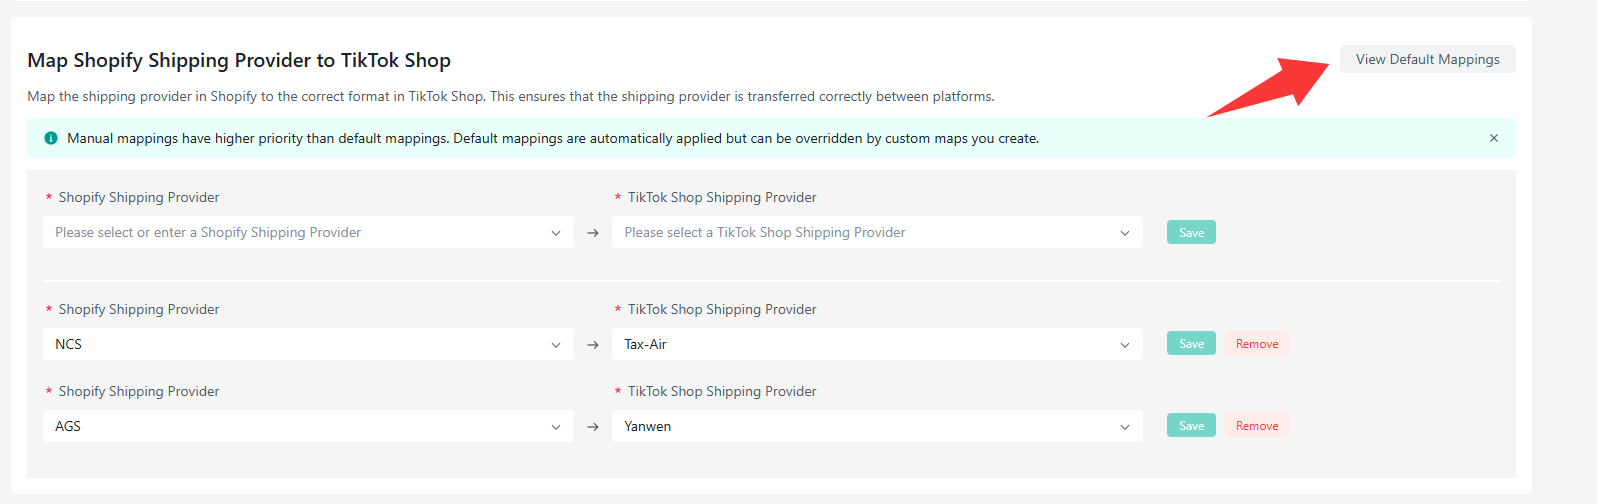
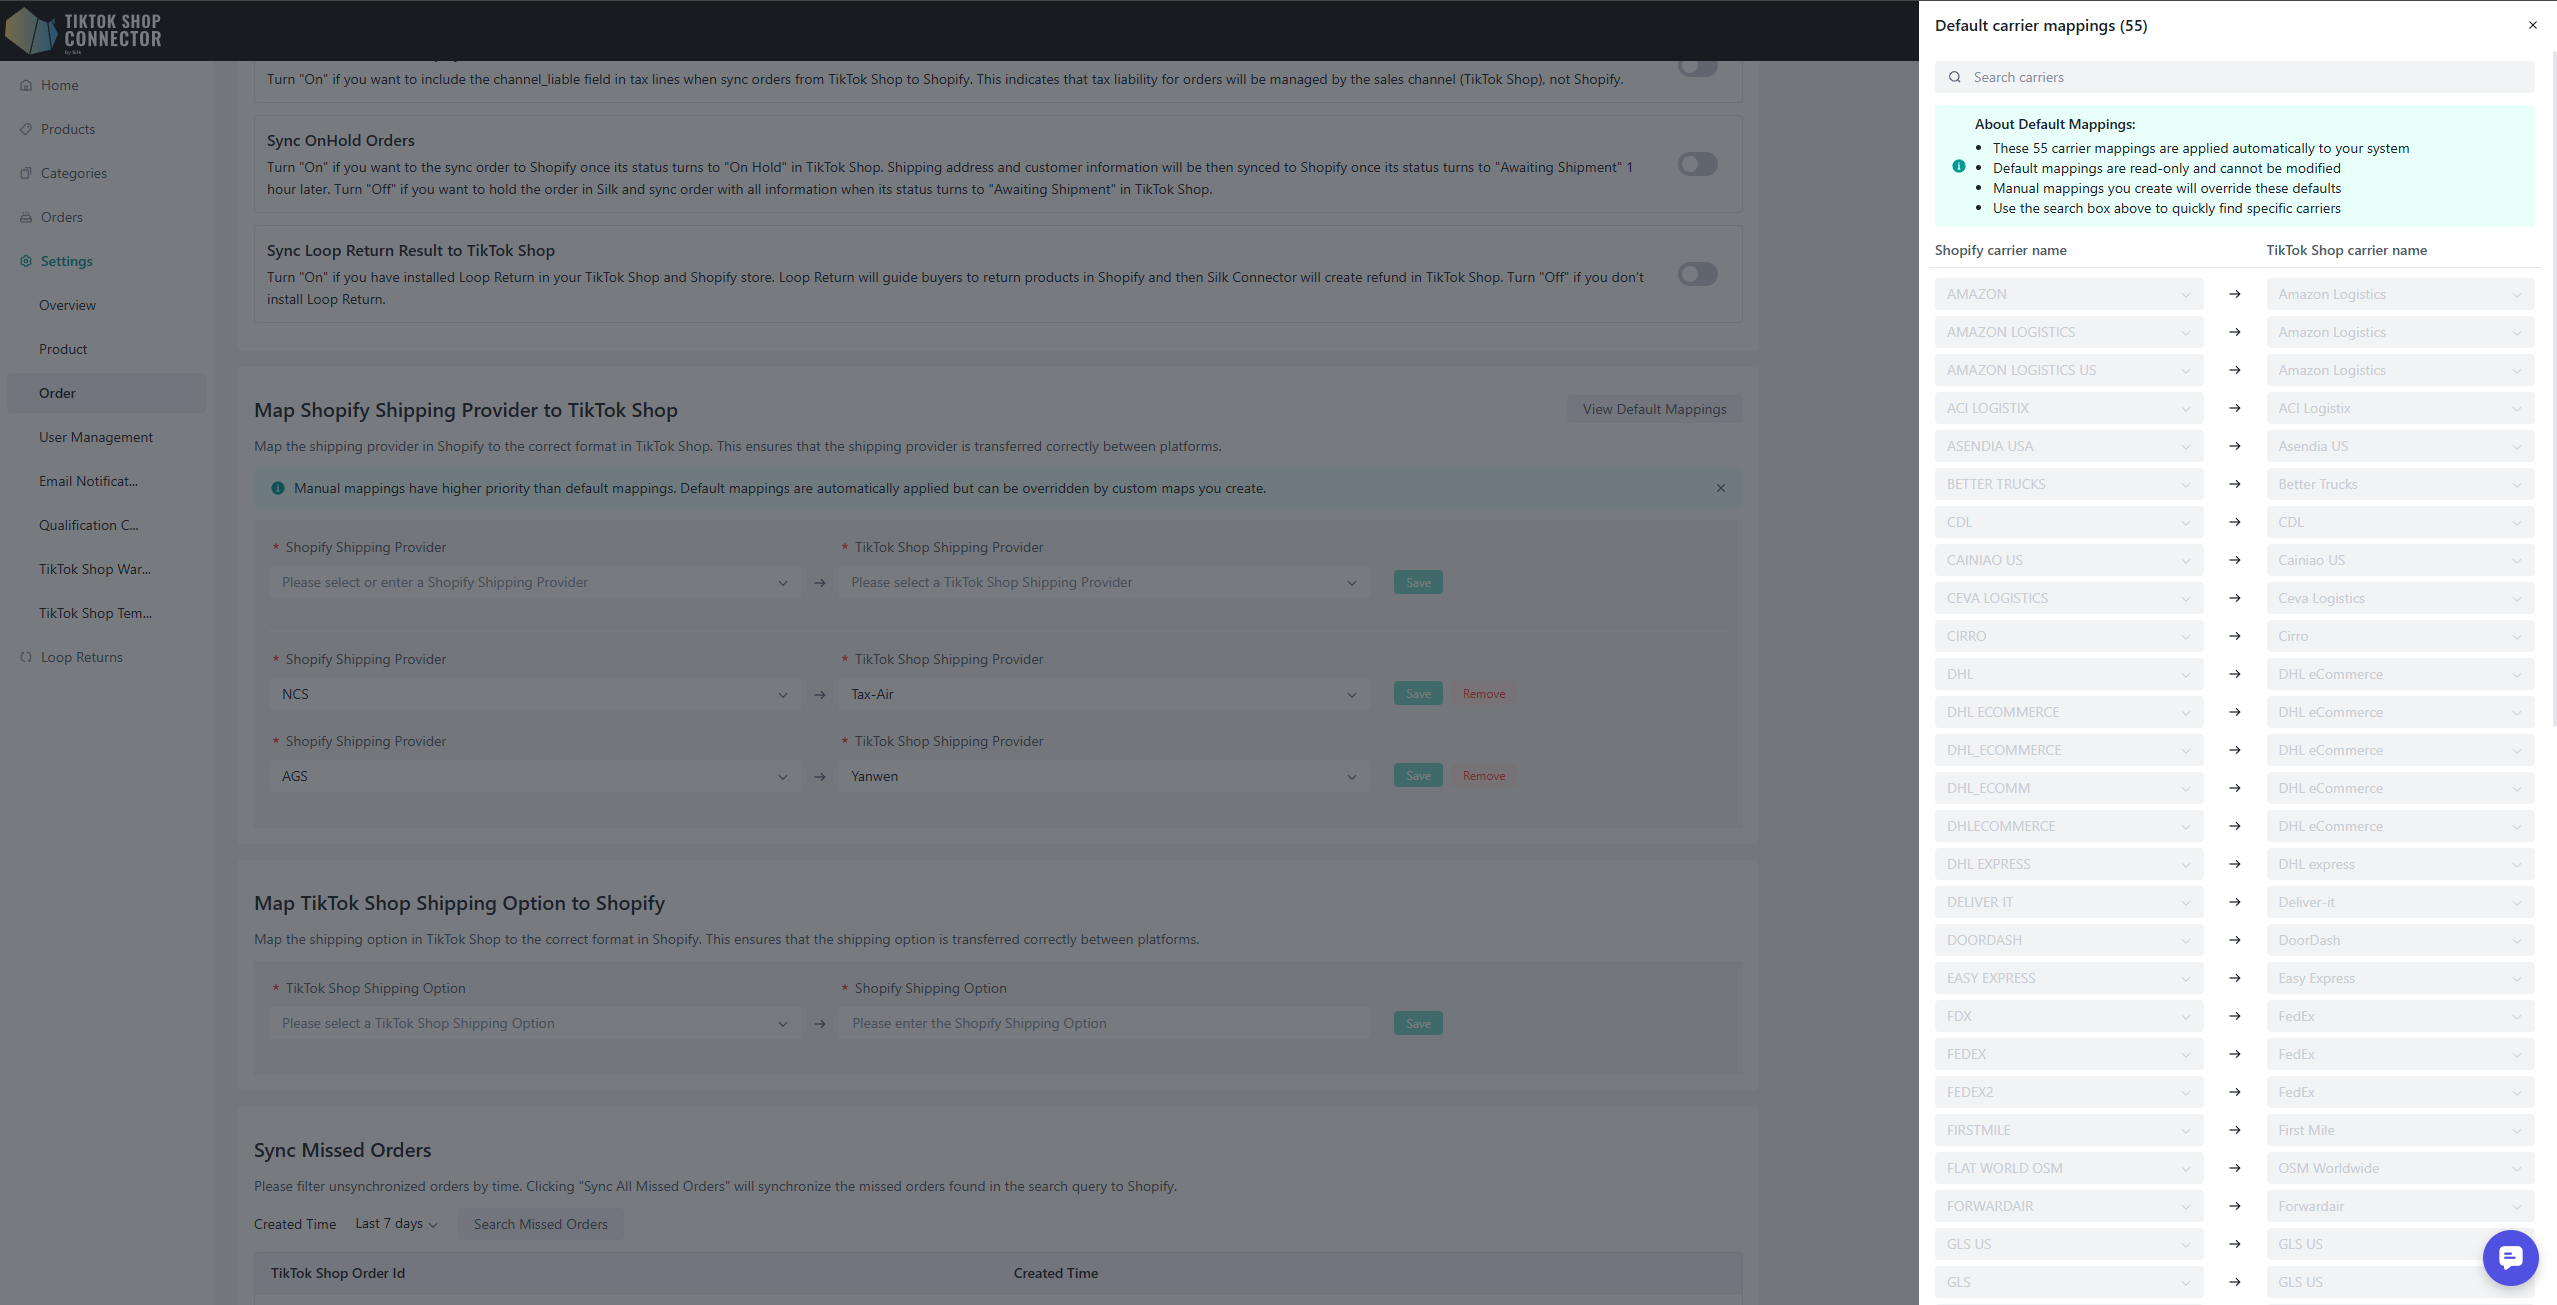
"About Default Mappings"
The system includes built-in default carrier mappings that are applied automatically when no custom mapping is found. Default mappings are read-only and can be viewed via View Default Mappings, while any custom mappings you create will always take priority.
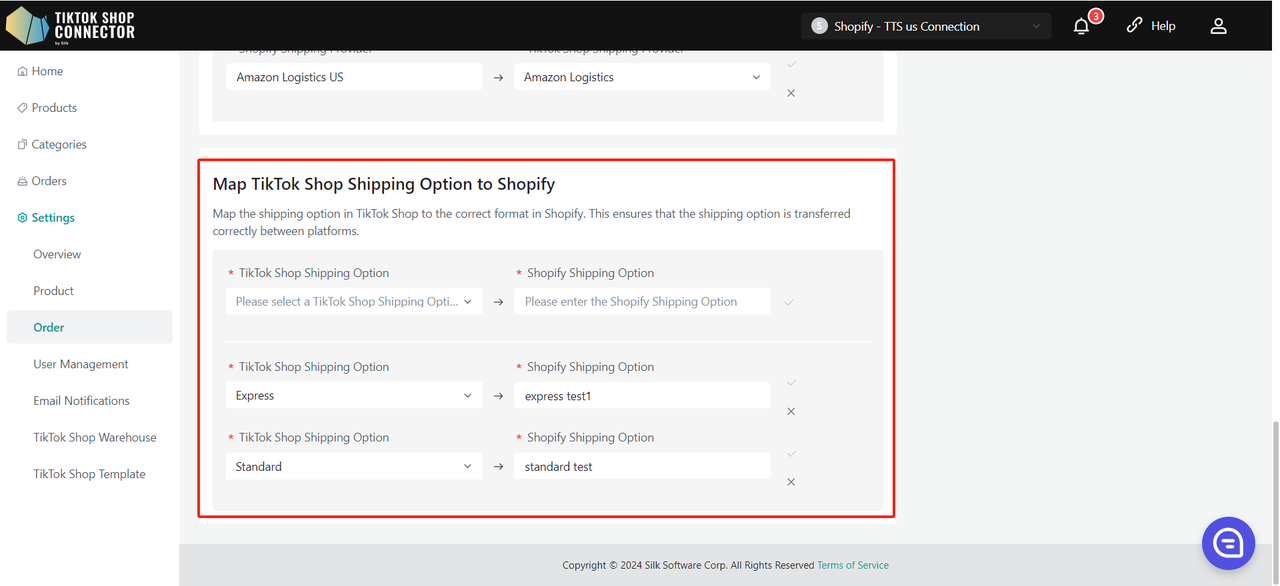
"Map TikTok Shop Shipping Option to Shopify"
TikTok Shop has a list of Shipping Option that may be different from that of Shopify. If the shipping Option are different for each of your shop platforms, you can map the shipping providers here to avoid syncing errors.
Please note, the Shopify Shipping Option section must appear exactly as is in your Shopify.
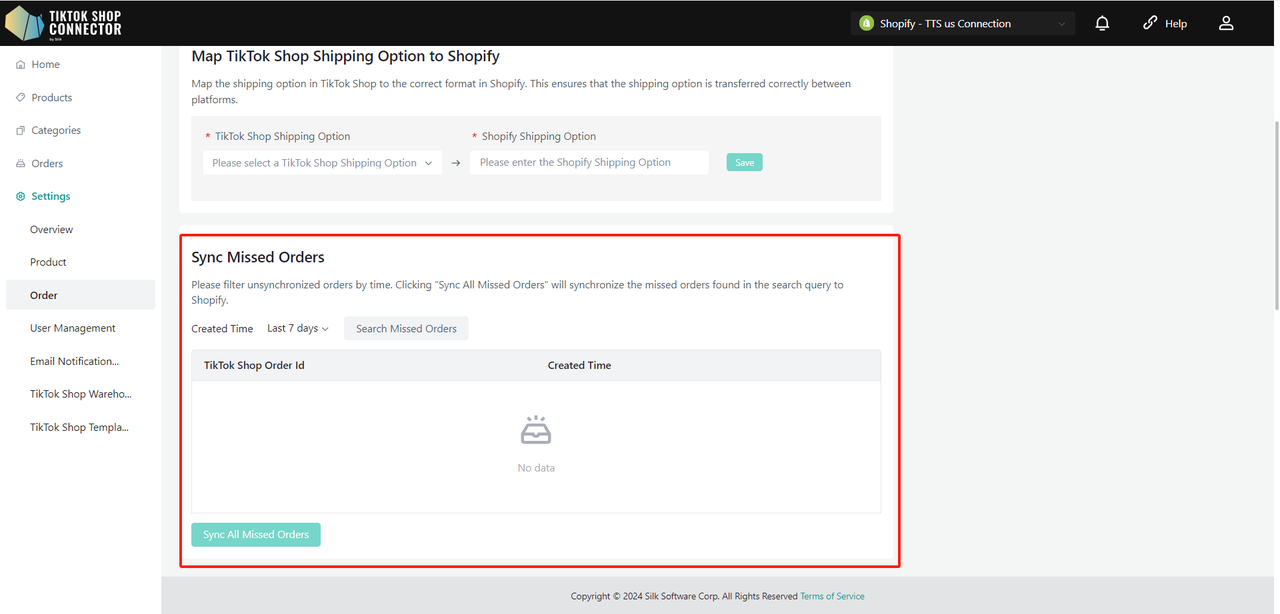
Sync Missed Orders
You can filter unsynchronized orders by time. Clicking "Sync All Missed Orders" will synchronize the missed orders found in the search query to Shopify.
Please note: We can only query and sync orders with "awaiting shipment" status. The order will not be queried if it is already in the TikTok Shop status of awaiting collection, completed, cancelled, etc.
Qualification Center
The Qualification Center module allows you to manage and configure essential product information, including Manufacturer and Responsible Person (RP) details. This guide will walk you through the process of adding, editing, and linking RP/Manufacturer information to products at a store level.
You can also add Manufacturer and Responsible Person (RP) at product-level, or category-level in the Fill in Compliance action.
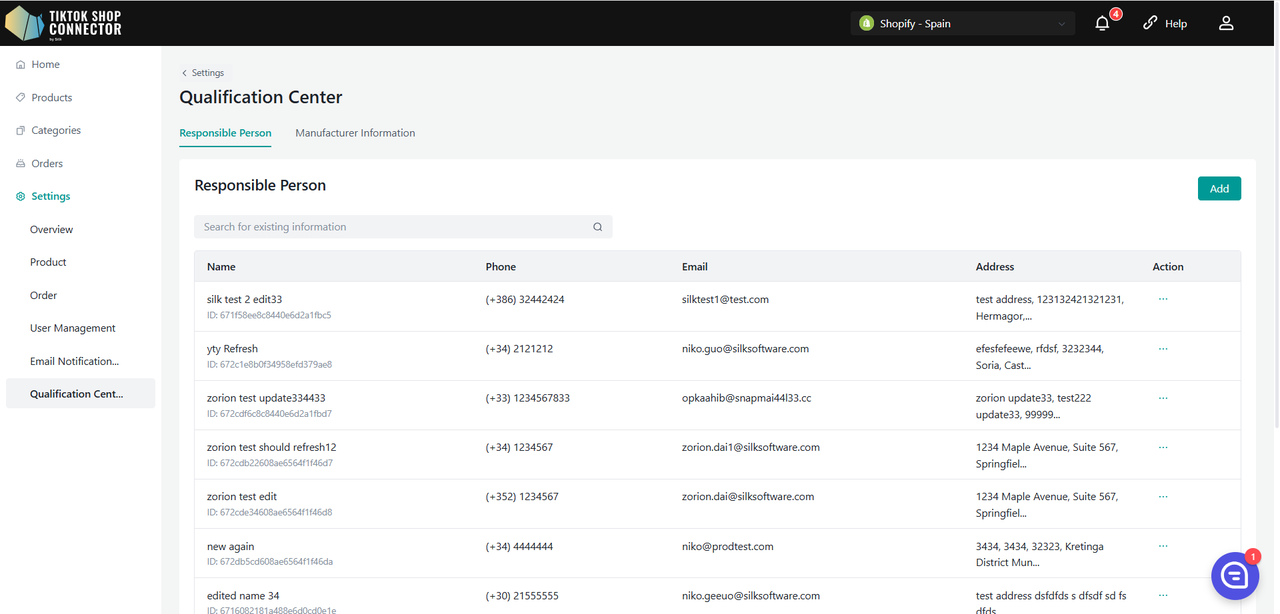
Adding RP/Manufacturer
View List:
- The newly added RP/Manufacturer will appear in the list.
- The list is paginated for easy navigation.
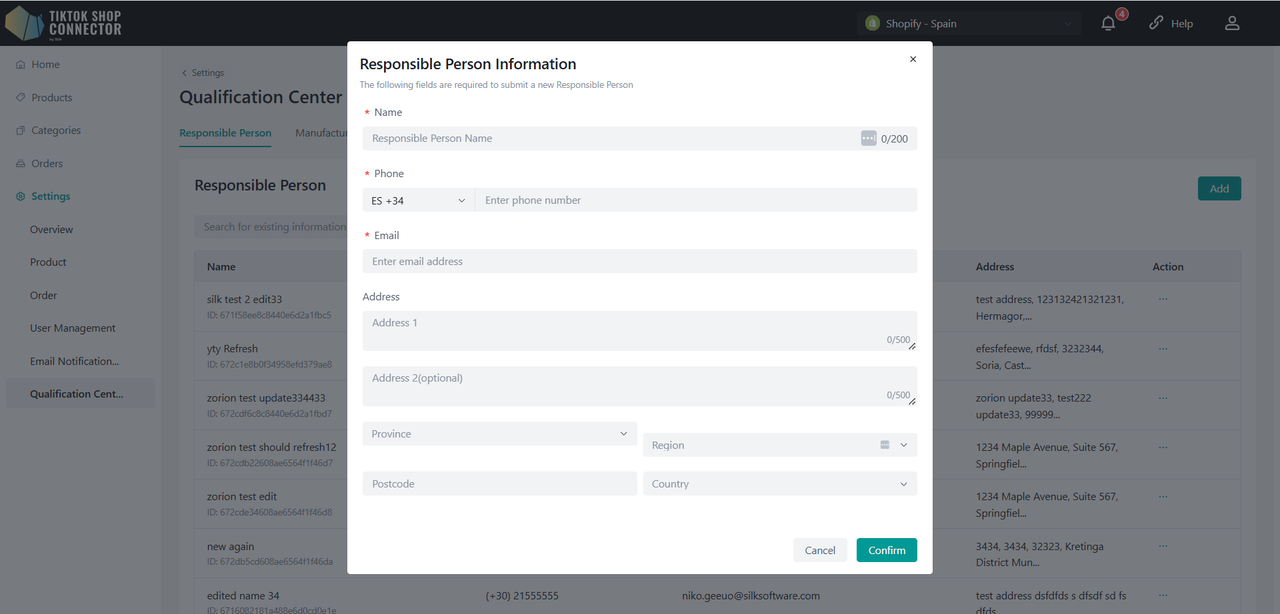
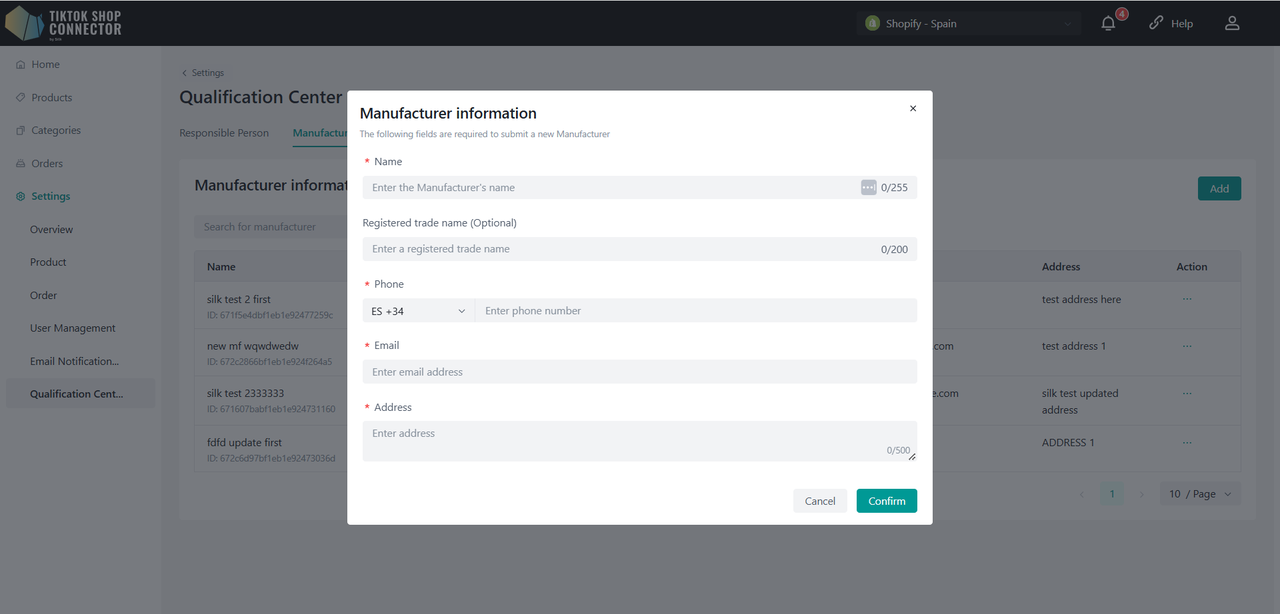
Add RP/Manufacturer:
Click on the "Add" button to open a pop-up window.
For RP:
- Fill in the fields: Name, Phone, Email, Address.
For Manufacturer:
- Fill in the fields: Name, Registered Trade Name, Phone, Email, Address.
Click "Save" to add the new RP/Manufacturer.
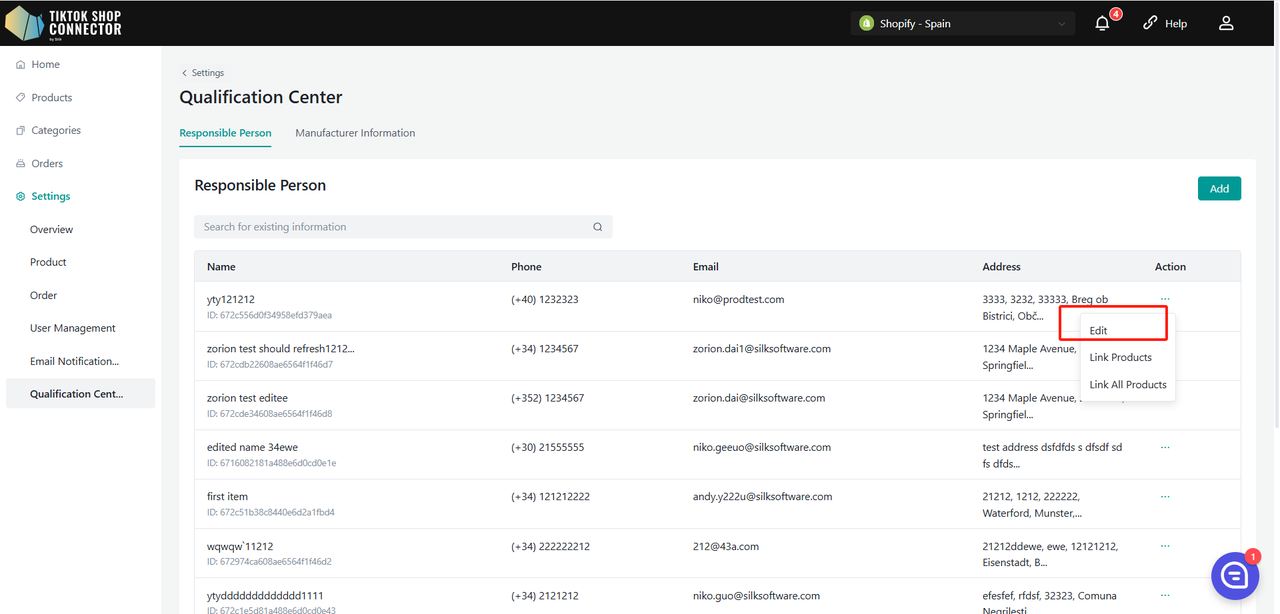
Editing RP/Manufacturer
Locate the RP/Manufacturer:
- Find the RP/Manufacturer you wish to edit in the list.
Edit Details:
Click the "Edit" button next to the RP/Manufacturer's name.
Modify the required fields and click "Save" to update the information.
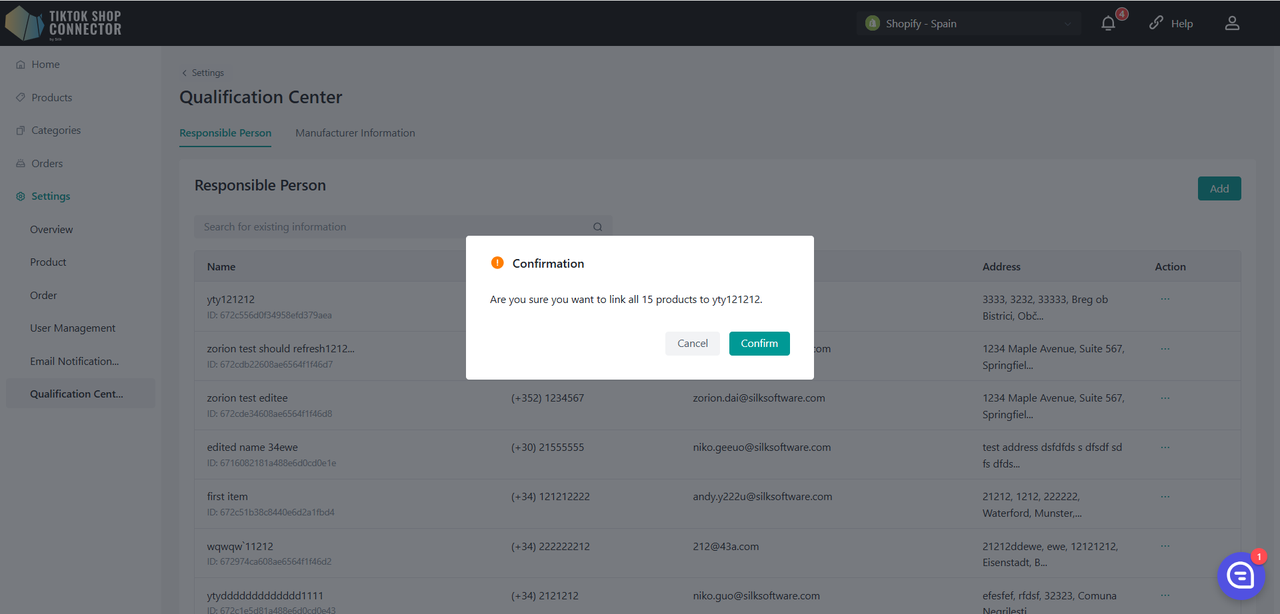
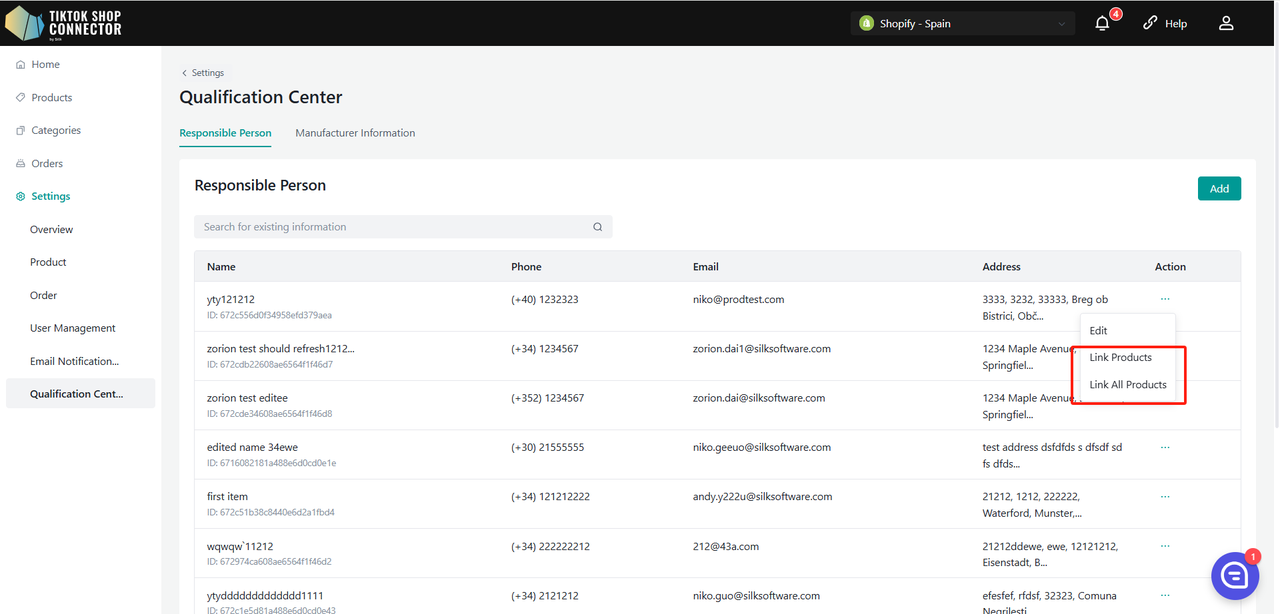
Linking RP/Manufacturer to Products
Link All Products:
To link all products in the system to a specific RP/Manufacturer, click the "Link all Products" button.
Manage Linked Products:
Click "Link products" to enter the detailed management page.
Information Module
Display RP/Manufacturer Details:
View the current RP/Manufacturer's detailed information.
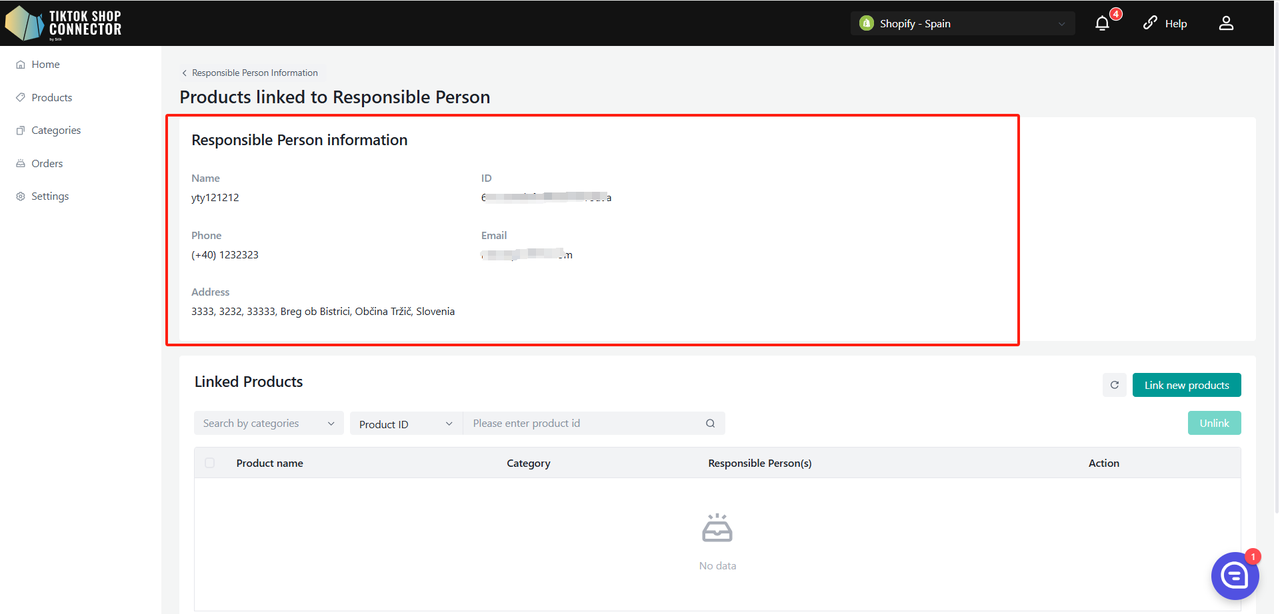
Product Detail Module
Search Products:
- Use filters by Category, Product ID, or Product Name to search for products in the list.
List Information:
- The list displays: Product Name, Category, RP/Manufacturer, and Action.
- If a product is associated with multiple RP/Manufacturers, one will be randomly displayed, with all options available in a dropdown.
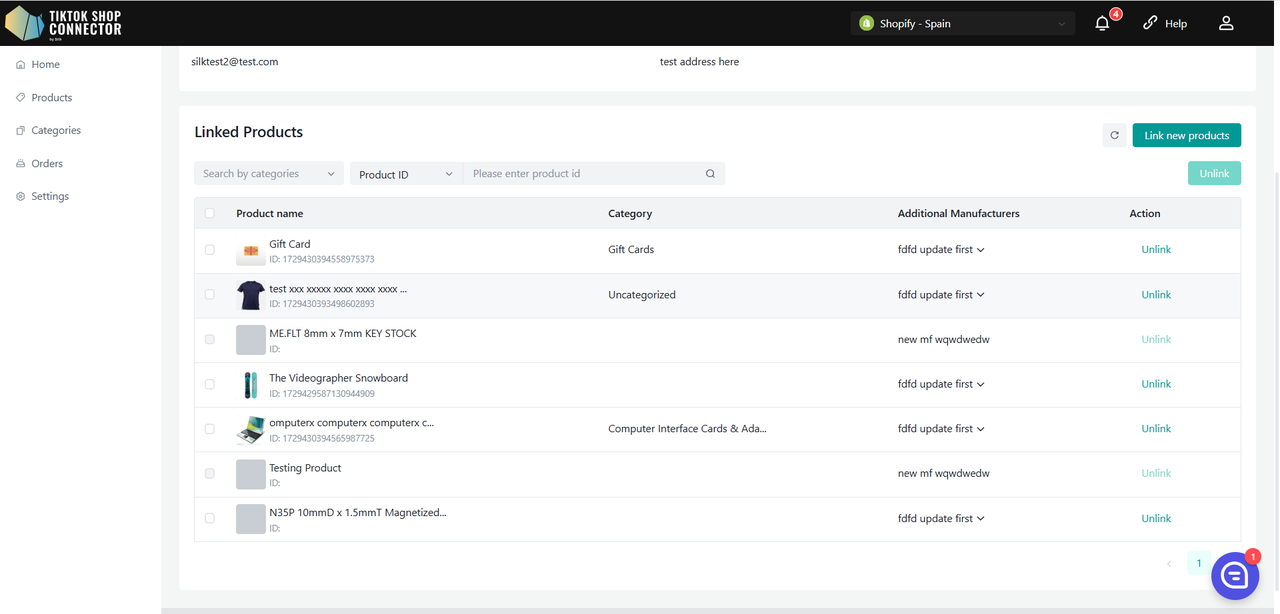
Unlink Product:
When a product has multiple RP/Manufacturers, you can unlink the current one by selecting it and clicking "Unlink".
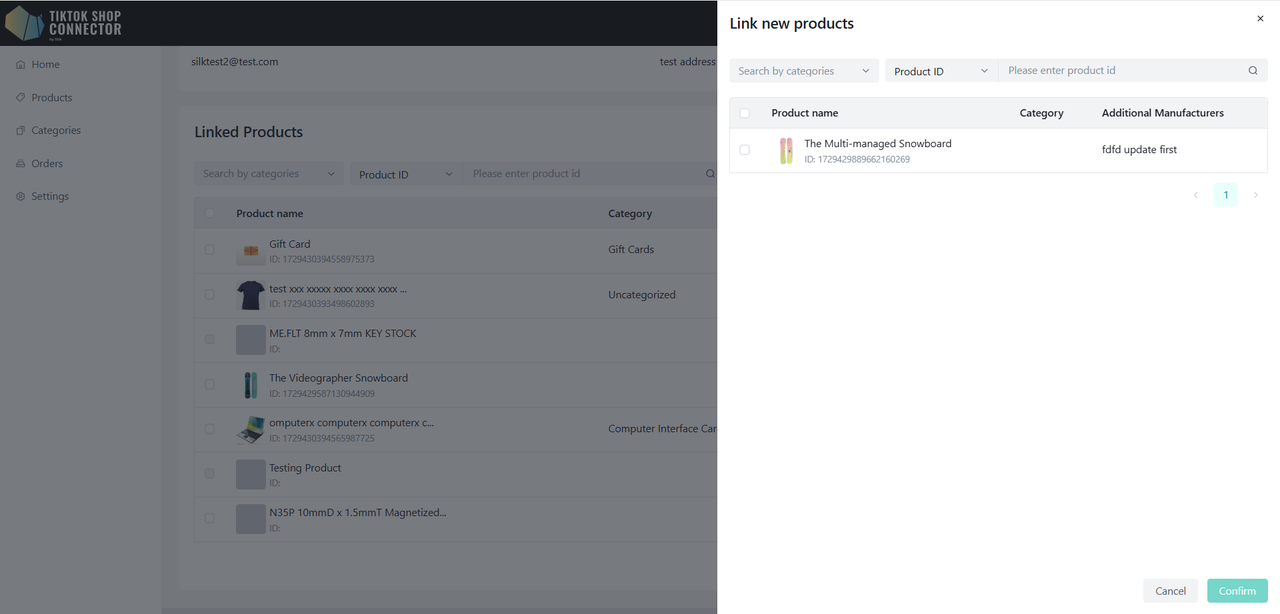
Link New Products:
Click "Link new products" to open a sidebar.
View all products not currently linked to the selected RP/Manufacturer.
Use filters by Category, Product ID, or Product Name to search for products.
Select the desired products, click "Confirm", and then confirm again in a secondary pop-up window.
A product can be linked to multiple RP/Manufacturers.
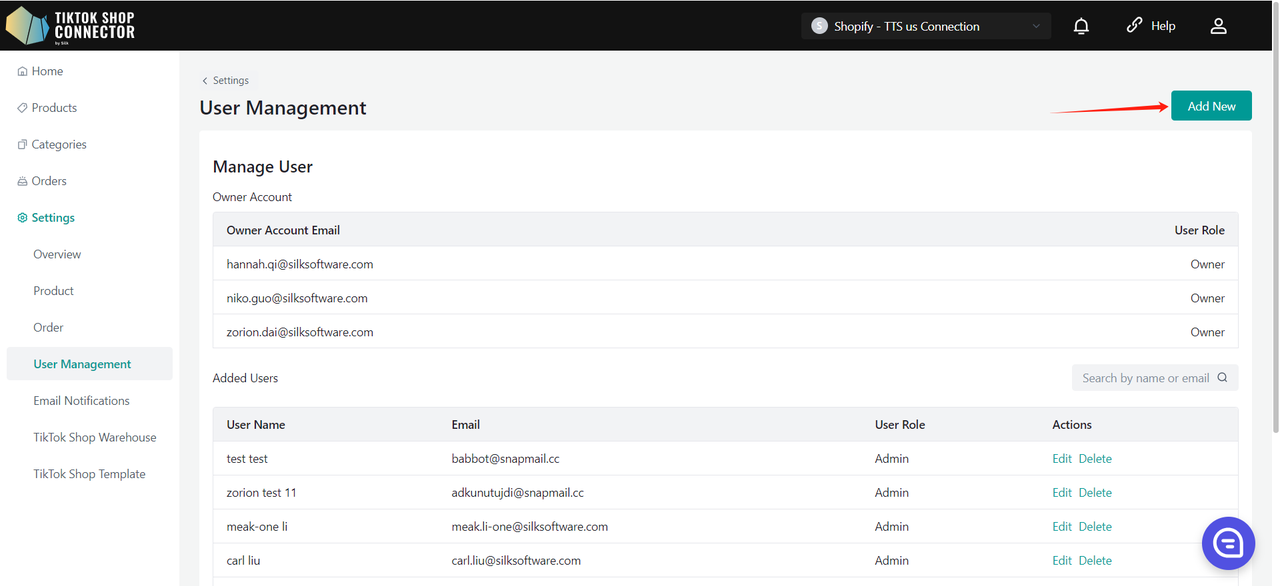
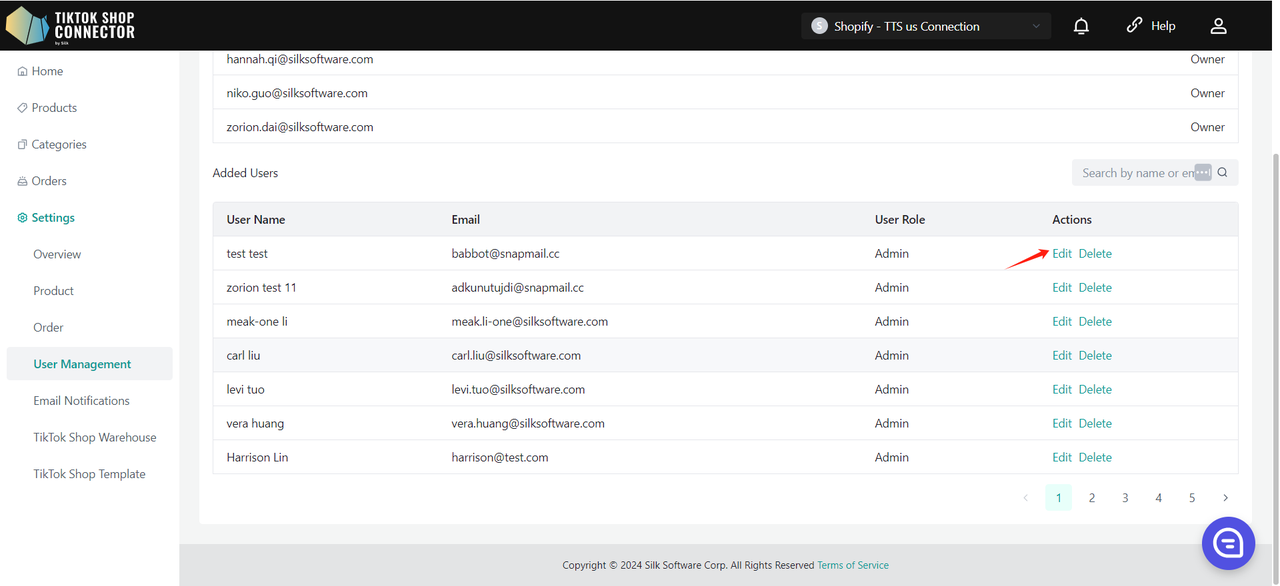
User Management
- Displays all users that are created in Silk Connector
- There are two types of user roles:
- Owner: Has the highest level of permission, and can add/edit/modify users.
- Admin: Has limited permissions, can only view users and their details but cannot add/edit/modify them.
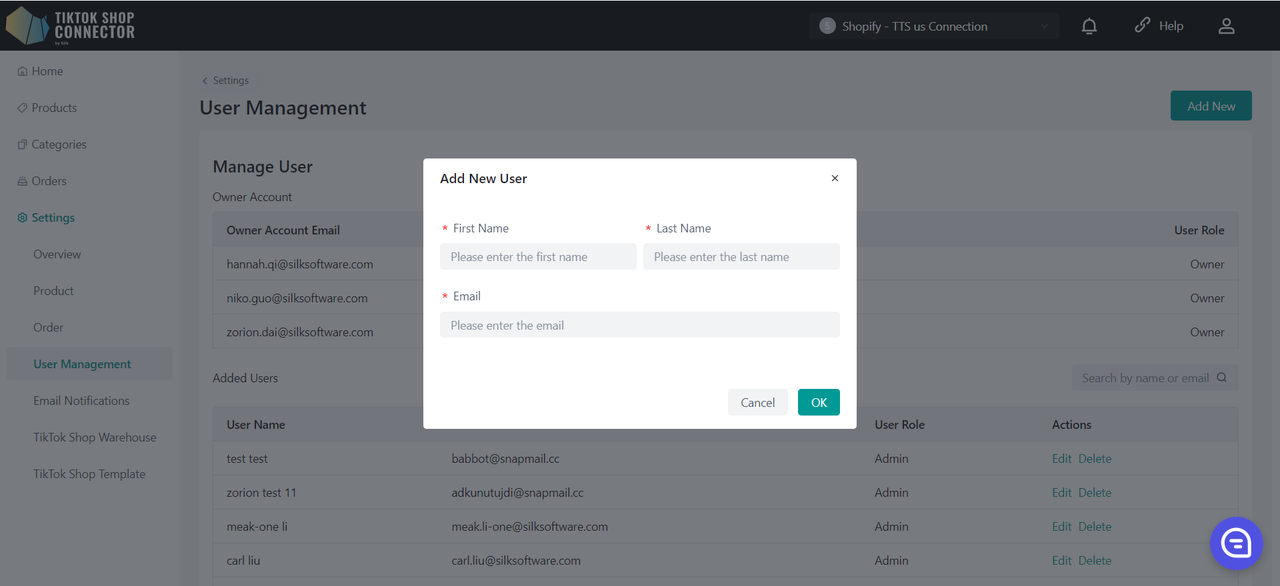
Create Users
(Only the owner can create a user)
To add a new user, click on "Add New" and provide the user's name and email.
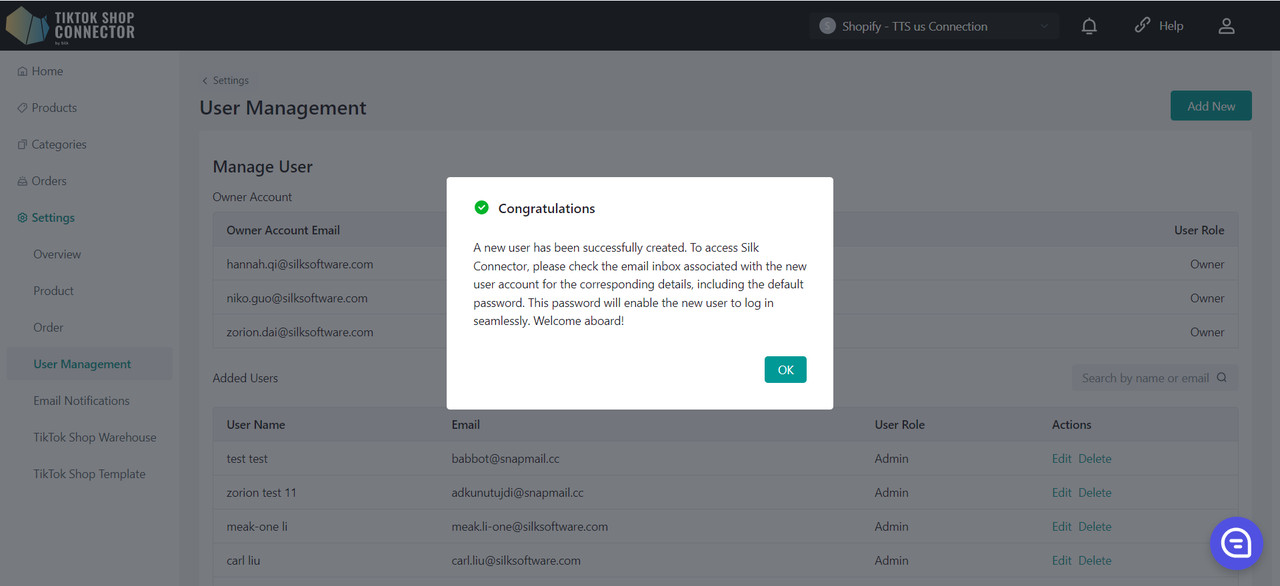
A new user has been successfully created. To access Silk Connector, please check the email inbox associated with the new user account for the corresponding details, including the default password. This password will enable the new user to log in seamlessly.
Edit Users
You can only edit the user's name but not the email.
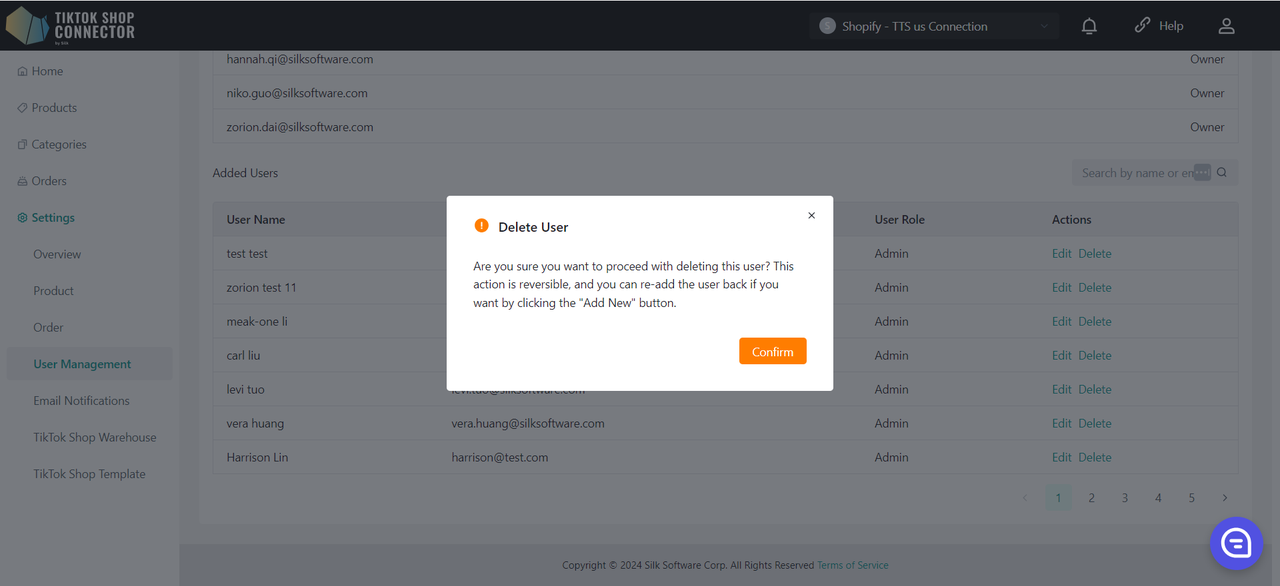
Delete Users
This action is reversible, and you can re-add the user back if you want by clicking the "Add New" button.
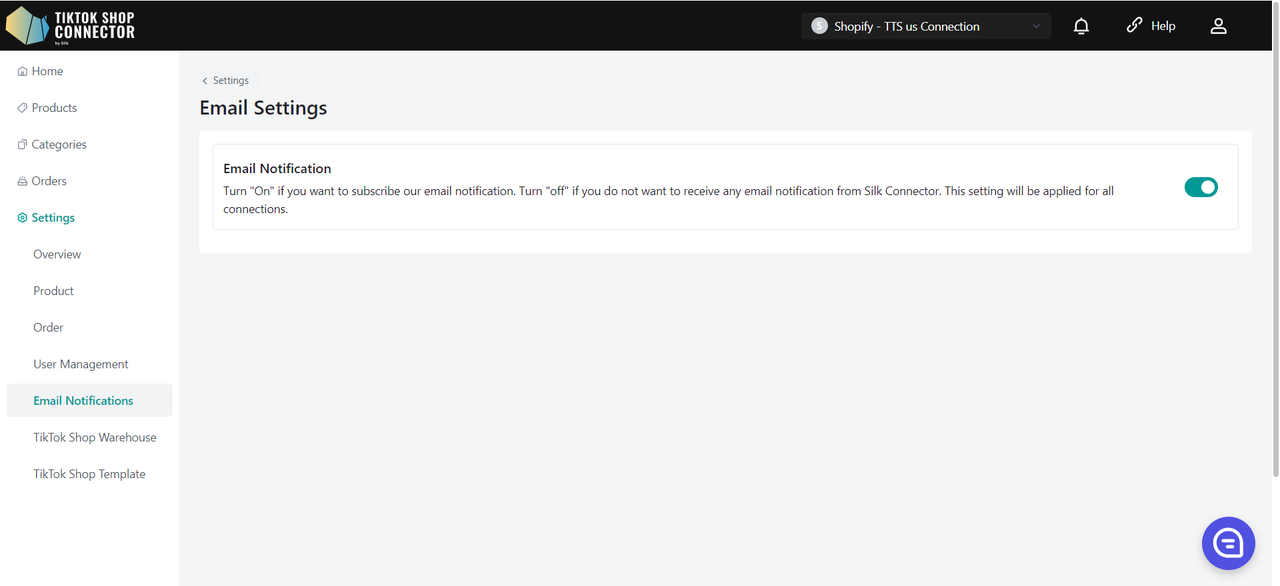
Email Notification
Turn 'On' if you want to subscribe our email notification. Turn 'off' if you do not want to receive any email notification from Silk Connector. This setting will be applied for all connections.
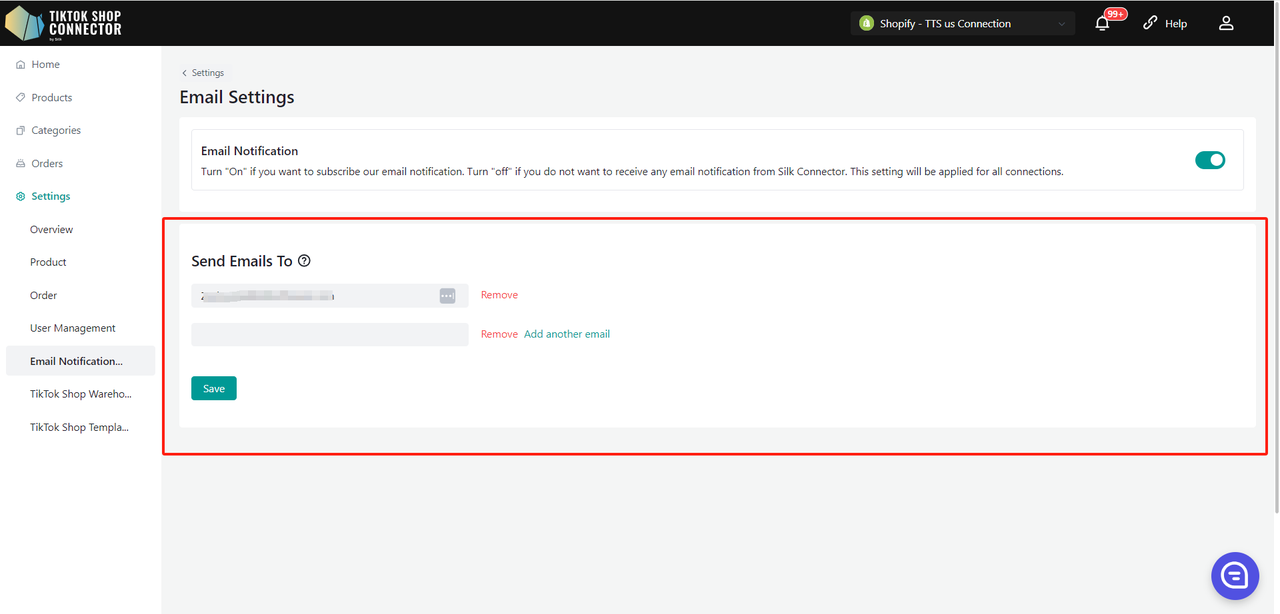
Send Emails To
The "Send Emails To" feature allows merchant store owners to customize the email addresses where system notifications and updates will be sent.
Upon entering the Email Notification Settings page, you will notice that the "Send Emails To" field is pre-populated with the merchant owner's email address.
Adding Email Addresses:
- To add a new email address, click on the "Add another email" button. This will create a new input field where you can enter the desired email address.
- Repeat this step to add up to 5 email addresses.
- Click on "Remove" to remove the email.
Once you've added all desired email addresses, click the "Save" button to apply your changes.
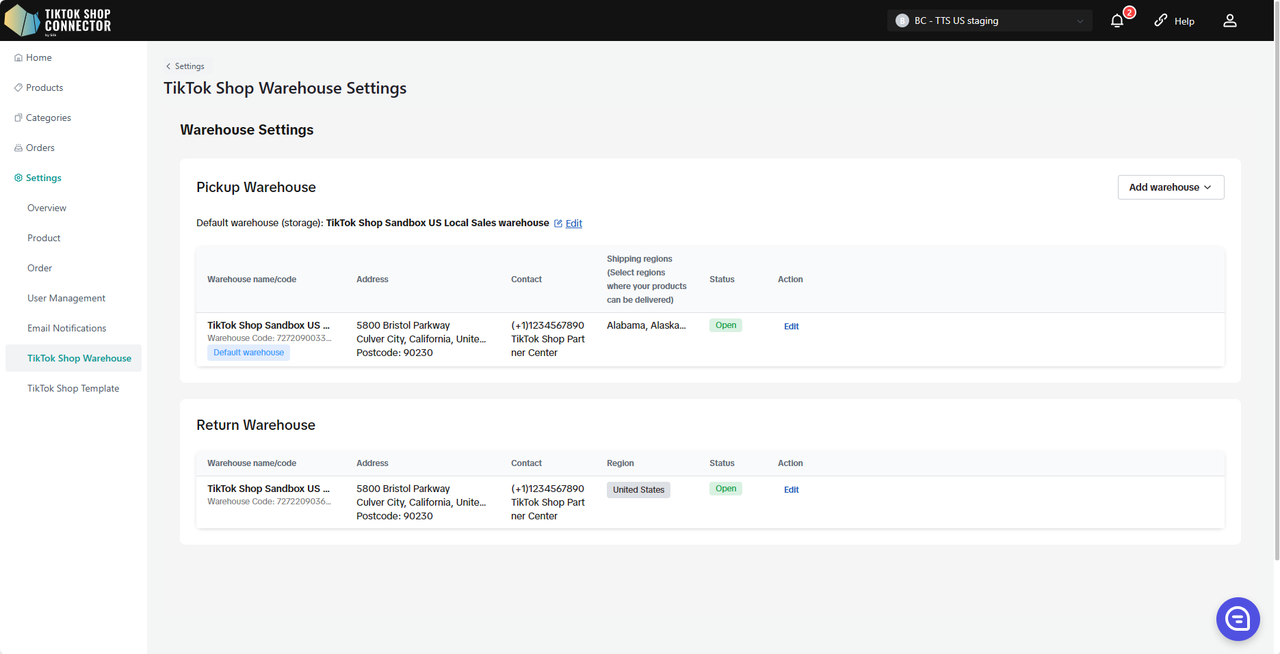
TikTok Shop Warehouse Setting
Pages displayed here are linked to your TikTok Shop account that is currently logged into the seller center. If the page doesn't match this connection, please logout and re-login to the correct TikTok Shop account in seller center, then refresh the current setting page.
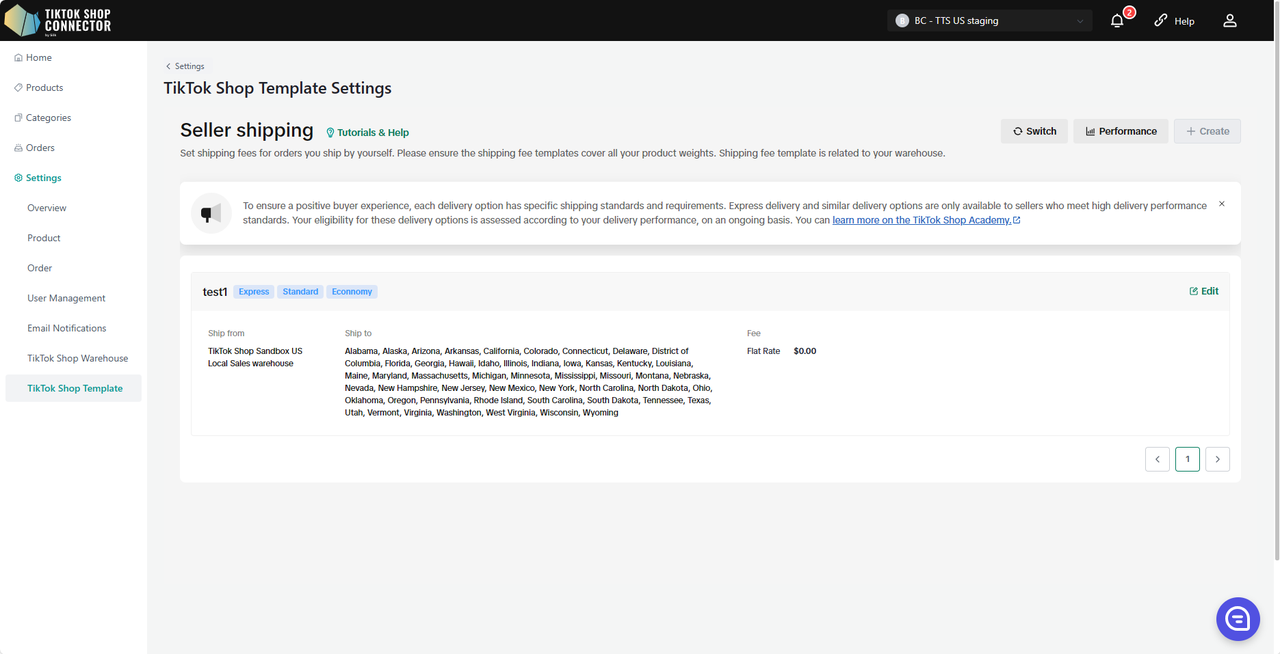
TikTok Shop Template Settings
Pages displayed here are linked to your TikTok Shop account that is currently logged into the seller center. If the page doesn't match this connection, please logout and re-login to the correct TikTok Shop account in seller center, then refresh the current setting page.
FAQ's
How much does this integration cost?
It’s FREE for 1 year if you onboard with us before 9/30/2023.
If you onboard with us AFTER 9/30/23, it will be FREE until 1/1/2024.
Why don't products show up in TikTok Shop after "pushing" my products?
If the product says "Synced Failed" click on the "Expand" -> check the "sync status" for a description of why the push was unsuccessful.
You can then troubleshoot and update anything from Shopify -> re-pull and re-push the product in the Connector.

What's an APP key, APP secret, and Access Token?
These are created in your Shopify store when you generate the custom app.
Please view the Tutorial Video on how to create a connection OR visit the "How to Create a Connection" tab in the integration manual.
Product needs "certificate" or "attributes"?
Please view the "Certificates/Required Attributes" tab in the integration manual under "How to Sync Products" -> "Push Product"
Incorrect Shopify URL?
The correct format should be: https://store1 .myshopify.com
To Find this in Shopify:
Settings (bottom left corner) > Domains
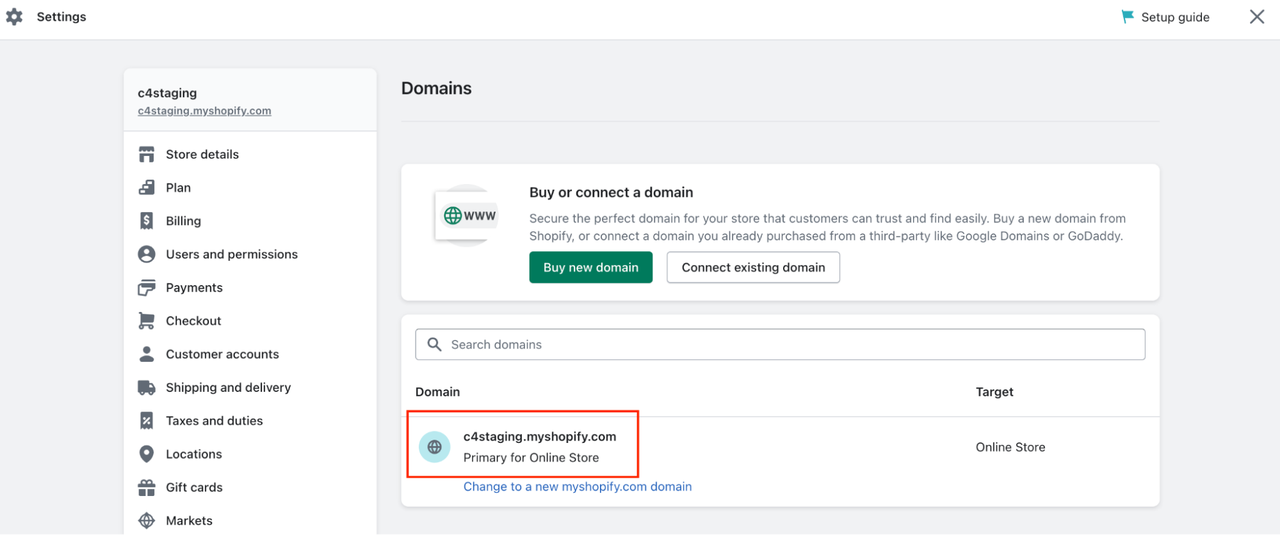 (use the https:// at the beginning)
Can't see the customer's shipping address in Shopify for order fulfillment?
TikTok Shop Seller Center -> Shipping -> Shipping Options -> Set "Ship by Seller" as "preferred"
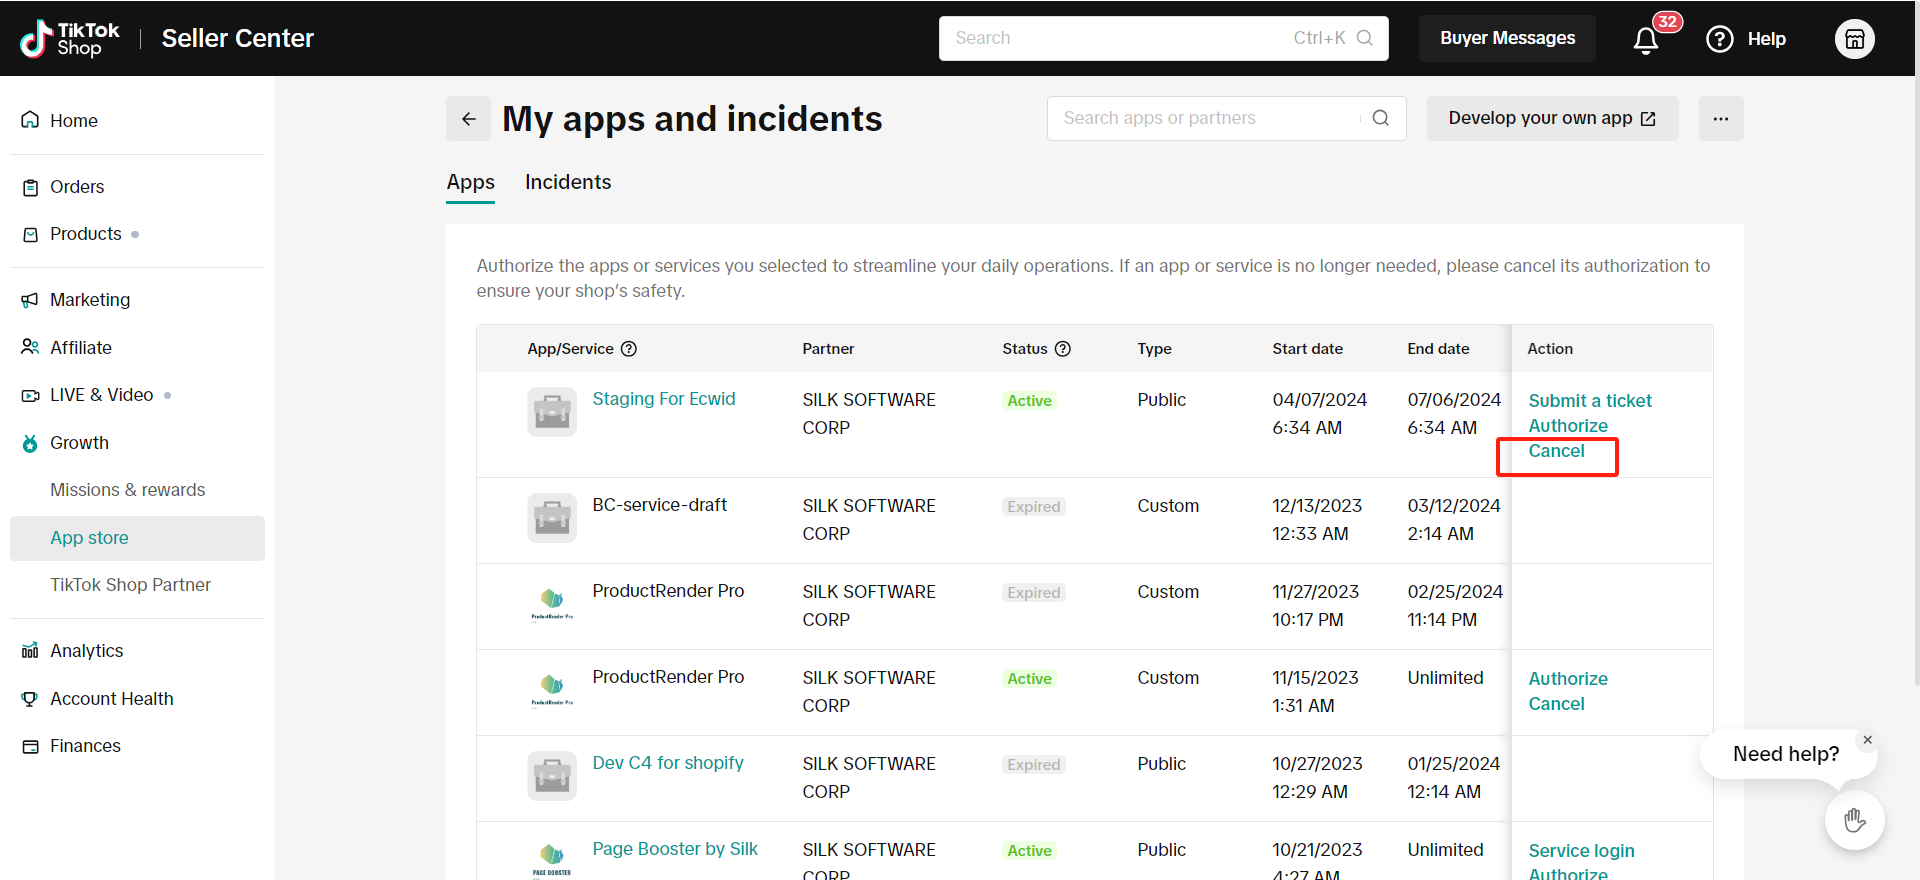
How to uninstall TikTok Shop App
Login to your TikTok Shop Seller Center
Click on Growth -> App store -> ... -> My apps and incidents
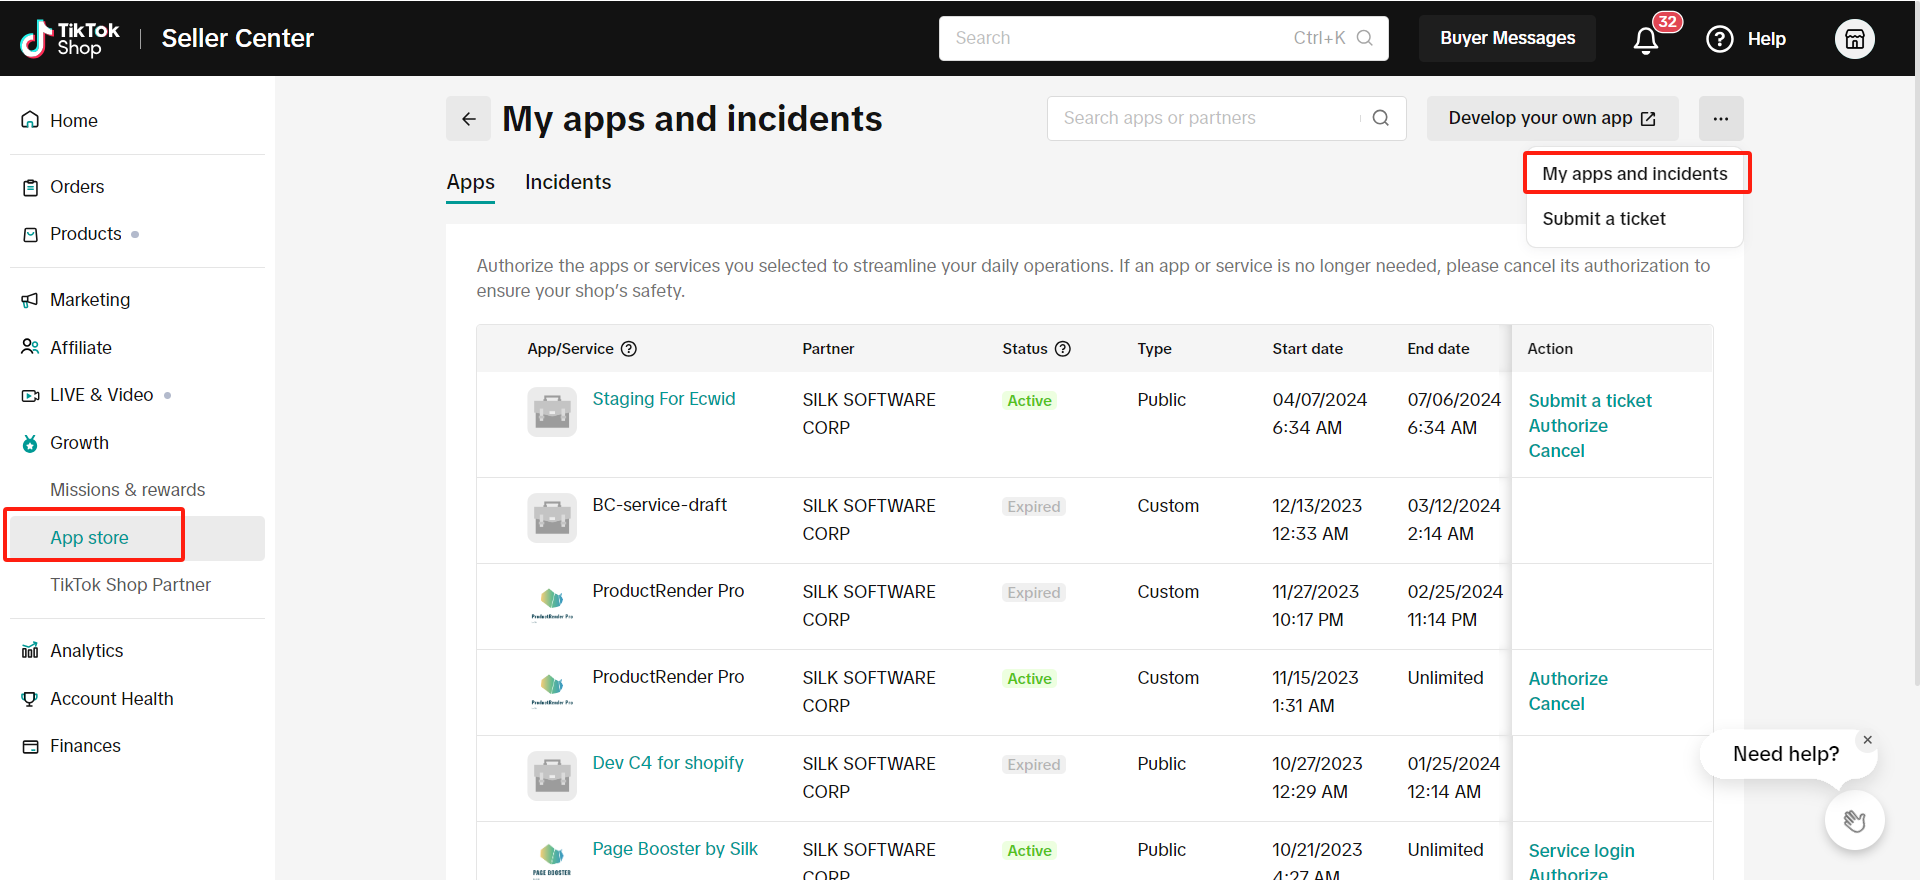
Click "Cancel" to uninstall the TikTok Shop App/Service you want to cancel
Common Sync Status Errors
If you "synced" a product to TikTok Shop, and it is not showing up in TikTok - view the sync status for an error message.
Click on the "blue arrow" next to the product -> View the "sync status"
You can then troubleshoot and update anything from Shopify -> re-pull and re-push the product in the Connector.
Common Sync Statuses:
SKU-related products are not found, please manually push to create a new product
Check the SKU in Shopify for this product. If you already have a SKU or a barcode, manually push the product individually again.
Check the box next to the product -> (...) under "Actions" -> Sync Product
The product is missing the required certificate file
Click on the (...) for the product under "Actions" -> "Certifications" -> upload the required document/image needed by TikTok Shop -> re-push
Local to local business, at least one of the package dimension is required
Settings -> Fill in all required fields with whole integers -> re-push*
Silk × TTS Strike-Through Price
Introduction
Welcome to the Silk Strike-Through Price Integration User Guide! This guide is designed to help Shopify users understand how to sync their Compare-at Price (also known as strike-through price) and Sale Price to TTS using Silk's integration feature.
Prerequisites
Before you begin, please ensure that:
Silk Account: Ensure you have a Silk account and it is connected to your Shopify store and TikTok Shop.
TTS Account: You must have an active TTS account and be a part of the strike-through price exemption whitelist.
Updated Silk Integration: Make sure your Silk integration with TTS is up-to-date to support the new strike-through price feature.
Step-by-Step Guide
Step 1: Access Silk Pricing Configuration
Log in to your Silk account.
Navigate to the pricing configuration settings.
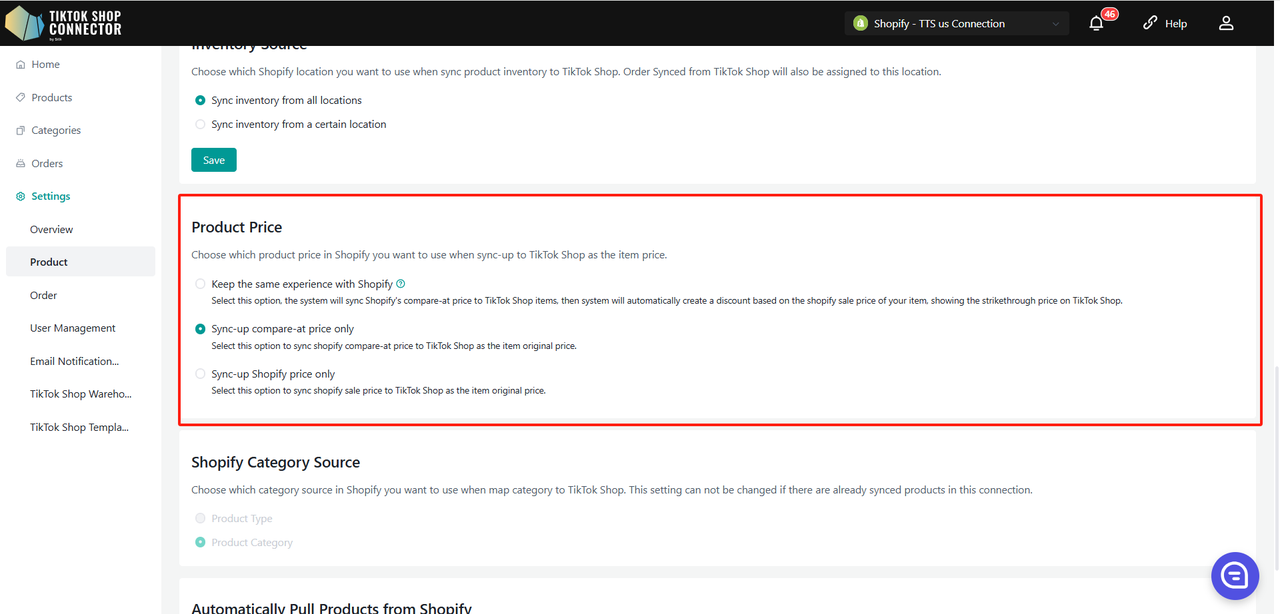
Step 2: Select Pricing Synchronization Options
In the product pricing settings, you will see three options for synchronizing prices from Shopify to TTS:
Keep the same experience with Shopify:
- Select this option, the system will sync Shopify's compare-at price to TikTok Shop items, then the system will automatically create a discount based on the shopify sale price of your item, showing the strikethrough price on TikTok Shop.
Sync-up compare-at price only
- Select this option to sync shopify compare-at price to TikTok Shop as the item's original price.
Sync-up Shopify price only
- Select this option to sync shopify sale price to TikTok Shop as the item's original price.
Note: The default option is "Sync-up Shopify price only"
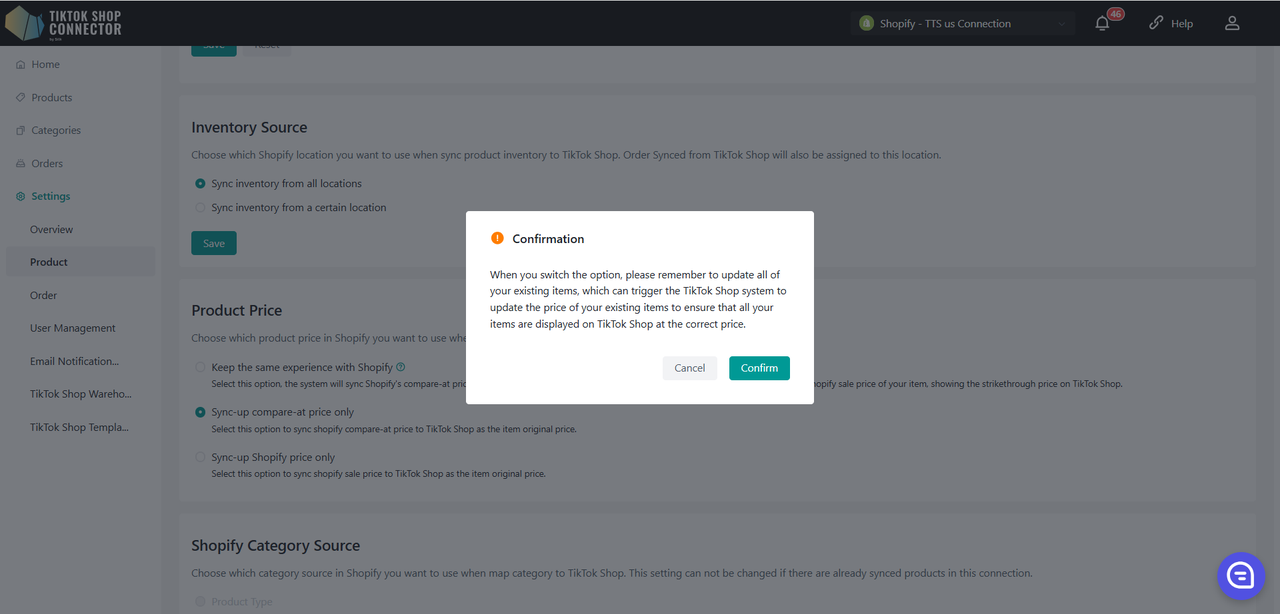
If you change the pricing synchronization option, Silk will prompt you to refresh your products, which can trigger the TikTok Shop system to update the price of your existing items to ensure that all your items are displayed on TikTok Shop at the correct price.
When you switch from syncing 2 prices (option 1) to syncing a single price (option 2 or 3), we will automatically clear all activities that have been created in TikTok Shop.
Step 3: Configure Price Updates
Silk will automatically detect changes in your Shopify prices and update the corresponding products in TTS. However, you should be aware of the following:
Updating Both Compare-at Price and Sales Price:
- Compare-at Price: Synchronized as the product's listed price in TikTok Shop, must be greater than the Sales Price.
- Sales Price: Synchronized as the discounted price, with a discount rate between 5% and 90% to create a promotion in TikTok Shop.
Updating Only Compare-at Price or Sales Price:
- Compare-at Price: Directly synchronized as the product's price in TikTok Shop.
- Sales Price: Directly synchronized as the product's price in TikTok Shop without creating a separate promotion.
Special Considerations
Exemption Period
As a whitelist seller, your products will be exempt from TTS's strikethrough price validation rules for 180 days after enabling this feature.
After 180 days, the system will automatically revert to the standard strikethrough price validation logic.
TTS promotions are valid for 45 days. Silk will automatically renew the discount every 45 days, up to a maximum of 180 days (4 renewals), as long as there are no price changes.
Price Rules
If the Sale Price in Shopify is greater than or equal to the Compare-at Price, Silk will synchronize the Sale Price as the original price in TTS.
If the Compare-at Price is empty, Silk will use the Sale Price as the sales price in TTS.
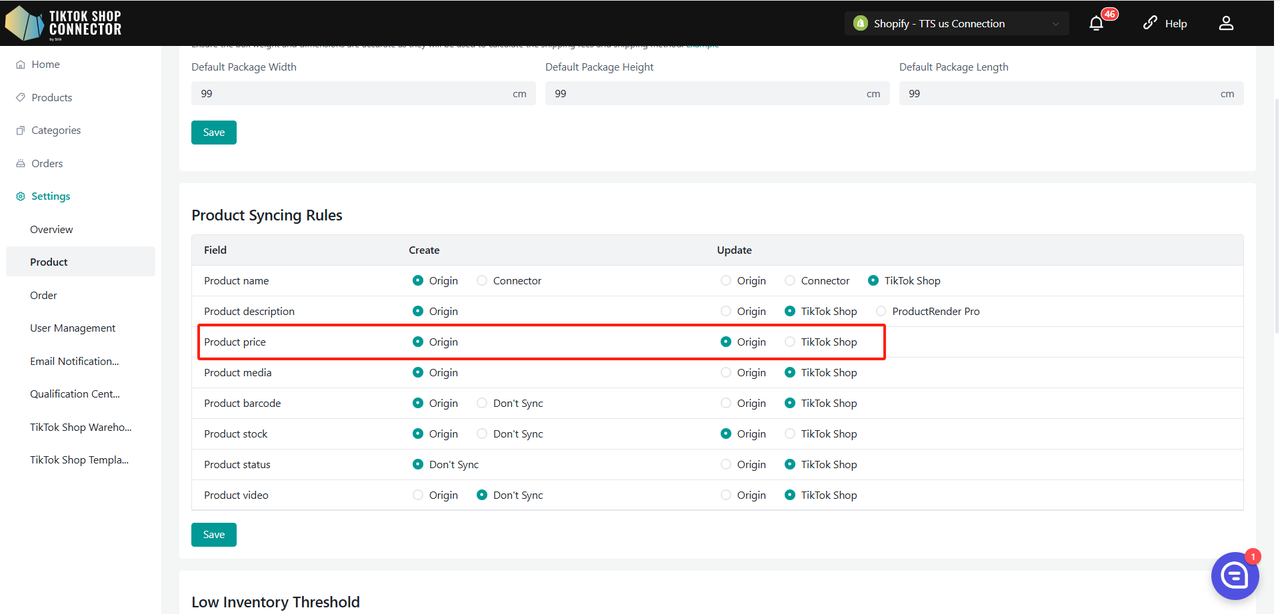
Please make sure your "Update Product Price Sync Rule" should be "Origin". If you choose "TikTok Shop" we will not create a product discount for you on TikTok Shop even if you select sync two prices.
Order Processing
Silk ensures that the strikethrough price and sale price displayed during order processing comply with TTS requirements. For whitelist sellers who have synchronized both Compare-at Price and Sale Price, Silk correctly calculates and displays discount information in orders.
Meanwhile, to ensure that TikTok Shop discount information is correctly displayed in your orders and synched to Shopify, please navigate to your order settings and enable the "Use TikTok Shop Pricing for Order Total" switch.
Notifications and Support
Silk will periodically send email notifications to whitelist sellers regarding updates and important information related to this feature.
If you encounter any issues or have questions, please contact Silk support for assistance, email to: tiktokshop@silkdigital.com
Silk Connector × TikTok Shop EU Full Sell Across EU User Guide
Introduction
TikTok Shop continues expanding across Europe, covering Spain, Ireland, Germany, France, Italy, Netherlands, Belgium, and Poland.
With the new Full Sell Across EU solution, sellers can now manage multi-market product publishing, replication, inventory, pricing, and compliance directly through Silk Connector.
Compared with the previous GPA model, the new architecture removes the concept of Global Products and introduces an Origin–Target Shop structure for flexible multi-country product management.
Silk Connector integrates with the Full Sell Across EU APIs to help merchants:
Push products directly to TikTok Shop
Replicate products across EU markets
Manage market-specific pricing and inventory
Configure compliance information
Manage bound products across multiple regions
Synchronize orders across EU markets
Prerequisites
Before using Silk Connector with TikTok Shop Full Sell Across EU APIs, ensure the following conditions are met:
Your TikTok Shop seller account must support EU multi-shop management.
All authorized EU shops must belong to the same TikTok Shop seller account.
Your Shopify store should have Shopify Markets enabled.
Your Silk account must have enabled the EU Full Sell Across EU features.
You must connect to your TikTok Shop Origin Shop before using multi-market replication features.
A Target Shop must be authorized under the same TikTok Shop seller account before it can be added to the connection. If a market is not available during authorization, please confirm that the market has been enabled in TikTok Shop Seller Center and that you are authorizing the correct seller account.
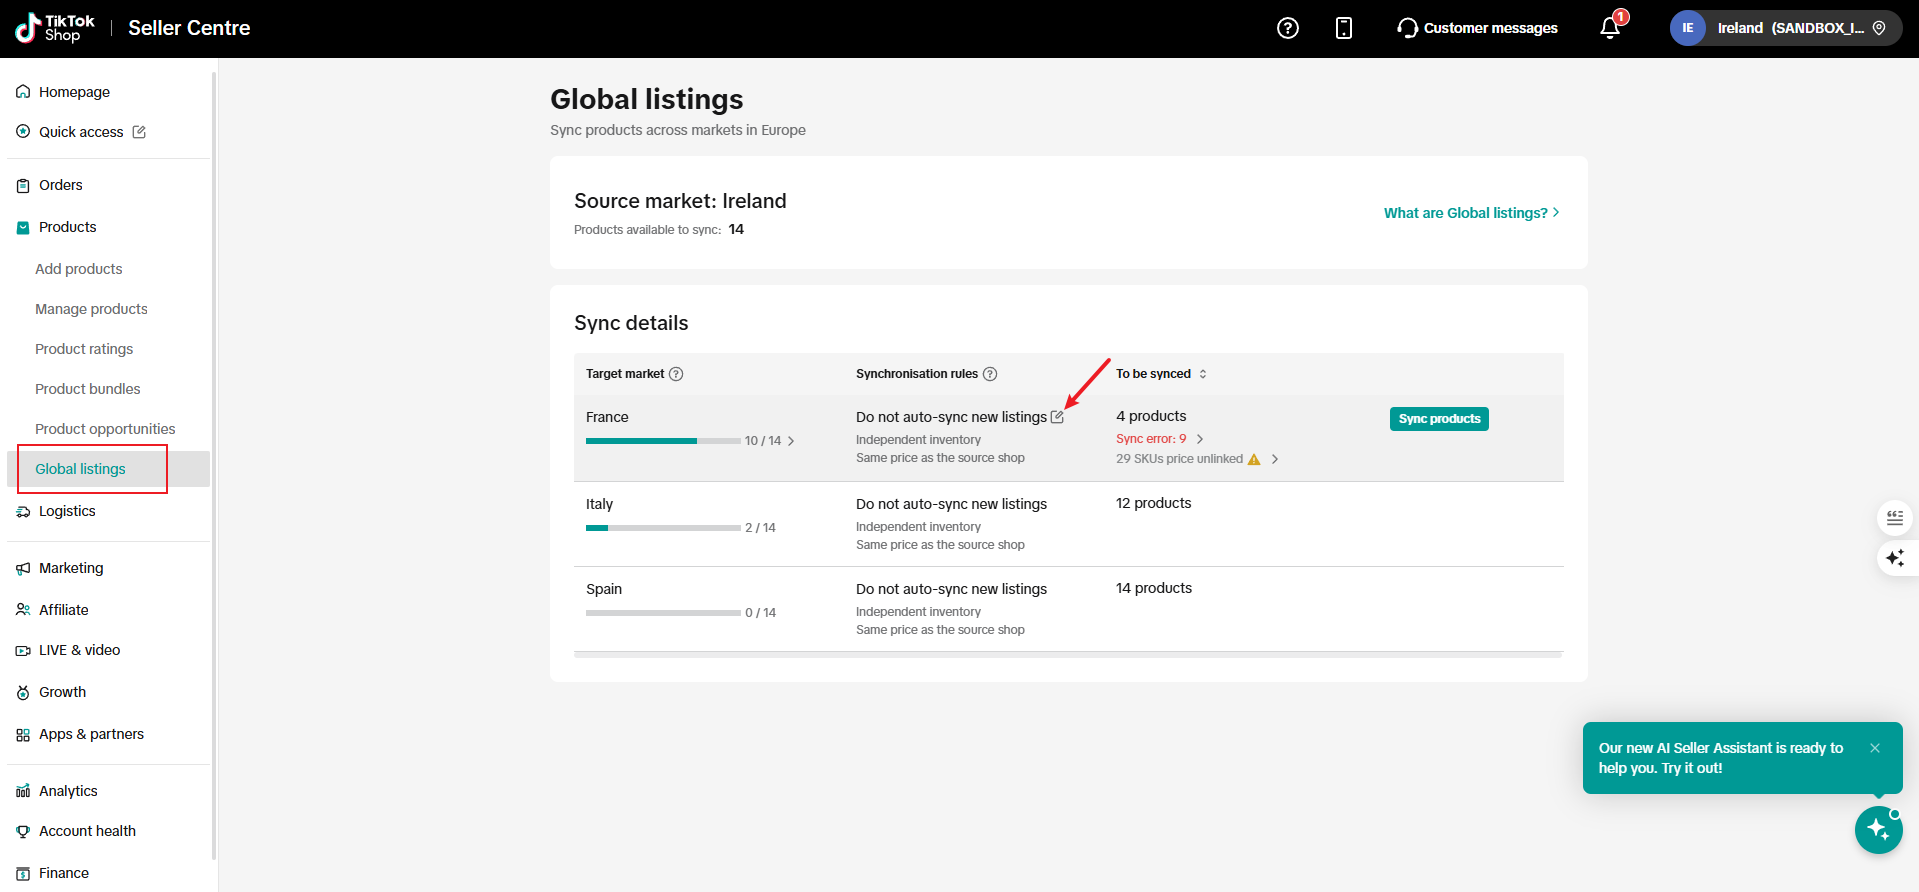
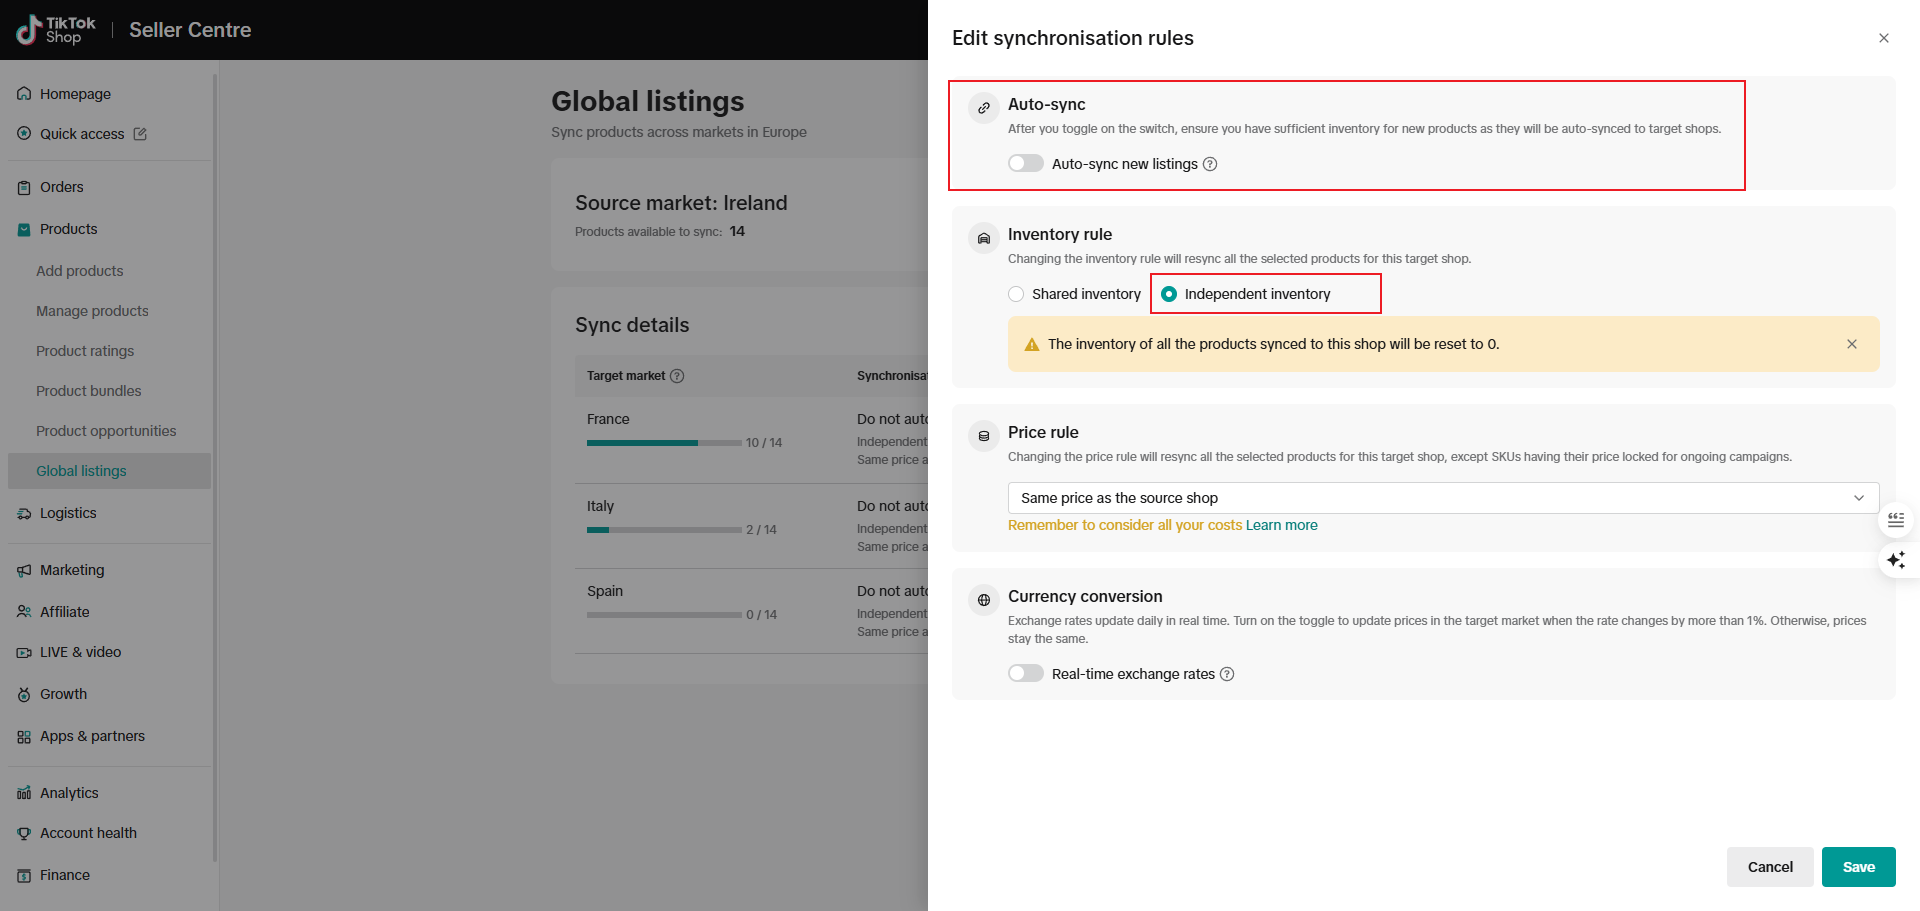
TikTok Shop Configuration – Disable Auto-sync Before Replication
Before performing the Replicate Product operation, please ensure that TikTok’s Auto-sync feature is turned off.
How to disable Auto-sync: Go to Global Listing → Edit Synchronisation Rules → Auto-sync, and turn it off before proceeding.
How to Create a Global Connection
Creating a connection for the first time follows the same process as usual. You can view the detailed guide here:
The only difference is that, when your TikTok Shop Seller ID is associated with multiple EU stores, you will need to select the specific EU store you wish to authorize during the initial connection creation.
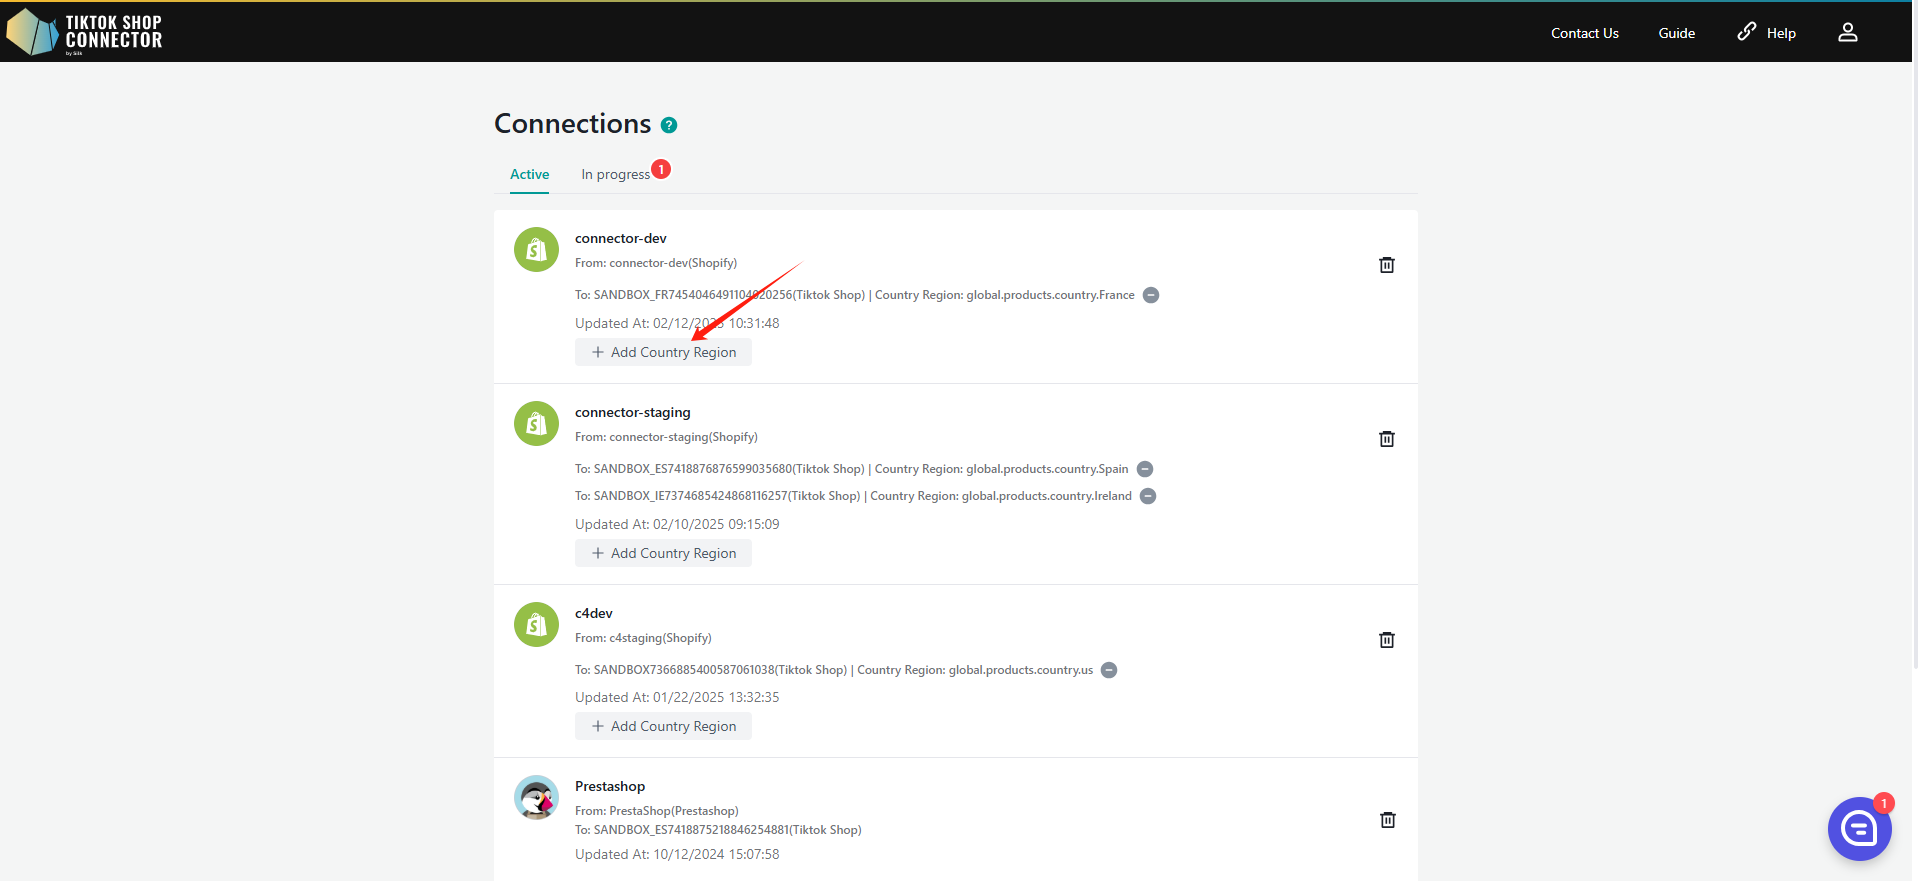
Once you've created a complete connection for one EU region, and you wish to add other EU regions to the same connection, simply click the "Add Country/Region" feature to authorize additional EU markets.
When authorizing different TikTok Shop stores, please pay attention to switching to the corresponding EU regions.
All TikTok Shop EU stores need to belong to the same TikTok Shop seller ID.

Supported EU markets include:
Spain
Ireland
Germany
France
Italy
Netherlands
Belgium
Poland
Coming soon:
Austria
Hungary
Portugal
Czech Republic
Greece
Managing Multiple TikTok Shop Regions in One Connection
Once you have added all the TikTok Shop regions, you can manage different TikTok Shop regions within a single connection.
Click on the connection name to enter the connection.
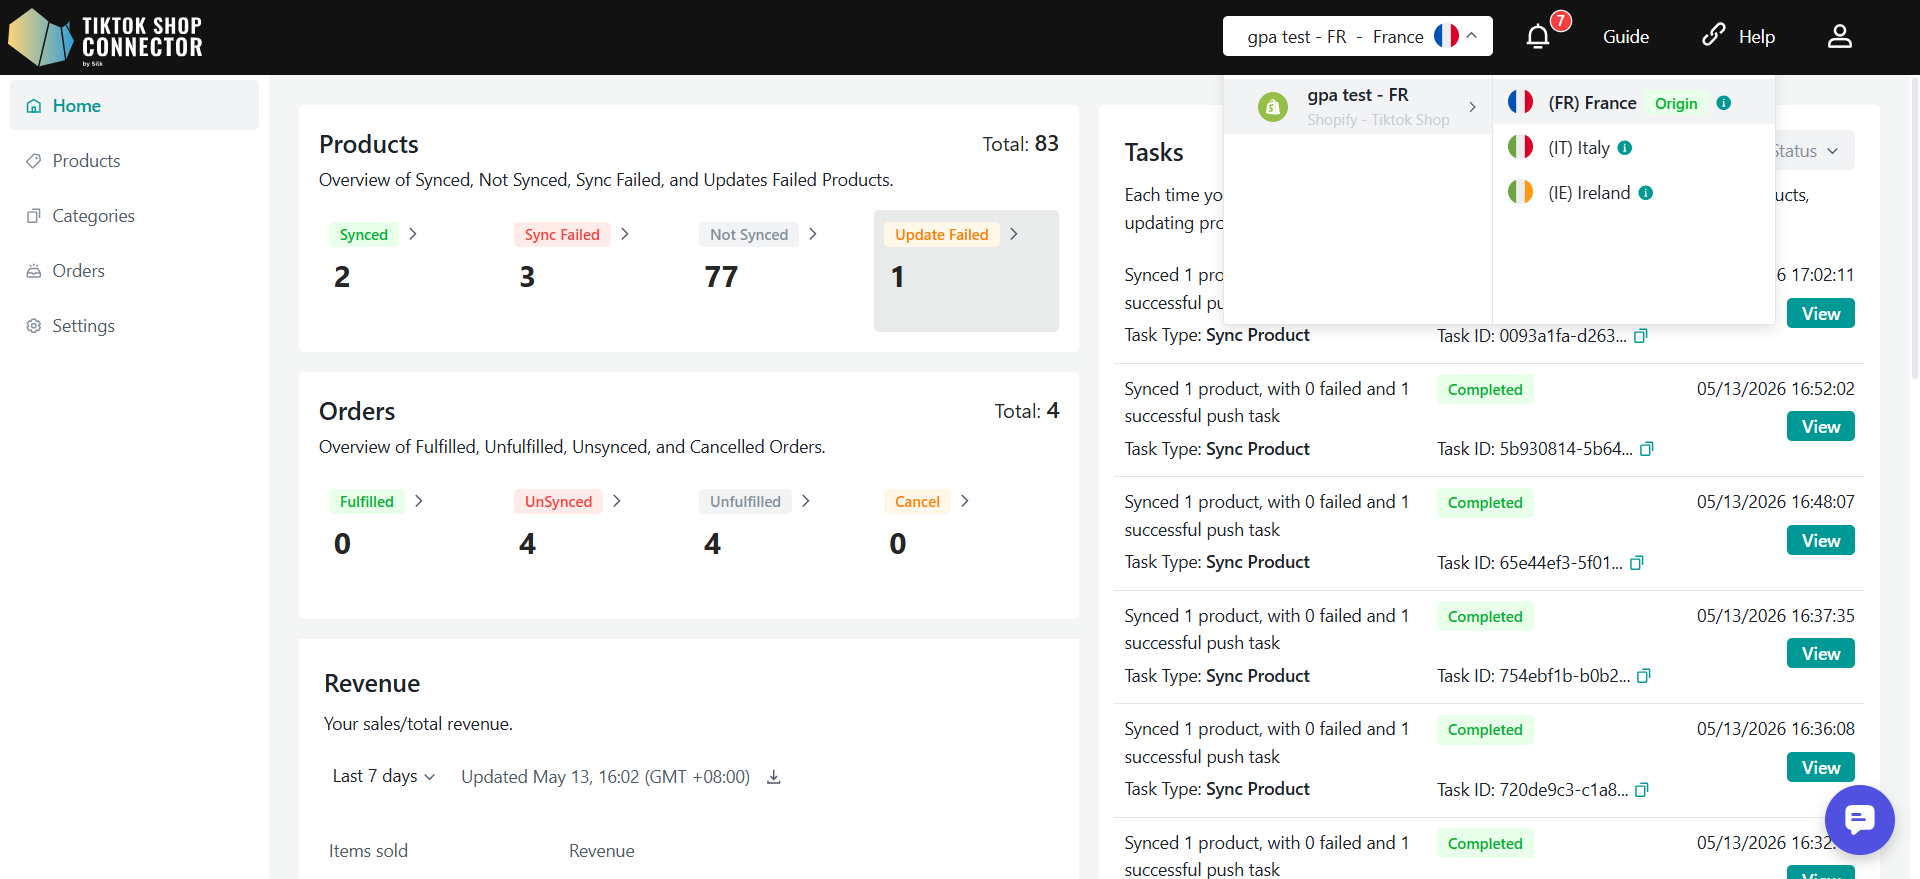
From the connection page, you can switch between the different authorized TikTok Shop regions by using the region dropdown at the top.
By default, you will be directed to the first authorized region in your connection.
When switching to a specific EU market from the dropdown, the data for the selected country will be displayed.
Each country has its own independent pages, including:
Home
Product
Category
Order
Setting
This allows you to manage data separately for each country, giving you full control over each region.
Configuring Origin Shop
What is an Origin Shop?
The Origin Shop is the primary TikTok Shop used to create and publish products.
Only the Origin Shop can:
Create products for multi-market replication
Trigger product replication to Target Shops
Serve as the source product for cross-market synchronization
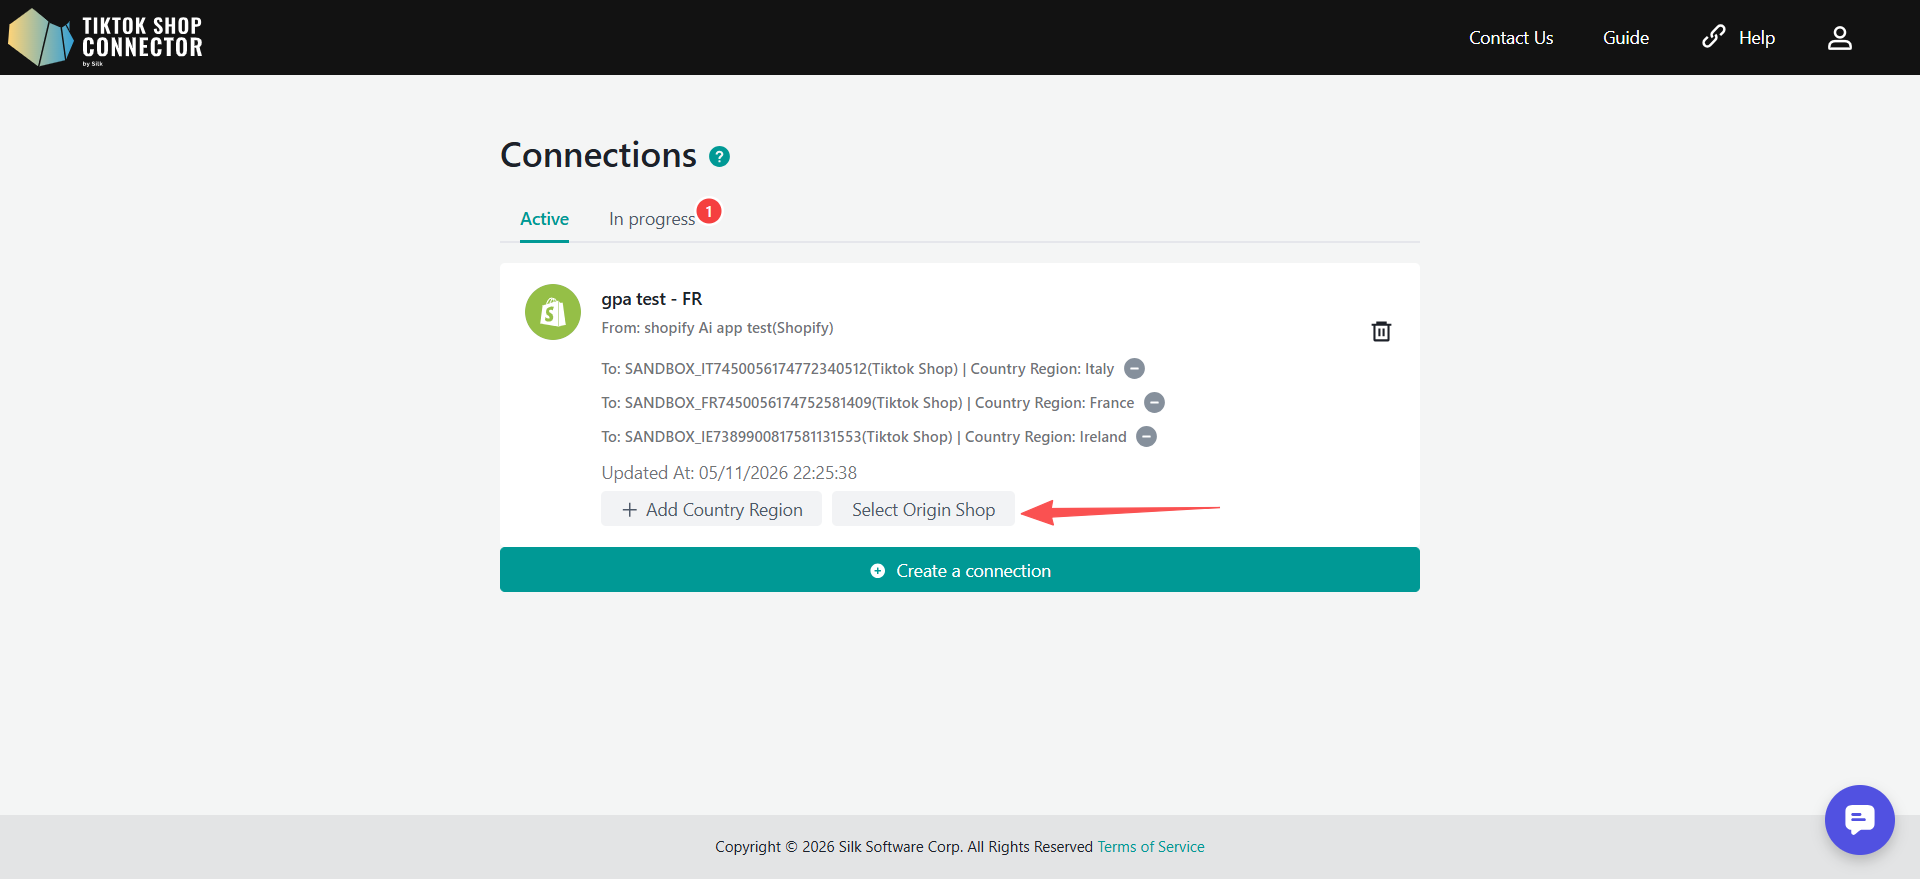
Multi-Shop Connection Scenario
When multiple TikTok Shop regions are connected with the same connection:
Sellers must manually select one shop as the Origin Shop.
A "Select Origin Shop" button will appear under the connection.
The selected Origin Shop must match the Origin Shop configured in TikTok Shop Seller Center.
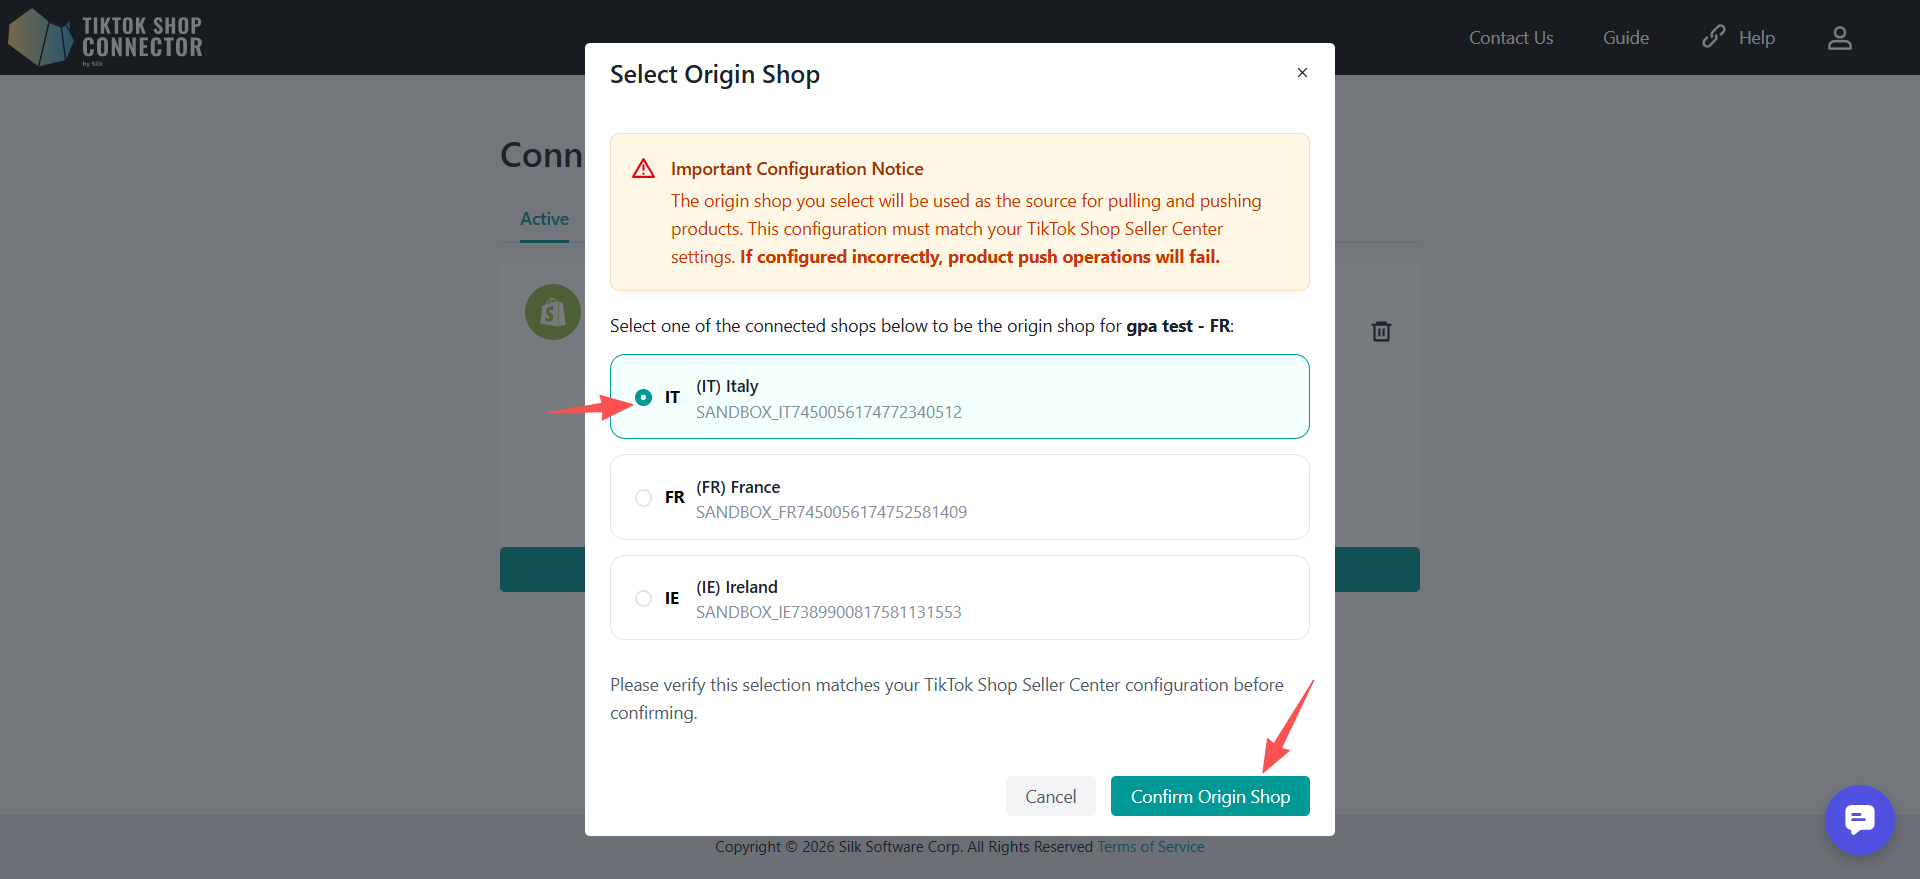
Important Notes
Origin Shop can only be configured once.
After products are successfully pushed to the Origin Shop, the Origin Shop cannot be changed.
Sellers must configure the Origin Shop before pulling or syncing products.
If Origin Shop is not configured, the system will display the following message:
Please select an Origin Shop before syncing products. The Origin Shop must match the Origin Shop configured in TikTok Shop.
Single-Shop Connection Scenario
When only one TikTok Shop is connected:
The system allows normal product push operations.
During the first product push, the system automatically attempts to set the connected shop as the Origin Shop.
If the connected shop is not the TikTok Shop Origin Shop, the push operation will fail with the following message:
Only the Origin Shop can create and publish products. Please connect your TikTok Shop Origin Shop and set it as the Origin Shop in the system.
Configuring Inventory Locations for Regional Connections
When you first enter a connection in Silk Connector, it’s important to configure the appropriate Shopify inventory location for each region connection, especially if you have different inventory locations set up for various regions in Shopify.
This configuration ensures that your products are properly managed and prevents overselling by ensuring accurate inventory synchronization for each region.
If you do not configure the inventory location for each region connection, Silk Connector will default to pulling all inventory locations configured in your Shopify account for each connection.
Step 1: Navigate to Product Settings
Log into your Silk Connector account.
Go to the Product Settings section from your main dashboard.
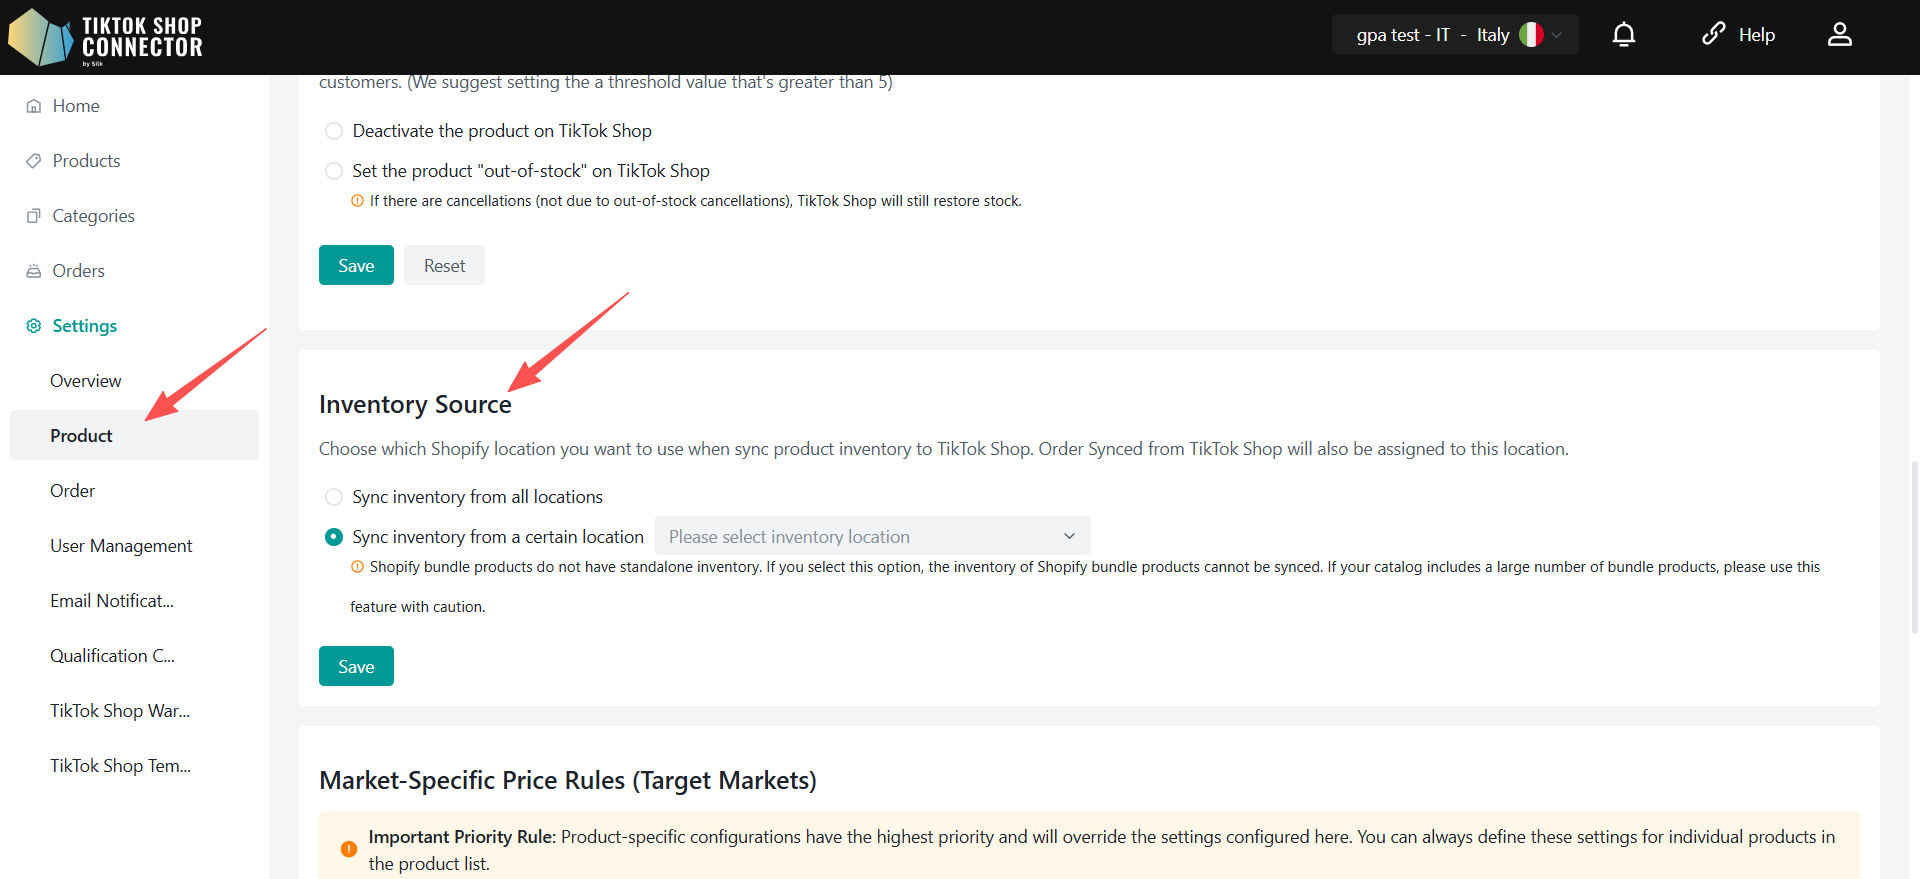
Step 2: Configure Shopify Inventory Location
On the Product Settings page, you will see the inventory source section.
Select the corresponding inventory location for this region from the available options.
After selecting the correct inventory location for each region, click Save to confirm the configuration.
Pull Products from Shopify
When you first access your new connection, your products and dashboard tabs will be blank.
You will need to pull products from Shopify into the Connector before pushing them to TikTok Shop.
Unlike the previous GPA workflow, products are now pulled directly into the Local Product page.
Pull Products
To pull products from Shopify:
Product tab → Bulk Actions → Pull Products
Choose the date range to pull products from Shopify.
Recommended:
Choose a start date from 2–3 years back OR when you first started your Shopify store.
Choose the end date as today’s date.
If you are pulling in products for the first time, select the full historical date range to ensure all products are imported into the Connector.
After the initial pull, future Shopify updates only need incremental pulls.
Click Confirm after selecting the date range.
Important Notes
Due to Shopify API rate limits, retrieving product information for multiple products may take some time.
Please wait for the product pull task to complete.
Required Category Mapping
All products must have the Shopify product category configured.
The Connector uses this category to map products to TikTok Shop categories.
Category Mapping Process
Navigate to the Category page.
Silk Connector will automatically recommend TikTok Shop categories using the TikTok Shop Category Recommend API.
Review the recommended categories.
Modify categories manually if necessary.
Save category mapping before syncing products.
Belgium Product Language Selection
When syncing products to TikTok Shop Belgium for the first time, sellers must select the source language for product content.
Supported source languages:
French
Dutch
German
Silk Connector will automatically translate the product content into other supported languages for TikTok Shop Belgium.
Important Notes
Language selection is required only during the first successful product sync.
Once the product is successfully synced and approved, the language cannot be changed.
If the sync fails, the seller may select a different language and retry.
How to Sync Products
Under the new Full Sell Across EU architecture, products are pushed directly to TikTok Shop.
Product Sync Scenarios
Silk Connector supports:
Single-market product sync
Multi-market product replication
Local independent product sync
Cross-market product binding
Sync One Product
Check the box next to the product image → (...) under Actions → Sync Product
Sync Multiple Products - One Page
Select multiple products → Selected → Sync Product
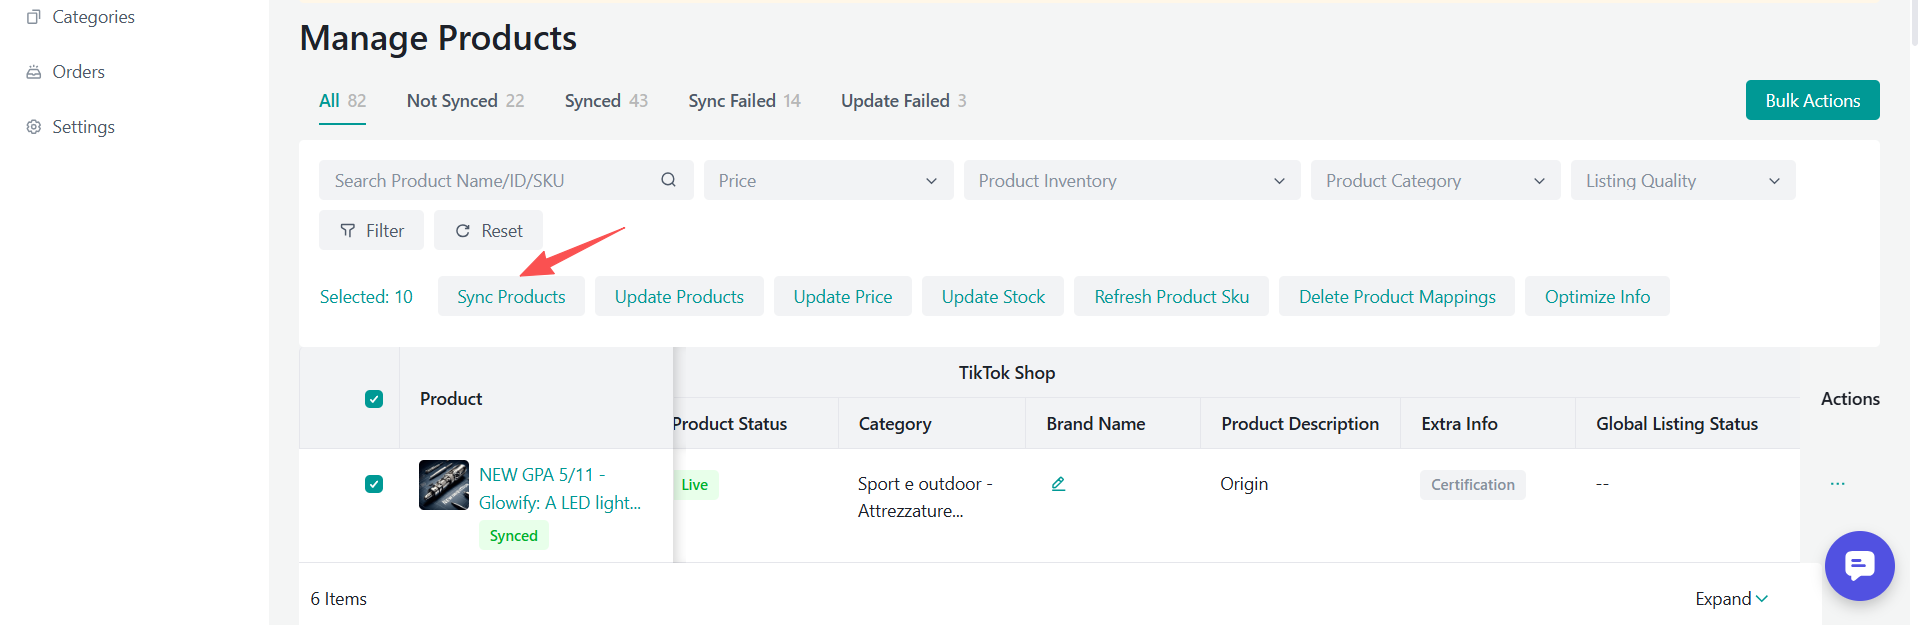
Sync All Products
Actions → Sync All Products
Replicate Products
After clicking Sync Product or Sync All Products, the system will open the Sync Products to TikTok Shop popup.
In this popup:
The Origin Shop is automatically selected.
The Origin Shop is marked with an ORIGIN label.
The Origin Shop cannot be deselected.
Other connected EU markets are selected by default.
Sellers may manually deselect target markets.
Sellers may click Deselect Targets to quickly clear all target markets except the Origin Shop.
Products will first be created in the Origin Shop.
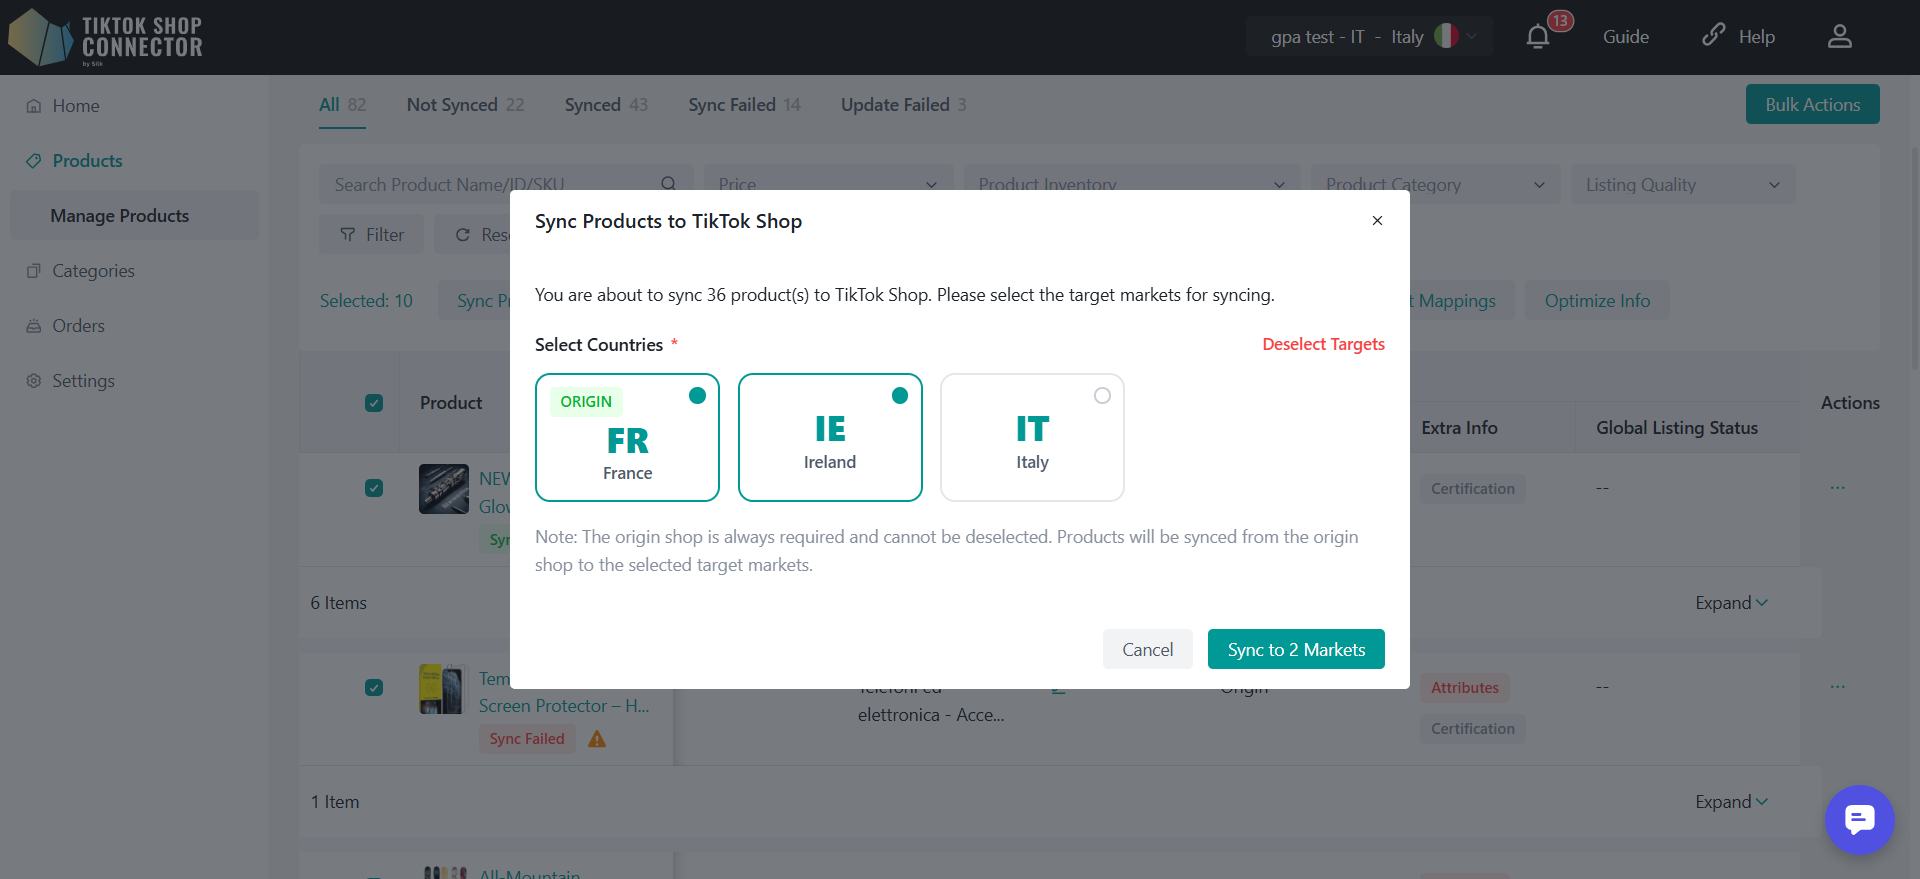
After the Origin Shop product is successfully created:
Silk Connector automatically triggers product replication.
Products are replicated to the selected Target Markets.
Product translation is automatically handled by TikTok Shop.
Replicate Products to Additional Markets
If a product has already been published to the Origin Shop or replicated to only some Target Markets, sellers can still replicate the product to additional markets later.
To do this:
Click the Replicate Product button under the Action column.
In the popup, select the markets that have not yet been replicated.
Confirm the replication request.
Only markets that have not already received the product will be available for selection in the popup.
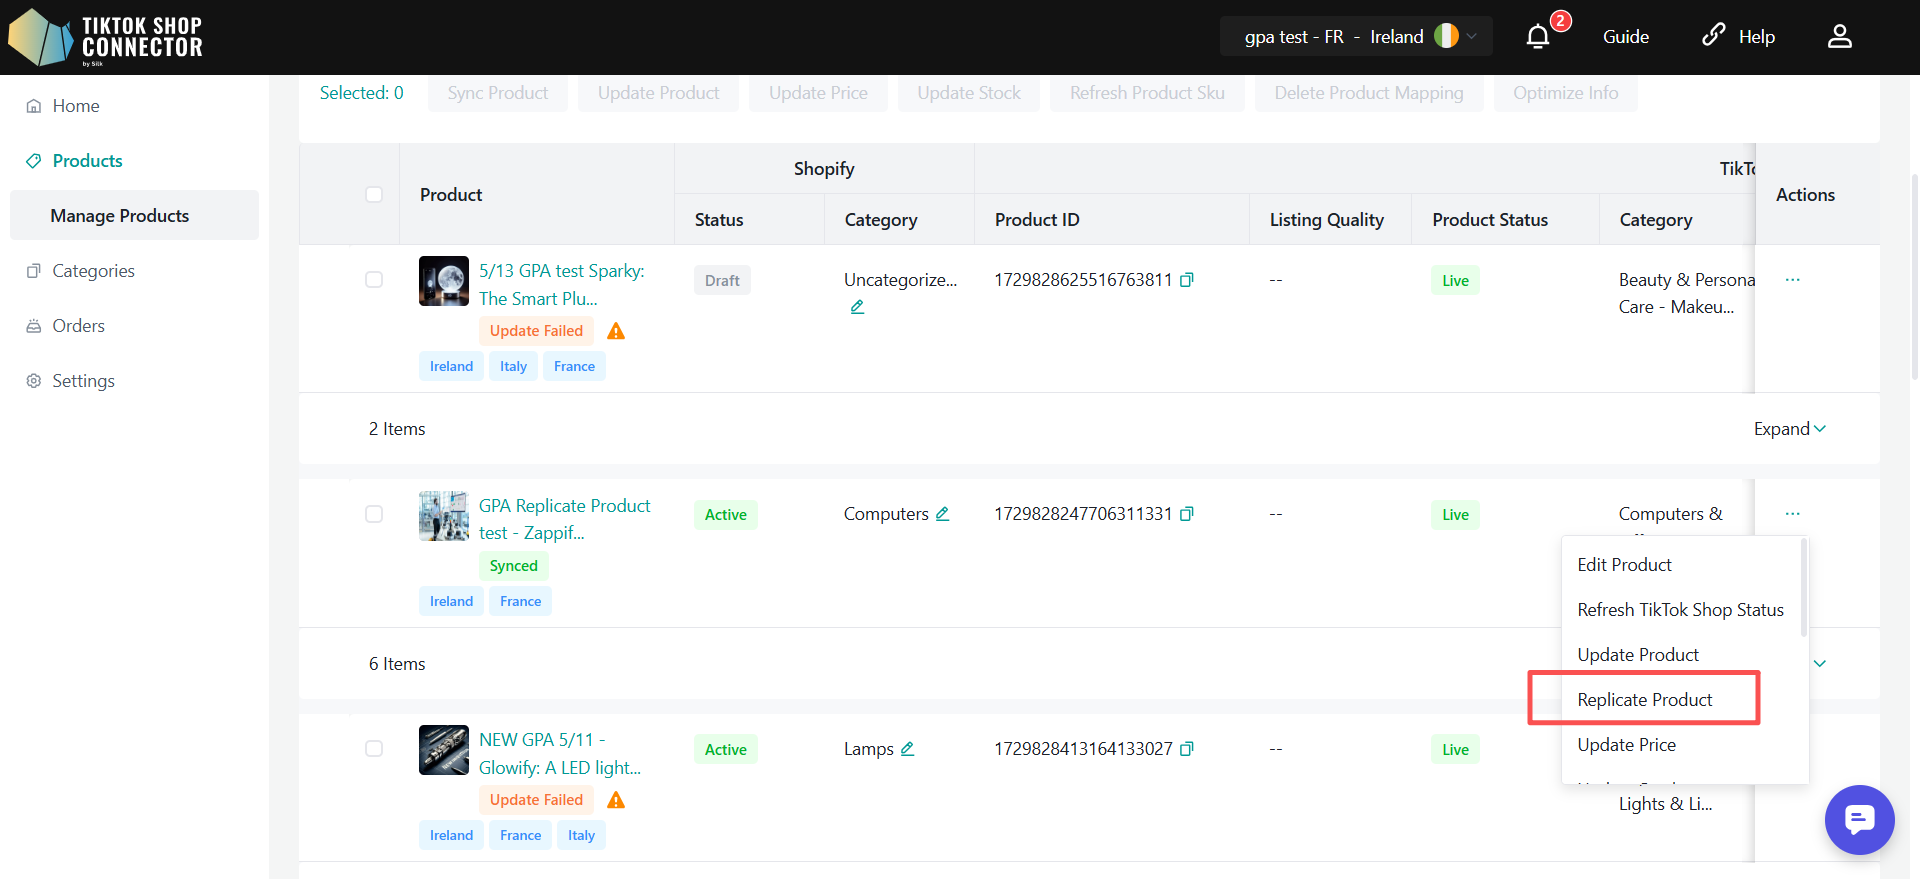
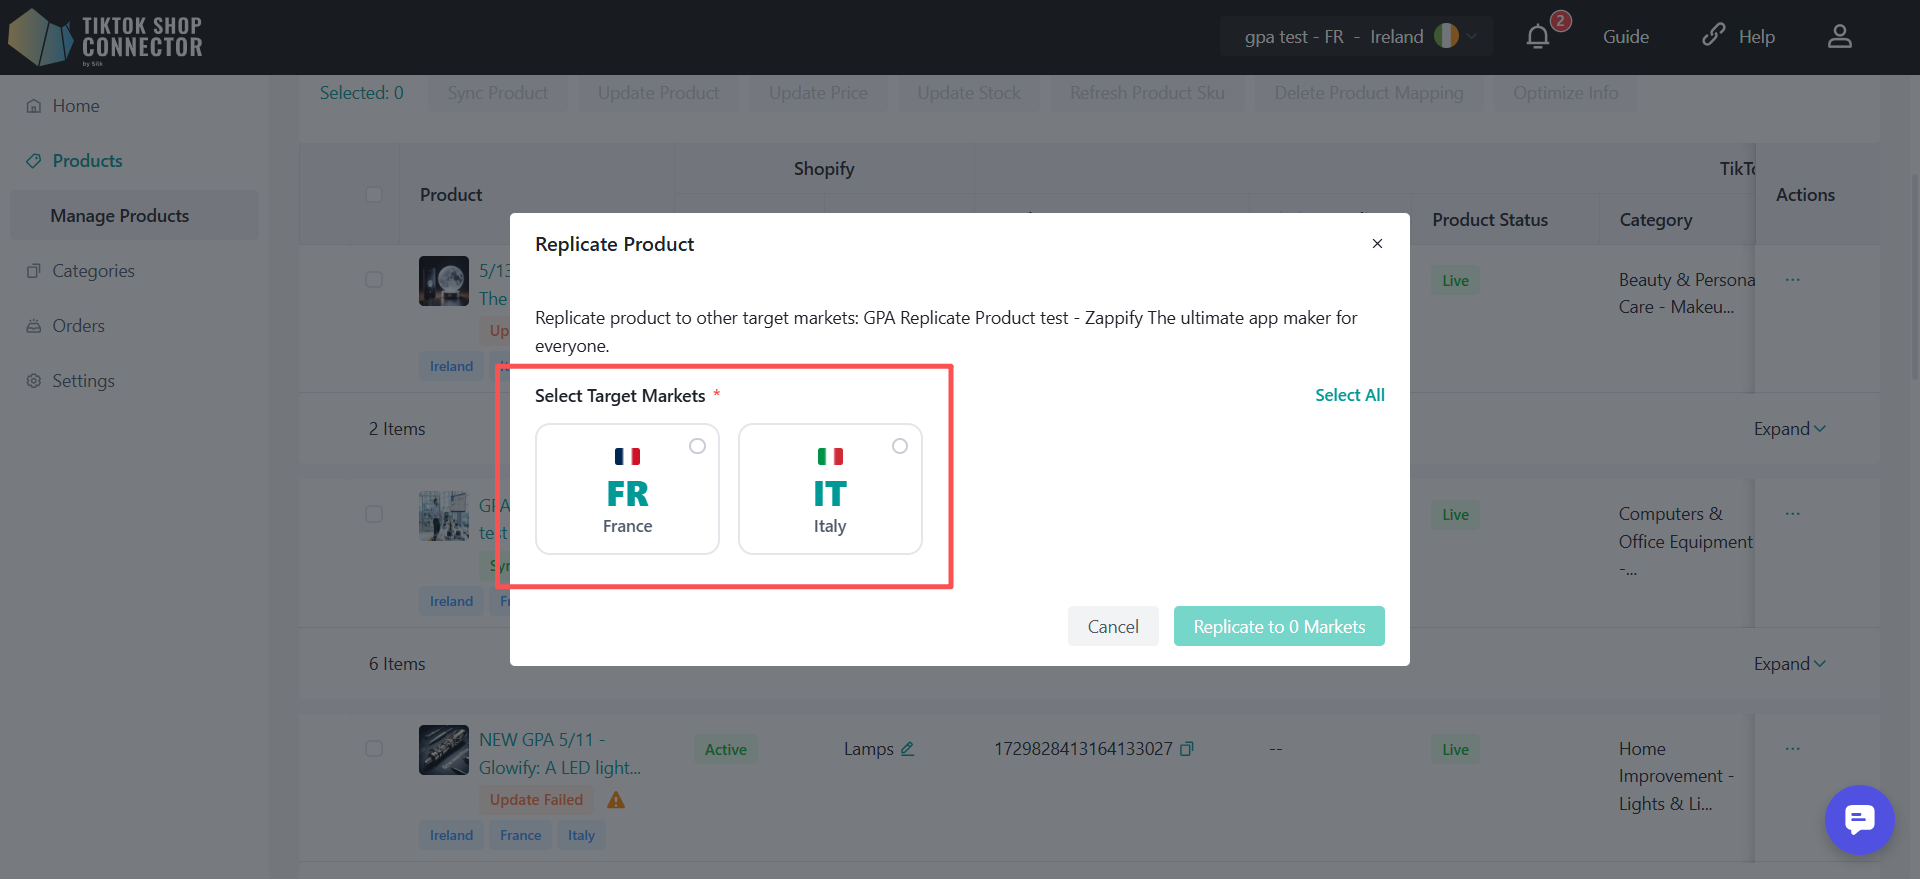
Important Notes
The Origin Shop is always required.
Products are synchronized from the Origin Shop to selected Target Markets.
If Origin Shop product creation fails, replication to Target Markets will not begin.
Different Target Markets may have different compliance or category requirements.
Sellers should complete all required compliance information before syncing products.
Sync Task Status
After you submit a sync task, go to Home > Task Status to review the processing result.
The task result will display:
Total selected markets
Successful markets
Failed markets
Processing status for each market
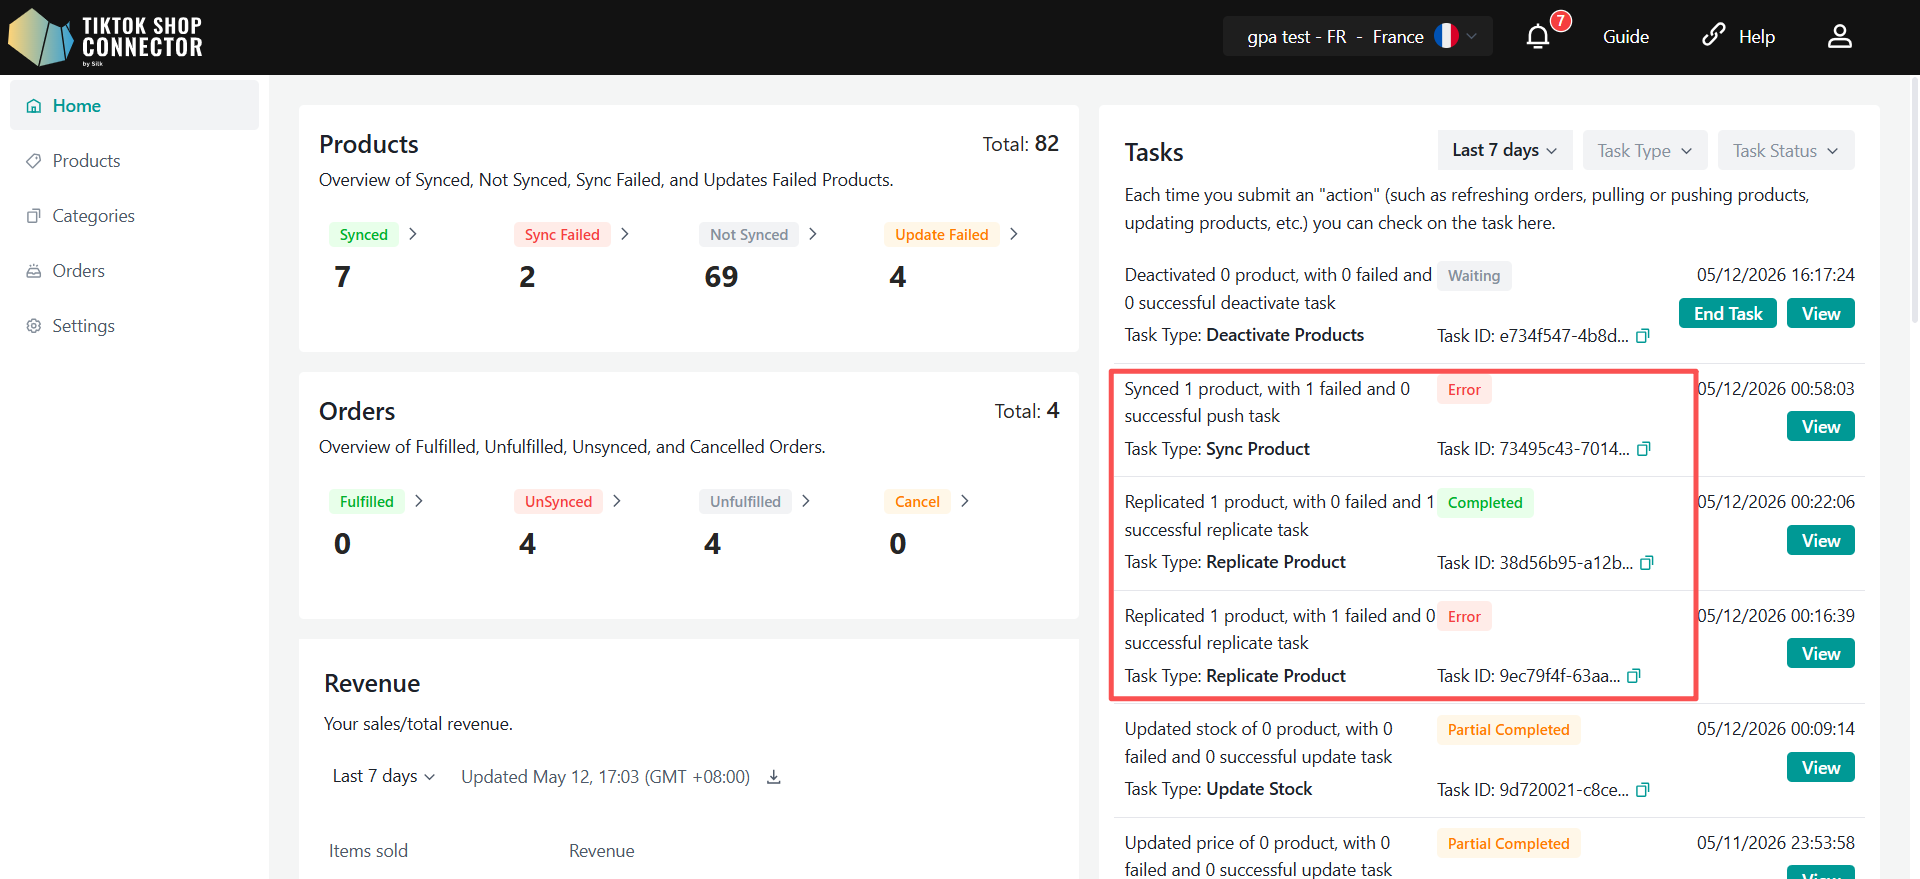
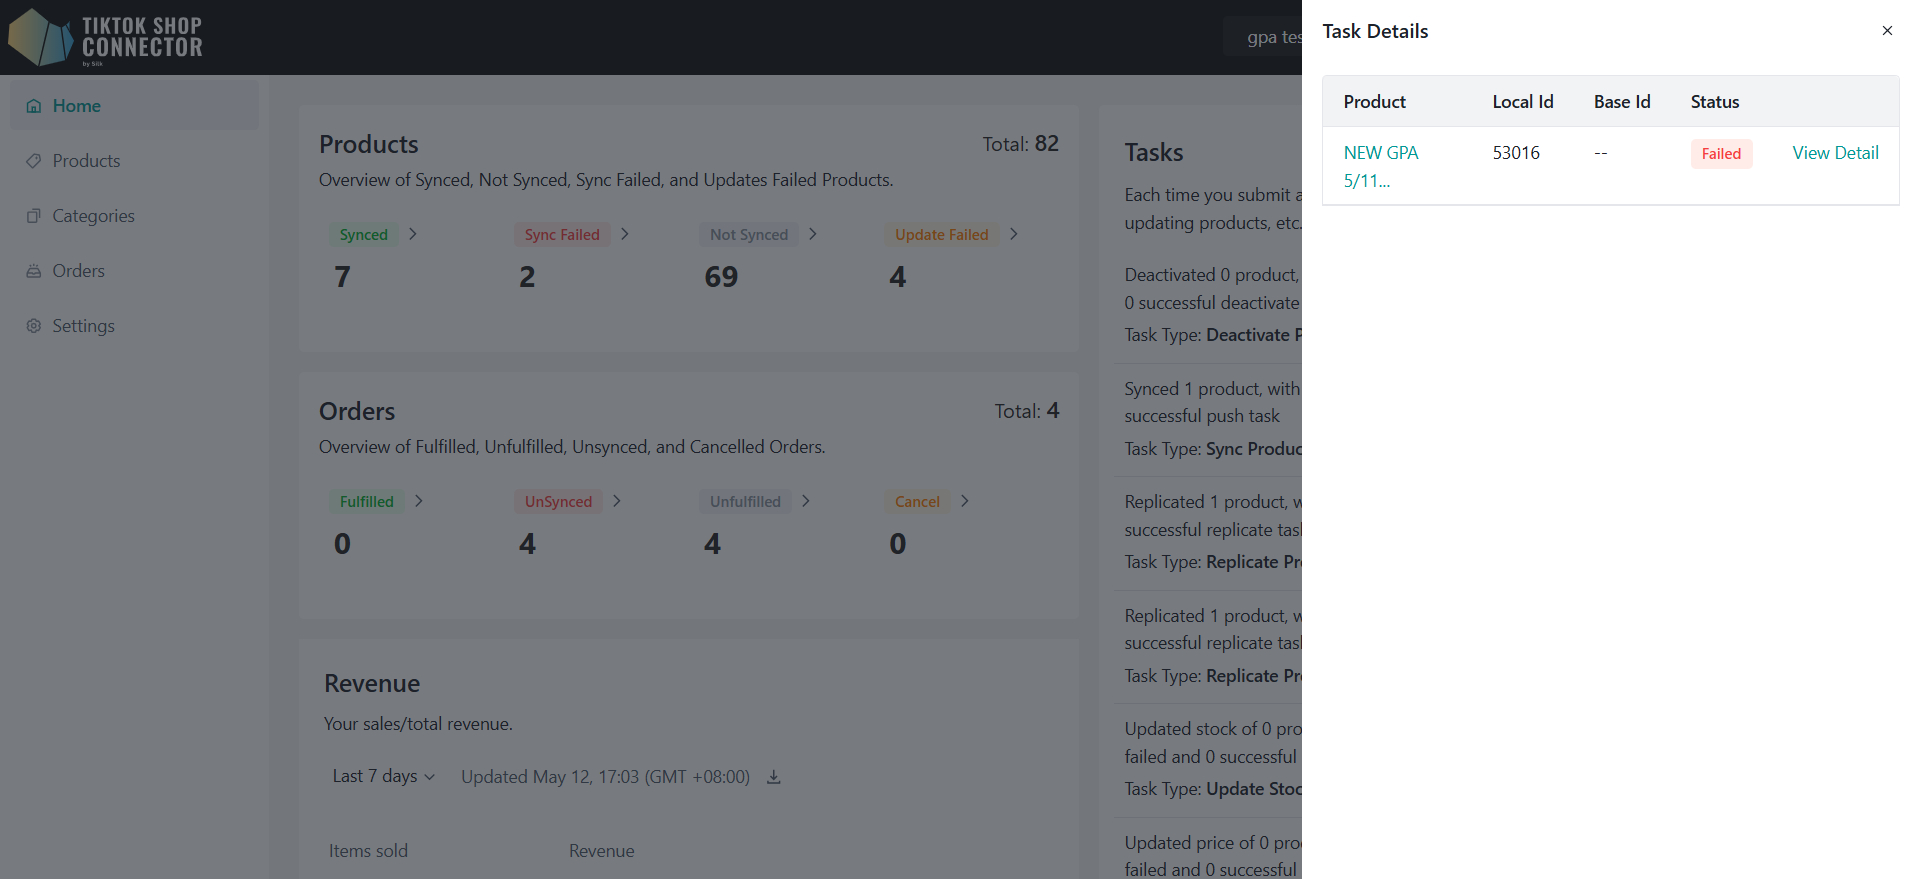
Please note:
A completed task status only means the synchronization task has finished processing.
It does not guarantee that all target market replications succeeded.
If replication fails in certain markets:
The product status becomes Draft.
Sellers can view failure reasons from the product status details.
After resolving issues, sellers may retry product synchronization.
Global Listing Status
The Product list page includes a Global Listing Status field to display cross-market replication status.
Status Definitions
- Live
The product has been successfully replicated and published to all selected Target Shops.
- Draft
One or more Target Shop replications failed or remain unpublished.
- Draft Status Tooltip
When hovering over Draft status:
Replication failed. This product is now in Draft status. Please update the product information in the target shop and update it.
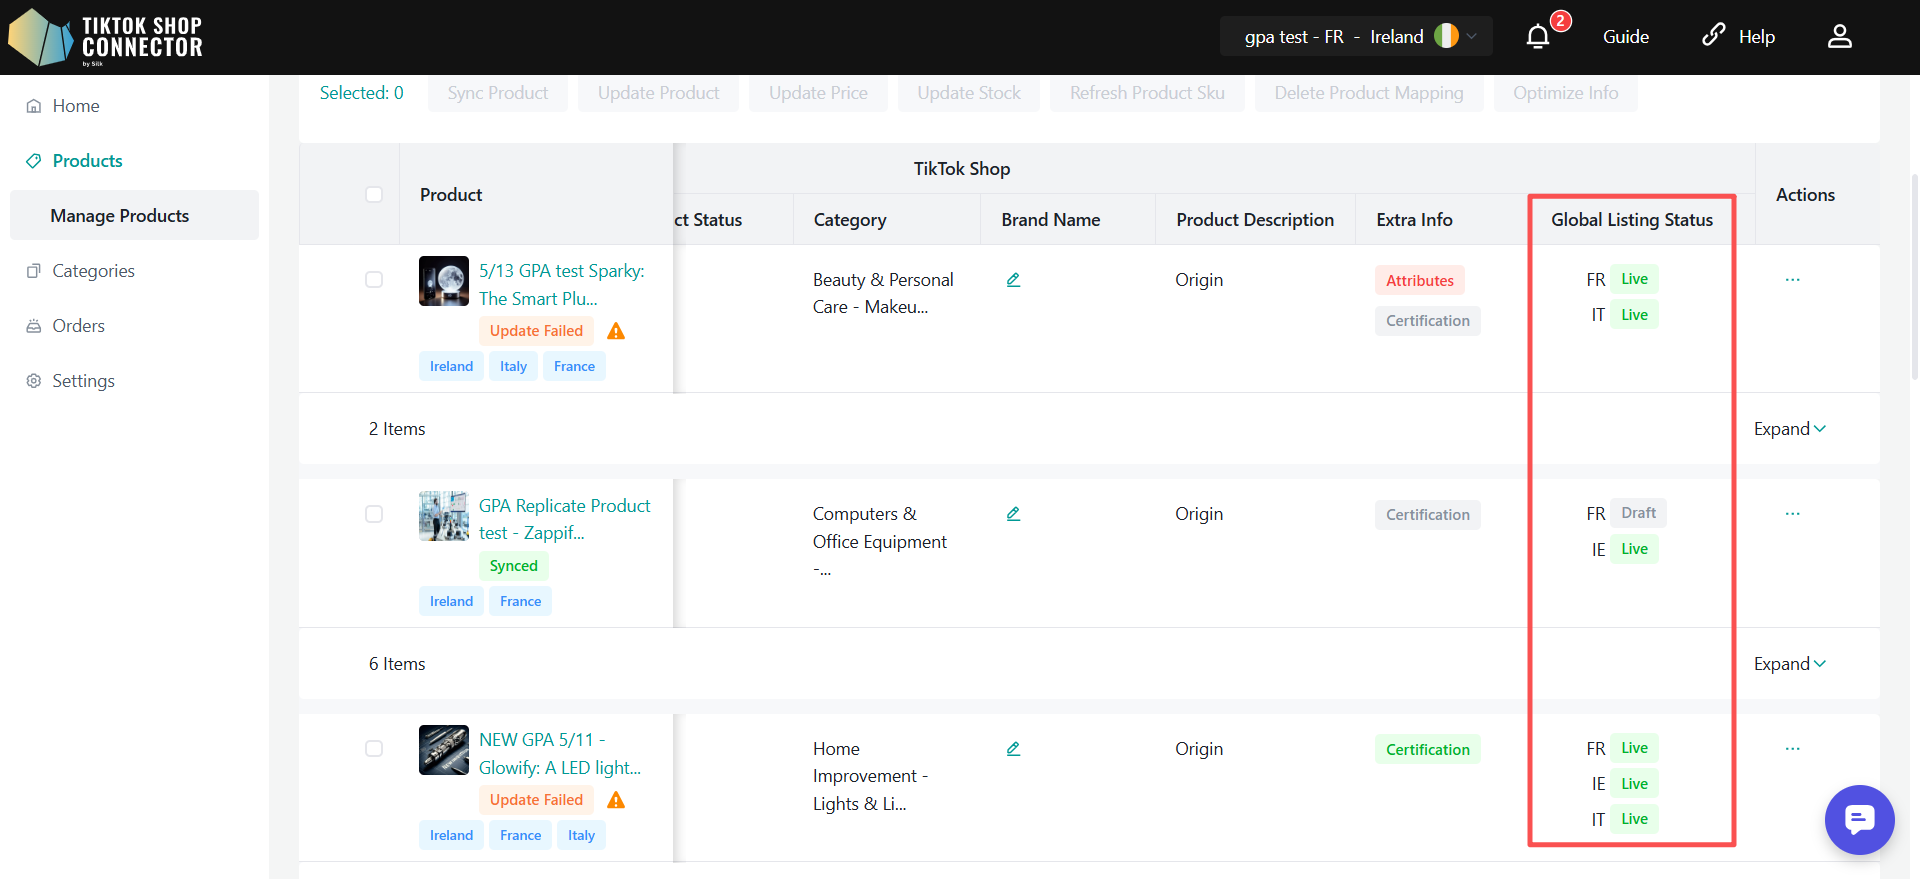
Edit Products
Silk Connector supports editing TikTok Shop products directly.
Supported editable content includes:
Title
Brand
Attributes
Certifications
Compliance information
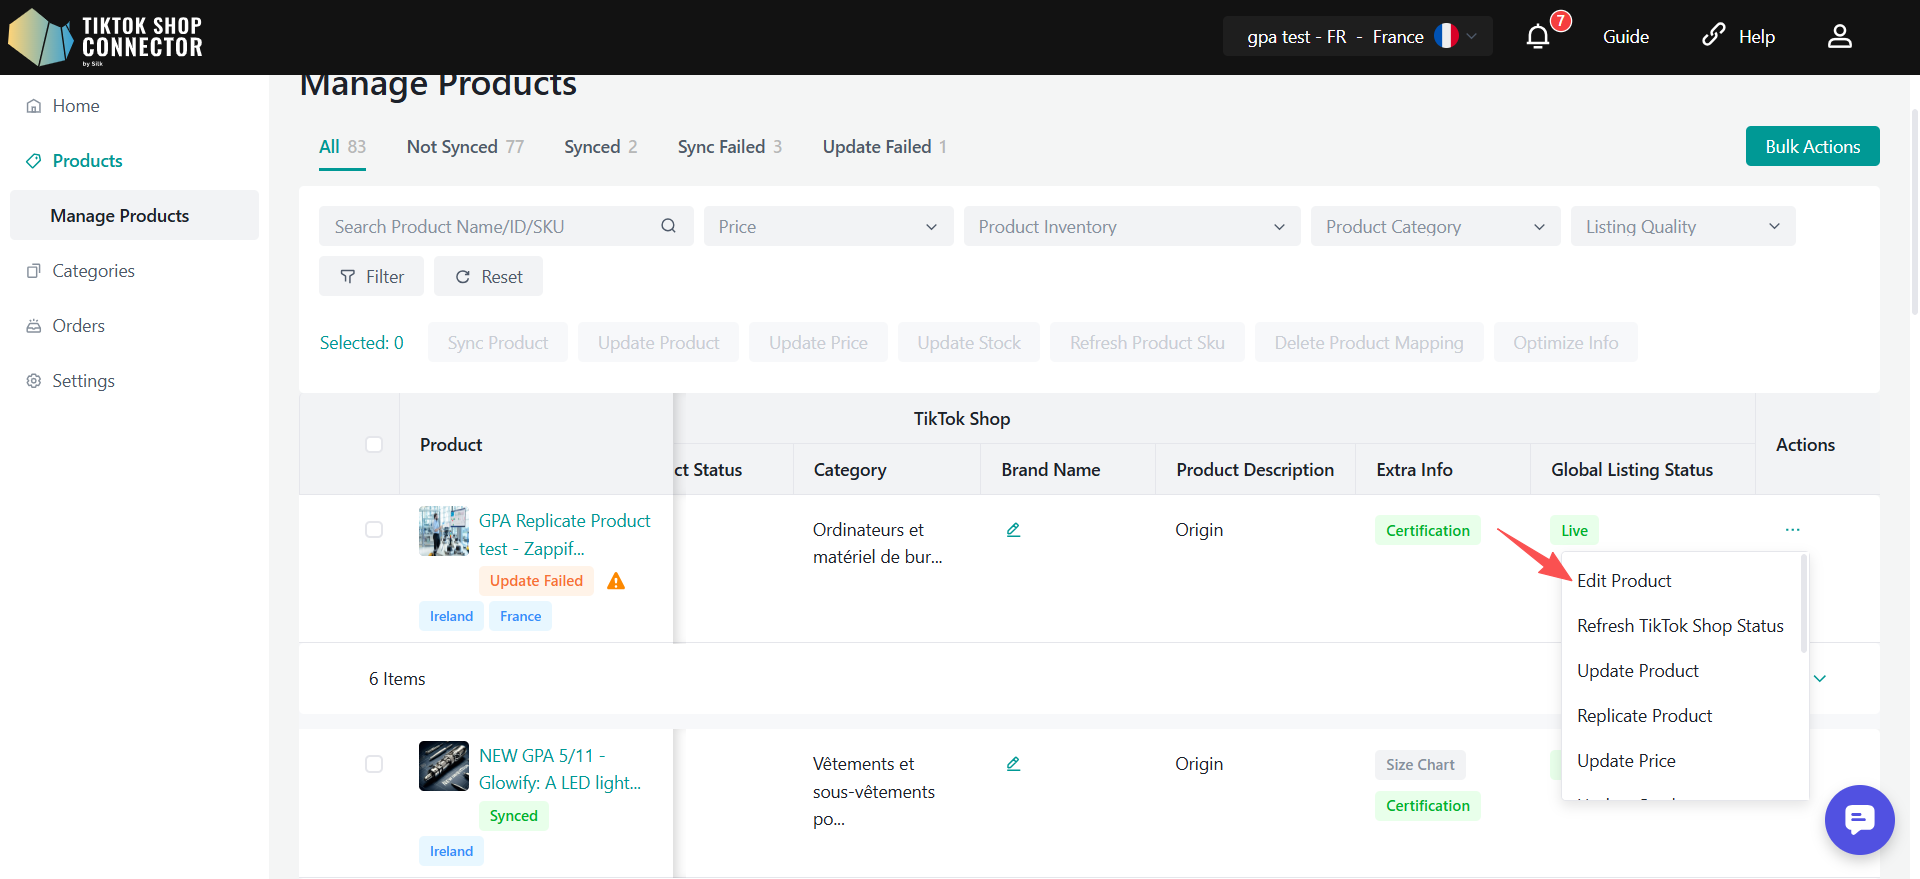
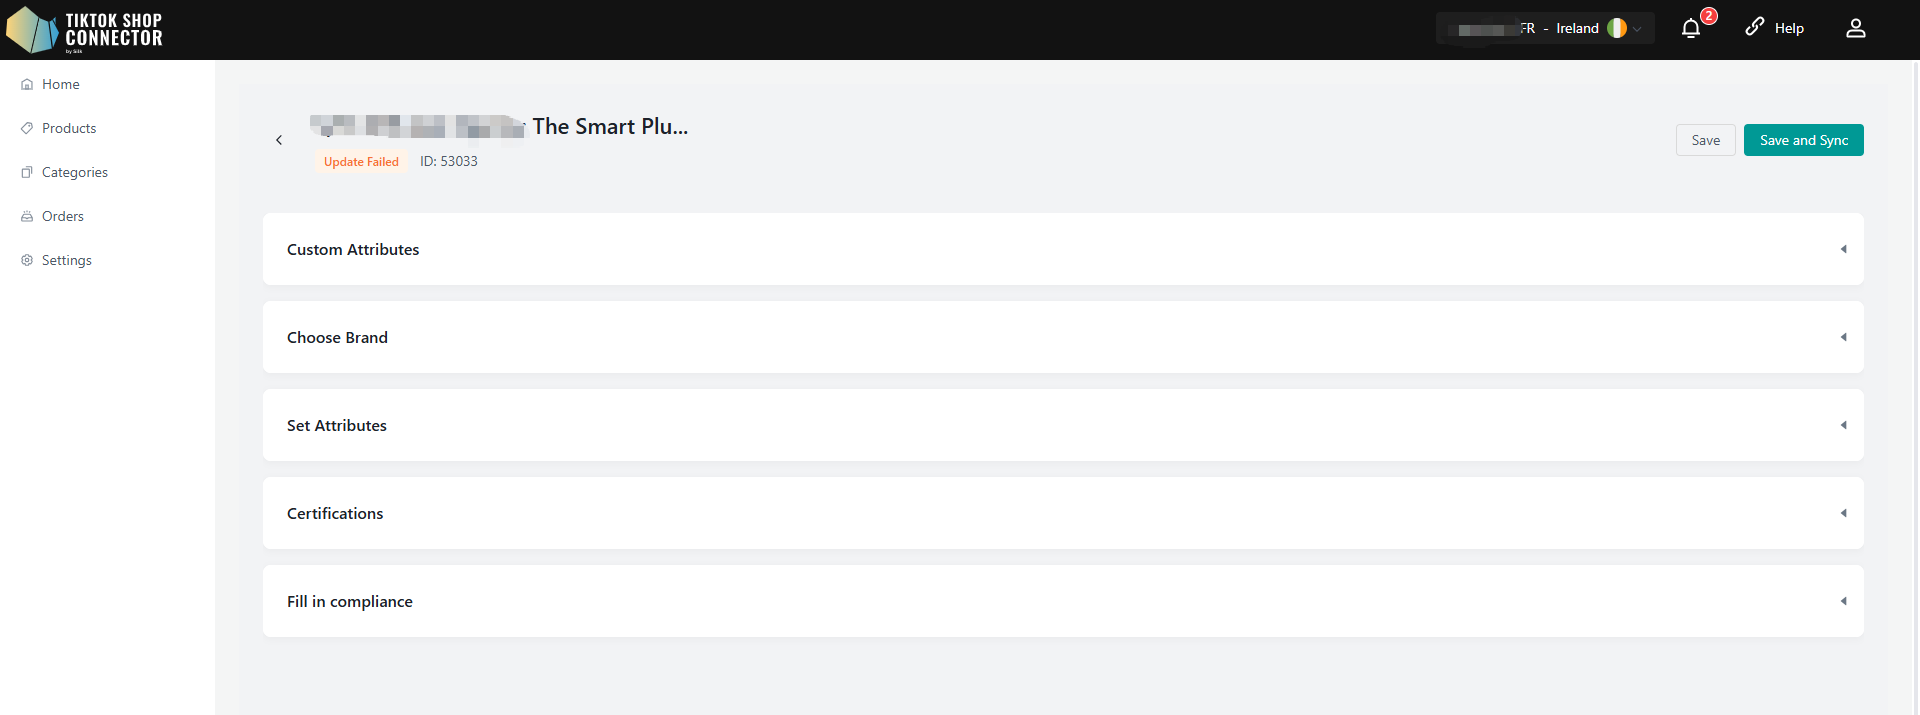
Current Shop Update
Sellers can update only the current market product.
In this case:
Updates apply only to the current Shop.
Bound products are not updated.
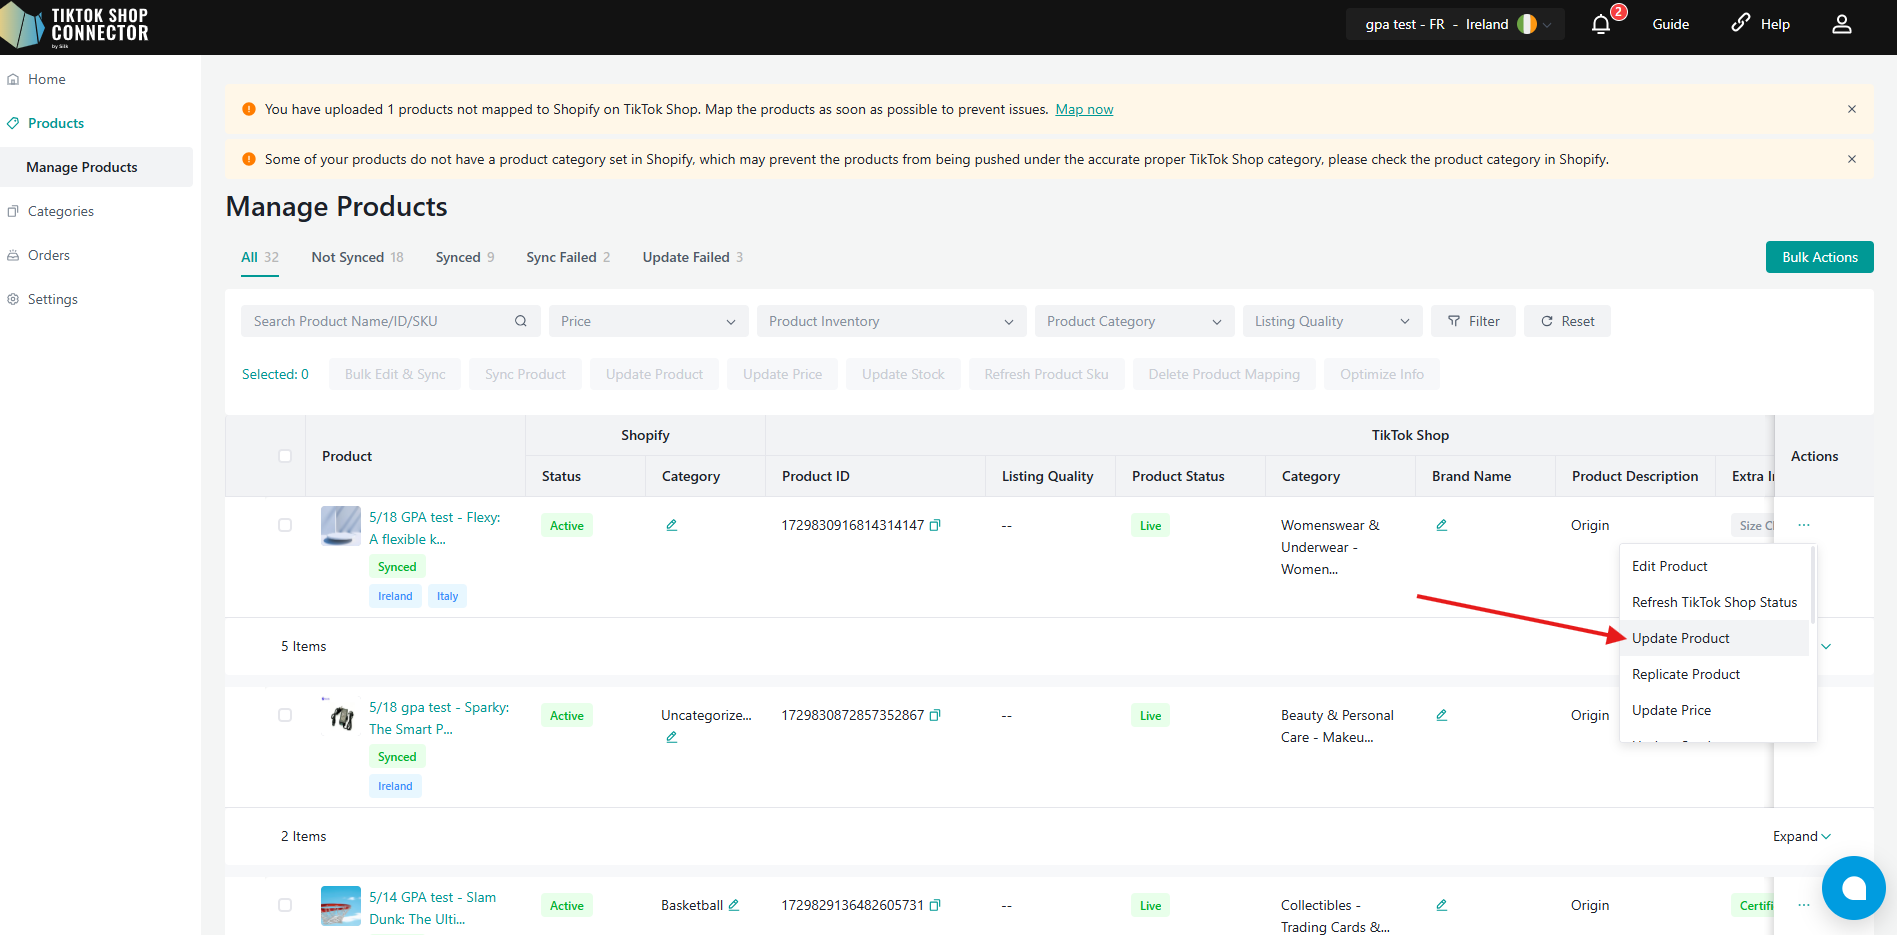
Sync Updates to Bound Products
Sellers can also choose to synchronize updates to all bound products.
When synchronized updates are enabled:
Silk Connector automatically translates content.
Updates are synchronized across all selected regions.
Edit Rules
Category and SKU Attributes
Category and SKU Attributes must remain consistent across all bound products.
If sellers modify:
Category
SKU attributes ID/name
Then all bound regions must be updated together. Partial region updates will fail.
Important Notes
When updating the product category, if the category between the original product and the replicated product is inconsistent, the system will follow the category of the product under the original connection.
In this case, the replicated products may still display the previous category in Silk, but the actual category synced to TikTok Shop will follow the primary connection’s category configuration.
Please use the category of the product under the primary connection as the final source of truth.
Region-Specific Editing
The following fields may be independently edited per region:
Title
Description
Attributes
Certification
Images
Localized content
To manage region-specific translations:
Switch to the corresponding Shop
Edit the product directly within that market

Partial Edit Product
Silk Connector supports partial product editing.
Non-object Fields
The following fields may be individually updated:
Title
Description
Object Fields
The following fields require full object replacement:
Images
Attributes
Certifications
Mandatory Attribute Validation
If TikTok Shop introduces new mandatory category attributes:
Sellers must complete missing attributes before editing.
Otherwise, the update operation may fail.
Update Products from Shopify
When Shopify product information changes, Silk Connector automatically synchronizes updates to TikTok Shop products across all connected EU markets.
The synchronization is triggered through Shopify webhooks and applies to all TikTok Shop products identified as the same source product, including:
The Origin Shop product
All replicated Target Market products
Sellers can also manually trigger synchronization by clicking the Update Product button in Silk Connector.
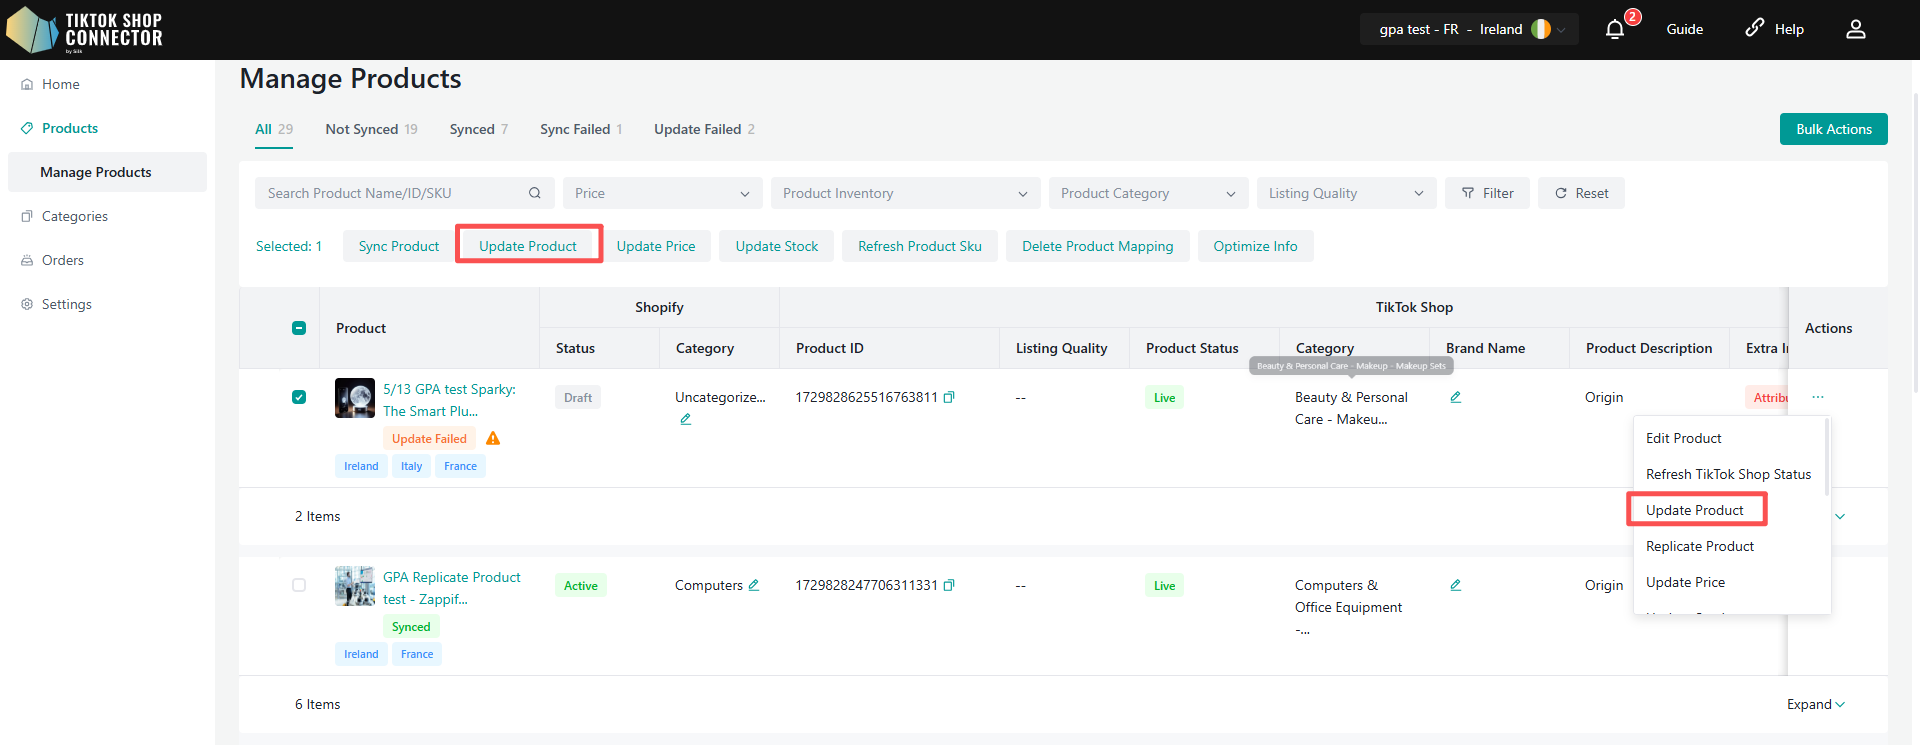
Update Logic
Product updates follow the Sync Rules configured in each market connection.
If a field is included in the connection’s Sync Rules, the system updates the field according to the configured rule.
If a field does not have a specific Sync Rule configured, the system updates the field by default.
The system automatically:
Synchronizes product updates to all related TikTok Shop markets
Applies each market’s Sync Rules independently
Handles product translation through TikTok Shop during replication flows
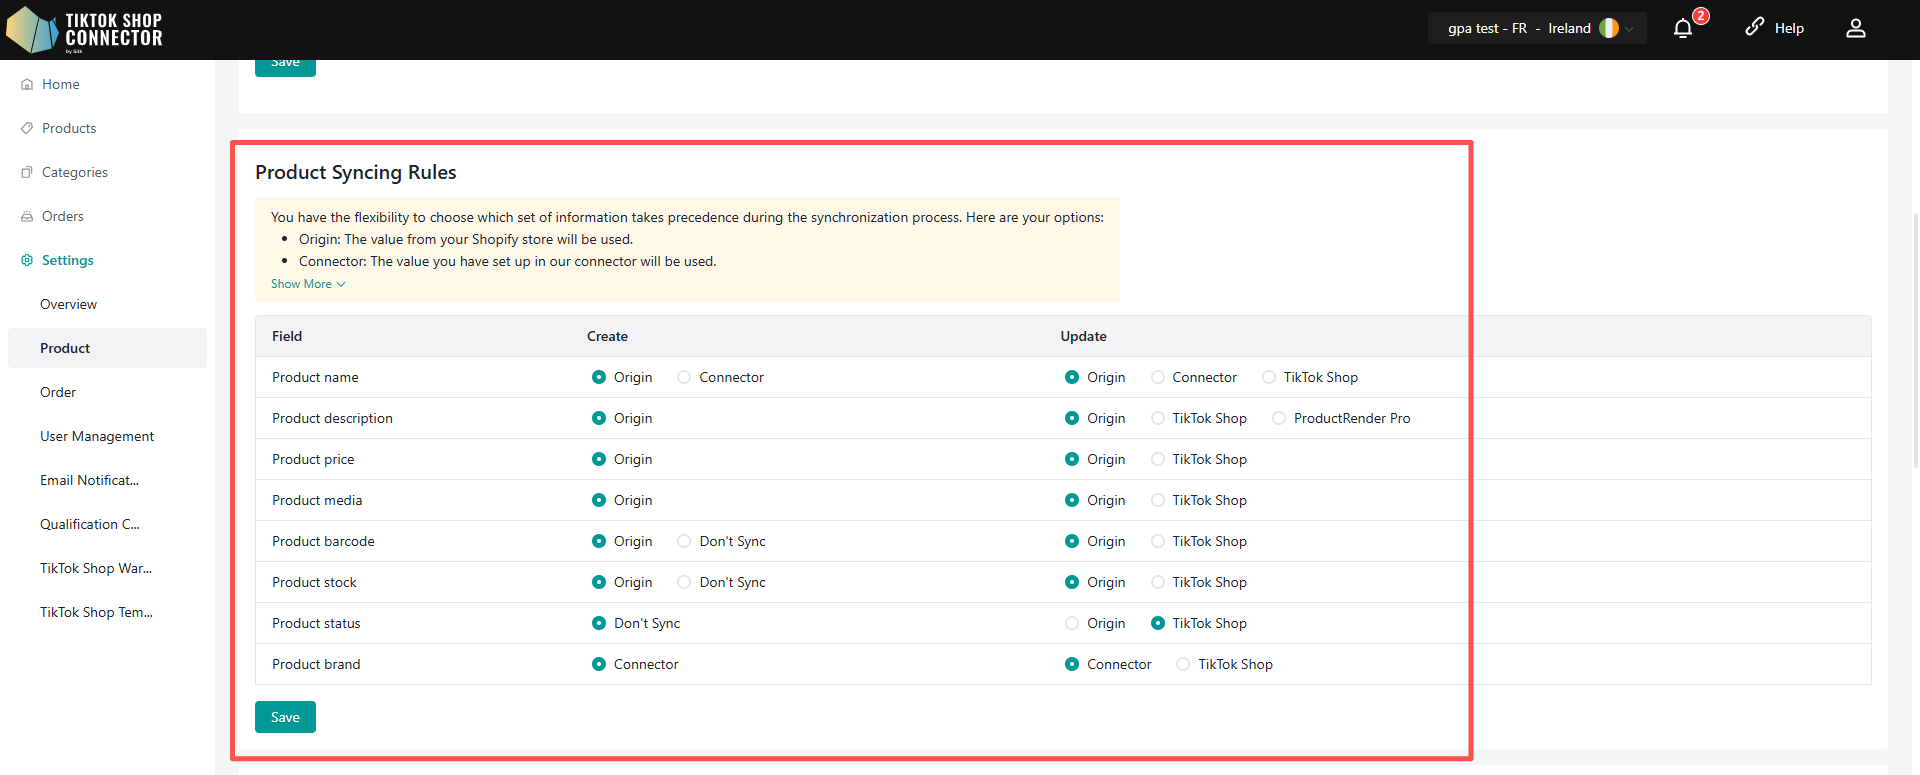
Important Notes
Update behavior may differ between markets depending on each connection’s Sync Rule configuration.
All replicated products that belong to the same source product group will receive updates automatically unless restricted by Sync Rules.
Price and Inventory Updates
Price and inventory continue using market-level independent updates.
Inventory Updates
Each market maintains independent inventory synchronization based on the inventory settings configured in its connection.
Inventory synchronization:
Uses SKU-level inventory updates
Supports Shopify inventory location mapping
Follows each connection’s Product Stock Sync Rules
Inventory Synchronization Logic
Inventory updates are synchronized according to:
The Shopify Inventory Location configured in the connection
The Stock Update Sync Rule configured for the market connection
Shopify Inventory Location
If different markets are configured with different Shopify inventory locations, each market maintains independent inventory quantities.
If multiple markets use the same Shopify inventory location, those markets share the same inventory quantity as Shopify.
To maintain separate inventory between markets:
Configure different inventory locations in Shopify.
Assign different Shopify inventory locations in each Silk Connector market connection.
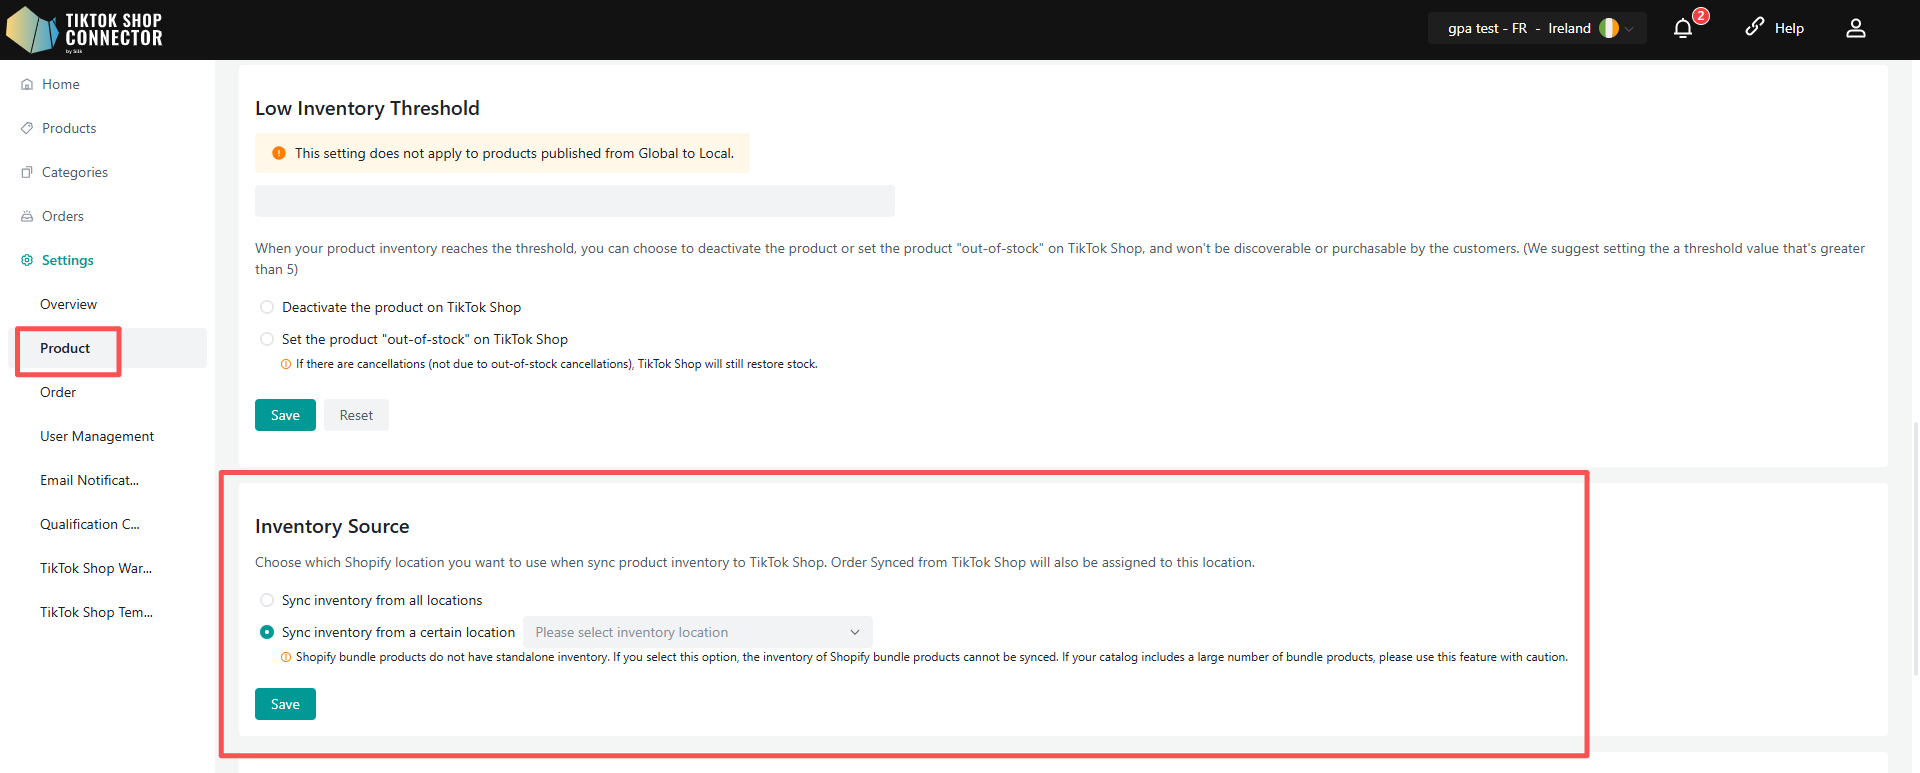
Stock Update Sync Rule
The Stock Update Sync Rule is configured at the connection level.
If the Stock Update Sync Rule is set to Shopify:
Inventory updates and inventory deductions are synchronized based on the Shopify inventory location configured in the connection.
Shopify inventory changes will automatically update TikTok Shop inventory.
If the Stock Update Sync Rule is set to TikTok Shop:
Shopify inventory updates will not synchronize to TikTok Shop.
Inventory is managed independently in TikTok Shop for that market connection.
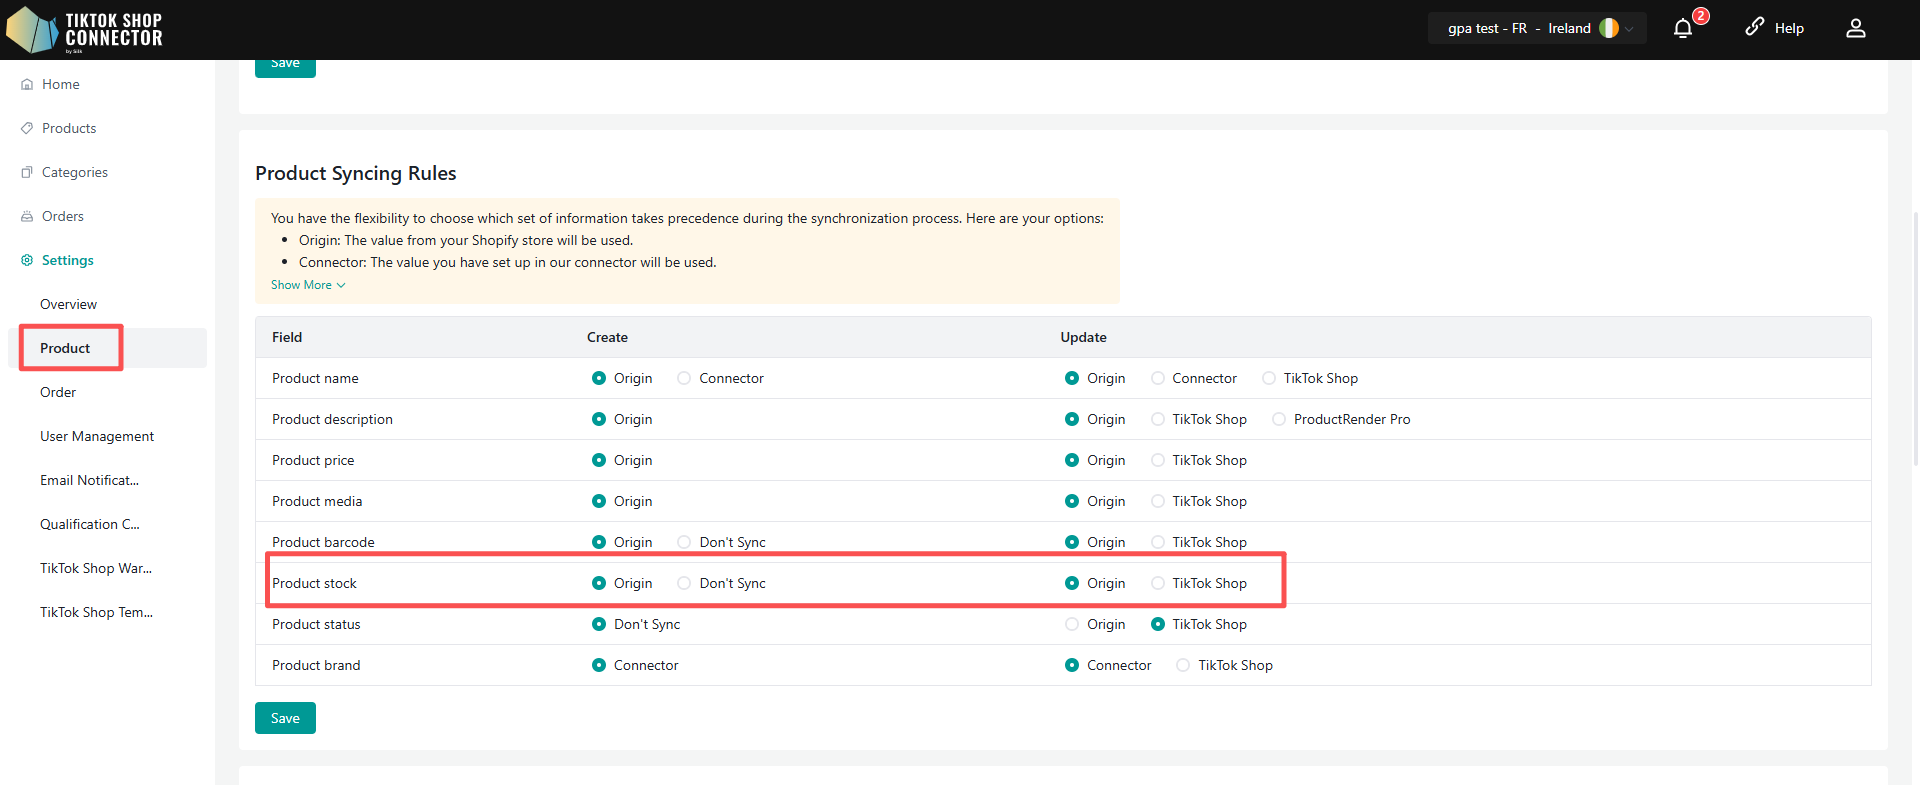
Important Notes
Inventory synchronization behavior may differ between markets depending on each connection’s configuration.
Markets connected to the same Shopify inventory location will always share the same inventory quantity.
Both the inventory location configuration and Stock Update Sync Rule are managed independently at the connection level.
Price Updates
Each market maintains independent pricing configuration.
Price updates support:
Increase by %
Decrease by %
Increase by Amount
Decrease by Amount
Price Synchronization Logic
Price synchronization is controlled by:
Market-Specific Price Rules (Target Markets)
Price Update Sync Rule configured in each target market connection
Market-Specific Price Rules
Configuration Path:
Settings → Product Settings → Market-Specific Price Rules
Each Target Market can configure independent pricing rules.
Target market prices can be adjusted based on the Shopify product price using configured price rules, including:
Percentage increase or decrease
Fixed amount increase or decrease
These rules are applied independently for each target market connection.
When Origin Shop prices change:
Target Market prices are recalculated automatically.
Previous target prices are not preserved.
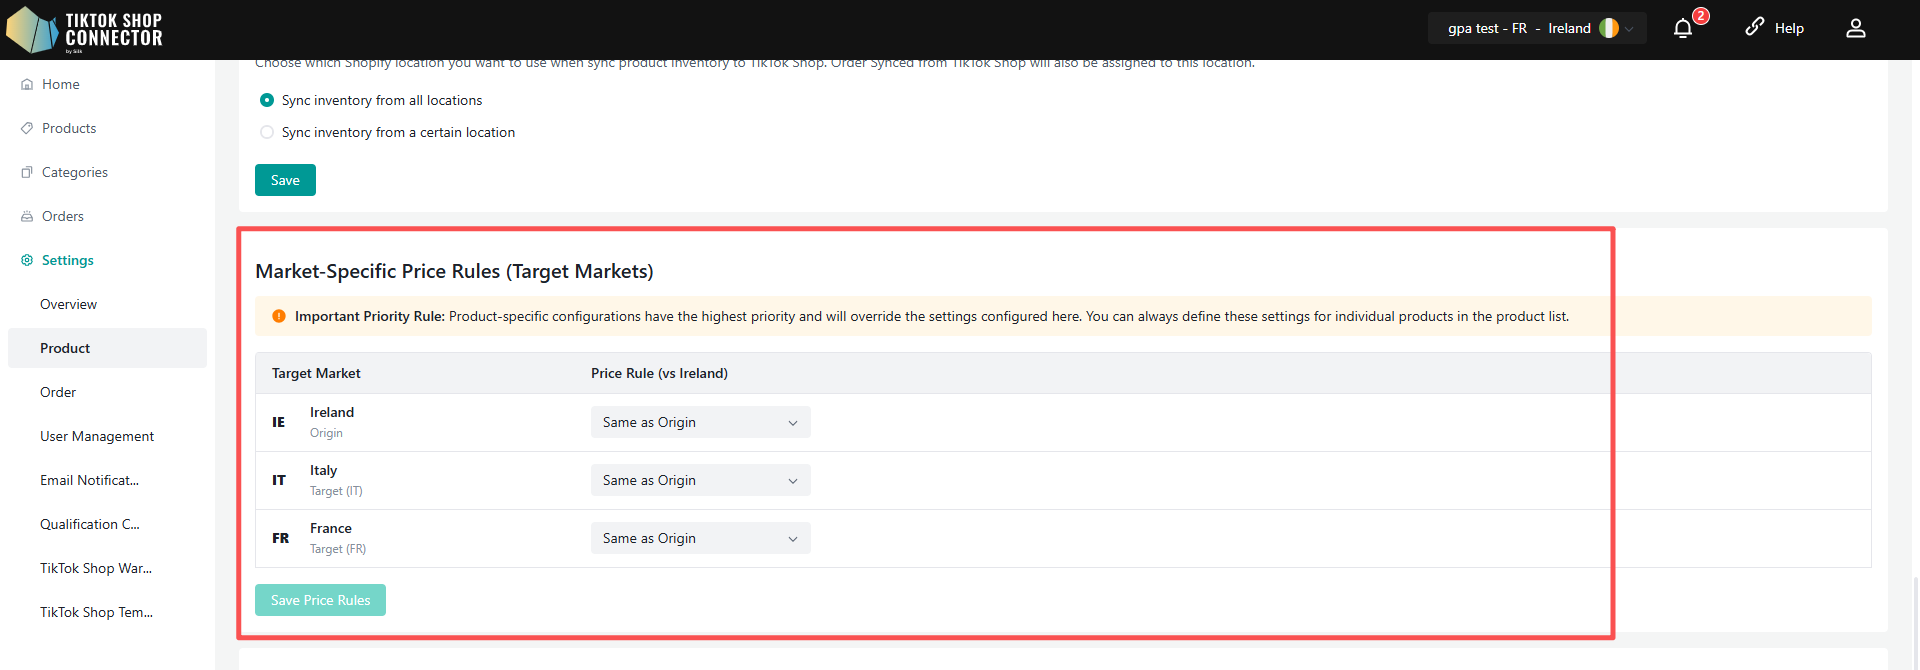
Price Update Sync Rule
The Price Update Sync Rule is configured at the connection level.
If the target market connection Sync Rule is set to Origin:
The system uses the latest Shopify product price as the source price.
Market-Specific Price Rules are then applied to calculate the target market price.
If the target market connection Sync Rule is set to TikTok Shop (TikTok Shop):
The existing TikTok Shop price is retained.
Shopify price updates will not overwrite or recalculate the TikTok Shop price.
Market-Specific Price Rules will not be re-applied during updates.
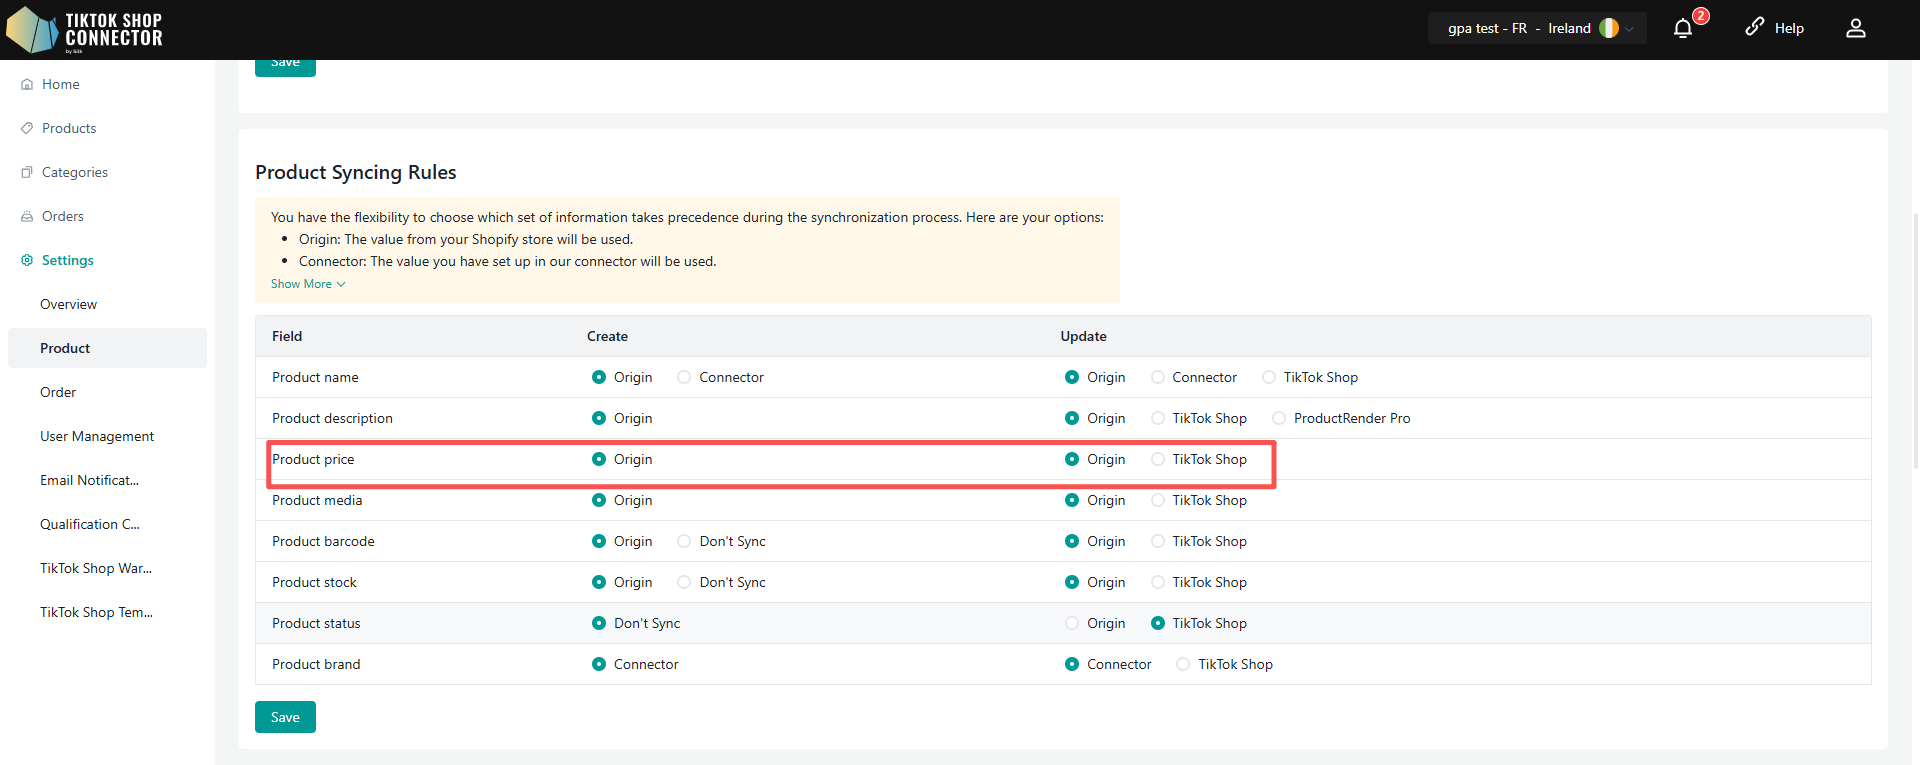
Important Notes
Each market connection maintains independent price synchronization behavior.
Different target markets may have different pricing results depending on their individual price rules and Sync Rule configurations.
Price synchronization behavior is managed independently at the connection level.
How to Bind Products Across Markets
Under the new architecture, binding is no longer limited to Global Products.
Silk Connector now supports:
Origin ↔ Target binding
Target ↔ Target binding
Multi-market binding groups
After binding:
Products share order history
Products share reviews
Products share product details
Price and inventory remain market-specific
Bind Products
Steps
Go to the Product management page.
Locate the product.
Click Bind Products under the Actions column.

- Select target products from other markets.
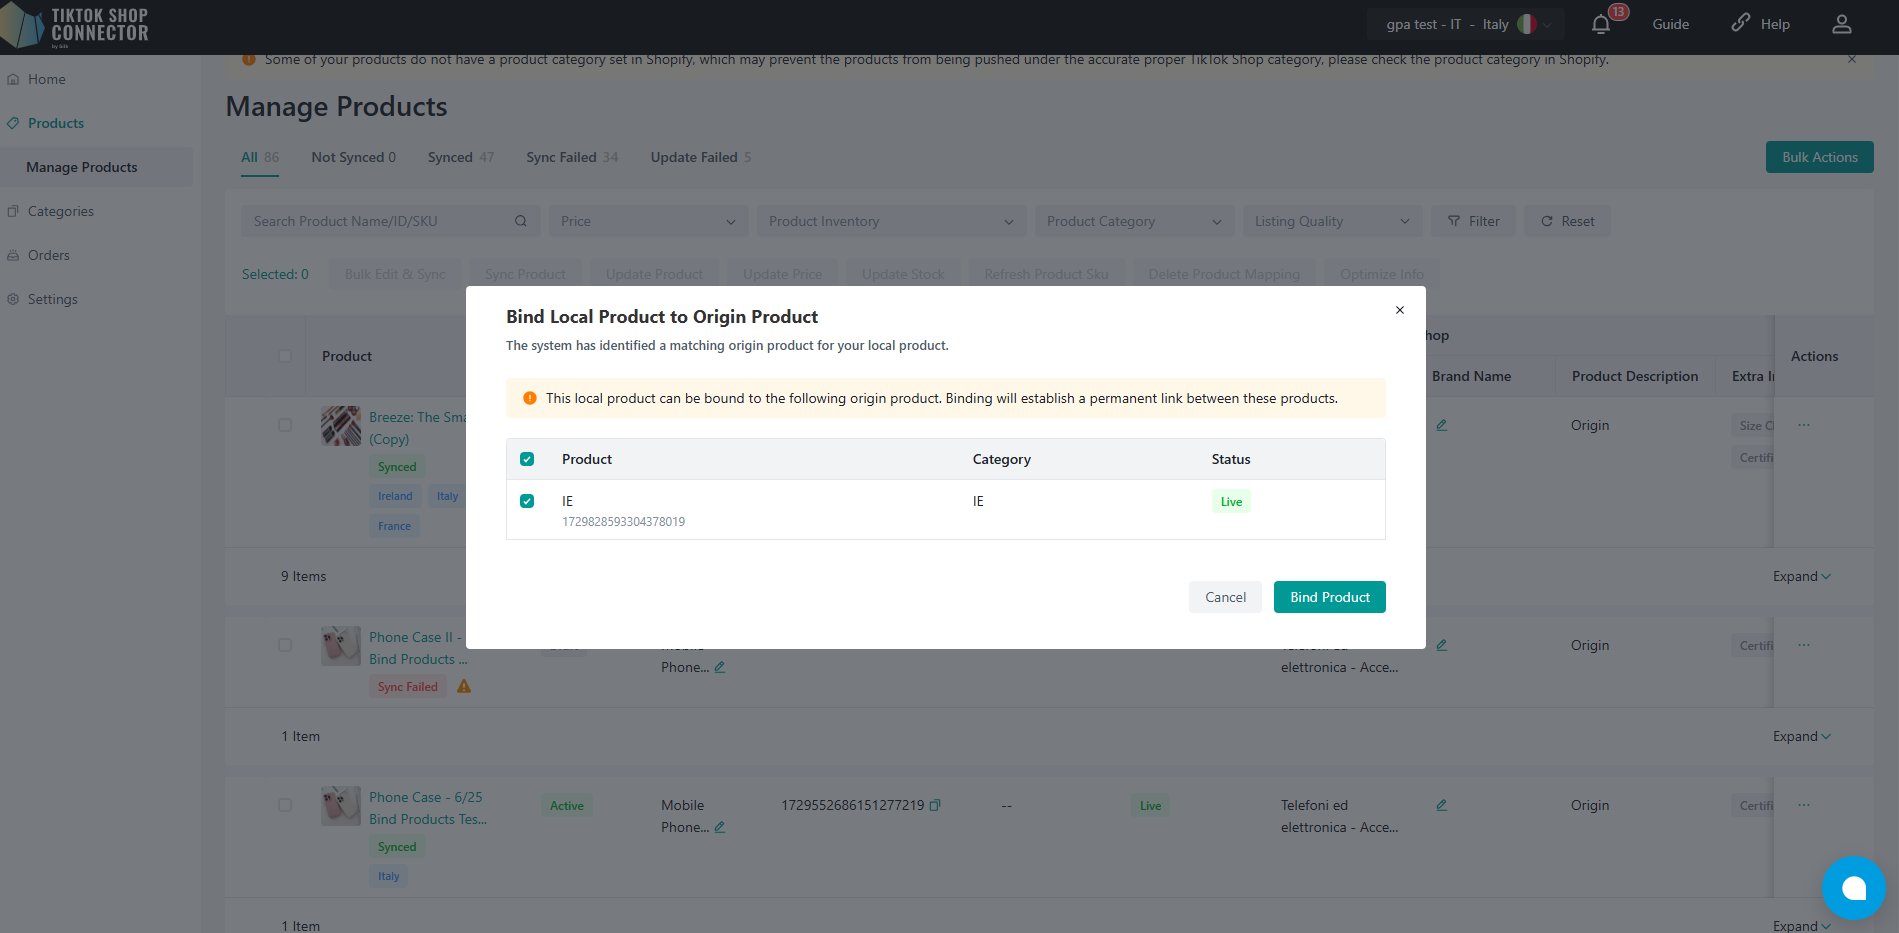
- Confirm binding.
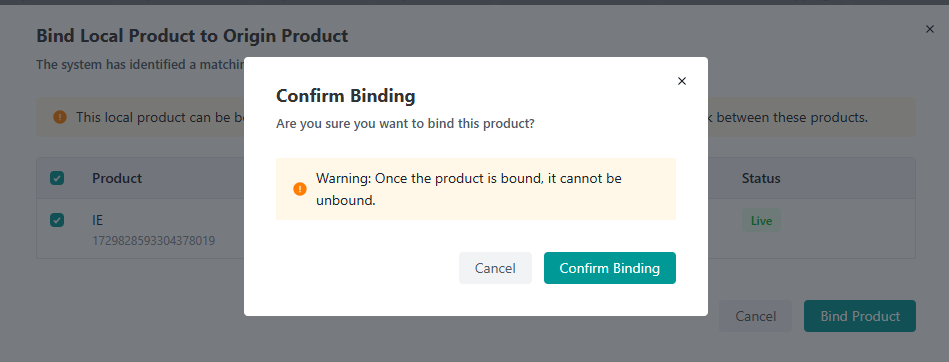
Binding Validation Rules
Products must satisfy:
Same Category ID
Same Sales Attribute IDs
Same Sales Attribute Names
If validation fails:
The system displays detailed mismatch information.
Sellers must align product information before retrying.
Binding Suggestions
Silk Connector may automatically recommend products for binding based on:
Shopify Product ID
Seller SKU
Same Shopify Store source
Binding Relationship Tags
After binding succeeds:
Products display market tags.
Origin Market displays an (Origin) label.
Bound market relationships are visible in product lists.
Orders from multiple TikTok Shop EU regions will be tracked on the Orders page.
*Note: To sync orders successfully from TikTok Shop to Shopify, your products must be linked from Shopify to TikTok Shop via our Connector. Any orders that contain unsynced products will NOT sync back to Shopify.
How to Sync Orders
Orders from multiple TikTok Shop EU markets can be tracked on the Orders page in Silk Connector. Each market connection manages its own orders independently.
To sync an order from TikTok Shop to Shopify, the related products must be linked from Shopify to TikTok Shop through Silk Connector. Orders containing unlinked or unsynced products will not be synchronized to Shopify.
Creating Orders
Automatic creation: The Connector will relay orders and automatically update Shopify when an order is placed and paid for in TikTok Shop
Please note: A Shopify market can have multiple regions. Orders will be assigned to the primary region of the Shopify market.
When an order is synced to the Shopify store, we will add a tag indicating which TikTok Shop market the order comes from.

order status = 'awaiting for shipment'
If the order status is "unpaid" -> order will NOT sync to Shopify
- Order ID will be blank in the Connector
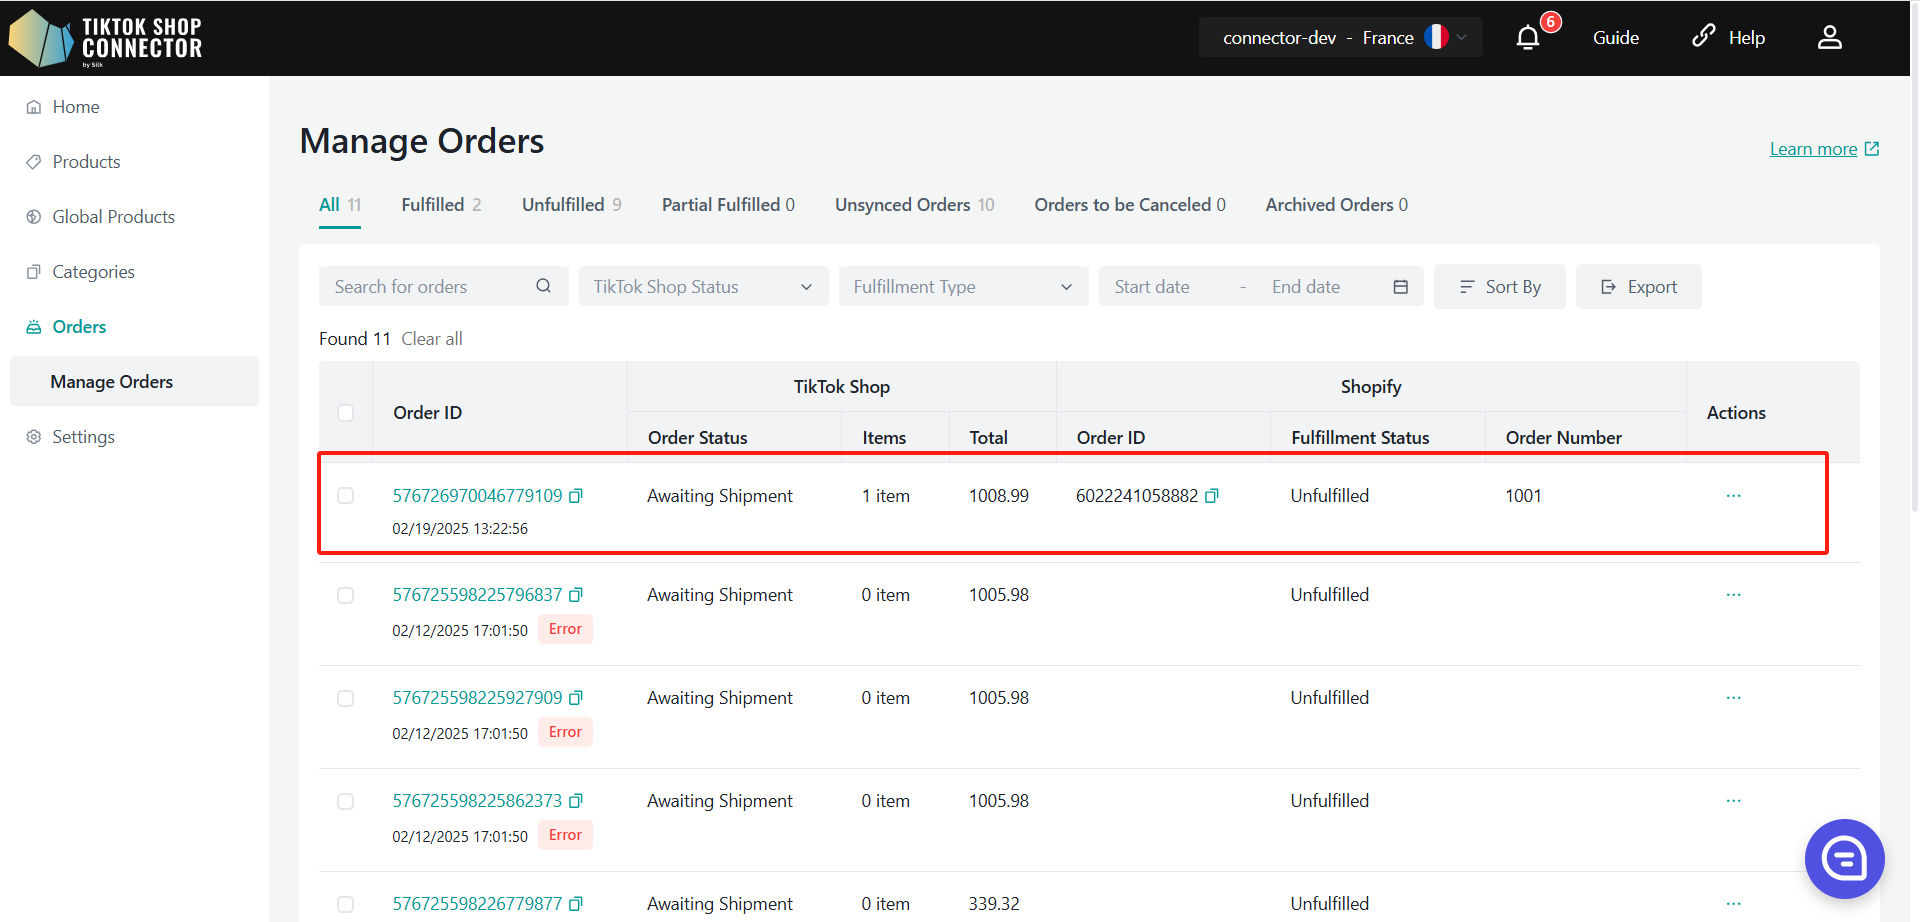
To Check on Orders
Click on the TikTok Shop Order ID or search for the order by the TikTok Shop Order ID.

Payment \& Fulfillment Status
| Status in Shopify | Connector by Silk | Status in TikTok Shop | |
|---|---|---|---|
| When you have NOT fulfilled the order in Shopify | Payment Status: Paid Fulfillment Status: Unfulfilled | Automatic Sync <-> | Awaiting Shipment |
| When you have fulfilled and shipped the order in Shopify | Payment Status: Paid Fulfillment Status: Fulfilled | Automatic Sync <-> | Awaiting Collection |
To fulfill an order in Shopify:
Open the synced order in Shopify.
Click "Fulfill item".
Enter the tracking number and carrier information.
Click "Fulfill item" to confirm.
After fulfillment is completed in Shopify, Silk Connector synchronizes the tracking information and fulfillment status back to TikTok Shop.
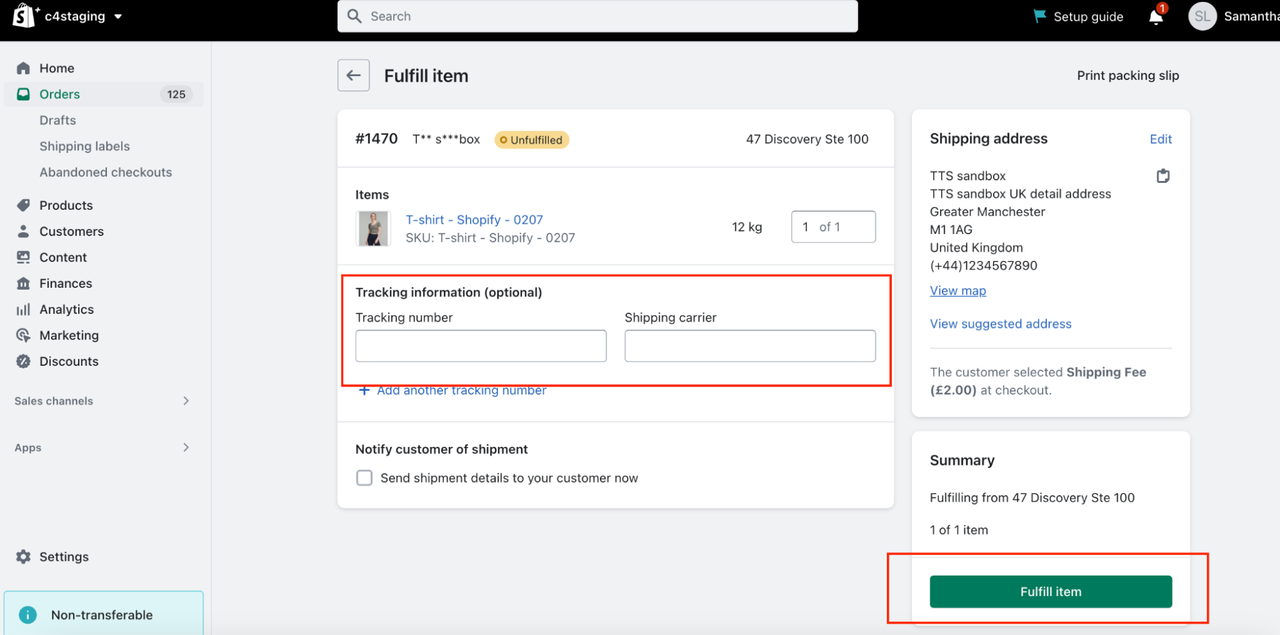
Shipping Status \& Delivery
| Shipping Status | Delivery/Complete |
|---|---|
| TikTok Shop will track the delivery status. Transit status will be updated to 'In Transit' automatically when the order is shipped from Shopify. | The order status in the TikTok Shop store will be updated to 'Delivered/Completed' by default when the order is delivered. |
Order Cancellations
Order cancellations are synchronized bidirectionally through Silk Connector.
If an order is canceled in Shopify, Silk Connector synchronizes the cancellation to TikTok Shop.
If an order is canceled in TikTok Shop, Silk Connector synchronizes the cancellation to Shopify.
The cancellation result can be reviewed from the Orders page in Silk Connector.
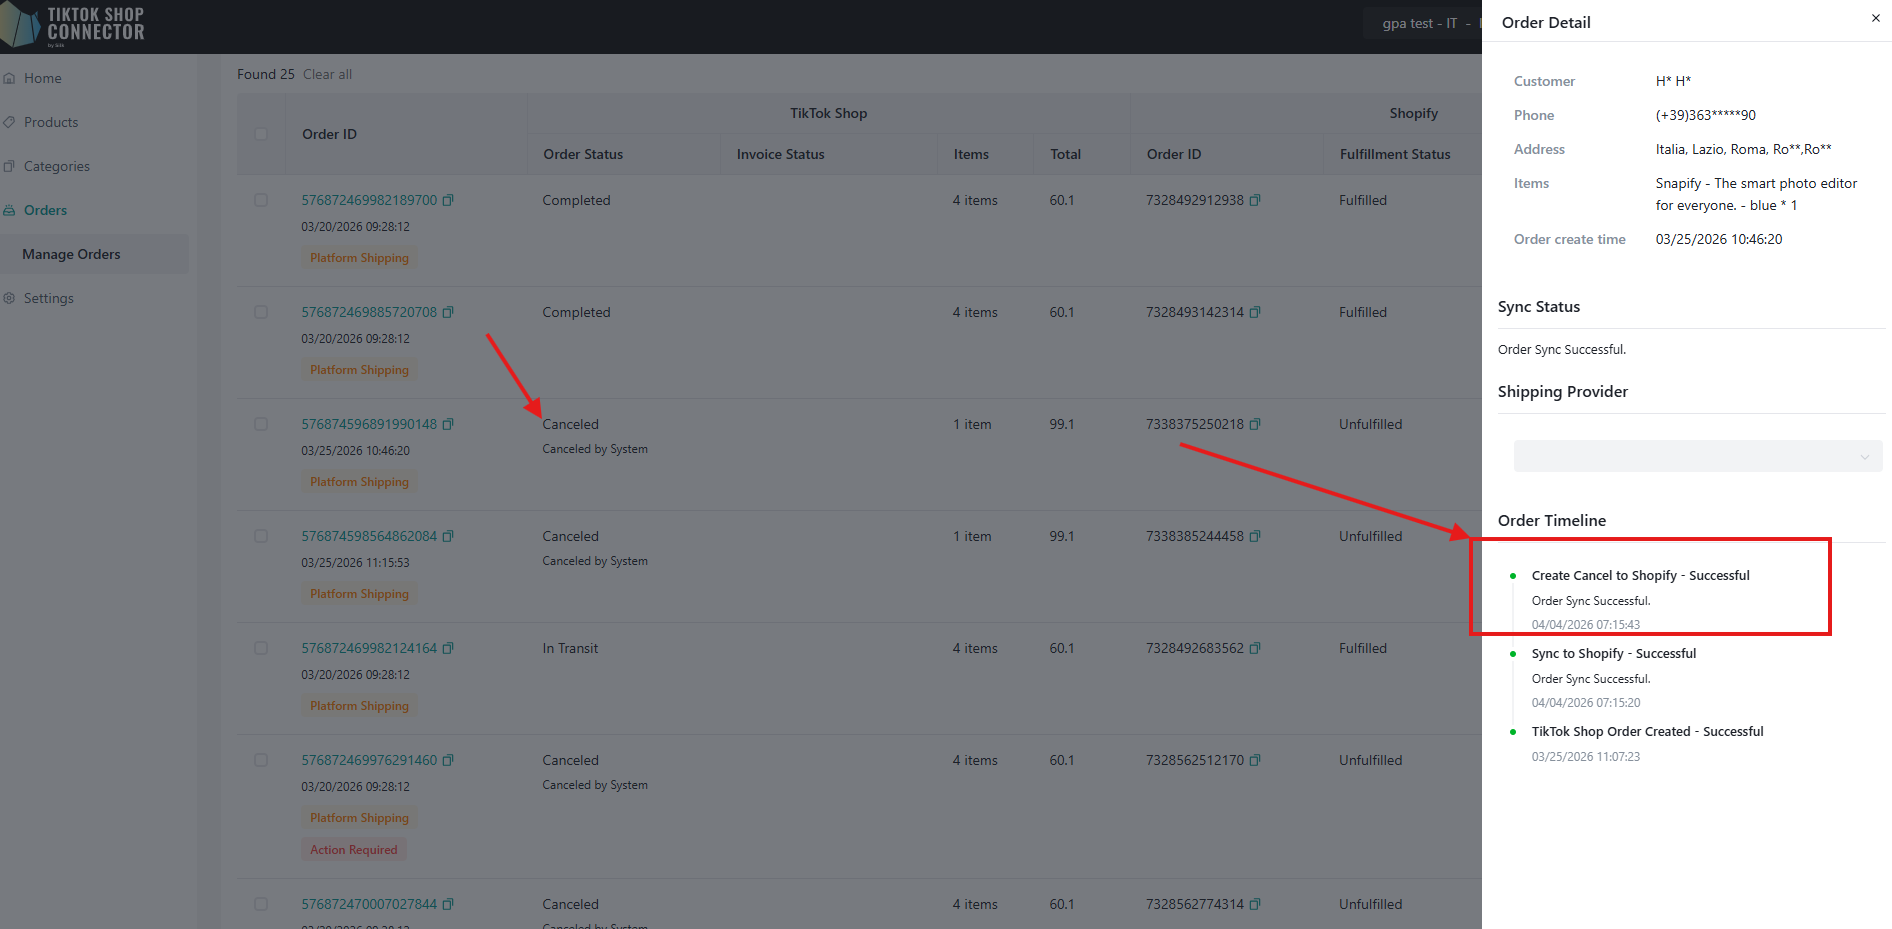
| Cancellation in Shopify | Cancellation in TikTok Shop |
|---|---|
| To cancel an order placed in TikTok Shop from Shopify: 1. Cancel the order in the Shopify. 2. Order cancellation will automatically sync through the connector and cancel the corresponding order in TikTok Shop. | To cancel or deny orders placed in TikTok Shop from TikTok Shop Seller Center. 1. Buyers from TikTok Shop will submit a cancellation request. 2. You can accept or decline the cancellation request in TikTok Shop Seller Center. 3. Accept cancellation request -> order status will be updated in the connector’s portal, and the corresponding order will be canceled in the Shopify. |
Connector Overview
The Connector provides separate pages for each authorized EU market. When you switch the current market from the region dropdown, the page displays data for the selected market connection.
Home
There is one dashboard section that displays product and order information for your current connection under the EU Full Sell Cross model:
Products: Overview of Synced, Not Synced, Sync Failed, and Update Failed products for the current connection
Orders: Overview of Fulfilled, Unfulfilled, Unsynced, and Cancelled orders for the current connection
Revenue: Sales and total revenue data for the current connection
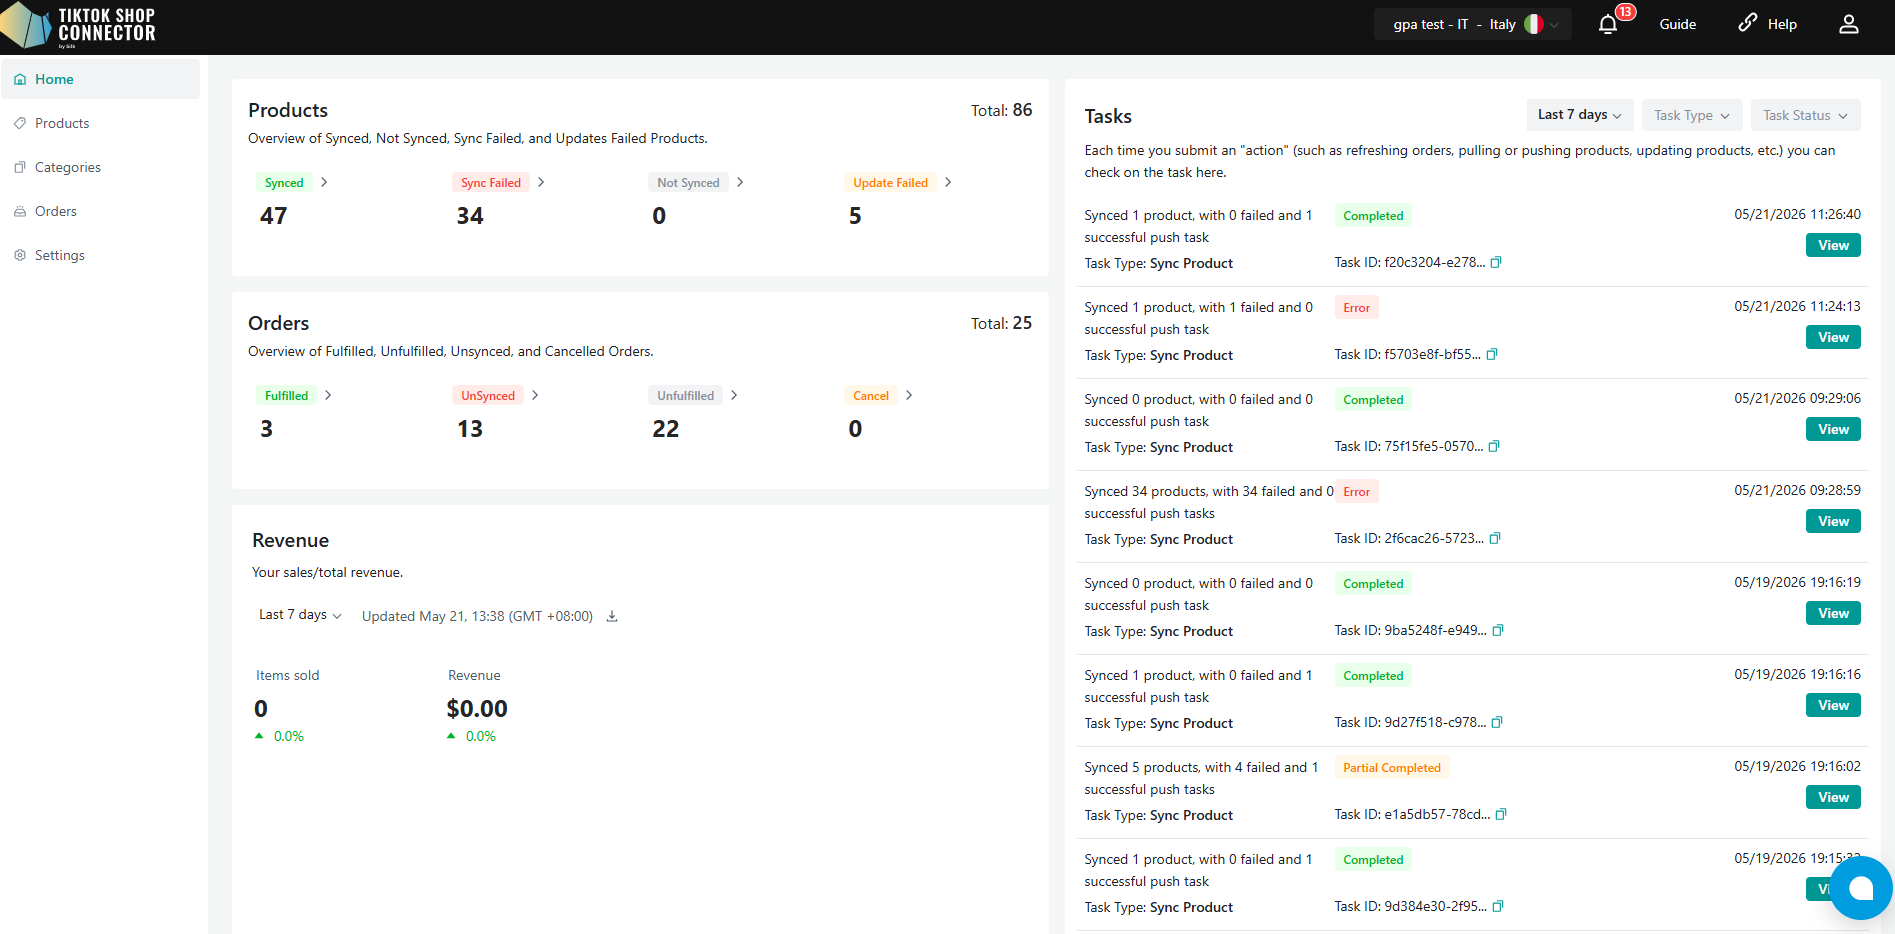
Top Products: Top 10 best-selling products for the current connection
Top Customers: Top customers who purchased from the current connection
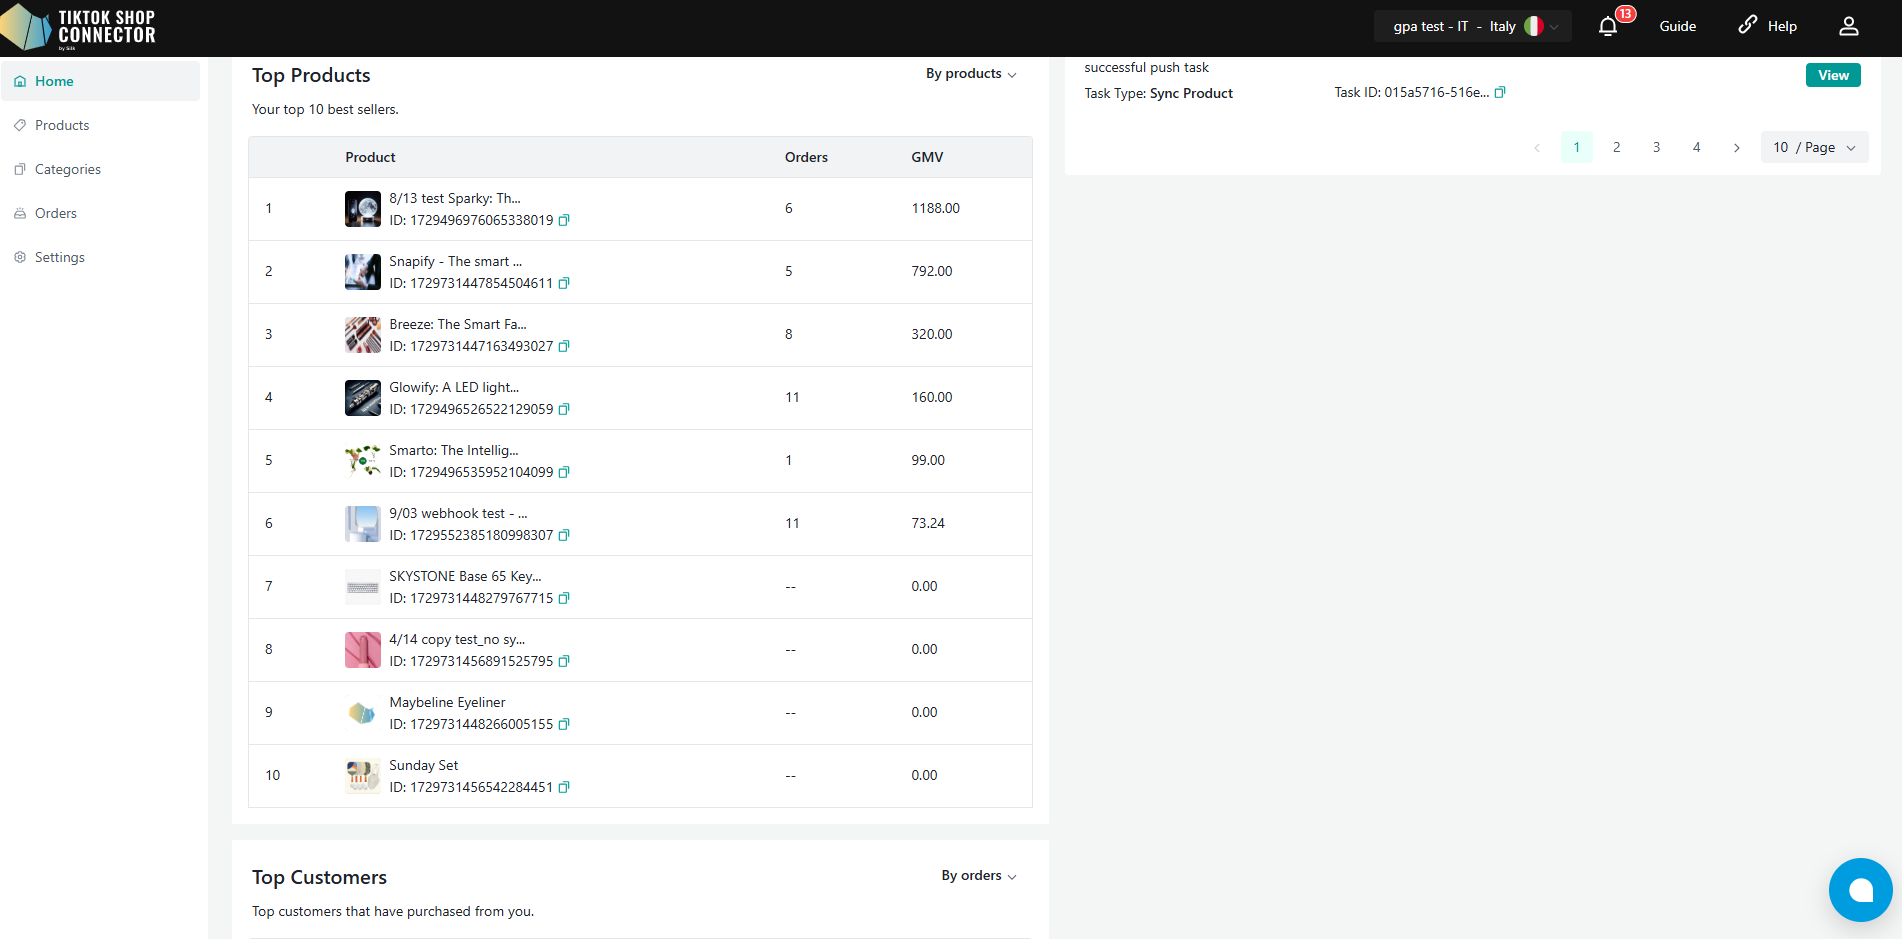
For the Task module:
Task records are displayed across all connected EU GPA markets
Sellers can review synchronization results and task statuses for all connected market connections in one place

Products
Displays all products pulled from Shopify for the current connection
Shows whether products have been successfully synced to TikTok Shop for the current market connection
Supports EU GPA product replication across connected EU markets
Displays which target markets the product has already been copied to within the current connection
Sellers can check the replication and synchronization result through the Global Listing Status field
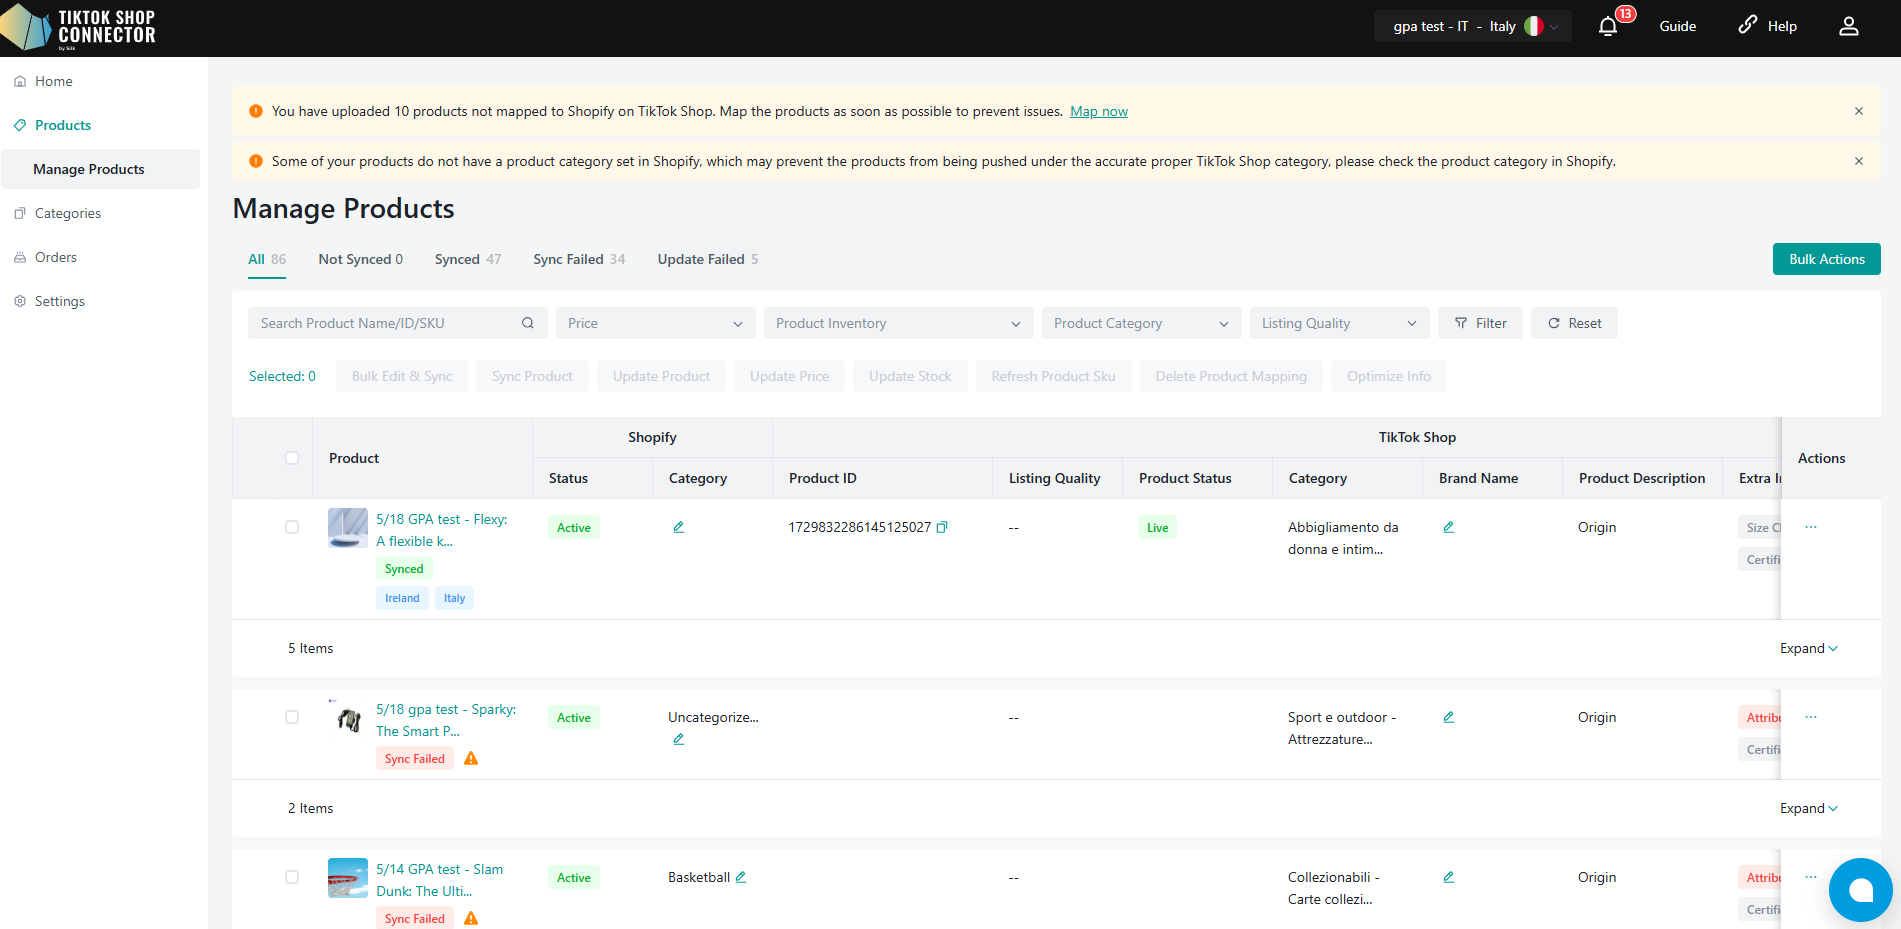
Products are categorized using the following statuses:
All
Synced
Not Synced
Replicate Failed
Draft
Live
Available Product Actions
Available actions on the Product page include:
Sync Product
Update Product
Bind Products
Fill in Attribute
Show Certification
Choose Brand
Size Chart
Pre-validation
Fill in Compliance
To copy products to other EU GPA markets, you may refer to the How to Sync Product section for the detailed product replication workflow.
Orders
Displays all orders placed in TikTok Shop for the current market connection
Each connection tracks and manages orders independently based on its corresponding EU market
Orders from TikTok Shop are automatically synced into the Connector and then pushed to Shopify
Sellers can fulfill orders directly in Shopify
Order synchronization and fulfillment statuses are managed separately for each connected market
(See How to Sync Orders in the Integration Manual)
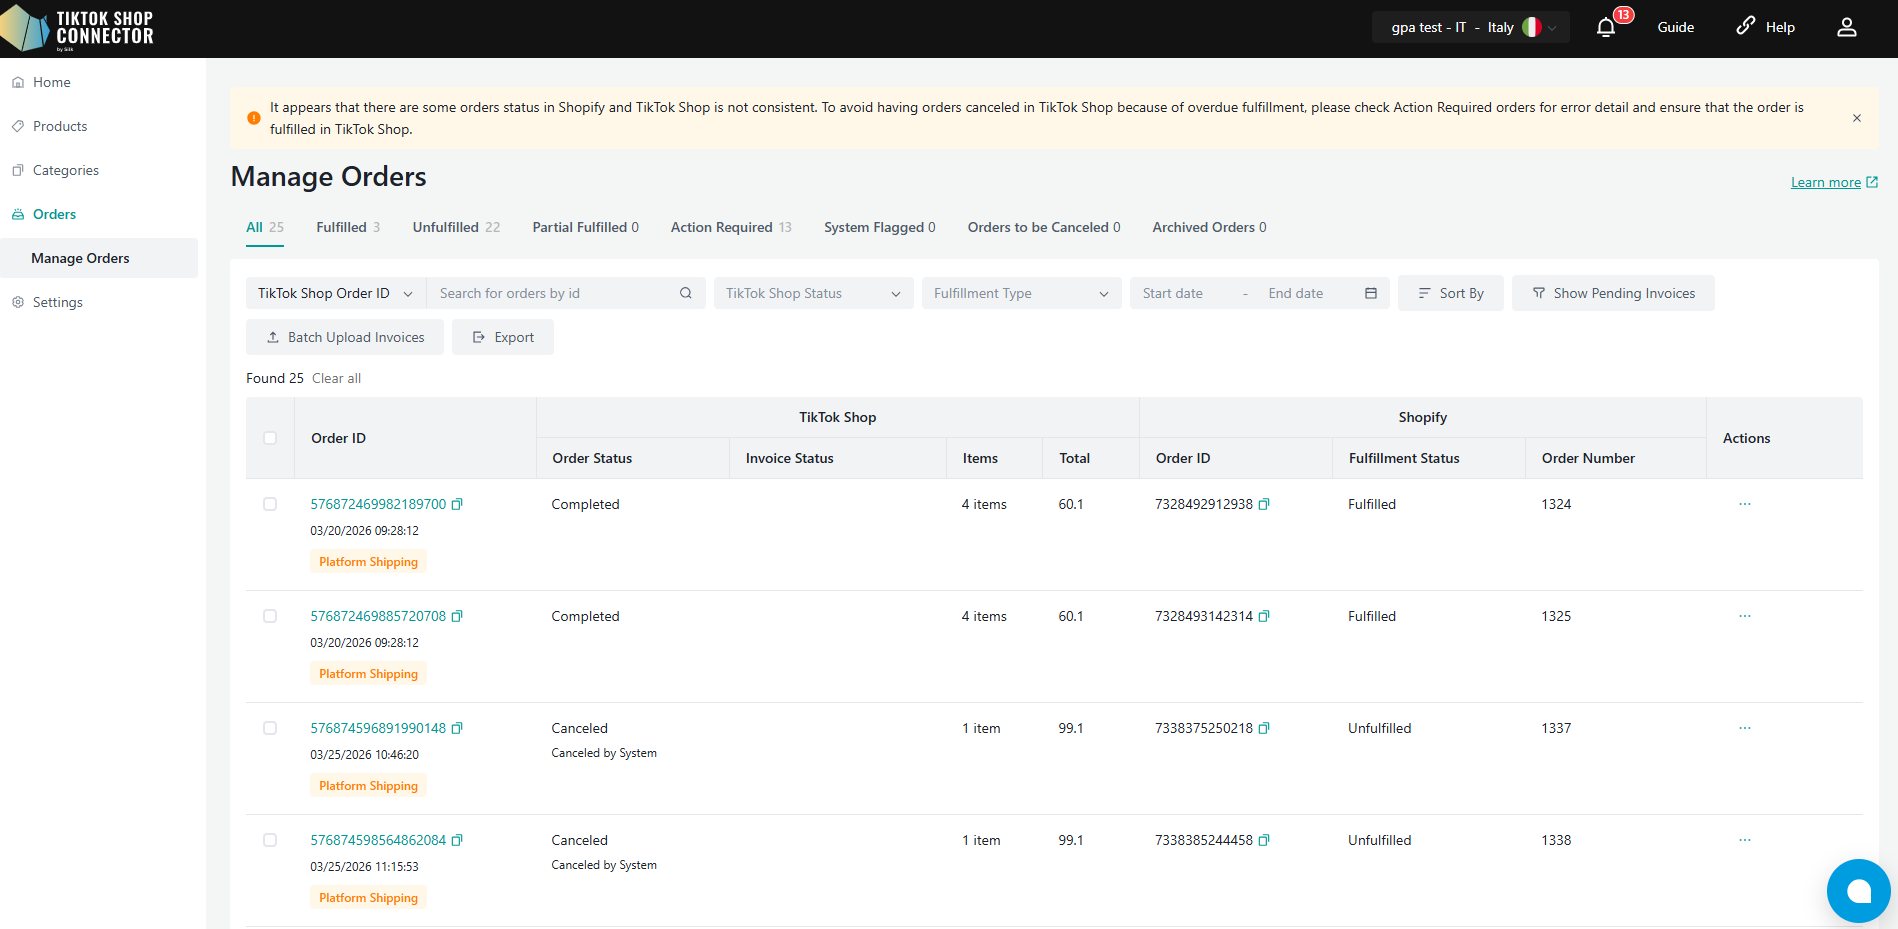
Categories
Maps the "Product Type/Category" in Shopify as the "Category in TikTok Shop" to the "Category in TikTok Shop"
Automatically suggests a category in TikTok Shop
- Can be changed or mapped to TikTok Shop categories manually
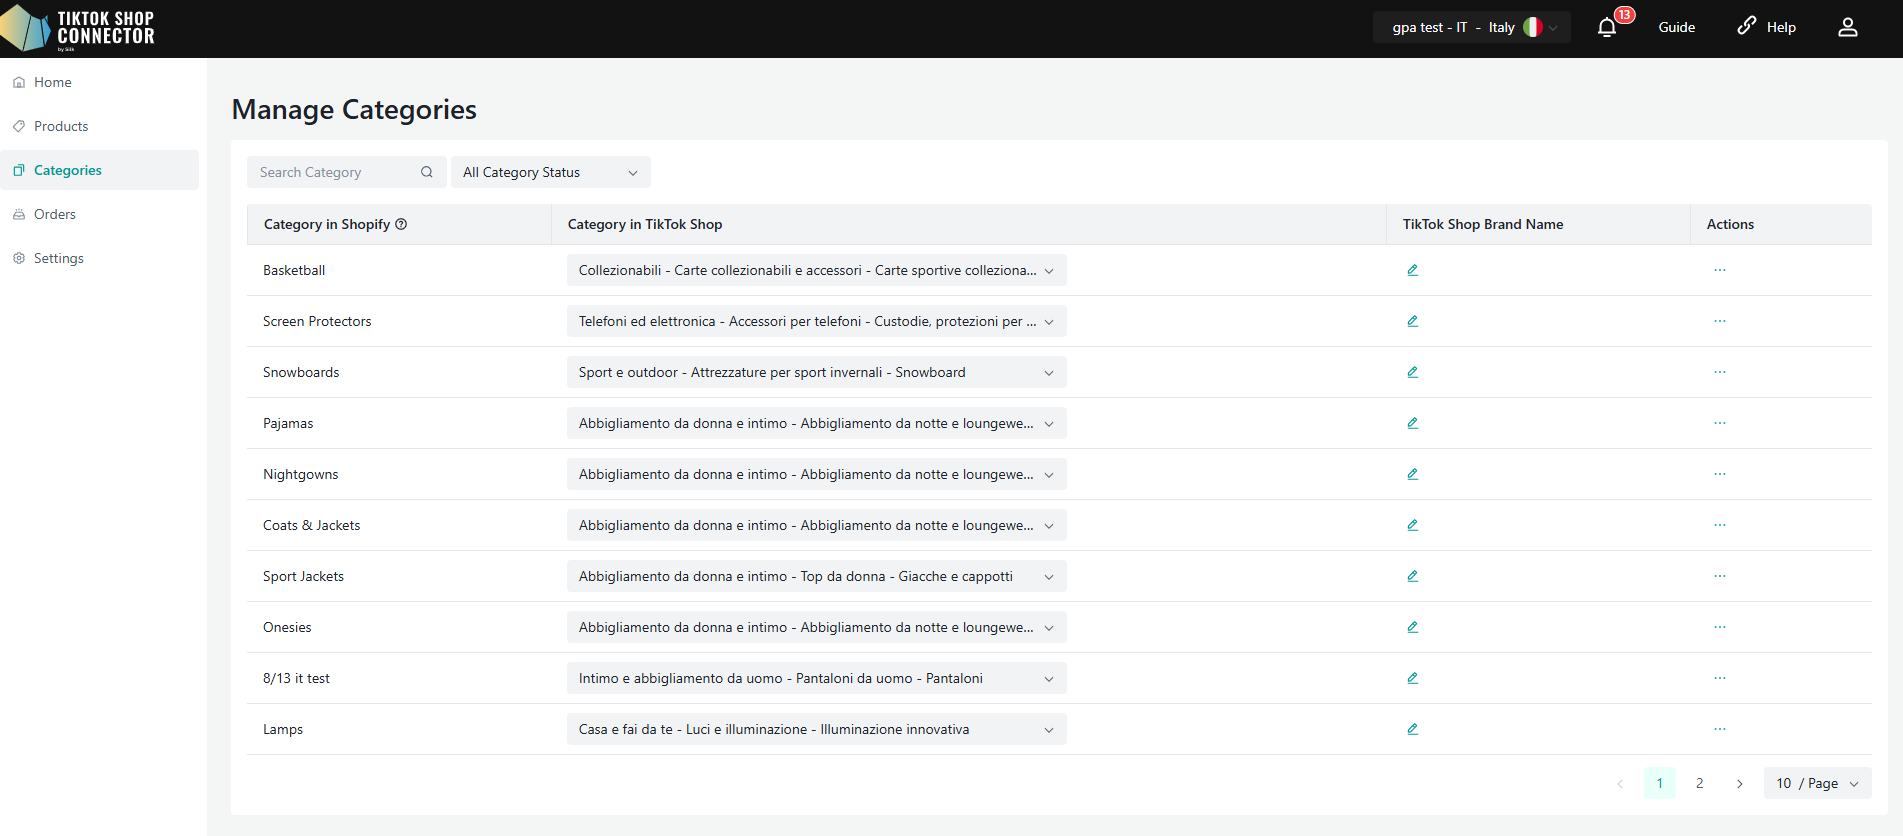
Marketing -How to sync promotion
Silk Connector supports synchronizing eligible Shopify discounts to TikTok Shop promotions for the current connection.
Promotion Sync is managed based on the selected TikTok Shop account or market. If multiple markets or regions are available, sellers should first switch to the target market, and then review or manage promotions for that market.
Supported Promotion Types
Silk Connector supports the following Shopify promotion types for Promotion Sync when they meet TikTok Shop requirements:
Amount off products
Amount off orders
Free shipping
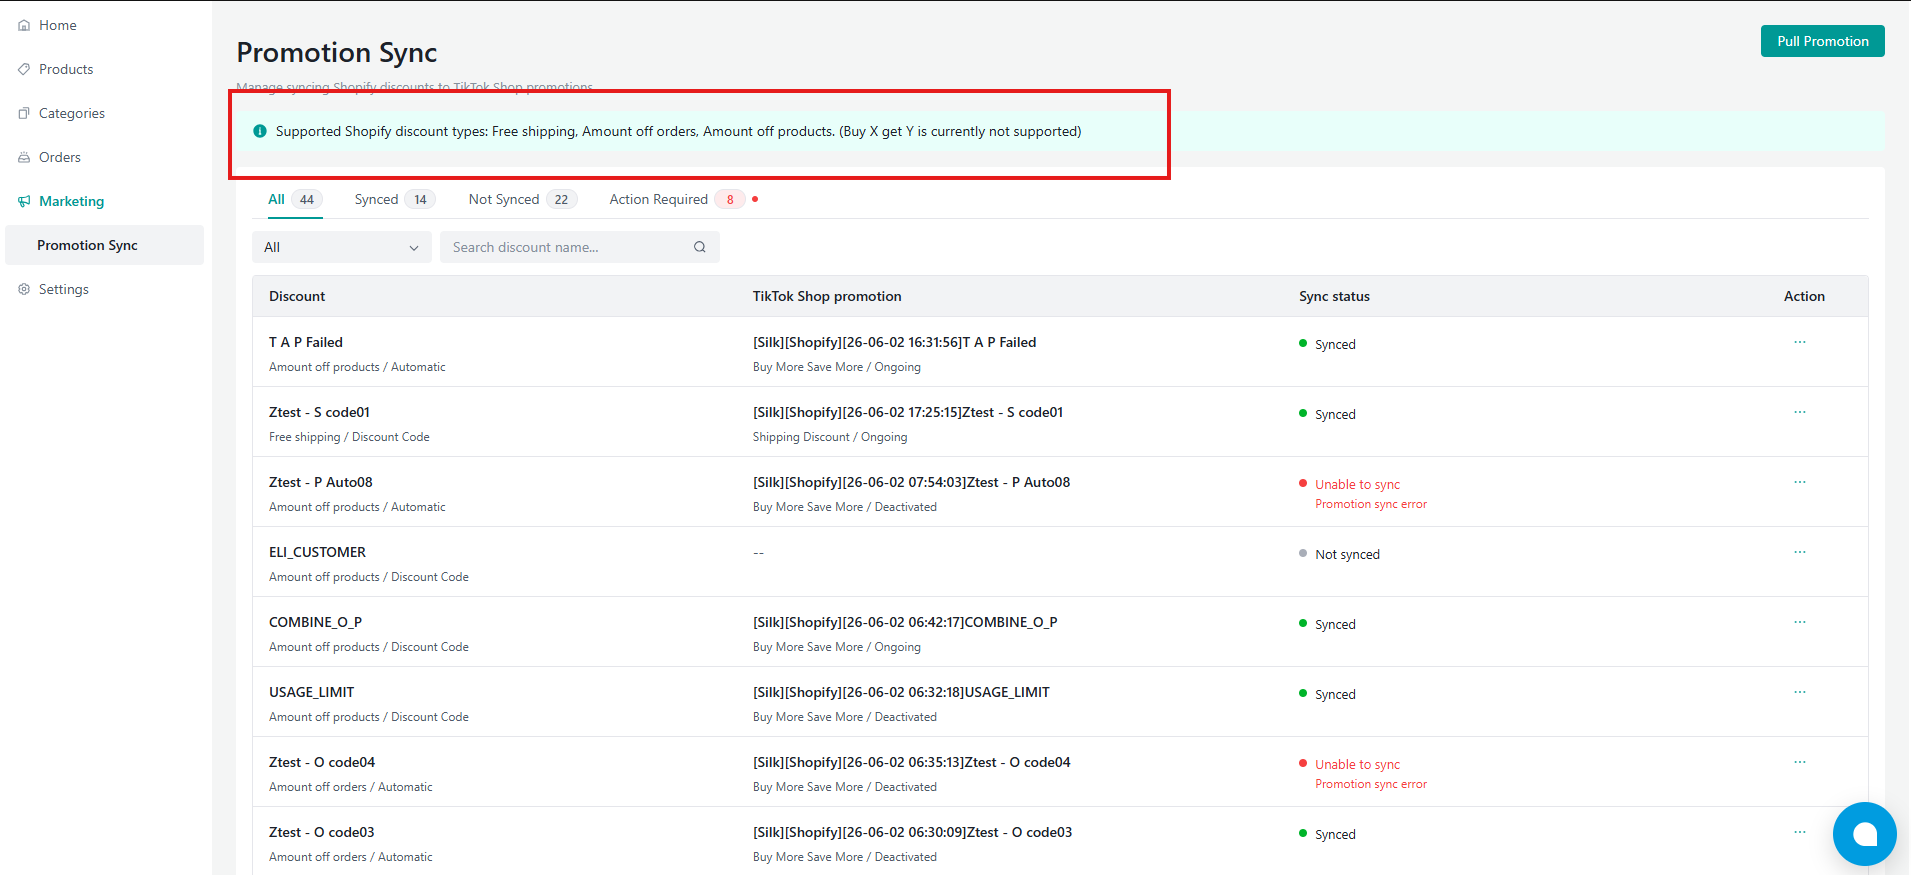
Note: Supported promotion details may vary depending on Shopify discount configuration, TikTok Shop promotion requirements, product eligibility, promotion time range, and market restrictions.
Configure Auto Promotion Sync
Configuration Path:
Settings → Product Settings → Promotion Sync
The Promotion Sync section allows sellers to control whether eligible Shopify promotions are automatically synchronized to TikTok Shop.
Available settings include:
Promotion Sync master switch
Amount off products
Amount off orders
Free shipping
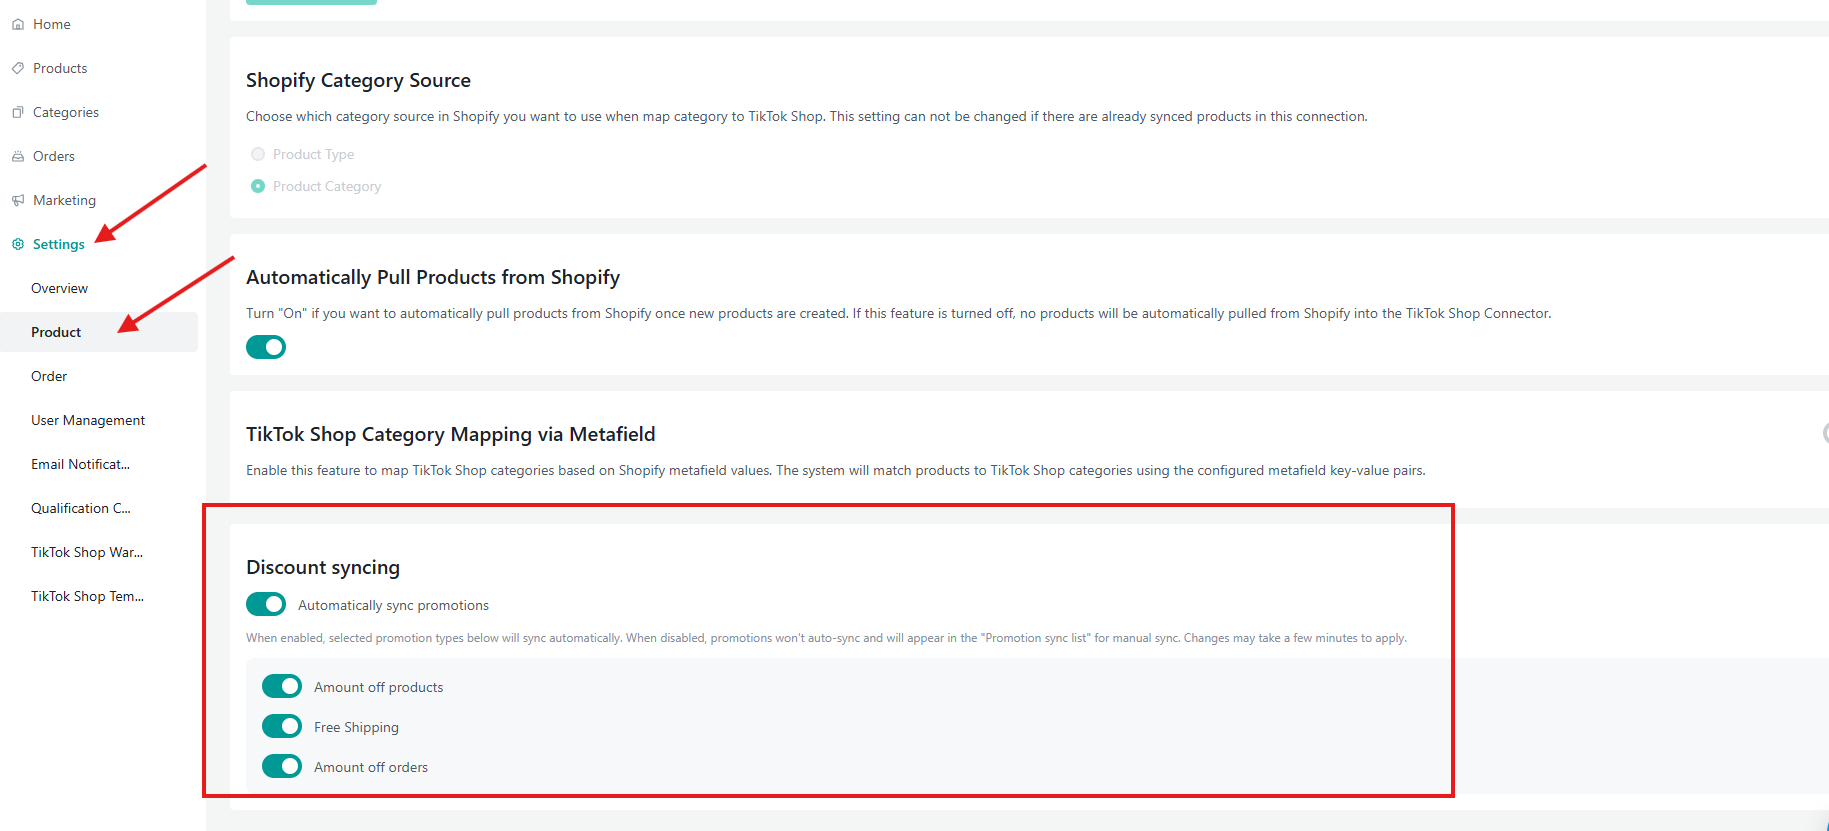
When the Promotion Sync master switch is turned on, Silk Connector can automatically pull and synchronize newly created or updated eligible Shopify promotions according to the selected promotion types.
When the Promotion Sync master switch is turned off, Silk Connector will not create new automatic promotion sync operations for the current connection.
Turning off automatic Promotion Sync does not delete promotions that have already been synchronized to TikTok Shop.
Pull promotions
In general, the connector pulls and updates Shopify promotions automatically.Sellers can also click Pull Promotion on the Promotion Sync page to manually pull all Shopify promotions into Silk.
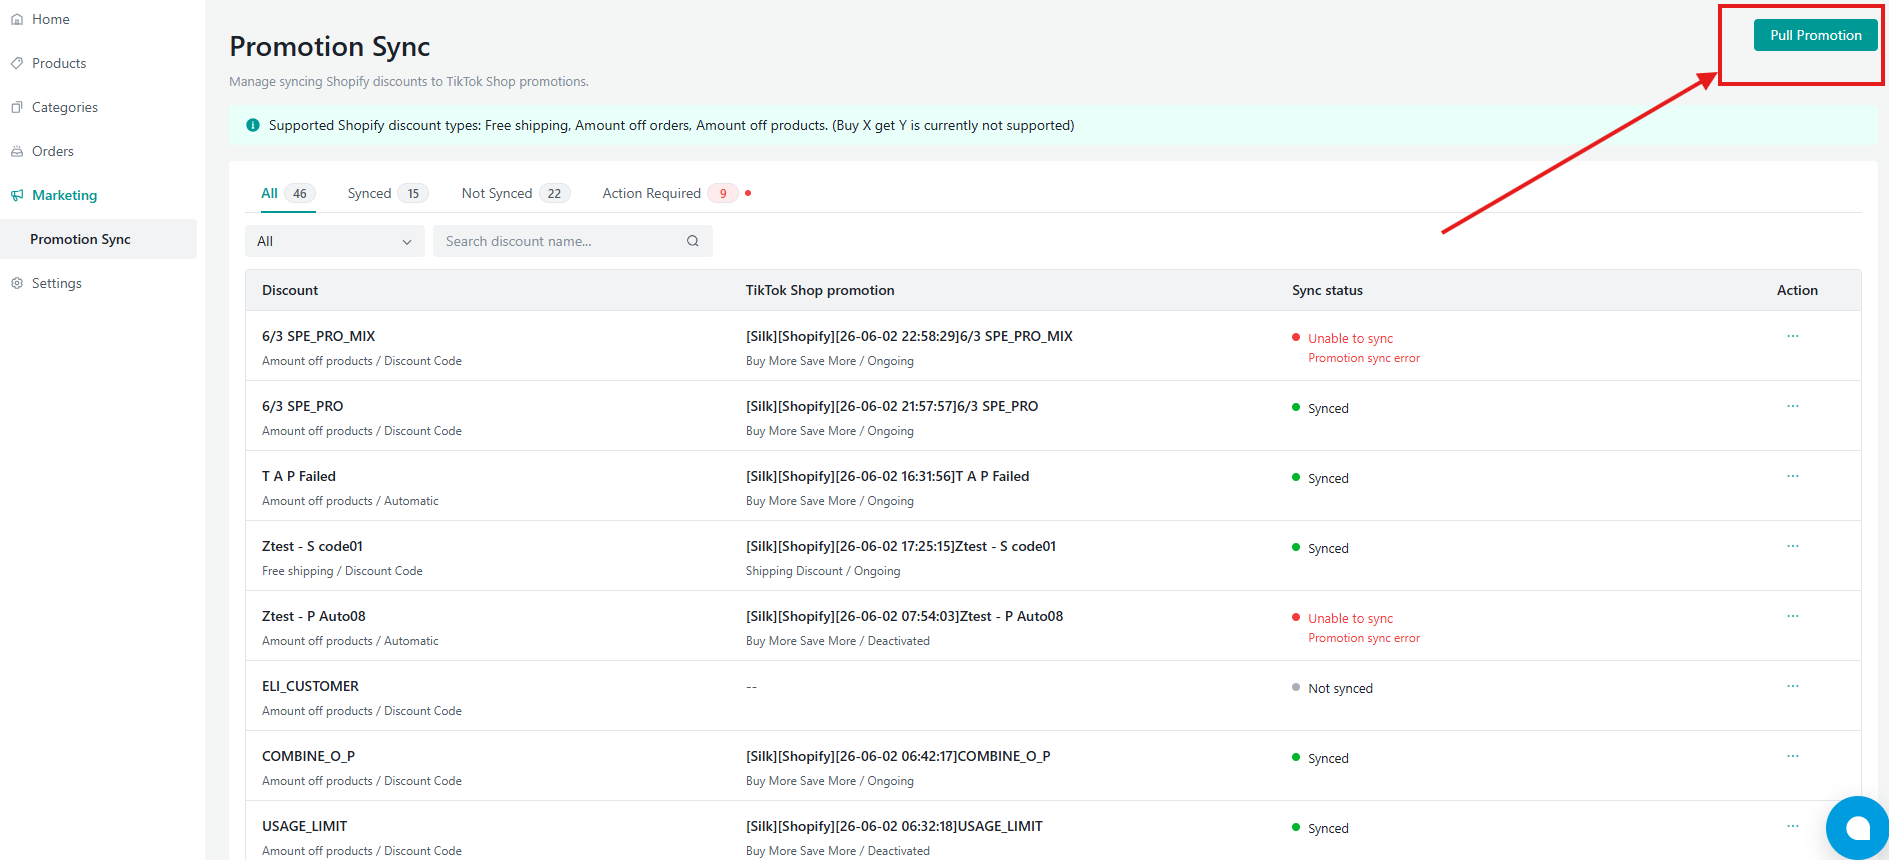
After the action is submitted, a Pull Promotions task will be generated automatically. Sellers can go to Home → Tasks to view the task result.

The task details show the total number of promotions processed, including successful and failed records. Once completed, the latest Shopify promotions will appear on the Promotion Sync list with their current sync status.

Manual Promotion Sync
On the Promotion Sync page, sellers can review the promotion list and confirm the discount type, scope, time range, related products, and current sync status.
- To manually sync a promotion, click Sync under the Action column for an eligible promotion.
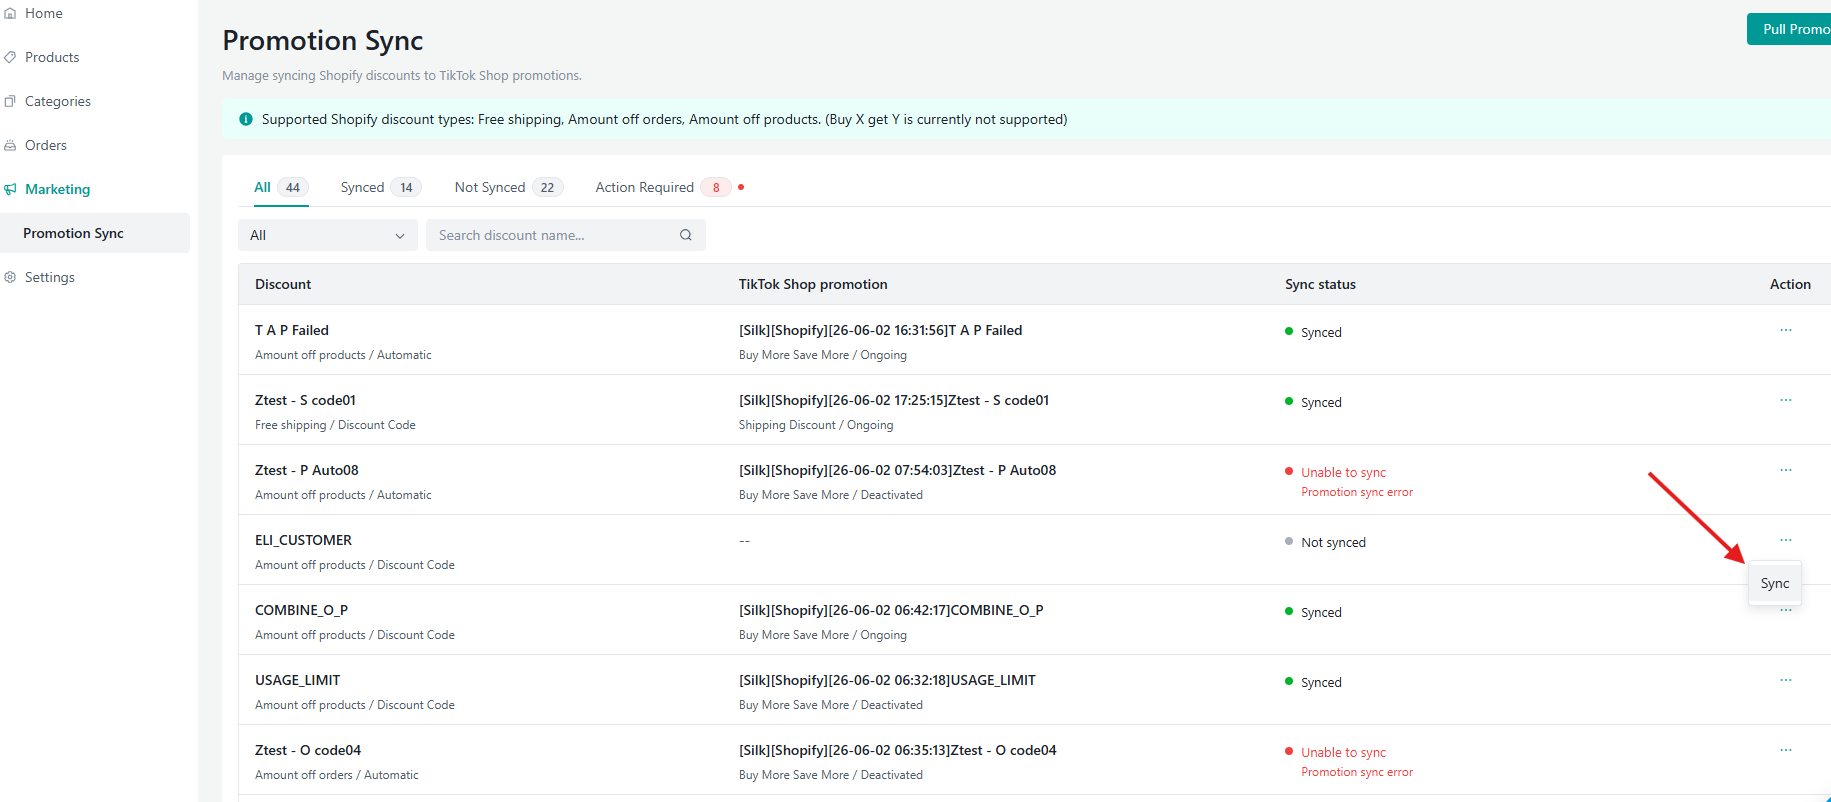
For promotions that previously failed, sellers can correct the related issue first and then click Retry.
For promotions that do not need to be synchronized, sellers can click Ignore.

- When available, sellers can use Unsync to remove or unlink a synchronized promotion from TikTok Shop.

Note: If automatic Promotion Sync is disabled, sellers can still use manual sync for eligible promotions when the Sync action is available.
Promotion Sync Status
The Marketing page displays the synchronization status for each promotion.
Not Synced
The promotion has been pulled from Shopify but has not been synchronized to TikTok Shop.
Synced
The promotion has been successfully synchronized to TikTok Shop.
Action Required
The promotion cannot be synchronized until required information is completed or corrected.
Sync Failed
The promotion sync request was submitted but failed due to TikTok Shop validation, API restrictions, product linkage issues, discount configuration issues, or other platform requirements.
Product-Level Promotion Requirements
For product-level promotions, the related Shopify products and SKUs should already be synced or linked to TikTok Shop under the current connection.
If a promotion references products that have not been synced or linked to TikTok Shop, the promotion may enter Action Required or Sync Failed status.
Order-level promotions and free shipping promotions may not require specific product linkage, but they still need to satisfy TikTok Shop promotion rules and market requirements.
Promotion Update and Unsync Behavior
When a supported Shopify promotion is updated, Silk Connector can synchronize eligible updates to TikTok Shop according to the Promotion Sync settings and selected promotion type.
If a promotion is no longer needed on TikTok Shop, sellers can use Unsync when available. Unsync does not delete the original Shopify discount.
If a promotion fails to sync, review the failure reason, correct the Shopify discount configuration or product relationship, and then retry the synchronization.
Promotion Sync Task Status
Promotion sync results are shown on the Marketing page. If a task record is generated, sellers can also review the result from:
Home → Tasks →view

The task result may include processing status, successful promotions, failed promotions, and failure reasons.
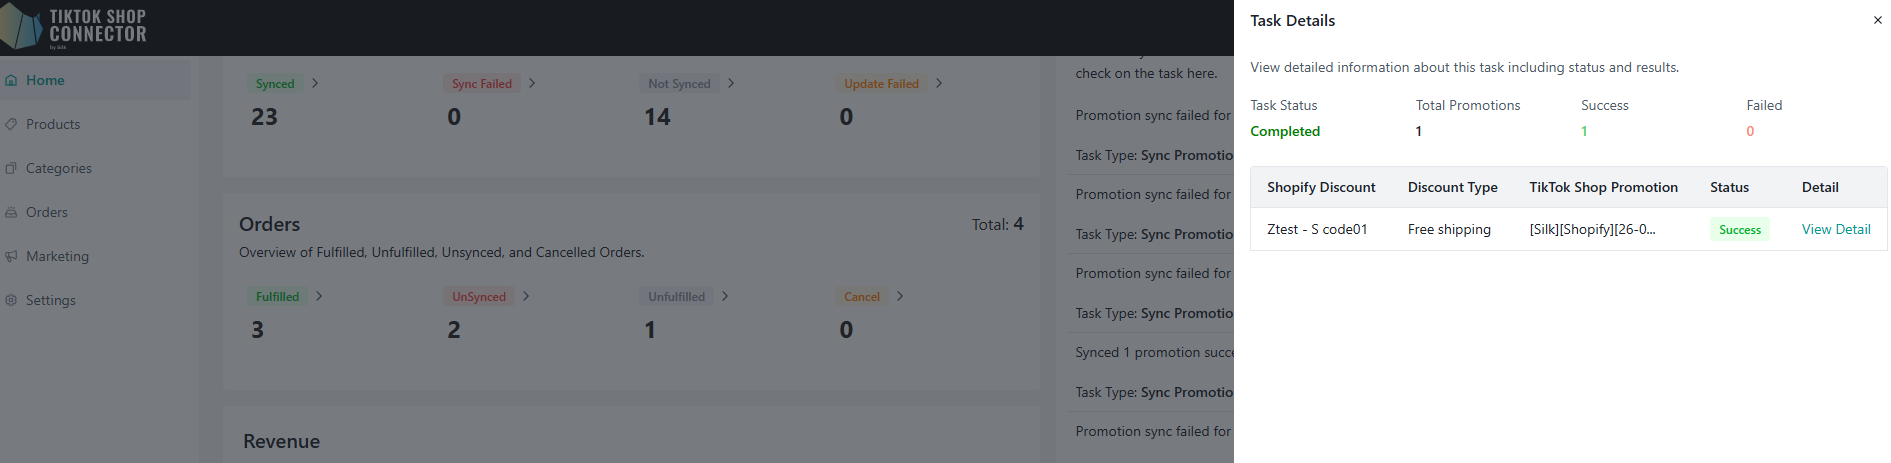

Important Notes
Promotion Sync settings are managed independently for each connection or selected TikTok Shop market.
Promotion Sync only supports eligible Shopify discount types that meet TikTok Shop requirements.
Product-level promotions require the related products or SKUs to be synced or linked to TikTok Shop under the current connection.
Unsupported promotions or incomplete discount configurations may require manual correction before synchronization.
Turning off automatic Promotion Sync does not remove existing synchronized TikTok Shop promotions.
Some promotions may fail to sync if they conflict with TikTok Shop promotion rules, product eligibility, promotion time range, or market-specific restrictions.
Settings
The Settings page allows sellers to configure key behaviors for EU GPA market management, including Origin Shop setup, inventory synchronization logic, and Shopify inventory location mapping.
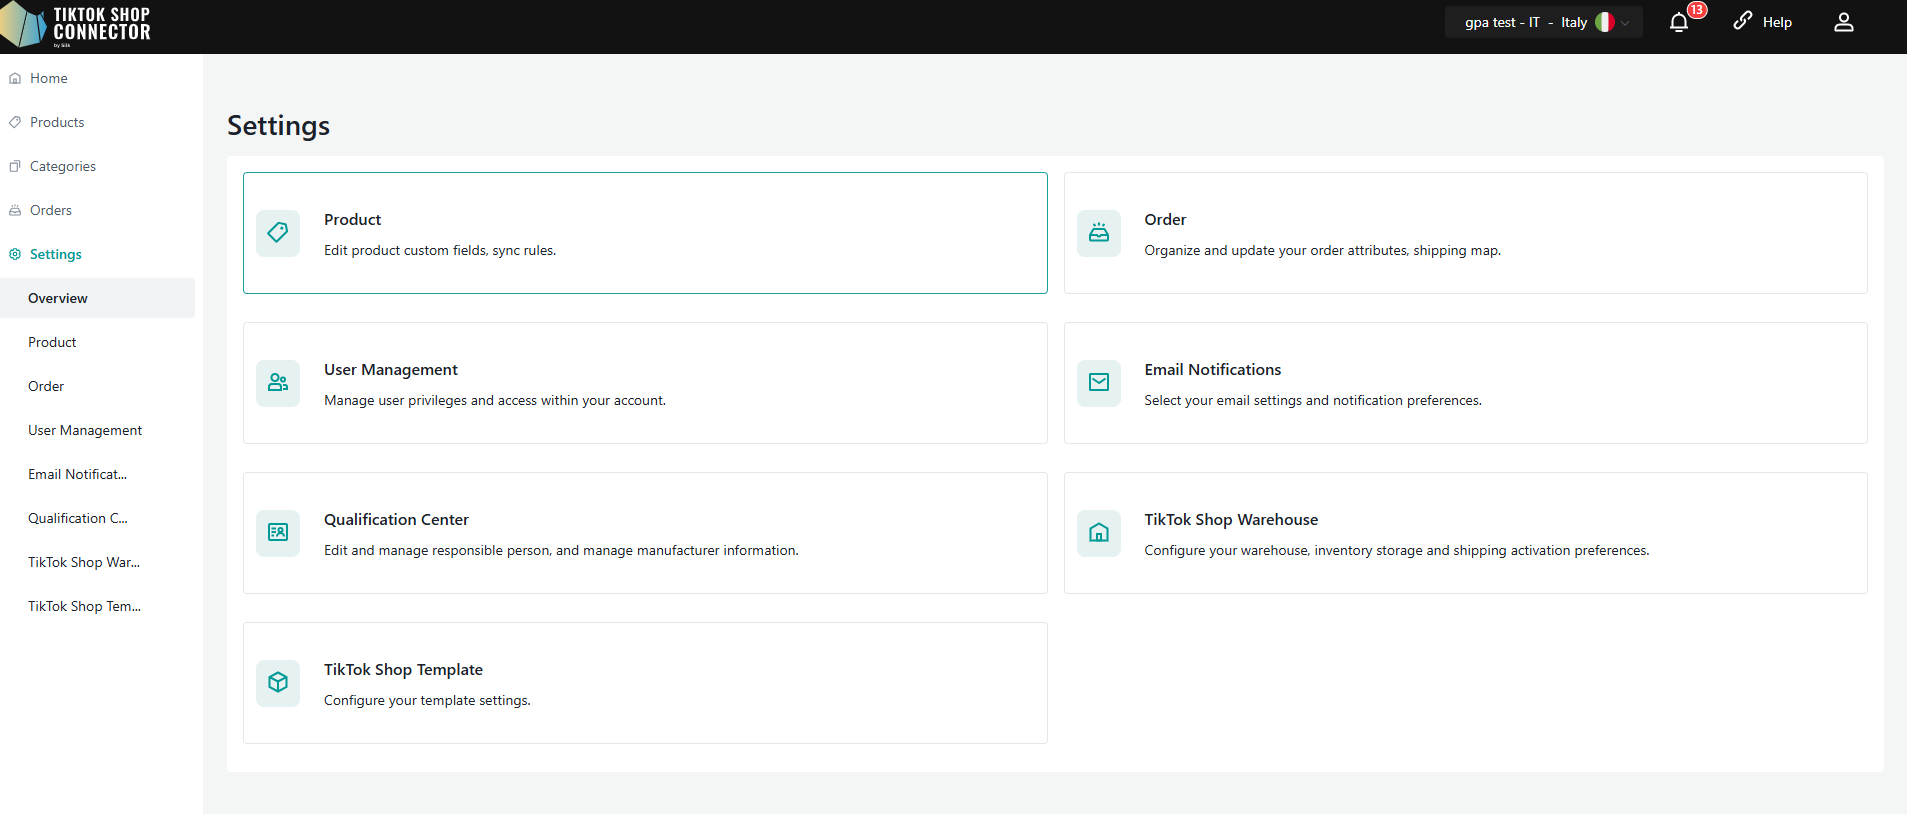
- Origin Shop Configuration
The Origin Shop is the primary market connection used for product publishing and replication across EU GPA markets.
Key Rules
Products can only be pushed to TikTok Shop after an Origin Shop is configured.
The Origin Shop acts as the source connection for product replication to other EU markets.
Once products from the Origin Shop have been successfully synced to TikTok Shop, the Origin Shop configuration can no longer be changed.
This helps ensure product relationship consistency across all connected EU GPA markets.
- Inventory Sync Logic
Inventory synchronization continues to follow Silk’s existing:
- Product Stock Sync Rule
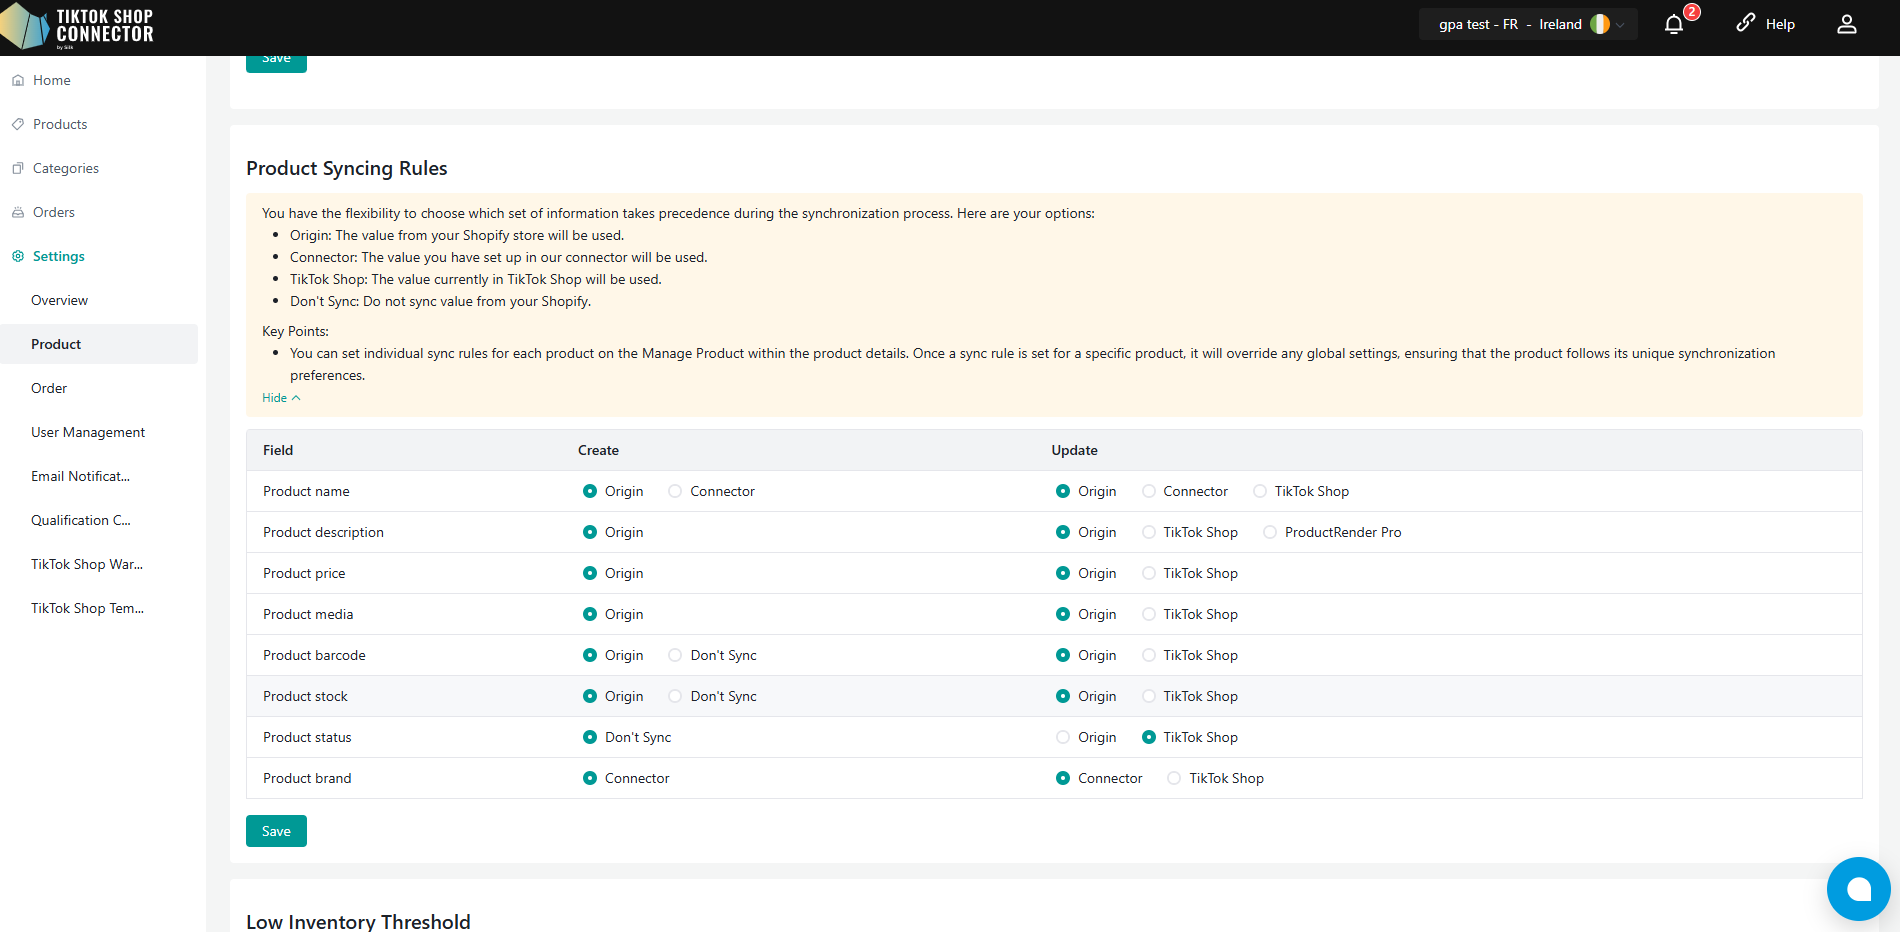
- Inventory Location Mapping
Each connection independently calculates and syncs inventory based on its own configuration.
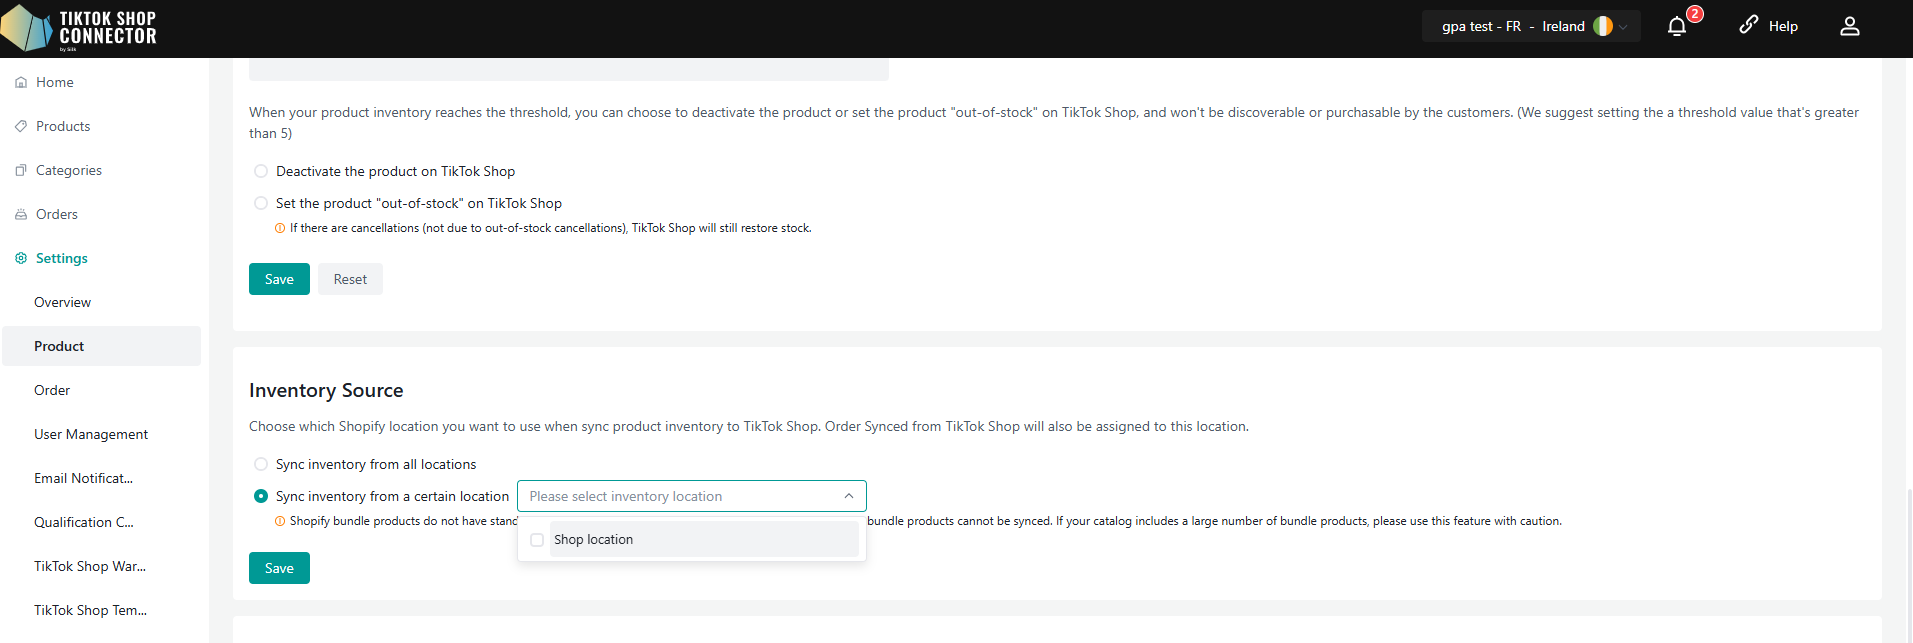
Inventory Calculation
The final inventory pushed to TikTok Shop is determined by:
The selected Stock Sync Rule
The mapped Shopify inventory location for the connection
Examples include:
Sync by available inventory
Reserve buffer stock
Percentage-based inventory sync
- Shared \& Exclusive Inventory Management
EU GPA supports both shared inventory and market-level exclusive inventory management.
Shared Inventory
If multiple connections select the same Shopify inventory location:
All connected markets will share the same inventory source
Inventory updates across markets are based on the same Shopify inventory pool
Example:
Germany connection → Shopify Location A
France connection → Shopify Location A
In this setup, both markets use shared inventory.
Exclusive Inventory
If each connection selects a different Shopify inventory location:
Each market manages inventory independently
Inventory quantities are separated by market
To achieve exclusive inventory management:
Create separate inventory locations in Shopify for different EU markets
Configure each Silk connection with its corresponding Shopify inventory location
Example:
Germany connection → Germany warehouse inventory
France connection → France warehouse inventory
4、 Stock Update Sync Rule
Inventory synchronization behavior also depends on the Stock Update Sync Rule configuration.
Shopify Mode
If the Update Sync Rule is set to Shopify:
- Inventory updates are synced from Shopify to TikTok Shop
TikTok Shop Mode
If the Update Sync Rule is set to TikTok Shop:
Shopify inventory will not sync to TikTok Shop
Inventory is managed directly on the TikTok Shop side
This setting applies independently to each connection.
Migrating Existing GPA Merchants to the New Intra-EU Solution
For merchants currently using the legacy GPA solution, Silk Connector provides a one-click upgrade path to the new Intra-EU solution.
Step 1: Upgrade Existing Products
Log in to Silk Connector.
A migration banner will be displayed at the top of the page for eligible merchants.
Click Upgrade on the banner.
Silk Connector will automatically upgrade all existing GPA products to the new Intra-EU replicated products.
Note: The upgrade process only migrates products. Additional configuration is required before synchronization can continue normally.

Step 2: Configure the Origin Shop
Navigate to Connection Listing.
Select one of the connected TikTok Shops as the Origin Shop.
The selected Origin Shop will serve as the primary data source for product synchronization and management across all replicated shops.
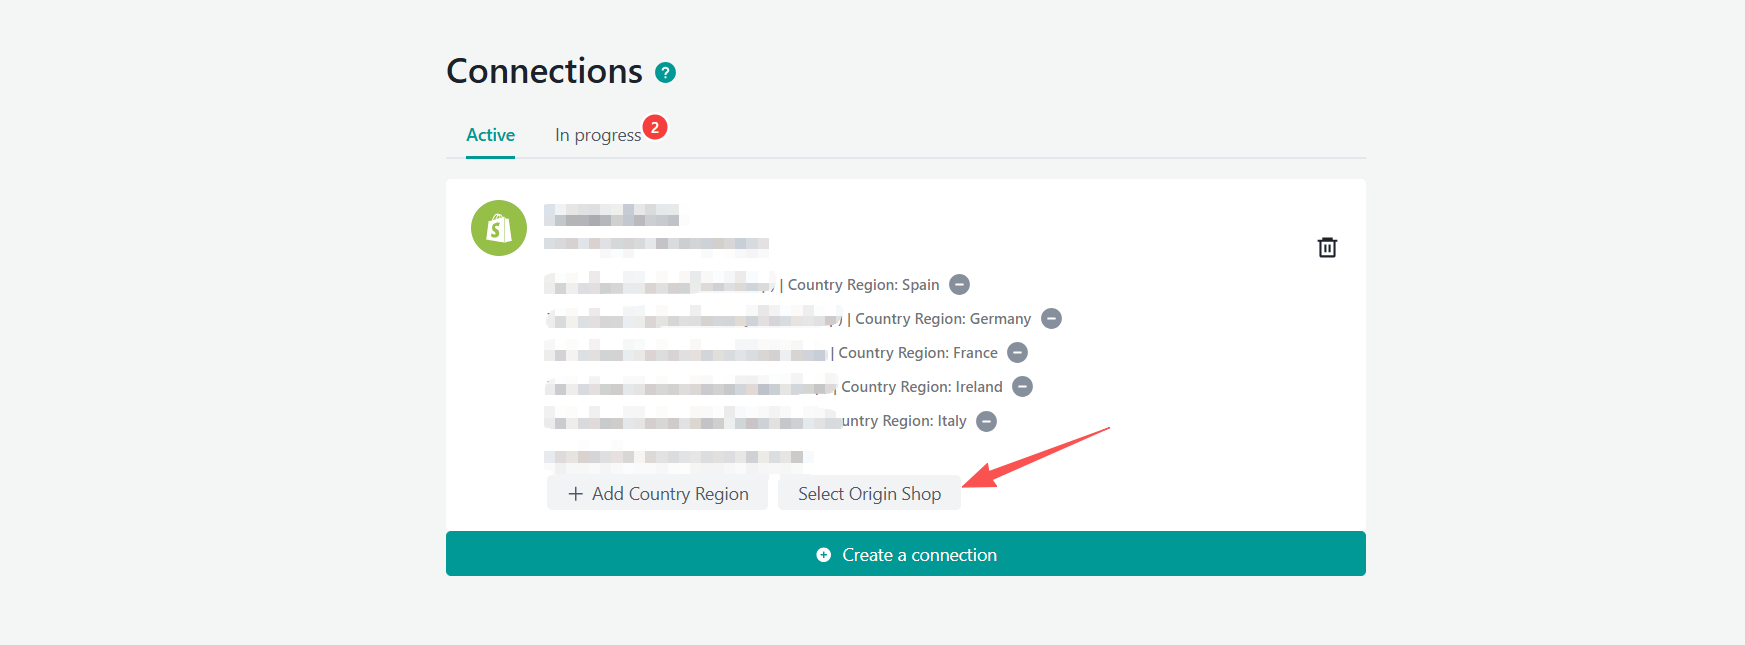
Migration Result
After completing the upgrade:
Existing GPA products will be converted to the new Intra-EU replicated product structure.
Product management will be unified under the new Intra-EU solution.
Future product updates can be synchronized across all connected EU shops through the selected Origin Shop.
Merchants can continue managing products using the new Full Sell Across EU workflow.
We recommend verifying product synchronization and shop connections after the migration is completed.
Important Notes
Origin Shop can only be configured once.
Global Products no longer exist in the new architecture.
Products are managed directly within Local Product pages.
Price and inventory remain independent per market.
Category and Sales Attributes must remain consistent across bound products.
Translation is automatically handled during replication and synchronized updates.
Binding currently cannot be reversed because TikTok Shop does not yet support unbind APIs.
Support
If you encounter any issues or have questions, please contact Silk support for assistance.
Email: tiktokshop@silkdigital.com
Or visit:
To start a live chat.